Advanced
For experienced crocheters who enjoy complex shaping, fine detail, and ambitious construction
Single-Day Project
A satisfying project you can complete in a single afternoon or evening.
Handmade Gift
A beautiful keepsake — free forever. Read online or print at home.
About This Midnight Pinwheel Blanket
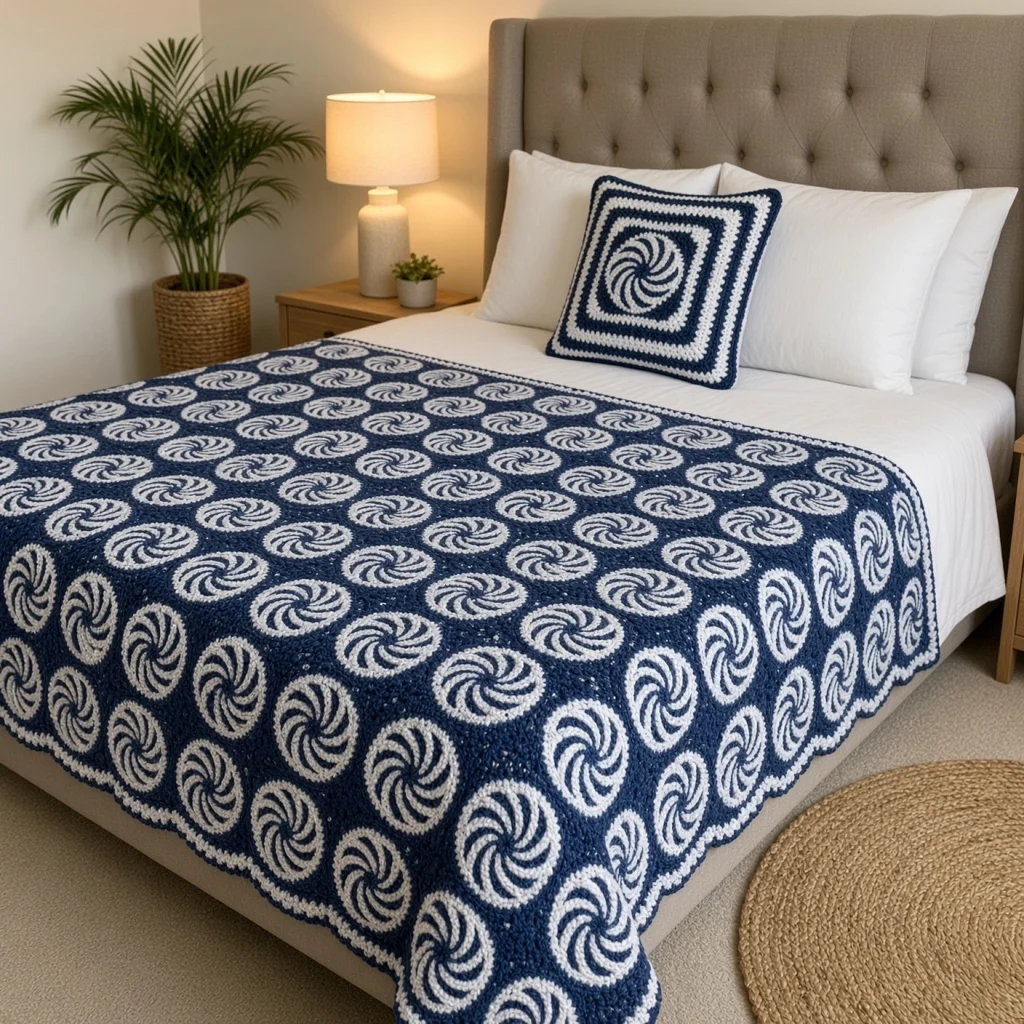
This pinwheel blanket crochet pattern turns a simple increasing circle into a six-armed spiral by carrying two colours at once and shifting the colour boundary one stitch every round. That single shift is what makes the white arms curve instead of sitting in straight wedges, and it is the whole reason this blanket reads as a swirl rather than a pie chart. Each motif is then squared off with graded stitches — single crochet in the middle of each side, double and treble crochet at the corners — so sixty-three circles turn into sixty-three tidy squares that join edge to edge with no gaps and no filler pieces.
Plan on 35 to 45 hours of work. A single motif takes most people between 30 and 40 minutes once the colour sequence clicks, and the first three or four are the slowest while you learn to read where the navy block ends and the white block begins. Joining and the three-round scalloped border add roughly four hours on top. It is very good travel and evening work: each motif is self-contained, so you can stop at the end of any round without losing your place.
This is an advanced make, but not because of fiddly stitches — the whole blanket uses single, half double, double and treble crochet. The difficulty is in tapestry colourwork over a continuous spiral: keeping float tension even, keeping the marker in the right place while the pattern rotates under it, and squaring sixty-three motifs to exactly the same size. If you have made granny-square blankets and want something that looks considerably harder than it is to work, this is a good next step.
Materials
- Worsted/aran weight cotton or cotton blend in deep navy approx. 1200 g / 2200 m
- Worsted/aran weight cotton or cotton blend in soft white approx. 600 g / 1100 m
- 4.0 mm crochet hook or size needed for gauge
- Blunt tapestry needle large eye, for joining and ends
- Stitch markers at least 6 — one for the round, four for motif corners
- Scissors
- Measuring tape to check every motif against 14 cm
- Yarn bobbins or two small zip bags optional, keeps the two strands from twisting
Abbreviations
MRmagic ringchchainsl stslip stitchscsingle crochethdchalf double crochetdcdouble crochettrtreble crochetinc2 stitches in the same stitchst / stsstitch / stitchesspspaceskskipBLOback loops onlyWwhite yarnNnavy yarnreprepeatRSright sideGauge and Pattern Notes
- Gauge: 16 sc and 18 rounds = 10 cm in continuous rounds with 4.0 mm hook. Rounds 1–4 of the motif should measure 5 cm across.
- One finished, squared motif measures 14 cm along each side. Measure your first motif before making 62 more; if it comes out at 13 cm or 15 cm, go up or down a hook size rather than changing the stitch counts.
- Rounds 1–10 are worked as a continuous spiral — do not join or chain up. Move a marker into the first stitch of every round.
- Every round from Round 2 onward is built from 6 repeats. Each repeat contains exactly one increase: on even-numbered rounds the increase falls in the white block, on odd-numbered rounds it falls in the navy block. That alternation is what keeps the arms and the gaps the same relative width as the circle grows.
- Several rounds begin with a short run of navy stitches before the first full repeat and end with the rest of that navy block. This is deliberate: it rotates the pattern one stitch per round and creates the spiral. Do not “tidy” it by starting the repeat at the marker.
- Change colour in the usual way: work the last stitch of the old colour until two loops remain on the hook, then yarn over with the new colour to close it.
- The blanket is 7 motifs wide by 9 motifs long = 63 motifs total.
Spiral Motif — Centre (make 63)
- Round 1 (N): 6 sc in MR. (6)
- Round 2: join W. *1 sc in W and 1 sc in N in the same st*; rep from * 5 more times. (12 — 6 white, 6 navy)
- Round 3: *W sc in next st, N 2 sc in next st*; rep from * 5 more times. (18)
- Round 4: N sc in next st; *W 2 sc in next st, N sc in next 2 sts*; rep from * 4 more times; W 2 sc in next st, N sc in next st. (24)
- Round 5: N sc in next st; *W sc in next 2 sts, N sc in next st, N 2 sc in next st*; rep from * 4 more times; W sc in next 2 sts, N 2 sc in next st. (30)
- Round 6: N sc in next 2 sts; *W 2 sc in next st, W sc in next st, N sc in next 3 sts*; rep from * 4 more times; W 2 sc in next st, W sc in next st, N sc in next st. (36)
- Round 7: N sc in next 2 sts; *W sc in next 3 sts, N sc in next 2 sts, N 2 sc in next st*; rep from * 4 more times; W sc in next 3 sts, N 2 sc in next st. (42)
- Round 8: N sc in next 3 sts; *W 2 sc in next st, W sc in next 2 sts, N sc in next 4 sts*; rep from * 4 more times; W 2 sc in next st, W sc in next 2 sts, N sc in next st. (48)
- Round 9: N sc in next 3 sts; *W sc in next 4 sts, N sc in next 3 sts, N 2 sc in next st*; rep from * 4 more times; W sc in next 4 sts, N 2 sc in next st. (54)
- Round 10: N sc in next 4 sts; *W 2 sc in next st, W sc in next 3 sts, N sc in next 5 sts*; rep from * 4 more times; W 2 sc in next st, W sc in next 3 sts, N sc in next st. (60)
- Cut white, leaving a 10 cm tail, and pull it through to the back. The circle should now show 6 white arms curving in the same direction, each one about 5 stitches wide at the rim, separated by 6 navy gaps. Continue in navy only.
- Place 4 corner markers: mark the next stitch, then mark every 15th stitch after that, so you have 4 marked stitches evenly spaced around the 60-stitch round.
Squaring the Motif (Rounds 11–13)
- Round 11 (N): *(tr, ch 2, tr) in marked st, tr in next st, dc in next 2 sts, hdc in next 2 sts, sc in next 4 sts, hdc in next 2 sts, dc in next 2 sts, tr in next st*; rep from * 3 more times, sl st to top of first tr. (64 sts and 4 corner ch-2 sps — 16 sts along each side)
- Round 12 (N): ch 1, *sc in each of the next 16 sts, (sc, ch 2, sc) in corner ch-2 sp*; rep from * 3 more times, sl st to first sc. (72 sts — 18 sts along each side)
- Round 13 (N): ch 1, *sc in each of the next 18 sts, (sc, ch 2, sc) in corner ch-2 sp*; rep from * 3 more times, sl st to first sc. (80 sts — 20 sts along each side, plus 4 corner ch-2 sps)
- Fasten off, leaving a 70 cm navy tail if you plan to sew the motifs together. Weave in the centre tails and the white tail now, before the pile grows.
- Block the finished motif flat to 14 cm square, pinning the four corners. Cotton holds the block well and squared motifs join far more neatly than unblocked ones.
Making the Full Set
- Make 63 motifs in total, all identical, all with the spiral turning the same way. Do not mirror any of them — the uniform rotation is what makes the surface look like it is moving.
- Work in batches of about ten, then stop and block that batch. Mixing fresh and blocked motifs at the joining stage leads to a wavy blanket.
- Measure one motif from each batch. If your tension drifted and some motifs come out at 13.5 cm, keep them together and use them for the centre of the blanket where the difference will not show along an edge.
- Lay out all 63 motifs in a grid, 7 across and 9 down, before you join anything. Check every spiral turns the same way and no motif is upside down relative to its neighbours.
Joining the Motifs
- Join with navy using a flat whip stitch through back loops only, with right sides facing up and the two motifs held edge to edge. BLO keeps a thin navy ridge on the back and a nearly invisible seam on the front.
- Thread a long navy tail on a tapestry needle. Starting in the corner ch-2 sp of both motifs, pass through the back loop of the first stitch of each motif at once, then work along: 20 stitch pairs down the seam, finishing in the next corner ch-2 sp of both motifs.
- Join the motifs into 9 horizontal rows of 7 first. Keep the seam tension the same as your crochet tension — pulling the sewing yarn tight shortens the row and the blanket will not lie flat.
- Now join the 9 rows to each other with 7 long seams, again BLO, 20 stitch pairs per motif. At every seam crossing, pass the needle through both corner spaces of all four meeting motifs so no hole opens up at the intersection.
- Weave in every seam tail along the back of the seam it came from. Lay the joined blanket out flat and check for ripples before you start the border.
Scalloped Border
- Round 1 (N): join navy in any blanket corner ch-2 sp with a sl st, ch 1, (sc, ch 2, sc) in same sp. Along each edge: *sc in each of the next 20 sts, then at the seam junction work 1 sc in the corner ch-2 sp of this motif and 1 sc in the corner ch-2 sp of the next motif*; continue to the blanket corner, then (sc, ch 2, sc) in the corner ch-2 sp. Work all four sides, sl st to first sc. (152 sts along each short edge, 196 sts along each long edge, plus 4 corner ch-2 sps)
- Round 2 (W): join white with a sl st in any corner ch-2 sp. (5 dc, ch 2, 5 dc) in same sp. Then along the edge: *sk 1 st, sl st in next st, sk 1 st, 5 dc in next st*; rep from * 37 more times along a short edge (38 repeats, 152 sts used) or 48 more times along a long edge (49 repeats, 196 sts used), ending with a 5-dc shell at the end of the edge. Work (5 dc, ch 2, 5 dc) in the next corner ch-2 sp and continue around all four sides. Sl st to the top of the first dc, fasten off white.
- Round 3 (N): join navy with a sl st in any sl st between two shells. *Sc in next 2 dc, (sc, ch 1, sc) in next dc, sc in next 2 dc, sl st in the sl st between shells*; rep from * around, outlining every shell. At each corner group work the same 6-stitch sequence over each 5-dc group and (sl st, ch 2, sl st) in the corner ch-2 sp between them. Sl st to first sc and fasten off.
- Weave in the last ends along the inside of the navy outline, where the white will not show them.
Finishing
Wet-block the whole blanket once the border is on. Soak it in cool water, press the water out between towels without wringing, then lay it flat and pin it to 105 cm by 135 cm, squaring the corners and pulling each white scallop out into a clean half-circle. Cotton takes a long time to dry at this weight — allow a full day, and turn it once halfway through so the underside dries evenly.
Give the back a look before it dries. Any float that was carried too tightly will show as a small pucker on the front of a motif; while the blanket is damp you can ease most of those out with your fingers. If a seam looks tight, snip the sewing yarn at that point, re-sew the section a little looser, and secure the new tail along the seam line. Once dry, the blanket should hang over the end of a bed with the scallops lying flat rather than curling, and the spirals should all lean the same way no matter which end you look from.
Tips for Success
- Keep the carried colour loose. Lay it flat along the top of the previous round and crochet over it with a relaxed hand — if the float pulls, the motif cups and will not block flat.
- Count the colour blocks, not just the stitches. At the end of every round you should be able to count 6 white arms and 6 navy gaps. If you count 5 or 7 of either, you lost or gained a repeat and the round is wrong even if the stitch total is right.
- Work the navy stitches that sit directly over white a touch firmly. Navy over white is where show-through happens, and a slightly tighter stitch covers the lighter strand completely.
- Make the marker do real work: move it into the first stitch of every round before you work that stitch, not after. Because the colour pattern rotates, you cannot find the start of the round by looking at the colours.
- Block in batches rather than all at the end. Sixty-three unblocked motifs are almost impossible to join evenly, and blocking as you go spreads the drying time out.
Common Mistakes to Avoid
- Starting every round’s repeat at the marker. Rounds 4 to 10 open with a short navy run before the first full repeat. Skipping it removes the one-stitch rotation, and you will get straight navy and white wedges instead of a spiral. Fix: rip back to the last correct round and follow the opening run exactly as written.
- Putting the increase in the wrong colour block. Even rounds increase in white, odd rounds increase in navy. Put them all in one colour and the arms either swallow the gaps or shrink to threads by Round 10. Fix: check Round 6 against the photo — white arm and navy gap should be the same width there.
- A rippling or cupping motif at Round 11. That round only lies flat if the graded stitches are in the right order: short in the middle of each side, tall at the corners. Reversing them makes a frill. Fix: pull out Round 11 and recount the four corner markers — they must be exactly 15 stitches apart.
- Sewing the seams tighter than the crochet. It is the most common cause of a blanket that will not lie flat, and it only becomes visible after several rows are joined. Fix: after every seam, stretch it gently lengthwise; if it does not reach the full 14 cm, it is too tight.
- Running the border round without checking the count. Round 2 of the border needs a multiple of 4 stitches on every edge, which is why Round 1 gives 152 and 196. Add a stray stitch at a seam junction and the scallops will not land evenly at the corner. Fix: count each edge of Round 1 before moving on.
Ways to Customize This Pattern
- Change the size by changing the grid, not the motif: 5 x 7 motifs makes a 75 x 105 cm lap blanket, 9 x 11 makes a 130 x 160 cm bed cover. Each added motif is about 25 g of navy and 12 g of white.
- Make the matching cushion cover: work 2 motifs through Round 13, then add 5 more rounds of navy sc on each (continuing (sc, ch 2, sc) in every corner) to reach roughly 40 cm, and join the two squares with navy sc around three sides before inserting the pad.
- Reverse the colours on every second motif — white ground with navy arms — and lay them out like a chequerboard for a much busier, graphic surface.
- Swap navy for charcoal, forest green or burgundy against cream. Keep the strong value contrast between the two yarns; two mid-tones of similar darkness will blur the spiral into mush.
- Work the scallop round in a third colour, such as pale grey or sand, for a border that frames the blanket instead of repeating it.
Frequently asked questions
Not without losing the look. The arms and gaps alternate several times in every round, so cutting and rejoining would mean dozens of ends per motif and well over a thousand across the blanket. Carrying the unused colour and crocheting over it is the whole technique here. If you have never done tapestry crochet, make two or three practice motifs first — the tension settles quickly.
Almost always because the opening navy run of Rounds 4 to 10 was skipped, or because the marker was moved to the colour change rather than to the true first stitch of the round. Those short runs rotate the colour pattern one stitch per round, which is what bends the arms. Check Round 7 against Round 4: the white arm should have visibly shifted sideways between them.
Yes, and it will be lighter and warmer, but it changes two things. Acrylic does not hold a block, so motifs that come out slightly off-square will stay slightly off-square — measure more strictly as you go. Light acrylic also shows the carried dark strand more than cotton does, so work the white stitches with a touch more tension to close them up.
You can join as you go on Round 13: work 10 sc along the free part of the side, then sl st into the corresponding stitch of the neighbouring motif every second stitch for the rest of that side. It is faster, but the seam is slightly more visible and far harder to correct if a motif ends up turned the wrong way. For a blanket this size, sewing with BLO whip stitch gives the flatter, more forgiving result.
Budget about 25 g of navy and 12 g of white per motif, plus roughly 200 g of navy and 120 g of white for the border and seams. That works out to about 1200 g navy and 600 g white for the 7 x 9 layout. Buy the navy in one dye lot if you can — it covers most of the surface and a lot change will show across the middle of the blanket.
The finished Midnight Pinwheel Blanket