Red Star Flower Doily Crochet Pattern
Advanced
For experienced crocheters who enjoy complex shaping, fine detail, and ambitious construction
Weekend Project
A satisfying weekend make — start Friday, finish Sunday, enjoy forever.
Handmade Gift
A beautiful keepsake — free forever. Read online or print at home.
About This Red Star Flower Doily Crochet Pattern
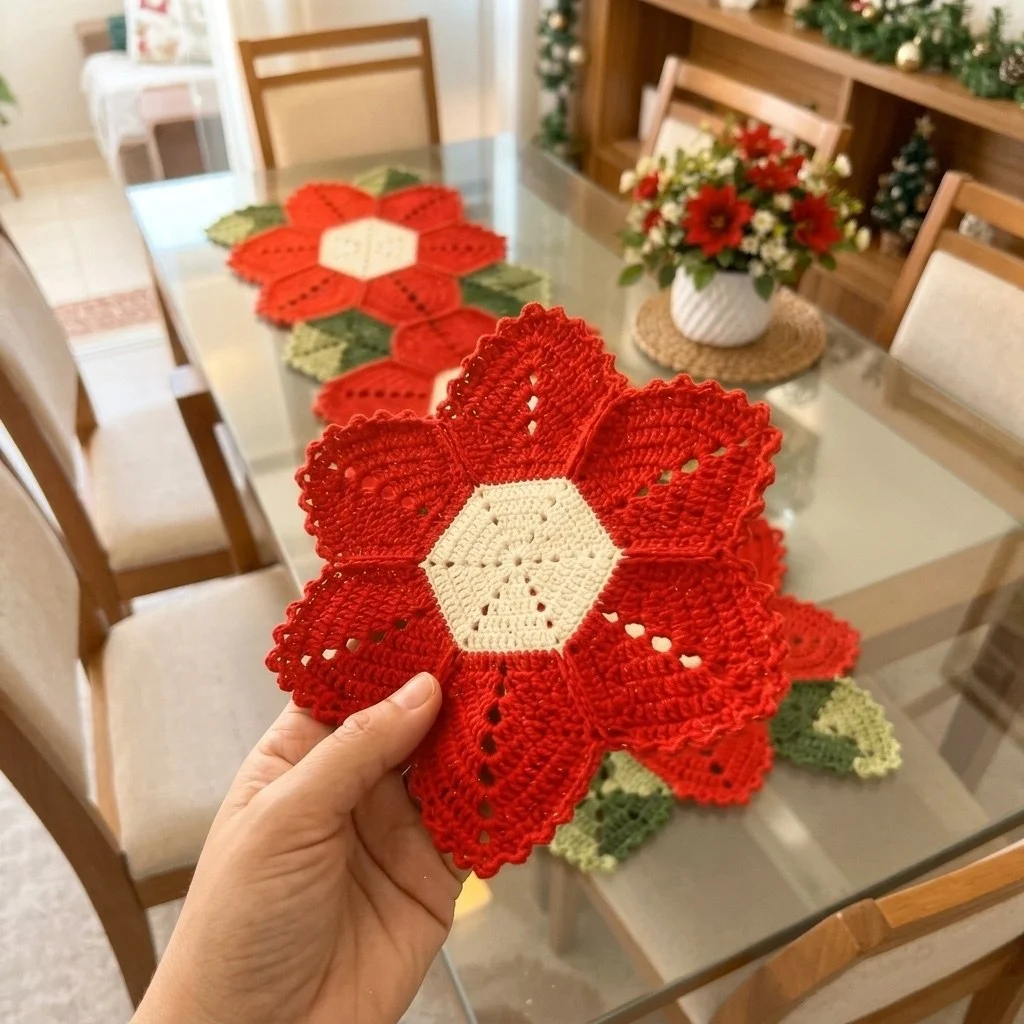
This red star flower doily crochet pattern turns a small cream hexagon into a wide six-petal star, and the whole thing is built in separate stages rather than one endless spiral. The centre is worked as a true hexagon with six stacked increase lines, so the corners stay sharp instead of drifting into a circle. Each petal is then worked outward in rows from one hexagon side, widening, running even through the fat part, and tapering to a single stitch at the tip. The little dotted lines you can see running down each petal are chain-space eyelets worked right into the rows, and they are what keeps a solid red petal from looking flat and heavy.
It is an advanced make, not because any single stitch is difficult — everything here is single crochet, decreases and chain spaces — but because the pieces have to agree with each other. Six petals of identical row count, six seams of identical length, and an edging round that has to travel over six tips and six valleys without rippling. If your row tension wanders by even a stitch or two per petal, the star will sit crooked. Expect roughly four to six hours of work spread over a couple of sittings, plus blocking time.
It suits anyone who already works amigurumi-style tight single crochet and wants to put that same control into a flat piece. The finished doily measures about 28 cm point to point in DK cotton and sits well under a vase, a pot of flowers, or at each place setting on a glass table where the shape shows through. Make one as a centrepiece, or make six and you have a matched set for the whole table.
Materials
- DK (light worsted) mercerised cotton in bright red approx. 90 g / 190 m
- DK mercerised cotton in cream or ecru approx. 15 g / 32 m
- 3.0 mm crochet hook or the size that gives you firm, hole-free fabric
- Blunt tapestry needle for seaming and weaving ends
- Stitch markers at least 7 — one for the round start, six for the corner lines
- Rustproof pins and a blocking mat essential for this piece
- Spray bottle with water, or spray starch for a stiffer doily
- Scissors
Abbreviations
MRmagic ringchchainsl stslip stitchscsingle crochetsc2togsingle crochet 2 stitches togethersc3togsingle crochet 3 stitches togetherinc2 sc in the same stitchst(s)stitch(es)skskipspspacereprepeatRS / WSright side / wrong side( ) x6work the sequence in brackets 6 timesCentre Hexagon (make 1)
- With cream, 6 sc in MR. (6)
- Rnd 2: inc in each st around. (12) — mark each of the 6 increase stitches; these are your corner lines.
- Rnd 3: (inc, sc 1) x6. (18)
- Rnd 4: (inc, sc 2) x6. (24)
- Rnd 5: (inc, sc 3) x6. (30)
- Rnd 6 (eyelet round): (inc, sc 1, ch 1, sk 1 st, sc 2) x6. (36 sts counting each ch-1 sp as one st)
- Rnd 7: (inc, sc 5) x6, working 1 sc into each ch-1 sp of the previous round. (42)
- Change to red in the last pull-through of Rnd 7. Cut cream, leaving a 10 cm tail.
- Rnd 8 (red outline round): (inc, sc 6) x6. (48) Sl st to the first st, fasten off red and weave in the end.
- The hexagon now has 6 corner stitches and 8 stitches between corners on each side. Lay it flat and check that the corners sit evenly — it should measure about 9 cm across.
Petals (make 6)
- Work each petal in rows, outward from one side of the hexagon. With RS facing, join red with a sl st in the first of the 8 side stitches, immediately after a corner stitch.
- Row 1 (RS): ch 1, sc in each of the next 8 sts. Turn. (8)
- Row 2: ch 1, inc in first st, sc 6, inc in last st. Turn. (10)
- Row 3: ch 1, inc, sc 8, inc. Turn. (12)
- Row 4: ch 1, inc, sc 10, inc. Turn. (14)
- Row 5 (eyelet): ch 1, sc 6, ch 1, sk 1 st, sc 7. Turn. (14, counting the ch-1 sp as one st)
- Row 6: ch 1, inc, sc 12 (working 1 sc into the ch-1 sp), inc. Turn. (16)
- Row 7: ch 1, sc in each st across. Turn. (16)
- Row 8 (double eyelet): ch 1, sc 4, ch 1, sk 1 st, sc 6, ch 1, sk 1 st, sc 4. Turn. (16)
- Row 9: ch 1, sc in each st across, working 1 sc into each ch-1 sp. Turn. (16) — this is the widest row.
- Row 10: ch 1, sc2tog, sc 12, sc2tog. Turn. (14)
- Row 11: ch 1, sc in each st across. Turn. (14)
- Row 12: ch 1, sc2tog, sc 10, sc2tog. Turn. (12)
- Row 13 (eyelet): ch 1, sc 5, ch 1, sk 1 st, sc 6. Turn. (12)
- Row 14: ch 1, sc2tog, sc 8 (working 1 sc into the ch-1 sp), sc2tog. Turn. (10)
- Row 15: ch 1, sc2tog, sc 6, sc2tog. Turn. (8)
- Row 16: ch 1, sc2tog, sc 4, sc2tog. Turn. (6)
- Row 17: ch 1, sc2tog, sc 2, sc2tog. Turn. (4)
- Row 18: ch 1, sc2tog twice. Turn. (2)
- Row 19: ch 1, sc2tog. (1) Fasten off, leaving a 15 cm tail for seaming.
- Repeat Rows 1-19 five more times, skipping the corner stitch of the hexagon between petals so each petal starts on a fresh side. Six petals total; the six corner stitches stay free and will be absorbed into the seams.
Seaming the Petals
- Lay the doily flat, RS up, and bring the row-end edges of two neighbouring petals together so they touch from the hexagon outward.
- Thread a petal tail onto the tapestry needle. Whipstitch through the outer loop only of each row end, catching the free hexagon corner stitch in the very first stitch of the seam.
- Seam from Row 1 up to and including Row 9 — the widest point. Stop there; the tapering rows from Row 10 outward stay free, which is what gives the star its six open points.
- Fasten off on the WS and leave the tail to weave in after blocking.
- Repeat for the remaining five seams. Check as you go that every seam ends at the same row number, or the star will sit lopsided.
Picot Edging Round
- With RS facing, join red with a sl st at the top of any seam, in the valley between two petals.
- Rnd 1: ch 1, work sc evenly along the first free petal edge, placing 2 sc for every 3 row ends, up to the tip.
- At the tip, work (sc, ch 3, sl st in the 3rd ch from the hook, sc) all in the single stitch of Row 19.
- Continue with 2 sc for every 3 row ends down the other side of the petal to the next valley.
- At each valley, work sc2tog over the last st of one petal and the first st of the next, so the seam line pulls in and stays crisp.
- Repeat around all six petals, then sl st to the first sc.
- Rnd 2 (picot round): ch 1, (sc 2, ch 3, sl st in the 3rd ch from the hook) around, working each picot into the last sc made; at each petal tip work (sc, ch 3 picot, sc) into the tip picot of Rnd 1, and sc3tog at each valley.
- Sl st to the first sc. Fasten off and weave the end along the back of a seam.
- Note: the exact sc total in Rnd 1 depends on your row tension. Count your first petal edge, then match that number on the other five so the picots land symmetrically.
Finishing
Weave in every end on the wrong side, running the red tails along the seam ridges and the cream tails around the back of the hexagon so nothing shows through the eyelets. Trim close, but not flush — cotton tails like to pop back out.
Blocking is not optional on this piece. Wet the doily thoroughly, press out the water in a towel without wringing, then pin it right side up on a blocking mat. Pin the six petal tips first, measuring from the centre of the hexagon to each tip so all six distances match, then pin the valleys, then ease each picot out along the petal edges. Let it dry completely, which usually takes a full day. If you want a stiffer doily that holds its star shape on a glass table, give it a light coat of spray starch once dry and pin it a second time. Unpin, and the eyelet lines down each petal will have opened into the neat dotted veins that make this motif read as a flower rather than a plain six-sided coaster.
Tips for Success
- Work all six petals from the same written rows without improvising, and count Row 9 on each one — if every petal has exactly 16 stitches at its widest point, the seams will match without stretching.
- Keep the ch-1 eyelets loose and the surrounding sc firm. A tight chain disappears after blocking and you lose the vein effect entirely.
- Turn your work the same direction every single row. Alternating the turn changes the row-end loops and makes one side of each petal edge visibly looser than the other when you come to seam.
- Join red for each petal with a standing single crochet instead of a sl st and ch 1 if you know the technique — six fewer bumps at the hexagon edge, and the red-to-cream line stays clean.
- Seam with the outer loops only. Full whipstitching through both loops creates a thick ridge that stops the doily lying flat.
Common Mistakes to Avoid
- The centre turns into a circle instead of a hexagon. This happens when the increase on each round is not worked directly above the previous one. Use six markers from Round 2 and check them every round; a circular centre leaves no corner stitch to absorb into the seams.
- Petals start at the wrong stitch. Each petal uses the 8 stitches between corners, not 8 stitches counted from wherever you finished. Skip the corner stitch between petals or you will run out of stitches before the sixth petal.
- Seaming too far out. Seaming past Row 9 closes the gaps between petal points and the star loses its shape. Stop at the widest row every time.
- Rippling edging. Too many stitches along the petal edges makes the border wave. Stick to 2 sc for every 3 row ends and always decrease in the valleys — never work a plain sc there.
- Skipping the block. Unblocked, the petals curl upward and the eyelets stay shut. Pin it properly even if the stitching looks fine off the hook.
Ways to Customize This Pattern
- Swap the cream centre for soft gold or pale butter yellow to make the middle read as a flower centre rather than a plain hexagon, keeping the red petals unchanged.
- Add two more eyelet rows to each petal — repeat the Row 8 double eyelet at Rows 11 and 15 — for a lacier, more open petal that drapes better under glass.
- Make a smaller coaster version by stopping the hexagon at Round 6 (36 sts, 6 sts per side) and starting each petal with 6 sc, then shortening the petal by working Rows 1-4, 7, 9, 12-19. Finished size lands near 16 cm.
- Work the whole motif in a single colour — deep burgundy, dusty rose or ecru throughout — and let the eyelet veins and picot edge carry the design instead of the colour change.
- Add six small green leaves between the petal points if you want a foliage version: work a simple 12-row pointed leaf in sage and stitch one behind each valley so just the tip peeks out.
Frequently asked questions
No, not for this shape. The petals need a free edge on both sides so they can be seamed only up to Row 9, and the tapering tip relies on turned rows. Working in the round would close the gaps between petal points and give you a solid hexagon with a bumpy outline instead of a star.
Most likely nothing — amigurumi-trained hands work very tight single crochet, and this piece is written for firm fabric. Check your gauge over the hexagon: it should measure about 9 cm across after Round 8. If yours is closer to 7 cm, go up to a 3.5 mm hook and work the whole motif again, or accept the smaller size and treat it as a mug mat.
Uneven seam length is almost always the cause. Count the whipstitches on each seam; they should all cover Rows 1 through 9 with the same number of stitches. A seam that is two or three stitches shorter will lift its petal pair. Undo that one seam and redo it against a correct seam as a reference.
Mercerised cotton in DK weight. It has very little stretch, so the petal tips stay pointed and the picots keep their definition after blocking. Acrylic will work but softens and curls at the points, and wool blends relax too much once washed. If you only have acrylic, use spray starch and a slightly smaller hook.
Yes. Lay two motifs so that one petal point of each meets edge to edge, then whipstitch the Rnd 1 edging stitches together along the outer thirds of those two petals before working Rnd 2 of the picot edging across the joined pair. Three or four motifs in a row make a runner roughly 80 to 110 cm long.
The finished Red Star Flower Doily Crochet Pattern