Advanced
For experienced crocheters who enjoy complex shaping, fine detail, and ambitious construction
Single-Day Project
A satisfying project you can complete in a single afternoon or evening.
Handmade Gift
A beautiful keepsake — free forever. Read online or print at home.
About This Spiral Mandala Crochet Blanket
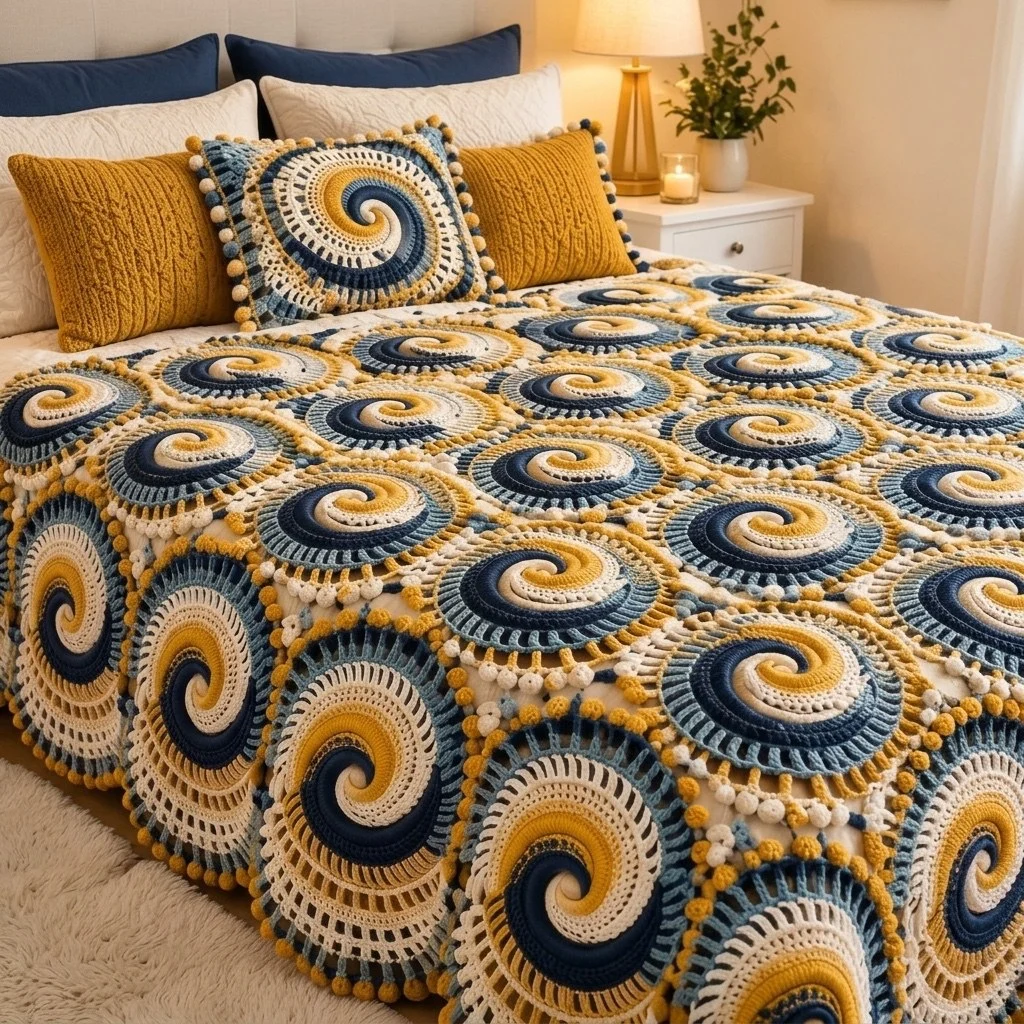
This spiral mandala crochet blanket pattern turns one repeated wheel motif into a full bedspread, and the thing that makes it work is the centre: three colours are carried at the same time so that gold, cream and navy chase each other outward in a true three-arm spiral. Nothing is appliquéd on top and nothing is faked with colour changes mid-round. Each arm is its own live strand, dropped and picked up in turn, and the swirl you see in the photo is simply what that construction does on its own.
Around the spiral sits a heavy navy rim, then an open slate-blue spoke round made of dc-and-chain pairs, then a ring of gold bobbles, and finally a cream corner frame that squares the circle off so the motifs join edge to edge with no gaps. Thirty motifs make a 5 x 6 layout. After joining, small bobble garlands are sewn along the seam lines — those are the little cream and gold berries scattered between the wheels — and the whole blanket is finished with a spoke-and-bobble border that echoes the motif.
Plan on 35 to 45 hours for the full bedspread, roughly 60 to 75 minutes per motif once the spiral stops feeling fiddly. This is an advanced project, not because any single stitch is hard, but because you manage three working strands in a continuous spiral and have to keep 30 motifs identical. If you have made mandalas or join-as-you-go squares before, you are ready. If you want a smaller commitment, nine motifs make a generous lap blanket with exactly the same instructions.
Materials
- DK cotton blend yarn in cream approx. 1400 m / 1530 yd — background, frames, garlands
- DK cotton blend yarn in deep navy approx. 800 m / 875 yd — spiral arm, wheel rim, final border round
- DK cotton blend yarn in mustard gold approx. 700 m / 765 yd — spiral arm, bobble ring, border bobbles
- DK cotton blend yarn in slate blue approx. 500 m / 545 yd — spoke rounds
- 4 mm crochet hook or size needed to reach gauge
- Blunt tapestry needle for joining and sewing garlands
- Stitch markers at least 4, ideally in 3 different colours for the spiral arms
- Blocking mats and rustproof pins essential for squaring the motifs
- Sharp scissors
Gauge: one finished motif measures 20 cm / 8 in square after blocking. The spiral centre alone (through Round 9) should measure 10 cm / 4 in across.
Abbreviations
MRmagic ringchchainsl stslip stitchscsingle crochethdchalf double crochetdcdouble crochetst / stsstitch / stitchesspspacereprepeatFOfasten offbobble5 unfinished dc in same st, yarn over, pull through all 6 loops( ) x4work the instructions inside the brackets 4 times totalSpiral Centre (make 30)
- Round 1: Make a MR. With gold, ch 1, 2 hdc in ring; drop gold. Join cream in ring, 2 hdc in ring; drop cream. Join navy in ring, 2 hdc in ring. Pull the ring tight. (6 hdc — 2 per colour)
- From here work in a continuous spiral, never joining. Each colour works its own segment, is dropped, and the next colour works over the dropped strands. Always keep the colours in the same order: gold, cream, navy.
- Round 2: With each colour in turn: 2 hdc in each of next 2 sts. (4 sts per colour — 12 total)
- Round 3: With each colour in turn: (2 hdc in next st, hdc in next st) x2. (6 per colour — 18 total)
- Round 4: With each colour in turn: (2 hdc in next st, hdc in next 2 sts) x2. (8 per colour — 24 total)
- Round 5: With each colour in turn: (2 hdc in next st, hdc in next 3 sts) x2. (10 per colour — 30 total)
- Round 6: With each colour in turn: (2 hdc in next st, hdc in next 4 sts) x2. (12 per colour — 36 total)
- Round 7: With each colour in turn: (2 hdc in next st, hdc in next 5 sts) x2. (14 per colour — 42 total)
- Round 8: With each colour in turn: (2 hdc in next st, hdc in next 6 sts) x2. (16 per colour — 48 total)
- Round 9 (levelling round, no increases): With each colour in turn: hdc in next 13 sts, sc in next 2 sts, sl st in next st, then FO that colour. The sc-to-sl st taper steps each arm down so the outer edge sits flat. (48 stitch positions)
- Weave the three tail ends in on the back before you go further — they are much harder to reach once the navy rim is on.
Wheel Rounds (on each motif)
- Round 10: Join navy with a sl st in any st, ch 1, sc in each st around, sl st to first sc. (48)
- Round 11: Ch 2, (2 dc in next st, dc in next st) x24, sl st to top of ch 2. FO navy. (72)
- Round 12 (spoke round): Join slate blue in any st, ch 4 (counts as dc + ch 1), skip next st, *dc in next st, ch 1, skip next st*, rep from * around, sl st to 3rd ch of ch 4. (36 dc and 36 ch-1 sps — 72 positions)
- Round 13: Ch 1, sc in each dc and 1 sc in each ch-1 sp around, sl st to first sc. FO slate blue. (72)
- Round 14 (bobble ring): Join gold in any st, ch 1, *sc in next 2 sts, bobble in next st*, rep from * around (24 reps), sl st to first sc. FO gold. (72 sts, 24 bobbles)
- Push every bobble through to the front of the work with your thumb before moving on — once the cream frame is attached they will not pop out cleanly.
Cream Square Frame (on each motif)
- Round 15 (squaring round): Join cream in any sc that sits directly before a bobble. Ch 1, then *(3 dc, ch 2, 3 dc) in next st [corner made], dc in next 2 sts, hdc in next 3 sts, sc in next 7 sts, hdc in next 3 sts, dc in next 2 sts*, rep from * 3 more times, sl st to first dc. Each repeat uses 18 stitches of Round 14, so the four corners land 18 sts apart. (92 sts and 4 ch-2 corner sps — 23 sts per side)
- Round 16: Ch 2, *(2 dc, ch 2, 2 dc) in corner ch-2 sp, dc in next 11 sts, 2 dc in next st, dc in next 11 sts*, rep from * 3 more times, sl st to top of ch 2. FO, leaving a 20 cm tail if you plan to join by sewing. (112 sts and 4 ch-2 corner sps — 28 sts per side)
- Block each finished motif to a true 20 cm square, pinning the four ch-2 corners first and then easing the sides straight. Do not skip this — unblocked motifs cup slightly from the bobble ring and the seams will ripple.
- Make 30 motifs in total for a 5 x 6 layout.
Joining the Motifs
- Lay all 30 blocked motifs out in 6 rows of 5. Rotate a few of them so the spiral arms do not all point the same way — the scattered swirl directions are what give the blanket its movement.
- Join in rows first. Hold two motifs with wrong sides together. With cream and the tapestry needle, whip stitch through the back loops only of both motifs, working 1 stitch into each of the 28 sts along the side and 1 stitch into each of the two ch-2 corner sps. (30 whip stitches per seam)
- Continue across until each row of 5 motifs is joined. You will have 6 long strips.
- Join the strips the same way, working the full length of each seam in one pass: 5 motifs x 30 stitches = 150 whip stitches per long seam. At each four-corner junction, pass the needle through all four ch-2 spaces once so no hole forms.
- Weave in all joining tails along the seam line on the back, then give the joined blanket a light steam-block flat before adding the border.
Bobble Garlands (make 20)
- Step 1: With cream, ch 4.
- Step 2: Bobble in 4th ch from hook, ch 4.
- Step 3: Change to gold, bobble in 4th ch from hook, ch 4.
- Step 4: Change back to cream, bobble in 4th ch from hook, ch 4.
- Step 5: Rep Steps 3 and 4, alternating gold and cream, until the garland has 7 bobbles in total, ending with a cream bobble. Ch 1 and FO, leaving a 25 cm sewing tail. Each finished garland measures about 18 cm.
- Carry the unused colour loosely along the chain stems rather than cutting it at every bobble — it hides inside the chain and saves 12 ends per garland.
- Make 20 garlands.
Border
- Round 1: Join cream in any blanket corner ch-2 sp. Ch 1, 3 sc in that corner sp, then sc in each st along each motif side (28 per side) and 2 sc into each seam junction where two motif corners meet, placing 3 sc in each of the remaining 3 blanket corners. Sl st to first sc. (148 sc on each short edge, 178 sc on each long edge, 12 corner sc — 664 total)
- Round 2 (spoke round): Join slate blue in the centre sc of any corner, ch 4, dc in same st, ch 2, dc in same st — wait at the corner only: work (dc, ch 2, dc) in each corner centre st. Along the edges work *dc in next st, ch 1, skip next st*. Sl st to join. (338 dc, 330 ch-1 sps, 4 ch-2 corner sps)
- Round 3: Join cream in any ch-1 sp, ch 1, sc in each dc and 1 sc in each ch-1 sp around, 3 sc in each corner ch-2 sp, sl st to first sc. FO cream. (680)
- Round 4 (bobble round): Join gold in the first sc after any corner, ch 1, *sc in next 3 sts, bobble in next st*, rep from * around (170 reps), sl st to first sc. FO gold. (680 sts, 170 bobbles)
- Round 5: Join navy in any st, ch 1, sc in each sc and in the top of each bobble around, working 3 sc in each corner st, sl st to first sc. FO navy. (692)
- Pull every border bobble to the right side as you go, then block the border edge straight with pins while the blanket is damp.
Finishing
Pin the bobble garlands along the seam lines before you sew anything. Place them in gentle arcs that follow the curve of the wheels rather than in straight lines — two or three per horizontal seam, tucked into the cream frame corners where four motifs meet. Step back and look at the whole blanket from a distance before committing; the garlands read as scattered berries, and they look best when they are not evenly spaced.
Sew each garland down with the cream tail and a tapestry needle, catching only the chain stems between the bobbles so the bobbles themselves stay loose and round. Two or three stitches per stem is plenty. Secure the tail on the back with a small knot and run it under the seam stitching for 5 cm before trimming.
Weave in every remaining end, then give the finished blanket a full wet block: soak in cool water, roll in a towel to press out the excess, and pin flat to 120 x 140 cm with the corners square. Let it dry completely, which usually takes a day. The bobbles flatten slightly during blocking and spring back once dry. Wash it on a cool gentle cycle afterwards and dry flat — a cotton blanket this size will stretch badly if you hang it wet.
Tips for Success
- Use three different coloured stitch markers in the spiral centre, one per arm, and move each one up as you finish that colour’s segment. This single habit prevents nearly every spiral error.
- Make the first three motifs, block them, and measure before you cut more yarn. If they come out at 19 cm, go up to a 4.5 mm hook; at 21 cm, drop to 3.5 mm. A 1 cm difference per motif adds up to 6 cm across the blanket.
- Work all 30 spiral centres first in one sitting-stretch, then all the navy rims, then all the spoke rounds. Batch working keeps tension consistent across motifs far better than finishing them one at a time over several weeks.
- Keep the ch-1 spaces in the spoke rounds loose and even. Tight chains pull the spokes into a star shape instead of a wheel, and it shows immediately next to a correctly worked motif.
- Block in batches of six on the same mat layout with the same pin positions, so every motif ends up genuinely identical rather than approximately so.
Common Mistakes to Avoid
- Joining a new colour each round instead of carrying it. The three spiral strands stay live for all nine rounds. If you cut and rejoin, the arms step instead of curving and you get 54 extra ends per motif.
- Skipping the levelling round. Round 9 is what makes the spiral edge flat. Without it the navy rim sits over a visible staircase and the motif will never block square.
- Bobbles popping to the wrong side. They form on the back of the work as you make them. Push each one through to the front before you work the next stitch — chasing them afterwards distorts the surrounding stitches.
- Placing the Round 15 corners randomly. The four corners must sit 18 stitches apart. Count them out and mark all four positions before you start the round, or you will end up with a lopsided square that fights its neighbours at the seam.
- Joining with the right sides together. This pattern uses a back-loop whip stitch with wrong sides together, which leaves a soft raised ridge on the front that frames each wheel. Joining the other way buries the detail.
Ways to Customize This Pattern
- Lap blanket: make 9 motifs in a 3 x 3 layout for a 70 x 70 cm throw. The border counts become 100 sc per edge in Round 1; everything else is worked exactly as written.
- Two-tone spiral: drop one colour from the centre and work a two-arm spiral instead, starting with 2 hdc per colour in the ring and increasing by 2 per colour per round. The swirl becomes wider and bolder, and it reads better from across a room.
- Calmer palette: keep the cream and slate blue, and swap navy and gold for charcoal and dusty rose. The construction carries the design, so almost any four-colour scheme with one dark, one bright, one mid and one light works.
- No bobbles: replace the Round 14 bobble with a dc for a flatter blanket that is easier to wash and far faster to make. Skip the garlands and work the border bobble round as plain sc.
- Matching cushion front: work four motifs, join them 2 x 2, add Border Rounds 1 to 4 only, and back it with a plain cream dc panel for a 45 cm cushion cover.
Frequently asked questions
Keep each ball in its own separate spot — three small bowls on the table works better than a project bag. Always drop the colour you just used toward the front of the work, and always pick up the next in the same order: gold, cream, navy. Because the work rotates in one direction only, the strands twist predictably; every few rounds, lift the blanket and let the motif spin backwards twice to undo the twist. Never reach over or under the strands out of order.
Almost always the spoke round, Round 12. If the ch-1 spaces are worked tightly, that round is too short for the 72 stitches underneath and the motif curls into a shallow bowl. Try working Round 12 with a hook half a size larger, then switching back. If the cupping starts earlier, at the navy increase round, check that you did 24 full increases in Round 11 — 48 to 72 is the only count that keeps the circle flat.
Yes, and it makes a lighter, warmer blanket. Two things change: acrylic bobbles are softer and less defined, so consider using 6 dc instead of 5 in each bobble; and acrylic will not hold a wet block the way cotton does, so steam-block the motifs instead and expect them to relax by about half a centimetre. Check your gauge again after steaming, because the motif size will drift.
For the 3 x 3 version, roughly a third of the listed amounts plus a little extra for the border, which does not shrink proportionally: about 500 m cream, 260 m navy, 230 m gold and 170 m slate blue. Buy one extra ball of cream — it is used in the frames, the joins, the garlands and two border rounds, and it is always the colour that runs out first.
The finished Spiral Mandala Crochet Blanket