Heirloom Floral Crochet Lampshade Pattern
Advanced
For experienced crocheters who enjoy complex shaping, fine detail, and ambitious construction
Single-Day Project
A satisfying project you can complete in a single afternoon or evening.
Handmade Gift
A beautiful keepsake — free forever. Read online or print at home.
About This Heirloom Floral Crochet Lampshade Pattern
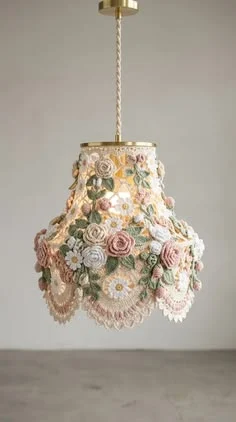
This floral crochet lampshade pattern recreates the romantic shape of the reference with an ivory shade, clustered roses, white daisies, sage foliage, and pink-edged swags. The narrow upper opening widens into a bell-shaped skirt, while overlapping flowers soften the outline.
This advanced project combines a fitted crochet foundation, separately shaped flowers, embroidered details, and carefully balanced assembly. Allow approximately 30–40 hours, including blocking and sewing. It suits crocheters who enjoy detailed floral work and are comfortable fitting fabric to a rigid frame.
Materials
- Sport-weight mercerized cotton, approximately 125 m per 50 g Ivory 200 g; dusty blush 75 g; pale peach 50 g; sage 75 g; muted olive 25 g; butter yellow 25 g
- 2.5 mm crochet hook Or size needed for the blocked gauge
- Rigid, six-rib bell lampshade frame Approximately 24 cm vertical height, 9.5 cm top diameter, and 19 cm lower diameter; choose ribs that flare gradually toward the bottom
- Tapestry needle, fine sewing needle, and strong matching thread For frame attachment and floral assembly
- Stitch markers, tape measure, rustproof pins, and blocking mat Use six locking markers for panel divisions
- Matching ivory cotton tape Approximately 1.1 m to wrap the upper and lower frame rings
- Compatible pendant hardware and enclosed LED light source Use only a fitting approved for textile shades, with the manufacturer’s required clearances
The frame and electrical fitting are purchased components. The crochet is a decorative shade covering; it does not support the pendant or cord. Keep every textile component clear of the light source and ventilation openings. Have electrical installation handled by a qualified person where required.
Abbreviations
chchainscsingle crochethdchalf double crochetdcdouble crochetsl stslip stitchinc2 sc in the same stitchsc2togsingle crochet 2 stitches togetherMRmagic ringst / stsstitch / stitchesUse US terminology. Instructions in parentheses followed by a repeat number are repeated that many times. Turning chains and joining slip stitches do not count as stitches. Work through both loops unless directed otherwise.
Gauge, Dimensions, and Fit
- With ivory, ch 31. Row 1: sc in the second ch from the hook and each remaining ch. Turn. (30 sts)
- Rows 2–30: ch 1, sc in each st, turn. (30 sts per row) Wash and block without stretching. Measure the central area: 20 sc and 24 rows must equal 10 cm.
- At this gauge, the shade foundation measures 30 cm around the top, 60 cm around the bottom, and approximately 24.2 cm tall. Flowers add approximately 2 cm to each side; swags extend approximately 3–4 cm below the rim.
- The foundation circumferences after shaping are 33, 36, 39, 42, 45, 48, 51, 54, 57, and 60 cm. These occur at Rounds 7, 12, 17, 22, 27, 32, 37, 42, 47, and 52 respectively. Check the corresponding frame levels before committing to assembly.
- For a frame that differs substantially, select another frame or recalculate the foundation before beginning. Do not pull a small finished cover tightly over a larger frame.
Ivory Bell Foundation
- With ivory, ch 60 loosely. Join with a sl st to the first ch without twisting. Round 1: ch 1, sc in each ch; join to the first sc. (60 sts)
- Rounds 2–6: ch 1, sc in each st; join. (60 sts per round)
- Round 7: ch 1, (sc in next 9 sts, inc) 6 times; join. (66 sts)
- Rounds 8–11: ch 1, sc in each st; join. (66 sts per round)
- Round 12: ch 1, (sc in next 10 sts, inc) 6 times; join. (72 sts)
- Rounds 13–16: ch 1, sc in each st; join. (72 sts per round)
- Round 17: ch 1, (sc in next 11 sts, inc) 6 times; join. (78 sts)
- Rounds 18–21: ch 1, sc in each st; join. (78 sts per round)
- Round 22: ch 1, (sc in next 12 sts, inc) 6 times; join. (84 sts)
- Rounds 23–26: ch 1, sc in each st; join. (84 sts per round)
- Round 27: ch 1, (sc in next 13 sts, inc) 6 times; join. (90 sts)
- Rounds 28–31: ch 1, sc in each st; join. (90 sts per round)
- Round 32: ch 1, (sc in next 14 sts, inc) 6 times; join. (96 sts)
- Rounds 33–36: ch 1, sc in each st; join. (96 sts per round)
- Round 37: ch 1, (sc in next 15 sts, inc) 6 times; join. (102 sts)
- Rounds 38–41: ch 1, sc in each st; join. (102 sts per round)
- Round 42: ch 1, (sc in next 16 sts, inc) 6 times; join. (108 sts)
- Rounds 43–46: ch 1, sc in each st; join. (108 sts per round)
- Round 47: ch 1, (sc in next 17 sts, inc) 6 times; join. (114 sts)
- Rounds 48–51: ch 1, sc in each st; join. (114 sts per round)
- Round 52: ch 1, (sc in next 18 sts, inc) 6 times; join. (120 sts)
- Rounds 53–58: ch 1, sc in each st; join. (120 sts per round) Fasten off and weave in the end.
- Wet-block to the frame dimensions. Allow to dry fully. Place the joining seam over a rear rib; the narrower opening is the top. This foundation remains open at both ends and is never stuffed.
Sculpted Roses — Make 12
- Make 5 dusty blush, 4 ivory, and 3 pale peach roses. For each rose, leave a 35 cm starting tail and ch 25.
- Row 1: sc in the second ch from the hook and each remaining ch. Turn. (24 sts)
- Row 2: ch 1, (sl st in next st, 5 dc in next st) 12 times. (12 petals; 60 dc and 12 sl sts) Fasten off with a 45 cm sewing tail.
- Roll the strip with the petals facing outward. Keep the first three petals fairly tight for the center, then wrap the remaining petals more loosely around them. Sew through the straight foundation edge after each wrap.
- Flatten the underside into a secure base approximately 2 cm across. Finished roses should measure approximately 3.5–4 cm across. Leave the long tail for attachment.
Small Rosebuds — Make 8
- Make 4 dusty blush and 4 pale peach buds. Ch 13, leaving a 25 cm starting tail.
- Row 1: sc in the second ch from the hook and each remaining ch. Turn. (12 sts)
- Row 2: ch 1, (sl st in next st, 4 dc in next st) 6 times. (6 petals; 24 dc and 6 sl sts) Fasten off with a 35 cm tail.
- Roll tightly and stitch through every layer of the foundation edge. Leave the petal tips free. Each bud measures approximately 2–2.5 cm across.
Ivory Daisies — Make 8
- With butter yellow, Round 1: 6 sc in MR; join to the first sc. (6 sts)
- Round 2: ch 1, inc in each st; join. (12 sts) Fasten off yellow.
- Round 3: join ivory in any center st. For each petal, sl st in the next unworked center st, ch 6, sc in the second ch from the hook, hdc in next ch, dc in next ch, hdc in next ch, sc in last ch, then sl st in the same center st where the petal began. Repeat around all 12 center sts. (12 petals, each with 5 worked chain sts)
- Fasten off, leaving a 35 cm tail. Bring the tail to the back of the yellow center. Block the petals radially to approximately 4–4.5 cm across.
- With a single strand of pale peach cotton, add six short straight stitches over the yellow center, radiating from its middle. Keep the embroidery shallow so the center stays flat.
Small Five-Petal Blossoms — Make 12
- Make 6 ivory and 6 pale peach blossoms. With butter yellow, work 5 sc in MR; join to the first sc. (5 sts) Fasten off.
- Join the petal color in any center st. In that same st work (ch 2, 3 dc, ch 2, sl st). Work the same sequence in each of the other 4 center sts. (5 petals; 15 dc total)
- Fasten off with a 30 cm tail. Tighten and secure the center ring. Block to approximately 2 cm across.
Shaped Leaves — Make 30
- Make 22 sage and 8 muted olive leaves. For each leaf, ch 3.
- Row 1: sc in the second ch from the hook and in the last ch. Turn. (2 sts)
- Row 2: ch 1, inc in each st. Turn. (4 sts)
- Row 3: ch 1, inc, sc in next 2 sts, inc. Turn. (6 sts)
- Rows 4–5: ch 1, sc in each st. Turn. (6 sts per row)
- Row 6: ch 1, sc2tog, sc in next 2 sts, sc2tog. Turn. (4 sts)
- Row 7: ch 1, sc2tog twice. Turn. (2 sts)
- Row 8: ch 1, sc2tog. (1 st) Fasten off with a 30 cm tail.
- Embroider a central vein in the other green shade, using three short backstitches from the broad base toward the tip. Add one diagonal stitch on each side of the vein. Pinch the base and secure with two stitches to cup the leaf slightly. Finished length is approximately 3–3.5 cm.
Layered Lower Swags — Make 6 Sets
- Each set contains one short blush strand and one longer ivory strand. Make the strands separately and leave a 25 cm tail at both ends.
- Short blush strand, Row 1: ch 26; sc in the second ch from the hook and each remaining ch. (25 sts)
- Short blush strand, Row 2: ch 1, turn; sc in first st, (ch 3, sl st in the third ch from the hook, sc in next 3 sts) 8 times. (25 sc and 8 picots) Fasten off.
- Long ivory strand, Row 1: ch 32; sc in the second ch from the hook and each remaining ch. (31 sts)
- Long ivory strand, Row 2: ch 1, turn; sc in first st, (ch 3, sl st in the third ch from the hook, sc in next 3 sts) 10 times. (31 sc and 10 picots) Fasten off.
- Block each strand gently into a curve, with the picots on the outside edge. The approximate relaxed lengths are 12.5 cm for blush and 15.5 cm for ivory.
- Mark stitches 1, 21, 41, 61, 81, and 101 of foundation Round 58. Attach both ends of each short strand between consecutive markers, with the final set returning to stitch 1. Attach a long strand at the same points below it. Each pair spans 20 foundation stitches.
- Use several small stitches at each anchor, passing around the covered lower ring during final assembly. Keep the strands untwisted and their picots facing downward.
Frame Covering and Floral Placement
- Wrap the upper and lower frame rings with ivory cotton tape, overlapping the tape slightly. Secure its ends with stitches. Keep the fitting and all ventilation areas uncovered.
- Slide the foundation over the frame. Align the back seam with a rear rib. Lace the upper foundation edge to the wrapped upper ring, working through each crochet stitch. Lace the lower edge to the lower ring in the same way.
- At each rib, make a small securing stitch through the fabric and around the rib at Rounds 12, 27, and 42. Keep these stitches relaxed enough to avoid dimples.
- Divide the shade into six vertical panels, matching the six lower swag anchors. Before sewing, arrange every motif on the frame using temporary thread tacks.
- Place one rose in each panel around Round 17 and another around Round 40. Alternate colors so neighboring flowers do not repeat the same arrangement. Offset the lower roses slightly left or right of the upper ones.
- Place one daisy in each panel around Round 31. Place the remaining two daisies near Round 49 on two opposing panels. Keep the lower daisies above the swag curves.
- Distribute the 8 rosebuds around Rounds 7–12 and the gaps between larger flowers. Arrange 2 small blossoms per panel, one in the upper half and one in the lower half.
- Place 5 leaves in each panel. Tuck their bases beneath flower edges and point their tips in different directions. Use the darker leaves mainly behind ivory flowers.
- Sew each rose through its rolled base at four or more points. Sew daisies through their centers and the bases of three alternating petals. Attach blossoms through their centers; secure leaves at the base and central vein, leaving the tips free.
- Embroider a short sage stem between nearby leaves and flowers in each panel, using backstitches approximately 4 mm long. Keep the stems partly concealed beneath the floral clusters.
Finishing
Stand the shade upright and turn it slowly to check the balance. The flowers should overlap enough to make a soft, abundant surface while leaving small patches of ivory visible. Adjust any loose petal or leaf that projects into the shade interior, then secure and conceal all ends.
Attach the swags to the wrapped lower ring as directed and check that each pair hangs freely. Fit the finished shade to compatible pendant hardware according to the hardware instructions. Support the shade entirely through its frame and fitting. The reference’s brass-colored hardware and twisted cord are separate purchased elements.
Tips for Success
- Check the foundation on the frame after every increase round. A tight band is easier to correct before the flower layer is attached.
- Sew rolled roses through their foundation edges several times before attaching them. A secure base keeps the spiral from opening under its own weight.
- Block the daisy petals separately with their tips spread evenly; this prevents the flowers from looking like narrow tassels.
- Position all six swag sets before fastening their tails permanently. View the shade from below to compare the drops.
- Use small stitches that catch the foundation fabric without pulling it inward. The rigid frame should preserve the bell shape.
Common Mistakes to Avoid
- Counting the joining slip stitch as a foundation stitch creates an extra stitch each round. Mark the first sc and join directly to it.
- Rolling every rose petal tightly produces a narrow cone. Loosen the outer wraps and flatten the sewn base before attachment.
- Attaching swags only to crochet fabric can pull the lower edge out of shape. Pass each anchor stitch around the wrapped frame ring.
- Sewing down every leaf edge makes the foliage look flat. Secure the base and central vein while allowing the tips to lift.
- Forcing the cover onto a mismatched frame distorts the flowers and shaping. Compare the measured frame circumferences with the gauge section before assembly.
Ways to Customize This Pattern
- Use ivory for all roses and blossoms, keeping the yellow daisy centers and two greens for a quieter floral palette.
- Replace pale peach roses with muted mauve while retaining blush swags and the ivory foundation.
- For a shorter lower trim, use the 25-stitch strand instructions for both layers, then attach the second strand slightly below the first.
- Create a denser upper border by making six additional small blossoms and placing one between each upper rose cluster.
Frequently asked questions
This pattern is sized for an open rigid frame. An existing covered shade changes the fit and heat behavior. Use a frame and light fitting approved for textile shades, and follow the fitting manufacturer’s clearance requirements.
Arrange the flowers across all six panels before sewing. Keep the largest roses distributed around the circumference and attach the foundation securely to both frame rings and the ribs.
Flower diameter and overlap affect coverage. Check that the roses measure approximately 3.5–4 cm and the daisies 4–4.5 cm. If your motifs are smaller, adjust their hook size separately or add small blossoms in the remaining gaps.
Disconnect the light and remove the shade before cleaning. Dust gently with a soft brush, supporting the flowers from behind. Spot-clean the cotton sparingly and dry fully before reinstalling; do not immerse electrical parts or a metal frame that could rust.
The finished Heirloom Floral Crochet Lampshade Pattern

