Heirloom Garden Crochet Floral Wreath Pattern
Advanced
For experienced crocheters who enjoy complex shaping, fine detail, and ambitious construction
Single-Day Project
A satisfying project you can complete in a single afternoon or evening.
Handmade Gift
A beautiful keepsake — free forever. Read online or print at home.
About This Heirloom Garden Crochet Floral Wreath Pattern
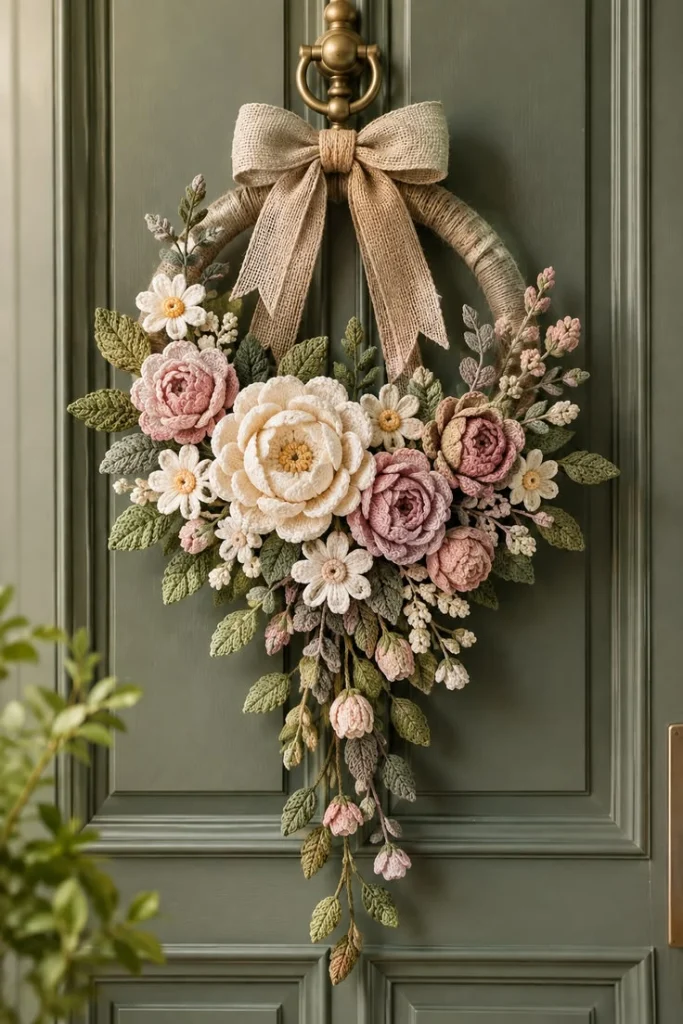
This crochet floral wreath pattern brings together a large ivory bloom, dusty pink roses, small cream daisies, and a long cascade of sage foliage. A warm flax cover and generous burlap bow frame the flowers, while the upper part of the ring stays open to show the wreath’s shape.
The design uses separately shaped petals, rolled flower strips, stuffed buds, embroidered leaf veins, and carefully stitched clusters. Allow about 30–40 hours for the crochet and assembly. It suits experienced crocheters who enjoy detailed botanical work and arranging individual pieces into a balanced display.
Materials
- Sport-weight cotton yarn, approximately 125 m per 50 g Flax 150 g; ivory 100 g; cream 50 g; dusty blush 50 g; muted mauve 50 g; pale peach 25 g; sage 100 g; olive 50 g; gray-green 50 g; mustard 10 g. Quantities include a working allowance.
- Crochet hooks 2.5 mm for botanicals; 3.0 mm for the cover, or sizes needed for gauge.
- Firm foam wreath ring 30 cm outside diameter, 22 cm inside diameter, with a round cross-section approximately 4 cm thick.
- Natural burlap ribbon 6 cm wide, approximately 1.5 m, preferably with finished edges.
- Polyester stuffing A small handful for flower centers and buds.
- Tapestry needle, sharp sewing needle, matching strong sewing thread, scissors, stitch markers, pins, and measuring tape For joining and placement.
- Cotton tape 25 cm long and approximately 1 cm wide for a concealed hanging loop.
- Blocking mat and rustproof pins For petals and leaves.
Abbreviations
chchainMRmagic ringsl stslip stitchscsingle crochethdchalf double crochetdcdouble crochetinc2 sc in the same stitchdecsingle crochet 2 stitches together; use an invisible decrease on stuffed piecesst / stsstitch / stitchesRSright sideGauge, Dimensions, and Working Notes
- Use US crochet terminology throughout. With the 3.0 mm hook, 20 sc and 24 rows should measure 10 × 10 cm after resting flat. Make a swatch larger than 10 cm and measure its central area.
- With the 2.5 mm hook, aim for 24 sc and 28 rows per 10 cm. Work stuffed pieces firmly enough to conceal filling. Petals and leaves should remain flexible.
- The cover measures approximately 13 × 81.7 cm before joining. Its width wraps around the ring’s tube; its length follows the ring’s centerline circumference.
- Approximate blocked component sizes: main ivory flower 12–14 cm across; large roses 7–8 cm; small rose 5–6 cm; daisies 4–5 cm; leaves 4–6 cm long; buds 2–2.5 cm long. Finished display: approximately 38 cm wide and 85 cm from bow top to lowest leaf.
- Turning chains do not count as stitches. Turn after each flat row unless instructed otherwise. Work numbered rounds continuously unless a join is specified; mark the first stitch.
- Leave 25–35 cm sewing tails on botanical pieces. Parentheses followed by a repeat number indicate exactly how many times to work that sequence. Counts include crochet stitches only, excluding unworked turning chains.
- This is a decorative wreath with no facial features or safety eyes. Stuff only the specified centers and buds; leave petals, leaves, and rose strips unstuffed.
Flax Wreath Cover
- With flax and the 3.0 mm hook, ch 27.
- Row 1: Starting in the second chain from the hook, sc in each chain. Turn. (26 sts)
- Rows 2–196: Ch 1, sc in each st. Turn after each row except Row 196. (26 sts per row; 196 rows total)
- Check the strip against the ring before fastening off. At the stated gauge, it measures approximately 13 × 81.7 cm. Its long edges should meet around the tube without a gap, and its short ends should meet around the ring without compressing the foam.
- Fasten off with a 100 cm tail. Sew the two short ends together, matching all 26 stitches, to make a closed band. Place this seam at the bottom of the ring.
- Fit the band around the ring and bring its long edges together at the back. Mattress-stitch corresponding row ends together around the entire ring. Distribute the fabric evenly before tightening the seam.
- If your ring or gauge differs, adjust the cover before sewing: width in stitches equals the measured tube circumference in centimeters multiplied by 2; length in rows equals the measured centerline circumference multiplied by 2.4. Round to the nearest whole number. The stated 26-stitch, 196-row version is for the specified ring.
Main Ivory Flower: Center and Backing
- Center, Round 1: With mustard and the 2.5 mm hook, work 6 sc in MR. (6 sts)
- Round 2: Inc in each st. (12 sts)
- Round 3: (Sc in next st, inc) 6 times. (18 sts)
- Round 4: Sc in each st. (18 sts)
- Round 5: (Sc in next st, dec) 6 times. (12 sts) Add a small amount of stuffing.
- Round 6: Dec 6 times. (6 sts) Fasten off, thread through the remaining front loops, and close. Flatten gently into a shallow dome.
- With mustard, embroider 12 short straight stitches across the dome, each spanning approximately 2 crochet stitches. Keep these stitches loose enough to preserve the raised center.
- Backing, Round 1: With sage, work 6 sc in MR. (6 sts)
- Round 2: Inc in each st. (12 sts)
- Round 3: (Sc in next st, inc) 6 times. (18 sts)
- Round 4: (Sc in next 2 sts, inc) 6 times. (24 sts)
- Round 5: (Sc in next 3 sts, inc) 6 times. (30 sts)
- Round 6: (Sc in next 4 sts, inc) 6 times. (36 sts) Sl st in the next st and fasten off. Leave the backing flat and unstuffed.
Main Ivory Flower: Five Inner Petals
- Make 5 with ivory. Ch 7.
- Row 1: Sc in the second chain from the hook and each remaining chain. (6 sts)
- Row 2: Ch 1, inc, sc in next 4 sts, inc. (8 sts)
- Row 3: Ch 1, inc, sc in next 6 sts, inc. (10 sts)
- Rows 4–5: Ch 1, sc in each st. (10 sts per row)
- Row 6: Ch 1, dec, sc in next 6 sts, dec. (8 sts)
- Row 7: Ch 1, dec, sc in next 4 sts, dec. (6 sts)
- Row 8: Ch 1, dec, sc in next 2 sts, dec. (4 sts)
- Row 9: Ch 1, dec twice. (2 sts) Fasten off. Each petal is approximately 3.2 cm from its foundation edge to its tip.
- Run the foundation tail through the 6 foundation stitches and draw them into a shallow cup, reducing the base to approximately 1 cm wide. Secure without closing the petal into a tube.
Main Ivory Flower: Seven Middle Petals
- Make 7 with ivory. Ch 9.
- Row 1: Sc in the second chain from the hook and each remaining chain. (8 sts)
- Row 2: Ch 1, inc, sc in next 6 sts, inc. (10 sts)
- Row 3: Ch 1, inc, sc in next 8 sts, inc. (12 sts)
- Rows 4–7: Ch 1, sc in each st. (12 sts per row)
- Row 8: Ch 1, dec, sc in next 8 sts, dec. (10 sts)
- Row 9: Ch 1, dec, sc in next 6 sts, dec. (8 sts)
- Row 10: Ch 1, dec, sc in next 4 sts, dec. (6 sts)
- Row 11: Ch 1, dec, sc in next 2 sts, dec. (4 sts)
- Row 12: Ch 1, dec twice. (2 sts) Fasten off. Each petal is approximately 4.3 cm long.
- Gather the 8 foundation stitches to approximately 1.3 cm wide. Leave the upper half open and gently curved.
Main Ivory Flower: Nine Outer Petals and Assembly
- Make 9 with ivory. Ch 11.
- Row 1: Sc in the second chain from the hook and each remaining chain. (10 sts)
- Row 2: Ch 1, inc, sc in next 8 sts, inc. (12 sts)
- Row 3: Ch 1, inc, sc in next 10 sts, inc. (14 sts)
- Rows 4–9: Ch 1, sc in each st. (14 sts per row)
- Row 10: Ch 1, dec, sc in next 10 sts, dec. (12 sts)
- Row 11: Ch 1, dec, sc in next 8 sts, dec. (10 sts)
- Row 12: Ch 1, dec, sc in next 6 sts, dec. (8 sts)
- Row 13: Ch 1, dec, sc in next 4 sts, dec. (6 sts)
- Row 14: Ch 1, dec, sc in next 2 sts, dec. (4 sts)
- Row 15: Ch 1, dec twice. (2 sts) Fasten off. Each petal is approximately 5.7 cm long.
- Gather each 10-stitch foundation edge to approximately 1.5 cm wide. Dampen all petals, spread the tips, and dry with a slight cup. Do not stretch the gathered bases.
- With the backing RS facing you, position the 9 outer petal bases evenly around Round 5. Point the tips outward and overlap neighboring sides slightly. Sew each base down twice.
- Sew the 7 middle petals around Round 3, staggering their tips between outer petals. Sew the 5 inner petals around Round 2, keeping them more upright. Stitch only the lower third of each petal so the upper sections remain dimensional.
- Sew the mustard dome over the central opening. Add concealed stitches between neighboring petal bases if needed to keep the flower from sagging. The finished flower should measure approximately 12–14 cm across.
Rolled Roses: Two Large and One Small
- Large roses: Make one dusty blush and one muted mauve. Ch 62 for each.
- Row 1: Sc in the second chain from the hook and each remaining chain. (61 sts)
- Row 2: Ch 1, sl st in the first st; (skip next st, work 5 dc in next st, sl st in next st) 20 times. (20 shells; 121 worked sts including slip stitches) Fasten off with a 70 cm tail.
- Small rose: With pale peach, ch 44.
- Row 1: Sc in the second chain from the hook and each remaining chain. (43 sts)
- Row 2: Ch 1, sl st in the first st; (skip next st, work 5 dc in next st, sl st in next st) 14 times. (14 shells; 85 worked sts including slip stitches) Fasten off with a 60 cm tail.
- For each rose, hold the shell edge upward. Roll the first 3 shells tightly to form the center. Wrap the remaining strip around it, lowering the foundation edge slightly as you work so the outer shells open outward.
- Use the long tail to sew through every turn of the foundation edge from underneath. Make at least 8 crossing passes through a large rose and 6 through the small rose. Keep the shell tops free. Shape the large roses to 7–8 cm and the small rose to 5–6 cm across.
Five Cream Daisies
- Make 5. With mustard, work 6 sc in MR. (6 sts)
- Round 2: Inc in each st. (12 sts) Join with a sl st to the first sc. Change to cream, fastening off mustard.
- Round 3: Repeat the following 6 times: ch 7; working back along this chain, sc in the second chain from the hook, hdc in next ch, dc in next 2 ch, hdc in next ch, sc in last ch; skip the next unworked center st and sl st in the following center st. Each petal has 6 return stitches. (6 petals; all 12 center sts used)
- Fasten off, keeping a sewing tail at the center. Gently cup the petals around the yellow center. Do not stuff. Each daisy should measure approximately 4–5 cm across.
Eight Hanging Flower Buds
- Make 4 dusty blush, 2 pale peach, and 2 cream buds. Round 1: Work 6 sc in MR. (6 sts)
- Round 2: Inc in each st. (12 sts)
- Round 3: (Sc in next st, inc) 6 times. (18 sts)
- Rounds 4–6: Sc in each st. (18 sts per round)
- Round 7: (Sc in next st, dec) 6 times. (12 sts) Stuff lightly, keeping an oval shape.
- Round 8: Dec 6 times. (6 sts) Fasten off and close through the remaining front loops. This closure is the bud’s base.
- With a separate length of matching yarn, make 5 evenly spaced long stitches from the base to Round 2 and back to the base. Tighten only enough to suggest overlapping petals. Leave the rounded tip visible.
Eight Five-Point Calyxes
- Make 8 in sage or olive. Round 1: Work 5 sc in MR. (5 sts)
- Round 2: Inc in each st. (10 sts)
- Round 3: Repeat the following 5 times: ch 5; working back along the chain, sl st in the second chain from the hook, sc in next ch, hdc in next 2 ch; skip the next unworked base st and sl st in the following base st. (5 points, each with 4 return stitches; all 10 base sts used)
- Fasten off. Place the calyx center over a bud’s closed base and sew it in place. Bring the five points up the sides and tack each point approximately halfway up the bud. Keep the colored bud tip exposed.
Veined Leaves: Make 36
- Make 12 large leaves: 6 olive, 4 sage, and 2 gray-green. Ch 13. Beginning in the second chain from the hook, work sl st in next ch, sc in next ch, hdc in next 2 ch, dc in next 6 ch, hdc in next ch, 3 sc in last ch. Rotate to work into the unused underside loops: hdc in next ch, dc in next 6 ch, hdc in next 2 ch, sc in next ch, sl st in last ch. (25 sts) Fasten off.
- Make 16 medium leaves: 8 sage, 4 olive, and 4 gray-green. Ch 11. Beginning in the second chain from the hook, work sl st in next ch, sc in next ch, hdc in next 2 ch, dc in next 4 ch, hdc in next ch, 3 sc in last ch. Along the underside, work hdc in next ch, dc in next 4 ch, hdc in next 2 ch, sc in next ch, sl st in last ch. (21 sts) Fasten off.
- Make 8 small leaves: 4 sage and 4 gray-green. Ch 9. Beginning in the second chain from the hook, work sl st in next ch, sc in next ch, hdc in next ch, dc in next 3 ch, hdc in next ch, 3 sc in last ch. Along the underside, work hdc in next ch, dc in next 3 ch, hdc in next ch, sc in next ch, sl st in last ch. (17 sts) Fasten off.
- The starting and ending slip stitches sit at the leaf base; the group of 3 sc forms the tip. Do not add a joining stitch to the count.
- Block leaves to approximately 6 cm, 5 cm, and 4 cm long respectively. With a slightly contrasting green, embroider a central backstitch vein over the foundation chain. Add 3 pairs of short diagonal stitches on large leaves, 2 pairs on medium leaves, and 1 pair on small leaves.
- Pinch each leaf base and sew its first and last edge stitches together with 2 small stitches. This gives the blade a shallow fold without closing it.
Six Tiny Blossom Sprays
- Make 24 cream florets. For each floret, make an MR and work (ch 2, dc in MR, ch 2, sl st in MR) 3 times. (3 lobes) Pull the ring closed and fasten off with a 15 cm tail.
- Make 6 sage stems. For each stem, ch 25; starting in the second chain from the hook, sl st in each chain. (24 sl sts) Fasten off with a sewing tail at the base.
- Number the stem stitches from the tip toward the base. Sew one floret at each of stitches 1, 6, 11, and 16, alternating the side on which the florets sit. Each spray has 4 florets and approximately 8 bare stitches at its base.
- Secure each floret through its central ring with 3 small stitches. Weave the ends along the back of the stem. Keep the sprays soft and slightly curved.
Three Cascading Stems
- With olive and the 2.5 mm hook, make one long stem: ch 111, then sl st in the second chain from the hook and each remaining chain. (110 sl sts)
- Make one medium stem: ch 86, then sl st in the second chain from the hook and each remaining chain. (85 sl sts)
- Make one short stem: ch 66, then sl st in the second chain from the hook and each remaining chain. (65 sl sts)
- Fasten off, leaving 35 cm tails at the bases. Lay the stems flat without stretching. Aim for approximately 45 cm, 35 cm, and 27 cm long; adjust tension on a new stem if yours differs substantially.
- Reserve 12 medium leaves and all 8 small leaves for the cascade. On the long stem, sew 5 medium and 3 small leaves at approximately 6, 12, 18, 24, 30, 35, 39, and 43 cm from its top. Alternate sides, with the smallest leaves near the bottom.
- On the medium stem, sew 4 medium and 3 small leaves at approximately 5, 10, 15, 20, 25, 29, and 33 cm from its top. On the short stem, sew 3 medium and 2 small leaves at approximately 5, 10, 15, 20, and 25 cm from its top.
- Sew 3 buds to the long stem at approximately 13, 25, and 36 cm from its top; 3 to the medium stem at approximately 9, 19, and 29 cm; and 2 to the short stem at approximately 10 and 21 cm. Attach each through the center of its calyx with 4 stitches, allowing the colored tip to hang downward.
- At each leaf attachment, sew through the pinched base and around the stem 3 times. Keep all knots on the back. Leave the top 3 cm of each stem free for anchoring to the ring.
Arrange and Sew the Floral Crescent
- Lay the covered ring flat and treat its top as 12 o’clock. Keep the area from approximately 10:30 to 1:30 mostly clear for the bow and open ring.
- Pin the main ivory flower around 6:30, slightly left of the bottom center. Pin the large blush rose around 8 o’clock, the large mauve rose around 5 o’clock, and the small peach rose around 4:30, below the mauve flower.
- Use the remaining 12 large and 4 medium leaves around the floral crescent: place 6 on the left from 7 to 10 o’clock, 6 on the right from 3 to 5 o’clock, and 4 beneath the central flowers. Point their tips outward and hide their bases.
- Place the 5 daisies at approximately 9:30, 7:30, 6, 4, and 3:30. Shift individual flowers slightly to prevent a daisy center from being hidden by a rose.
- Place 3 blossom sprays on each side, with tips reaching toward the exposed upper ring and outward beyond the roses. Tuck their bare stem bases under larger flowers.
- Attach the cascading stems at approximately 5:30, 6, and 6:30. Overlap their top 3 cm onto the cover and stitch along that entire overlap. Let the longest stem fall near the center, with the shorter stems spreading slightly to either side.
- Check that the finished arrangement is approximately 38 cm wide. Sew leaves, sprays, and trailing stems first, then daisies and roses, and the main ivory flower last. Sew into the crochet cover rather than relying on stitches through the foam.
- Anchor each large flower at 4 points around its backing or foundation, passing the sewing yarn under several cover stitches at every point. Add a fifth attachment near the top of the main ivory flower to prevent it tipping forward.
Burlap Bow and Hanging Loop
- Cut one 60 cm length of burlap ribbon for the loops, two 32 cm lengths for the tails, and one 15 cm length for the center wrap. Reserve the remaining ribbon.
- Bring the ends of the 60 cm piece to its back center with a 2 cm overlap. Sew the overlap. Flatten into two loops, pinch the middle into 3 folds, and stitch through the folds securely. Shape to approximately 22–24 cm wide.
- Cut a shallow inverted V into the lower end of each tail. Fold their top ends into small pleats and stitch them behind the bow center, allowing one tail to hang slightly lower.
- Fold the 15 cm strip lengthwise to approximately 3 cm wide. Wrap it around the bow center, turn the raw ends under, and sew them together at the back. Secure the wrap to the gathered bow beneath it.
- Sew the bow to the cover at 12 o’clock using strong matching thread. Attach through the bow’s center and several cover stitches with at least 8 passes. Spread the tails down the open upper ring so their lower ends rest above the main flowers.
- Pass the cotton tape around the ring’s tube at the top, behind the bow. Join its ends with a 3 cm overlap using a box of backstitches and two diagonal crossing seams. Rotate the join behind the ring and pull the remaining tape upward into a hanging loop.
Finishing
Hang the wreath on a sturdy hook and let the stems settle before making the final adjustments. Turn individual leaves outward, separate overlapping buds, and gently lift the ivory petal tips. Check the silhouette against the approximate 85 cm finished length; the lowest leaves should form a loose taper rather than a straight edge.
Secure every remaining tail through several stitches on the back, reverse direction once, and trim. Add concealed support stitches wherever a flower pulls away from the cover. Keep the wreath indoors or on a sheltered door, and dust it with a soft brush. Spot-clean the cotton pieces carefully; avoid soaking the foam ring and burlap bow.
Tips for Success
- Gather only the foundation edges of the ivory petals. Leaving their tips free creates the layered, open flower seen in the reference.
- Shape each rose before sewing it to the wreath. A tightly rolled center and loosely wrapped outer shells give a clearer rose shape than an evenly tight spiral.
- Pin all large flowers in place before filling the gaps. Their weight and spacing determine how much foliage remains visible.
- Hang the wreath briefly after attaching the three cascading stems. Add concealed stitches where stems twist so the embroidered leaf veins face forward.
- Use a separate sewing strand when a component’s tail becomes worn. Repeated passes through the cover can weaken cotton yarn.
Common Mistakes to Avoid
- A puckered cover usually means the strip is too long for the ring. Measure the centerline circumference and remove rows before joining the short ends.
- A flat ivory flower often comes from sewing too far up the petals. Remove those stitches and attach only their lower thirds.
- A rose that unrolls has missed foundation layers in its base stitching. Sew through every turn of the spiral before mounting it.
- Leaves that look blunt may have their bases mistaken for their tips. The group of 3 sc marks the pointed end; sew the opposite end to the stem.
- A heavy cascade can pull the bottom cover seam forward. Anchor each stem along its full 3 cm overlap and distribute the attachments across the lower ring.
Ways to Customize This Pattern
- Use ivory for all three roses and retain the mustard daisy centers for a soft bridal version.
- Replace the gray-green leaves with muted eucalyptus blue while keeping the olive leaves for depth.
- For a shorter display, omit the long cascading stem and redistribute its leaves and buds onto the other two stems, leaving enough space for each piece to show.
- Replace the burlap with a 6 cm wide linen ribbon, using the same cutting lengths for a smoother bow.
- Make a matching small wall posy using one large rose, two daisies, six leaves, and one blossom spray sewn to a fabric-covered backing.
Frequently asked questions
Yes. Measure around the tube for the cover width and around the ring’s centerline for its length. Use the formulas in the cover section, then fit the strip before sewing. A thicker tube also gives the flowers a more forward-facing angle.
No. These slip-stitched stems are designed to hang naturally. The embroidered leaf veins and pinched leaf bases provide shape, while attachment stitches control which direction each leaf faces.
Attach its backing at four widely spaced points, then add the upper support stitch described in assembly. If it still leans, sew a concealed stitch from the base of an upper outer petal to the cover behind it.
A sheltered door is suitable for occasional display, but bring the wreath inside during damp weather. Cotton flowers absorb moisture, and burlap can lose its crisp shape when wet.
The finished Heirloom Garden Crochet Floral Wreath Pattern

