Heirloom Ivory Floral Lace Crochet Curtain Pattern
Advanced
For experienced crocheters who enjoy complex shaping, fine detail, and ambitious construction
Multi-Day Project
A rewarding 12+ hour journey — perfect for dedicated crafters who love detailed work.
Handmade Gift
A beautiful keepsake — free forever. Read online or print at home.
About This Heirloom Ivory Floral Lace Crochet Curtain Pattern
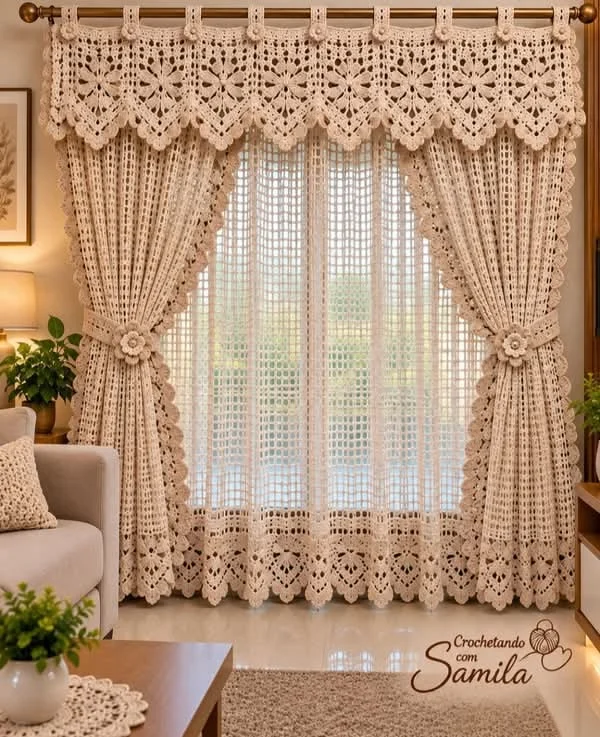
This lace crochet curtain pattern recreates the soft ivory color, open mesh and floral lace details of the reference window treatment. Two sheer center panels sit behind fuller side drapes, while a separate floral valance finishes the top. Pointed lace borders and layered flower tiebacks give the set its distinctive shape.
This original interpretation uses joined floral squares rather than attempting to reproduce stitchwork that cannot be identified reliably from a photograph. It is an advanced household crochet project, with separate lace components, careful blocking, shaped points and reinforced hanging tabs. Allow approximately 100–150 hours for the complete set. It suits an experienced crocheter who enjoys large lace projects and is comfortable matching independently worked pieces to measured dimensions.
Materials
- Ivory size 5 crochet cotton Approximately 6,000–8,000 m for the complete set; buy the same dye lot and verify consumption with your swatches
- 2.0 mm crochet hook Or the size needed for blocked gauge
- Tapestry needle and removable stitch markers For joining, placement and marking mesh intervals
- Blocking mats, rustproof pins and measuring tape Enough space to block sections accurately
- Ivory cotton twill tape, 12–15 mm wide Approximately 5 m for reinforcing hanging tabs and tieback ends
- Ivory sewing thread and sewing needle For attaching reinforcement discreetly
- Two curtain rods or a double curtain track At least 120 cm usable width; center sheers hang behind drapes and valance
- Two wall-mounted tieback hooks Position to suit the window and keep all loops out of children’s reach
Abbreviations
chchainsl stslip stitchscsingle crochethdchalf double crochetdcdouble crochetdc2togdouble crochet two stitches togetherMRmagic ringst / stsstitch / stitchesspspaceRSright sideGauge, Dimensions and Construction
- Use US crochet terminology. Work all components in ivory. The curtains are flat textile pieces; no stuffing, eyes or toy components are used.
- Blocked mesh gauge: 20 stitch positions and 10 rows = 10 cm. One mesh cell consists of ch 2 followed by dc and occupies three stitch positions. Ten cells measure 15 cm wide; ten mesh rows measure 10 cm high.
- Mesh swatch: ch 36. Row 1: dc in sixth ch from hook, then repeat (ch 2, skip 2 ch, dc in next ch) ten times. You have 11 cells and 12 boundary dc, counting the initial turning chain as the first dc. Rows 2–15: ch 3, turn, then (ch 2, dc in next boundary dc) eleven times. Measure the inner ten cells and ten rows after washing and blocking.
- Each floral square must block to 15 × 15 cm. Each pointed drop must block to 15 cm across its attachment edge and 6 cm deep. Adjust the hook used for motifs separately if necessary; matching these measurements matters more than using one hook throughout.
- The main mesh portion of every panel measures 129 cm high. A 15 cm floral band and a 6 cm pointed border bring the nominal panel length to 150 cm. Hanging tabs add approximately 6 cm above the panel.
- Make two center panels, each 40 cells wide, and two outer drapes, each 50 cells wide. Make 26 floral squares: eight for the valance, eight for the center-panel hems and ten for the drape hems. Make 26 pointed drops, two tieback bands, two layered flowers and 41 hanging tabs.
- Counts given for mesh rows include the turning chain as the first boundary dc. Chains inside a cell are not included in the boundary-dc count. Turn after every flat row unless directed otherwise.
Center Sheer Panels — Make Two
- Foundation: ch 123 loosely. This provides 120 stitch positions across the fabric plus the turning allowance.
- Row 1: dc in sixth ch from hook; repeat (ch 2, skip 2 ch, dc in next ch) 39 times. Count 40 mesh cells and 41 boundary dc.
- Row 2: ch 3, turn; repeat (ch 2, dc in next boundary dc) 40 times, placing the final dc in the top of the previous turning chain. Count 40 cells and 41 boundary dc.
- Rows 3–129: repeat Row 2. Keep 40 cells in every row. Fasten off after Row 129.
- Mark the foundation edge as the top. Row 129 is the lower edge where the floral band will be sewn. Block the mesh rectangle to 60 × 129 cm without stretching its edges beyond the interior gauge.
Outer Drapes — Make Two
- Foundation: ch 153 loosely.
- Row 1: dc in sixth ch from hook; repeat (ch 2, skip 2 ch, dc in next ch) 49 times. Count 50 mesh cells and 51 boundary dc.
- Row 2: ch 3, turn; repeat (ch 2, dc in next boundary dc) 50 times. Count 50 cells and 51 boundary dc.
- Rows 3–129: repeat Row 2. Fasten off. Block each rectangle to 75 × 129 cm.
- Mark one long edge of each drape as its inner edge. Make these mirror images when assembling: the marked edges face the middle of the window.
Floral Lace Squares — Make 26
- Round 1: in MR, ch 3, counting as dc, and work 15 dc. Join with sl st to top of beginning ch 3. Tighten the ring securely. Count 16 dc.
- Round 2: ch 1, sc in the same st; repeat (ch 3, skip next dc, sc in next dc) seven times; ch 3, skip final dc and join to first sc. Count eight sc and eight ch-3 spaces.
- Round 3: in each ch-3 sp work (sc, hdc, 3 dc, hdc, sc). Join to first sc. Count eight petals, seven sts per petal, 56 sts total.
- Round 4: fold petals toward the front. Sl st into the first sc of the first petal, ch 1 and sc in that same st. Working behind the petals, repeat (ch 5, sc in first sc of next petal) seven times; ch 5 and join to the first sc. Count eight sc and eight ch-5 spaces.
- Round 5: sl st into the first ch-5 sp. In that sp work (ch 3, 2 dc, ch 3, 3 dc) for the first corner. Ch 1; in the next sp work (3 dc, ch 1, 3 dc); ch 1. Repeat the following three times: in next sp work (3 dc, ch 3, 3 dc), ch 1, in next sp work (3 dc, ch 1, 3 dc), ch 1. Join to top of beginning ch 3. Count 48 dc, four corner ch-3 spaces and twelve side ch-1 spaces.
- Round 6: sl st across to the first corner sp. Work (ch 3, 2 dc, ch 3, 3 dc) there. Along the side, work ch 1, 3 dc in each of its three ch-1 spaces, with ch 1 between groups, then ch 1 before the next corner. Work (3 dc, ch 3, 3 dc) in each remaining corner and repeat the same side sequence. Join. Count 60 dc, four corner spaces and sixteen side ch-1 spaces.
- Round 7: repeat the construction of Round 6, working a corner group in each corner and 3 dc in each of the four ch-1 spaces along each side, with ch 1 between every adjacent group. Join. Count 72 dc, four corner spaces and twenty side ch-1 spaces.
- Round 8: repeat again, now working into five ch-1 spaces per side. Join and fasten off. Count 84 dc, four corner spaces and twenty-four side ch-1 spaces. Each side has seven 3-dc groups and six intervening ch-1 spaces, measured between corner spaces.
- Weave in the central tail through several stitches in different directions. Block each square to exactly 15 × 15 cm, with the petals facing up.
Joining the Floral Bands
- Arrange squares with RS facing up and their floral centers oriented consistently. Use four squares for each center-panel band, five for each drape band and eight for the valance.
- With squares edge to edge, whipstitch matching dc tops and matching ch-1 spaces along each shared side. Sew the facing corner spaces together with two small stitches. Keep seams flat and avoid drawing the thread tight. Each joined side contains seven 3-dc groups and six ch-1 spaces.
- Block the joined bands to 60 × 15 cm for the center panels, 75 × 15 cm for the drapes and 120 × 15 cm for the valance. Seam allowances must not shorten these measurements.
- Pin the top edge of each panel band to its corresponding lower mesh edge. Match each square to ten mesh cells, marking the ends and the midpoint of each 15 cm segment.
- Sew with small, evenly distributed overcast stitches through the mesh edge and motif edge. Place approximately one stitch per mesh stitch position, spreading these stitches across the motif edge rather than forcing its stitch count to match the mesh. Remove pins and check that the seam hangs flat.
Pointed Lace Drops — Make 26
- These small mesh triangles attach beneath the floral squares. Foundation: ch 33.
- Row 1: dc in sixth ch from hook; repeat (ch 2, skip 2 ch, dc in next ch) nine times. Count ten cells and eleven boundary dc.
- Row 2: ch 1 and turn. Sl st in each of the two chains of the first cell and in its following dc. Ch 3, counting as the new first boundary dc. Work (ch 2, dc in next boundary dc) eight times, leaving the last cell unworked. Count eight cells and nine boundary dc.
- Row 3: use the same beginning slip stitches to move past the first cell, then ch 3. Work (ch 2, dc in next boundary dc) six times; leave the last cell unworked. Count six cells and seven boundary dc.
- Row 4: repeat the same reduction, working four cells and leaving the last cell unworked. Count four cells and five boundary dc.
- Row 5: repeat the same reduction, working two cells and leaving the last cell unworked. Count two cells and three boundary dc.
- Row 6: ch 2, turn; work one unfinished dc in the first boundary dc and one unfinished dc in the last boundary dc, skipping the middle boundary dc and both chain spaces; yarn over and pull through all three loops to complete dc2tog. The beginning ch 2 is a height allowance, not a counted stitch. Fasten off. Count one tip stitch.
- Block each triangle to 15 cm across its foundation edge and 6 cm from foundation to tip. Sew that foundation edge across the lower edge of one floral square, matching both ends and the center. Attach one drop beneath every square in all five bands.
Scalloped Inner Drape Edges
- Work this border only along the 129 cm mesh portion of each drape’s marked inner edge. Leave the floral band and pointed drops free. With RS facing, join ivory at the upper end.
- Preparation row: ch 1; work 2 sc around each mesh row-end post for all 129 rows. Count 258 sc. Ch 1 and turn.
- Scallop row: repeat (skip 2 sc, 7 dc in next sc, skip 2 sc, sl st in next sc) 43 times. This consumes all 258 sc and produces 43 scallops. Fasten off.
- Repeat on the other drape’s inner edge. Block the shells gently so that they sit outside the mesh without pulling it shorter. This trim adds a small amount of width beyond the stated rectangular panel measurements.
Reinforced Hanging Tabs — Make 41
- Each tab is a narrow strip folded into a loop. Ch 7. Row 1: sc in second ch from hook and each remaining ch. Count 6 sc.
- Rows 2–28: ch 1, turn, sc in each st. Count 6 sc in every row. Fasten off, leaving a sewing tail.
- Block each strip to approximately 2 × 14 cm. If your sc row gauge differs, adjust the number of rows until the strip measures 14 cm; retain 6 sc across.
- Cut a 12 cm length of twill tape for each tab. Center it on the wrong side, leaving approximately 1 cm of crochet exposed at each short end. Sew the tape along both long sides with small stitches.
- Fold each tab in half with the reinforcement inside. Overlap both short ends onto the uppermost 1 cm of the curtain or valance and sew through both ends and the fabric. The folded tab rises approximately 6 cm above the fabric.
- For each center panel, attach seven tabs at mesh boundary numbers 0, 7, 13, 20, 27, 33 and 40, counting from one side. For each outer drape, attach nine tabs at boundaries 0, 6, 13, 19, 25, 31, 38, 44 and 50. Attach the remaining nine tabs to the valance at 0, 15, 30, 45, 60, 75, 90, 105 and 120 cm.
Textured Tieback Bands — Make Two
- Ch 81 loosely. Row 1: sc in second ch from hook and each remaining ch. Count 80 sc.
- Row 2: ch 3, turn, dc in next sc; repeat (ch 2, skip 2 sc, dc in each of next 2 sc) nineteen times; dc in each of final 2 sc. Count 42 dc, including the turning chain, and nineteen ch-2 spaces. The row spans 80 stitch positions.
- Row 3: ch 1, turn, sc in each dc and 2 sc in each ch-2 sp. Count 80 sc.
- Row 4: repeat Row 2. Count 42 dc and nineteen ch-2 spaces.
- Row 5: repeat Row 3. Count 80 sc. Fasten off. Block each band to approximately 40 × 4 cm.
- At the center of each short end, attach yarn, ch 12 and sl st back into the same attachment point to make a loop. Work 16 sc around the chain loop and join to its first sc. Fasten off. Reinforce the attachment area on the wrong side with a small square of twill tape.
- Check the band around the gathered drape before attaching its flower. For a longer band, add a multiple of four foundation chains and add one additional repeat in each openwork row for every four added chains.
Layered Tieback Flowers — Make Two Sets
- Large flower, Round 1: 8 sc in MR. Join to first sc. Count 8 sc.
- Round 2: ch 1; repeat (sc in next sc, ch 4) eight times. Join to first sc. Count eight sc and eight ch-4 spaces.
- Round 3: in each ch-4 sp work (sc, hdc, 5 dc, hdc, sc). Join to first sc and fasten off with a long assembly tail. Count eight petals and 72 sts.
- Small flower, Round 1: 6 sc in MR. Join to first sc. Count 6 sc.
- Round 2: ch 1; repeat (sc in next sc, ch 3) six times. Join to first sc. Count six sc and six ch-3 spaces.
- Round 3: in each ch-3 sp work (sc, hdc, 3 dc, hdc, sc). Join and fasten off. Count six petals and 42 sts.
- Center disc, Round 1: 6 sc in MR. Join. Count 6 sc.
- Round 2: ch 1, 2 sc in each st. Join and fasten off with a sewing tail. Count 12 sc. Leave the disc flat and unstuffed.
- Layer the small flower over the large flower, rotating it so its petals sit between the larger petals where possible. Sew their centers together, then sew the disc over the center. Add five short ivory straight stitches radiating across the disc for subtle surface detail.
- Sew one completed flower securely to the center of each tieback band, catching its central layers without flattening the petal tips. The finished flower should measure approximately 7–9 cm across, depending on tension.
Finishing
Weave in all remaining ends and wash the completed pieces according to the cotton manufacturer’s instructions. Support the wet fabric fully when lifting it. Block the panels flat to their intended measurements, keeping the floral bands straight and pinning each pointed drop separately. Let every piece dry completely before hanging.
Hang the two center panels on the rear rod. On the front rod, alternate the drape tabs with the valance tabs where they overlap, keeping the valance in front of the drape headers. Distribute the valance evenly across its 120 cm width and gather the wider outer panels toward the sides. Secure each tieback to a wall hook by its two end loops and turn the flower toward the room. Adjust the gathers by hand so the mesh falls in soft vertical folds.
Tips for Success
- Mark every tenth mesh cell. These marks give you exact attachment points for the 15 cm floral squares.
- Keep one blocked floral square beside your work and compare each new square with it before joining a band.
- Work Round 4 of each square behind the petals. Pulling those chains across the front hides the flower and distorts its shape.
- Measure the first panel again after it has dried completely. Cotton can relax differently while wet and after hanging.
- Support the growing panel on a table or your lap so its weight does not stretch the working edge.
Common Mistakes to Avoid
- Missing the final turning-chain dc makes a panel narrower with every row. Count 41 boundary dc on center panels and 51 on drapes.
- Adding a ch-1 space twice beside a square corner changes the next round’s count. Round 8 must finish with six side spaces between each pair of corner spaces.
- Sewing a floral band onto unblocked mesh can create a puckered hem. Block both pieces first, pin ten cells to each square and sew without pulling the thread tight.
- Working the triangle reduction only at the beginning creates a slanted strip. Move past the first cell and leave the last cell unworked on every reduction row.
- Hanging tabs without reinforcement can lengthen unevenly. Sew in the twill tape before attaching the tabs to the curtain headers.
Ways to Customize This Pattern
- For a wider window, add one 15 cm floral square and ten mesh cells to the relevant panel or valance section. Add 30 foundation chains for every ten extra mesh cells.
- Change panel length by adding or removing mesh rows. At the stated gauge, each row changes the finished length by approximately 1 cm.
- Use warm ecru or pale oatmeal cotton for a slightly deeper shade while keeping the monochrome floral effect.
- Make only the eight-square valance for a shorter project. It finishes at approximately 120 × 21 cm, plus its hanging tabs.
- For a flatter tieback flower, use the large flower and center disc only, sewing the disc directly over the large flower’s center.
Frequently asked questions
Yes. The rear rod carries the center sheers. The front rod carries the outer drapes and valance, with the valance positioned in front. This arrangement creates the layered window treatment shown in the reference.
Try a smaller hook for the squares and block a new sample. If it is narrower, try a larger hook. Do not ease a substantial size difference into the seam; the hem will ripple or pull inward.
No. It includes the 129 cm mesh section, 15 cm floral band and 6 cm pointed border. The tabs add approximately 6 cm above the fabric, so the nominal drop from the top of a folded tab to a lower point is 156 cm before hanging relaxation.
Only after making fresh swatches. A thicker yarn changes the mesh openness, motif size, fabric weight and rod load. For the fine, airy appearance of this design, use smooth fine crochet cotton and match all three component measurements.
The finished Heirloom Ivory Floral Lace Crochet Curtain Pattern

