Heirloom Rose Crochet Wall Hanging Pattern
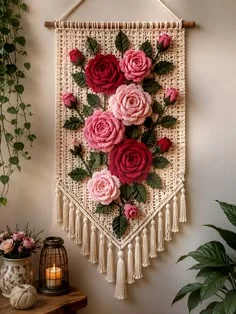
Advanced
For experienced crocheters who enjoy complex shaping, fine detail, and ambitious construction
Weekend Project
A satisfying weekend make — start Friday, finish Sunday, enjoy forever.
Handmade Gift
A beautiful keepsake — free forever. Read online or print at home.
About This Heirloom Rose Crochet Wall Hanging Pattern
This crochet rose wall hanging pattern brings deep red, dusty pink, and pale blush roses together on an ivory pointed banner. Layered olive and forest-green leaves fill the spaces between the flowers, while knotted fringe follows the lower V. A wooden dowel and simple hanging cord complete the shape shown in the reference.
The flowers are crocheted separately, rolled into dimensional blooms, and sewn to a firm fabric backing. Allow approximately 18–24 hours for the crochet, blocking, flower arrangement, and tassels. This advanced project suits crocheters who enjoy sculpting petals, working small shaped pieces, and planning a balanced floral composition.
Materials
- DK cotton yarn, approximately 110 m per 50 g Ivory: 200 g; deep red: 50 g; dusty pink: 75 g; pale blush: 75 g; olive green: 50 g; forest green: 25 g. Quantities include finishing allowance.
- Crochet hooks 3.5 mm for the panel and sleeve; 3.0 mm for flowers, leaves, buds, and stems.
- Wooden dowel 32 cm long, approximately 8 mm diameter, with smooth ends.
- Small amount of polyester stuffing For the six rosebuds only.
- Tapestry needle, scissors, stitch markers, ruler, and blocking pins Use a blunt needle for joining and a sharp embroidery needle if needed for vein details.
- Strong matching sewing thread Optional reinforcement for heavy flowers.
- Cardboard tassel template 15 cm long.
Abbreviations
chchainscsingle crochethdchalf double crochetdcdouble crochetsl stslip stitchsc2togsingle crochet two stitches togetherinc2 single crochet in one stitchMRmagic ringRSright sideWSwrong sideGauge, Construction, and Counts
- Use US crochet terminology. With ivory and the 3.5 mm hook, blocked sc gauge is 20 stitches and 26 rows per 10 cm. Make a swatch at least 15 cm square and measure its center. Change hook size if necessary.
- With the 3.0 mm hook, aim for approximately 22 sc and 28 rows per 10 cm. This secondary gauge controls leaf and bud size; rose diameter also depends on how tightly the strip is rolled.
- The unedged backing measures approximately 24.5 cm wide × 32.3 cm long. The border increases its width slightly; projecting leaves bring the displayed width to approximately 27 cm. Fringe brings the total length to approximately 49 cm, excluding the hanging cord.
- Turning ch 1 never counts as a stitch. Turn after every panel, sleeve, and flower-strip row unless directed otherwise. Numbers in parentheses are completed stitch counts. Buds are worked in continuous rounds; mark the first stitch.
- Make one backing, one sleeve, three large roses, three medium roses, one small rose, six buds, six calyces, fourteen large leaves, and eight small leaves. The finished piece is a decorative wall hanging; only the buds receive stuffing.
Ivory Backing Panel
- With ivory and the 3.5 mm hook, ch 50. Row 1: sc in the second ch from the hook and each remaining ch; ch 1, turn. (49)
- Rows 2–60: sc in every stitch; ch 1, turn. (49 each row)
- Row 61: sc2tog, sc in next 45 stitches, sc2tog; ch 1, turn. (47)
- Rows 62–83: sc2tog, sc across to the final 2 stitches, sc2tog; ch 1, turn. Completed counts by row: 45, 43, 41, 39, 37, 35, 33, 31, 29, 27, 25, 23, 21, 19, 17, 15, 13, 11, 9, 7, 5, 3.
- Row 84: sc in all 3 stitches together as follows: insert hook into each stitch in turn and draw up a loop, yarn over and pull through all 4 loops. (1) Fasten off. This final decrease forms the point.
- Mark Row 1 as the top edge and choose one face as the RS. The decreases should form two equal slopes below the 60-row rectangle.
Panel Border
- With RS facing, join ivory at the top-left corner. Work 1 sc into the underside of each of the 49 foundation stitches across the top, then ch 2. (49 sc and one ch-2 corner)
- Work 1 sc into each row end down the right edge: 60 along the straight section and 24 along the sloping section. Place a marker after the first 60. (84 sc on this side)
- Ch 2 across the bottom point. Work 1 sc into each row end up the left edge: 24 along the slope and 60 along the straight section. Mark the transition between them. (84 sc on this side)
- Ch 2 and sl st to the first border sc. Fasten off. Border total: 217 sc and three ch-2 spaces. Joining sl st does not count. Do not add another stitch into the panel’s bottom stitch.
- Wet-block flat, keeping the top level and both slopes equal. Ease any crowded edge stitches evenly rather than stretching the point. Allow to dry completely.
Dowel Sleeve and Hanging Cord
- With ivory and the 3.5 mm hook, ch 50. Row 1: sc in second ch from hook and across; ch 1, turn. (49)
- Rows 2–10: sc in each stitch; ch 1 and turn after Rows 2–9 only. (49 each row) Fasten off with a 90 cm sewing tail.
- Fold the sleeve lengthwise so its foundation edge meets Row 10. Whipstitch these long edges together, leaving both short ends open. The tube lies horizontally and measures approximately 24.5 cm long.
- Position the seam against the WS of the backing, 5 mm below its upper edge. Sew the seam line to the panel across the full width. Add a second line of small securing stitches through the sleeve’s lower fold and the backing, without closing the passage for the dowel.
- Slide in the dowel. Cut three 100 cm strands of ivory, braid them together, and tie the ends securely around the exposed dowel ends. Adjust the cord to give an approximately 18 cm rise above the dowel; trim the excess.
Large Layered Roses — Make 3
- Make two in deep red and one in pale blush. Use the 3.0 mm hook throughout. For each rose, ch 61.
- Row 1: sc in second ch from hook and across; ch 1, turn. (60)
- Row 2, inner petals: repeat the following four times: sl st in next stitch, skip 1 stitch, 3 dc in next stitch, skip 1 stitch, sl st in next stitch. Each repeat uses 5 base stitches and makes 5 stitches. (20 stitches over 20 base stitches)
- Continue Row 2, middle petals: repeat four times: sl st in next stitch, skip 1, 5 dc in next stitch, skip 1, sl st in next stitch. (28 additional stitches over 20 base stitches)
- Continue Row 2, outer petals: repeat four times: sl st in next stitch, skip 1, 7 dc in next stitch, skip 1, sl st in next stitch. (36 additional stitches over the final 20 base stitches; 84 stitches and 12 petals in Row 2 altogether)
- Fasten off, leaving a 70 cm tail. Starting at the 3-dc petal end, roll the first two petals snugly into a center. Continue wrapping the strip with the foundation edge level and the petal edges opening outward. Sew through the foundation layers after each full turn.
- Spread the final four petals around the outside and secure their lower edges. Aim for a rose approximately 7–7.5 cm across and 2.5–3 cm deep. Leave the remaining tail for attachment.
Medium Layered Roses — Make 3
- Make two in dusty pink and one in pale blush. With the 3.0 mm hook, ch 51.
- Row 1: sc in second ch from hook and across; ch 1, turn. (50)
- Row 2, inner petals: repeat three times: sl st in next stitch, skip 1, 3 dc in next stitch, skip 1, sl st in next stitch. (15 stitches over 15 base stitches)
- Continue Row 2, middle petals: repeat three times: sl st in next stitch, skip 1, 5 dc in next stitch, skip 1, sl st in next stitch. (21 additional stitches over 15 base stitches)
- Continue Row 2, outer petals: repeat four times: sl st in next stitch, skip 1, 7 dc in next stitch, skip 1, sl st in next stitch. (36 additional stitches over 20 base stitches; 72 stitches and 10 petals altogether)
- Fasten off with a 60 cm tail. Roll and sew as for the large rose, beginning at the smallest petals. Shape each bloom to approximately 5.5–6 cm across.
Small Dusty Pink Rose — Make 1
- With dusty pink and the 3.0 mm hook, ch 31.
- Row 1: sc in second ch from hook and across; ch 1, turn. (30)
- Row 2: repeat twice: sl st in next stitch, skip 1, 3 dc in next stitch, skip 1, sl st in next stitch. Then repeat twice using 5 dc in place of 3 dc. Finally repeat twice using 7 dc. (42 stitches over 30 base stitches; 6 petals)
- Fasten off with a 45 cm tail. Roll from the small-petal end and sew through every foundation layer. Shape to approximately 3.5–4 cm across.
Rosebuds — Make 6
- Make three deep red buds and three dusty pink buds with the 3.0 mm hook. For each bud, Round 1: 6 sc in MR. (6)
- Round 2: inc in every stitch. (12)
- Rounds 3–4: sc in every stitch. (12 each round)
- Round 5: sc2tog six times. (6) Add a very small amount of stuffing; keep the bud soft enough to shape into an oval.
- Fasten off with a 30 cm tail. Thread through the front loops of all 6 remaining stitches and draw closed. Pass the tail through the bud to the MR end.
- Use the tail to make two loose, curved surface stitches from the MR end toward the closed end, suggesting overlapping petals. Avoid pulling them tight enough to divide the bud into lobes. Each bud measures approximately 1.5–2 cm long.
Five-Point Calyces — Make 6
- With olive green and the 3.0 mm hook, Round 1: 5 sc in MR. Join with sl st to first sc. (5)
- Round 2: repeat five times: sl st in next base sc, ch 4, sl st in second ch from hook, sc in next ch, hdc in final ch, sl st in the same base sc. Each repeat uses one of the five base stitches and creates one pointed sepal. (5 sepals)
- Fasten off with a 30 cm tail. Place the calyx center over the MR end of a bud. Sew the center and lower half of each sepal to the bud, leaving the pointed tips free. Leave a tail for joining to the panel.
Large Leaves — Make 14
- Make eight olive and six forest-green leaves with the 3.0 mm hook. For each leaf, ch 10.
- Round 1, first side: sc in second ch from hook, hdc in next ch, dc in next 5 ch, hdc in next ch, 3 sc in final ch. (11 stitches)
- Continue around the opposite side of the foundation chain: hdc in next ch, dc in next 5 ch, hdc in next ch, 2 sc in the same chain that holds the first sc. Join with sl st to first sc. (20 stitches altogether)
- Round 2: ch 1, sc in next 9 stitches, work (sc, ch 2, sc) in next stitch, sc in next 10 stitches. Join to first sc. (21 sc and one ch-2 tip)
- Fasten off with a 35 cm tail. Use a strand of the other green to embroider a loose central vein from the starting end toward the pointed tip, then three short diagonal branches on each side. Keep the leaf flat while stitching. Each leaf is approximately 4.5–5 cm long.
Small Leaves — Make 8
- Make four olive and four forest-green leaves with the 3.0 mm hook. For each leaf, ch 7.
- Round 1, first side: sc in second ch from hook, hdc in next ch, dc in next 2 ch, hdc in next ch, 3 sc in final ch. (8 stitches)
- Continue along the opposite side: hdc in next ch, dc in next 2 ch, hdc in next ch, 2 sc in the same chain that holds the first sc. Join to first sc. (14 stitches altogether)
- Round 2: ch 1, sc in next 6 stitches, work (sc, ch 2, sc) in next stitch, sc in next 7 stitches. Join to first sc. (15 sc and one ch-2 tip)
- Fasten off with a 30 cm tail. Embroider one contrasting green central vein. Finished length is approximately 3 cm.
Floral Layout and Stems
- Lay the blocked panel RS up. Measure coordinates from the upper-left corner of the original panel, excluding the border: the first number is distance right, and the second is distance down. Mark flower centers with removable markers.
- Place the large red roses at (8 cm, 7 cm) and (16 cm, 20 cm). Place the large pale blush rose at (14 cm, 11.5 cm).
- Place the medium dusty pink roses at (17 cm, 4.5 cm) and (8 cm, 16 cm). Place the medium pale blush rose at (9 cm, 25 cm). Place the small dusty pink rose at (15 cm, 29 cm).
- Place the three red buds at (3.5 cm, 3.5 cm), (22 cm, 2 cm), and (21.5 cm, 18 cm). Place the three pink buds at (2.5 cm, 11 cm), (22 cm, 10.5 cm), and (3.5 cm, 20 cm). Angle each calyx toward the nearest large flower.
- Pin two large leaves beside each of the seven roses, giving fourteen large leaves altogether. Point them outward into gaps, alternating the two greens. Keep the lower rose’s leaves within the narrowing panel.
- Place one small leaf beside each of the six buds. Put the remaining two small leaves below the small rose, pointing toward the bottom tip.
- Remove the blooms temporarily, leaving their center markers. With olive yarn and the 3.0 mm hook, surface sl st a gently curved main stem through the panel from (12.25 cm, 31 cm), through (12 cm, 24 cm), (14 cm, 18 cm), and (11 cm, 11 cm), ending at (14 cm, 2 cm). Make approximately one surface stitch per panel stitch-width; keep the yarn loose enough that the panel remains flat.
- Work six short surface-slip-stitch branches from the main stem to the marked bud bases. Exact stitch counts follow the curved paths and are not structural. Fasten off all stem ends on the WS.
Attach the Leaves, Buds, and Roses
- Replace all pinned pieces. Sew each large leaf along its central vein and across its lower third, leaving its outer edges slightly free. Secure the small leaves in the same way. Catch panel stitches rather than splitting yarn strands.
- Sew each bud through its calyx center and again through the bud’s underside. Hide the branch endpoint beneath the calyx. Add a small stitch near the bud tip if it lifts away from the panel.
- Sew the large pale blush rose first, then the upper red rose, upper dusty pink rose, left dusty pink rose, lower red rose, lower pale blush rose, and small dusty pink rose. Allow petals to overlap naturally without folding a neighboring bloom underneath.
- For every rose, stitch around the foundation spiral through the panel in at least eight evenly spaced places. Add two crossing stitches through the center base. Keep sewing stitches below the visible petals and do not sew the outer petal rims flat.
- Hang the piece briefly and check the arrangement. Add hidden stitches beneath any flower whose weight pulls it forward. Weave tails into the backing on the WS without drawing the fabric tight.
V-Shaped Fringe and Wrapped Tassels
- Make 17 tassels. For each tassel, cut twelve ivory strands, each 30 cm long. Fold the bundle in half, giving twenty-four hanging ends approximately 15 cm long.
- On each sloping border, count its 24 sc from the shoulder toward the point. Mark stitches 2, 5, 8, 11, 14, 17, 20, and 23. These provide eight attachment points per side. The seventeenth attachment point is the ch-2 space at the bottom tip.
- Insert the hook through a marked border stitch, draw the folded bundle through approximately 2 cm, pass all cut ends through that loop, and tighten into a lark’s-head knot. Repeat at all seventeen positions.
- For each tassel, cut a separate 40 cm ivory strand. Make a small downward-facing loop against the bundle approximately 2 cm below the attachment knot. Wrap the long end firmly around the bundle and loop eight times. Pass the wrapping end through the loop, then pull the upper end to draw the loop beneath the wraps. Trim the wrapping ends close.
- Comb the strands with your fingers and trim each tassel to 14 cm from the attachment knot. Equal tassel lengths preserve the descending V outline. Do not trim the whole fringe straight across.
Finishing
Settle the outer petals with your fingers and gently open any that curled inward during sewing. Check the back for loose tails, then slide the dowel into place and adjust the hanging cord until the top edge is level. The flowers should sit securely while their petal edges and leaf tips retain some movement.
Let the finished hanging rest vertically overnight before its final fringe trim. Support the flower heads if you need to reshape the backing; avoid pressing or flattening the roses. For cleaning, dust gently or spot-clean with a damp cloth, then dry flat with the blooms facing upward.
Tips for Success
- Mark every fifth decrease row on the panel. This makes it easier to compare the two slopes and locate an accidental extra stitch before attaching the border.
- Keep the rose-strip foundation edges aligned while rolling. A rising foundation spiral creates a cone and makes the bloom harder to sew flat.
- Pin all seven roses before attaching any leaves. Rotate the large blooms until their fullest outer petals cover gaps without crowding the upper sleeve.
- Support each flower from behind while sewing. Pull the thread just snug enough to anchor the base without making a dimple in the ivory panel.
- Check the hanging after attaching the lower red rose. Its weight can reveal loose sleeve stitching before the fringe is added.
Common Mistakes to Avoid
- Missing the paired decreases makes the point lean. Each of Rows 61–83 removes exactly two stitches; Row 84 reduces the final three stitches to one.
- Sharing a base stitch between adjacent rose petals changes the strip count. Each petal uses its own five base stitches, including separate beginning and ending slip stitches.
- Pulling surface stems tightly puckers the backing. Undo the affected section and remake the slip stitches with slack while the panel lies flat.
- Rolling from the largest petals hides the graduated structure. Begin at the 3-dc end and finish with the 7-dc petals outside.
- Sewing through both sleeve walls blocks the dowel. Keep a pencil or the dowel inside the tube while attaching the lower securing line.
Ways to Customize This Pattern
- Replace deep red with burgundy and dusty pink with muted mauve while retaining the pale blush center bloom and ivory backing.
- Embroider the leaf veins in a lighter sage green for more visible foliage detail without changing any leaf counts.
- Use a darker wooden dowel and a braided olive hanging cord to give the same floral arrangement a stronger frame.
- Shorten every tassel to 10 cm for a more compact display; keep all seventeen attachment positions unchanged.
- Add a removable cotton lining to the back after assembly, cutting it to the blocked panel outline with a 1 cm seam allowance and hand-sewing its turned edges below the sleeve.
Frequently asked questions
This image-inspired version uses a firm single-crochet backing with a shaped point. The fringe uses lark’s-head knots and wrapped tassel heads to echo the knotted textile finish in the reference.
The strip may be rolled too tightly, or your flower gauge may be smaller. Loosen the outer two turns before securing them and spread the 7-dc petals. If all flowers are too small, swatch with a slightly larger flower hook.
Block the backing before assembly, keep embroidered stems loose, and distribute each rose’s attachment stitches around its whole base. If the backing draws inward after sewing, loosen the tight attachment stitches and resew with the panel flat.
The written assembly sews them permanently in place. For a removable arrangement, sew each flower to a small fabric patch fitted with two sew-on snaps, then reinforce the corresponding panel positions with fabric patches on the back. Remove the dowel and flowers before gently hand-washing the backing.
The finished Heirloom Rose Crochet Wall Hanging Pattern

