Heirloom Rose Diamond Lattice Crochet Blanket
Advanced
For experienced crocheters who enjoy complex shaping, fine detail, and ambitious construction
Weekend Project
A satisfying weekend make — start Friday, finish Sunday, enjoy forever.
Handmade Gift
A beautiful keepsake — free forever. Read online or print at home.
About This Heirloom Rose Diamond Lattice Crochet Blanket
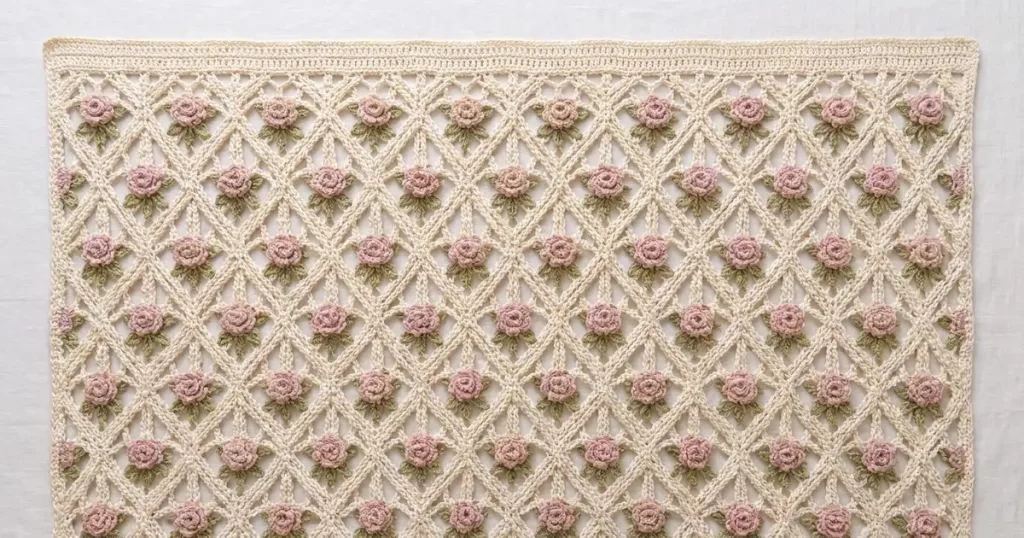
This rose lattice crochet blanket pattern pairs an open cream diamond ground with raised dusty blush roses and muted sage leaves. Inspired by the photographed blanket, it uses a staggered floral arrangement and a firm rectangular border to frame the delicate lace.
The project suits experienced crocheters who enjoy shaping small flowers, reading lace structures and carefully sewing separate motifs. Allow approximately 45–60 hours for the mesh, 68 rolled roses, 136 leaves and finishing. The directions below are an original interpretation of the visible design; the completed blanket measures approximately 86 × 74 cm when the specified blocked gauge is achieved.
Materials
- Sport-weight cotton or cotton-blend yarn Approximately 350 g cream, 180 g dusty blush and 80 g muted sage; choose matching yarns around 300 m per 100 g
- Crochet hook 3.5 mm, or size needed for blocked mesh gauge
- Tapestry needle For assembling flowers and securing motifs
- Locking stitch markers At least 8, including 4 for border corners
- Blocking equipment Rustproof pins, blocking mats and a measuring tape
- Scissors and contrasting waste yarn For marking flower positions
Abbreviations
chchainsl stslip stitchscsingle crochethdchalf double crochetdcdouble crochettrtreble crochetststitchRSright sideConstruction, Size and Gauge
- Use US crochet terminology. Work the mesh flat, turning after every row. The blanket has 8 full openings on odd-numbered mesh rows and 7 full openings plus 2 half openings on even-numbered rows.
- Blocked mesh gauge: one full opening measures approximately 10 cm across at its widest point; each mesh row adds approximately 7.5 cm in height. Measure away from the foundation and side edges. The unbordered panel targets approximately 80 × 67.5 cm.
- For a swatch, ch 32 and follow the mesh instructions with 3 full openings on Row 1. On Row 2, repeat the ch-9 section twice; on Row 3, work into the 2 full ch-9 spaces before completing the last edge span. Work 5 rows total, wet-block and measure the central opening.
- The border adds approximately 3 cm at each edge. A completed rose should measure approximately 3–3.5 cm across and a leaf approximately 2–2.5 cm long. Adjust hook size before beginning if your flowers overwhelm the openings.
- Make the mesh and border in cream, all 68 roses in dusty blush, and all 136 leaves in sage. These are surface appliqués; no stuffing or safety eyes are used.
Cream Diamond Mesh Panel
- Foundation: ch 82 loosely in cream.
- Row 1: sc in second ch from hook; repeat (ch 9, skip 9 foundation chains, sc in next chain) 8 times. Turn. Count: 9 sc and 8 ch-9 spaces; all 81 available foundation chains are used.
- Row 2: ch 5, sc in first ch-9 space; repeat (ch 9, sc in next ch-9 space) 7 times; ch 5, tr in the first sc of Row 1. Turn. Count: 8 sc, 7 full ch-9 spaces, 2 edge ch-5 spaces and 1 edge tr. Each sc goes around the center of its space.
- Row 3: ch 1, sc in top of edge tr; repeat (ch 9, sc in next full ch-9 space) 7 times, passing over the first edge ch-5 space; ch 9, sc in the turning ch-5 space at the far edge. Turn. Count: 9 sc and 8 ch-9 spaces.
- Row 4: ch 5, sc in first ch-9 space; repeat (ch 9, sc in next ch-9 space) 7 times; ch 5, tr in first sc of previous row. Turn. Count: 8 sc, 7 full ch-9 spaces and 2 edge ch-5 spaces.
- Row 5: repeat Row 3. Count: 9 sc and 8 ch-9 spaces.
- Row 6: repeat Row 4. Count: 8 sc, 7 full ch-9 spaces and 2 edge ch-5 spaces.
- Row 7: repeat Row 3. Count: 9 sc and 8 ch-9 spaces.
- Row 8: repeat Row 4. Count: 8 sc, 7 full ch-9 spaces and 2 edge ch-5 spaces.
- Row 9: repeat Row 3. Count: 9 sc and 8 ch-9 spaces. Fasten off. There are 68 full spaces: 5 rows of 8 and 4 rows of 7. Leave all 8 side half spaces undecorated.
- Wet-block the panel to approximately 80 × 67.5 cm. Pin the four corners first, then align the mesh junctions in staggered rows. Allow it to dry completely before adding the border.
Rectangular Cream Border
- Preparation: mark the two endpoint sc of Row 1 and the two endpoint sc of Row 9 as corners. The short ends are the foundation and Row 9 edges. Join cream at the upper-right corner with RS facing.
- Round 1, upper edge: work 3 sc in the corner sc and mark the middle sc. Work 9 sc around each of the 8 top ch-9 spaces, 1 sc in each of the 7 internal anchor sc, and 1 additional sc around the fourth ch-9 space. This gives 80 sc between corners.
- Round 1, first side: work 3 sc in the next corner and mark the middle sc. Along the side, work 8 sc evenly over each two-row interval, Rows 9–7, 7–5, 5–3 and 3–1: 32 sc total. Then add a second set of 32 sc evenly among those stitches as you work, giving 16 sc per interval and 64 side sc total. Work into chain edges and around edge tr posts as appropriate; do not add stitches in the marked corners.
- Round 1, lower edge: work 3 sc in the next corner and mark the middle sc. Work 9 sc around each of the 8 foundation chain spans, 1 sc in each of the 7 internal foundation anchor positions, and 1 additional sc around the fourth span: 80 sc between corners.
- Round 1, second side: work 3 sc in the final corner and mark the middle sc. Work 64 sc evenly along this side, matching the first side with 16 sc over each two-row interval. Join with sl st to first sc. Total: 300 sc, comprising 80 + 64 + 80 + 64 side stitches and 12 corner stitches.
- Round 2: ch 1; sc in every stitch, working 3 sc in each marked corner stitch. Move each marker to the middle of its new group of 3. Join with sl st. Total: 308 sc.
- Round 3: ch 2, which does not count as a stitch; hdc in every stitch, working 3 hdc in each marked corner stitch. Move the markers and join with sl st to first hdc. Total: 316 hdc.
- Round 4: ch 1; sc in every stitch, working 3 sc in each marked corner stitch. Move the markers and join with sl st. Total: 324 sc.
- Round 5: repeat Round 4. Total: 332 sc. Fasten off. Check that the border lies flat before attaching the flowers; changing border hook size is preferable to forcing a rippled edge flat.
Rolled Blush Roses — Make 68
- Foundation: with dusty blush, ch 26, leaving a 15 cm starting tail.
- Row 1: sc in second ch from hook and each remaining chain. Turn. Count: 25 sc.
- Row 2: ch 1, sc in first st; repeat (skip next st, work 5 dc in next st, skip next st, sc in next st) 6 times. Count: 6 shell petals, 30 dc and 7 sc, or 37 stitches total. The repeat uses 24 stitches after the first sc.
- Fasten off with a 40 cm sewing tail. With the petal edge uppermost, roll the strip from the starting end. Keep the first two petals snug for the center, then wrap the remaining petals more loosely around them.
- Use the finishing tail to stitch through the straight foundation edge of every layer. Make at least 3 crossing passes through the base so the outer petals cannot unwind. Keep the petal tips free. Retain the remaining tail for attachment.
- Shape each rose into a shallow cup approximately 3–3.5 cm across. Face the opening toward the RS of the blanket. Make all roses with the same rolling direction for a consistent appearance.
Pointed Sage Leaves — Make 136
- Foundation: with sage, ch 7, leaving a 15 cm tail. Work around both sides of the foundation chain without turning.
- Round 1, first side: sl st in second ch from hook, sc in next ch, hdc in next ch, dc in next ch, hdc in next ch, and 3 sc in last ch. This uses all 6 available chains and produces 8 stitches.
- Round 1, return side: rotate the piece and work into the unused loops on the opposite side of the foundation: hdc in next ch, dc in next ch, hdc in next ch, sc in next ch, sl st in final ch. Count: 13 stitches around the leaf. Do not join.
- Tip: ch 2, sl st in second ch from hook, then sl st into the same foundation chain as the final sl st. This small point is additional to the 13-stitch outline. Fasten off with a 25 cm tail.
- Thread the tail down the central foundation chain with 3 loose running stitches. Draw it just enough to cup the leaf slightly, then secure at the rounded base. Do not cinch the leaf into a tube.
Flower Supports and Motif Placement
- Lay the bordered panel RS up. Mark the center of every full ch-9 space with waste yarn: 8 positions on Rows 1, 3, 5, 7 and 9, and 7 positions on Rows 2, 4, 6 and 8. These are the 68 flower positions.
- For each position, identify the midpoint of the ch-9 arch and the point directly below it. On Rows 2–9, that lower point is the midpoint of the full arch from two rows earlier; on Row 2 it is a foundation anchor sc. For Row 1, use the midpoint of its foundation span. These points form the top and bottom of the open diamond.
- With a 35 cm length of cream yarn, secure the yarn at the upper point, carry it straight down to the lower point, and return to the upper point without drawing the diamond closed. Repeat once to make 4 parallel strands. Secure both ends on the reverse. This narrow vertical support remains behind the flower and leaves.
- Arrange two sage leaves across the support at the center of each diamond, with rounded bases overlapping and points angled left and right, slightly downward. Sew each base around the support and tack each leaf tip to the nearest diagonal mesh strand without stretching it.
- Place one rose over the overlapping leaf bases. Sew its foundation edge to the support, both leaf bases and the nearest mesh strands at 4 separate points. Keep all stitches behind the petals. Repeat for all 68 diamonds.
Finishing
Weave each yarn end through several stitches on the reverse, changing direction once before trimming. Check every flower by lifting its outer petals gently; the base should remain secure while the petals stay soft. Remove the placement markers and check that no sewing thread crosses an open space unnecessarily.
Dampen the blanket and block it to approximately 86 × 74 cm, keeping the border square and the diamonds evenly spaced. Shape the leaves with your fingers and lift the rose petals while they are damp. Allow the blanket to dry flat without pressing the flowers. The open lace and attached motifs make this especially suited to decorative use as a lap blanket or bed accent.
Tips for Success
- Place a marker in the first and last anchor of each mesh row. This makes the edge tr and turning ch-5 space easier to identify on the return row.
- Block the cream panel before measuring flower positions. Unblocked chain arches tend to bunch together and make the roses appear too large.
- Make and attach one complete rose-and-leaf arrangement before producing the other 67. Check that its support remains relaxed when the diamond is spread to gauge.
- Sew roses through their foundation edges. Catching the tops of the dc petals flattens their raised shape.
- Count the border after each round. Four corner increases add exactly 8 stitches per round.
Common Mistakes to Avoid
- Working into the side half space on Row 3 creates an extra opening. Pass over the first ch-5 space and work into the 7 full ch-9 spaces before making the final edge span.
- Pulling support strands tight collapses the diamond vertically. Lay the panel flat at its blocked size while setting the support length.
- Rolling every rose tightly produces small buds. Keep only the center snug and let the outer four petals spread before securing the base.
- Counting the border ch-2 as an hdc adds an unwanted stitch. It is a lifting chain only; join to the first actual hdc.
- Sewing leaves only at their bases lets them twist through the lace. Add the small tip tacks to the adjacent diagonal strands.
Ways to Customize This Pattern
- Alternate dusty blush and pale pink roses by row while keeping the cream lattice and sage foliage.
- For a wider blanket, add 10 foundation chains per additional full opening. Each odd row gains one flower and each even row also gains one flower; recalculate border distribution for the new width.
- For a longer blanket, add pairs of mesh rows before bordering. Each pair adds 15 roses, 30 leaves and approximately 15 cm at the stated gauge.
- Use deeper olive leaves and antique ivory for a warmer vintage palette, keeping the same yarn weight across all pieces.
Frequently asked questions
The mesh is staggered. Even-numbered rows have 7 full diamonds and a half diamond at each side; only the full diamonds receive flowers. Across 9 rows, this gives 68 roses.
The supports hold the flowers in the open centers and help prevent sagging. Keep them for this placement. Without them, each flower would need to sit directly on a mesh junction, which changes the arrangement.
Follow the yarn label, wash gently and support the wet blanket when lifting it. Press out water in a towel, then dry flat. Reshape the roses and leaves by hand; do not iron the petals.
The cream diamond lattice, blush roses and sage foliage follow the visible reference. This original construction uses specified mesh repeats and sewn floral supports; the photograph does not establish the original stitch pattern or the blanket’s full dimensions.
The finished Heirloom Rose Diamond Lattice Crochet Blanket

