Indigo Block Print Bedspread and Shams Crochet Pattern
Beginner Friendly
Perfect for those just starting their crochet journey, with clear instructions and simple techniques
Single-Day Project
A satisfying project you can complete in a single afternoon or evening.
Handmade Gift
A beautiful keepsake — free forever. Read online or print at home.
About This Indigo Block Print Bedspread and Shams Crochet Pattern
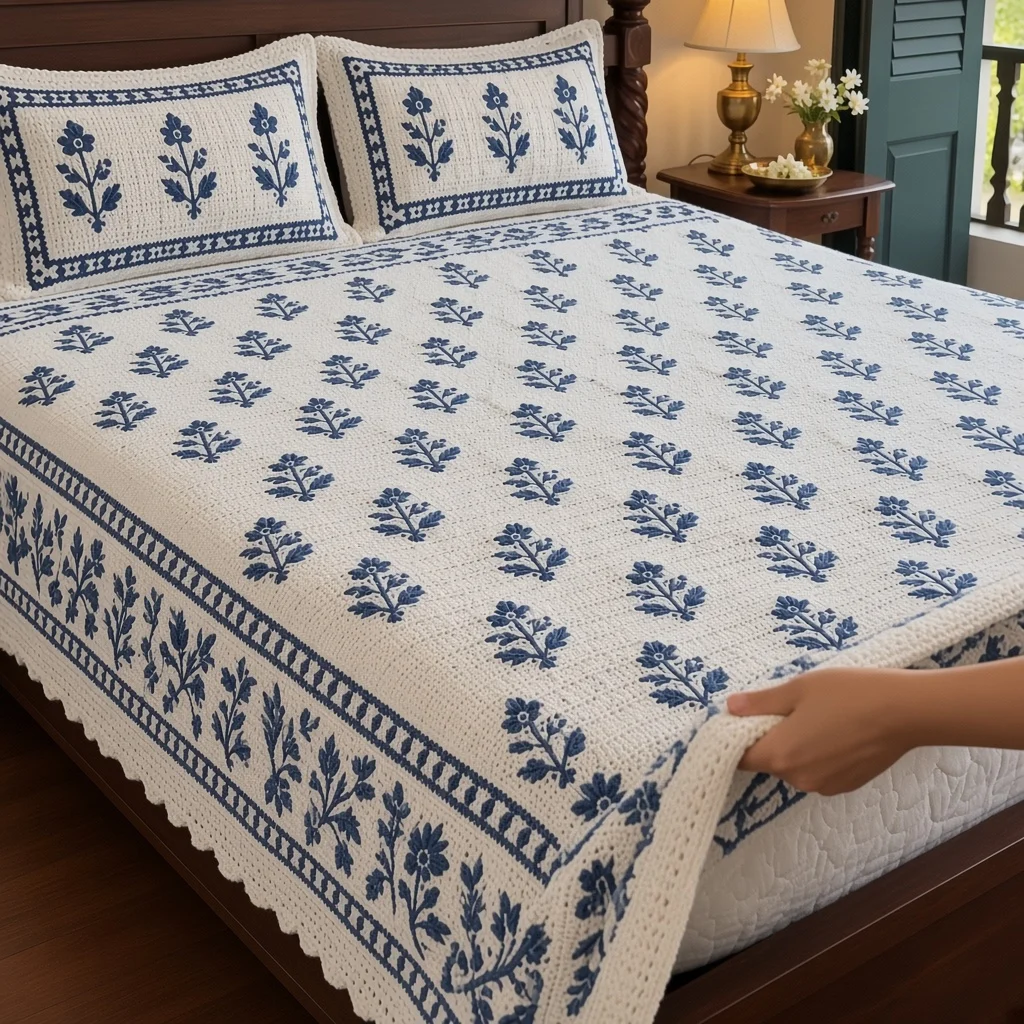
This blue floral crochet bedspread takes its look from Indian block-printed cotton: a cream ground covered with neat rows of small indigo flower sprigs, framed by a wide border of taller sprigs between two patterned bands. A shell edge finishes the hem, and two pillow shams each carry three tall sprigs inside a matching frame.
The base is worked in Tunisian simple stitch, which makes a firm grid of little squares, and every motif is added afterward in cross stitch, one square per stitch. That’s what gives the sprigs their slightly stamped, block-print feel. The field sprigs sit in offset rows on the top of the bed, and the border bands run down the drop on both sides and the foot, so the pattern frames the mattress the way a printed coverlet does.
The set takes about 180 to 210 hours. The Tunisian base is plain, steady work, and the cross stitching is relaxing once the base is done. It suits a crocheter who knows Tunisian simple stitch or is happy to learn it, and who enjoys working from charts.
Materials
- Bulky weight cotton blend, cream about 4,800 m (48 skeins of 100 g / 100 m)
- Bulky weight cotton blend, indigo blue about 1,000 m (10 skeins), for cross stitch
- 8 mm Tunisian crochet hook with a 100 cm cable
- 6.5 mm standard crochet hook for seaming and edging
- Large blunt tapestry needle with an eye big enough for bulky yarn
- Locking stitch markers about 40, for marking chart positions
- Two pillows 50 x 75 cm, for the shams
Abbreviations
chchainscsingle crochetdcdouble crochetsl stslip stitchskskipTSSTunisian simple stitchXone cross stitch, worked over one TSSst(s)stitch(es)rndroundreprepeatRS / WSright side / wrong sideTunisian Simple Stitch Strips (make 3)
- Make two outer strips of 84 sts and one center strip of 83 sts.
- With cream and the 8 mm Tunisian hook, ch 84 for an outer strip (ch 83 for the center strip).
- Row 1, forward pass: insert hook in 2nd ch from hook, yarn over and pull up a loop; pull up a loop in each ch across, keeping all loops on the hook. (84 or 83 loops)
- Row 1, return pass: yarn over, pull through 1 loop, *yarn over, pull through 2 loops; rep from * until 1 loop remains on hook.
- Row 2, forward pass: skip the first vertical bar, *insert hook under the next vertical bar, yarn over and pull up a loop; rep from * across to the last st, then insert hook under both strands of the last bar and pull up a loop.
- Row 2, return pass: work as Row 1 return pass.
- Rows 3-278: rep Row 2. (Same st count in every row)
- Bind off: sl st under each vertical bar across. Fasten off.
- Each strip measures about 70 x 253 cm. Block flat before seaming, since TSS curls while you work.
Joining the Strips
- Lay the strips side by side, RS up, with the center strip in the middle and all foundation edges at the same end. This end is the foot of the bedspread.
- Hold two strips RS together and, with cream and the 6.5 mm hook, sl st through both layers in each row end, matching row for row. (278 sl st)
- Join the third strip the same way. The bedspread is now 251 sts wide and 278 rows long.
- Grid: lay the bedspread RS up with the foot toward you. Number the columns 1-251 from left to right and the rows 1-278 from the foot. Columns 35-217 and rows 35-278 sit on top of the mattress; the rest is the drop.
Small Sprig Chart (9 x 12)
- Key:
Bone indigo X,.no stitch (cream shows). Read each row from left to right. Row 1 is the top of the flower. - Row 1:
...B.B... - Row 2:
..BBBBB.. - Row 3:
.BB.B.BB. - Row 4:
..BBBBB.. - Row 5:
...B.B... - Row 6:
....B.... - Row 7:
.B..B..B. - Row 8:
.BB.B.BB. - Row 9:
..BBBBB.. - Row 10:
....B.... - Row 11:
...BBB... - Row 12:
....B.... - Each small sprig has 38 X.
Tall Sprig Chart (11 x 17)
- Key as above. Row 1 is the top of the flower.
- Row 1:
....B.B.... - Row 2:
...BBBBB... - Row 3:
..BB.B.BB.. - Row 4:
...BBBBB... - Row 5:
....B.B.... - Row 6:
.....B..... - Row 7:
.B...B...B. - Row 8:
.BB..B..BB. - Row 9:
..BB.B.BB.. - Row 10:
...BBBBB... - Row 11:
.....B..... - Row 12:
B....B....B - Row 13:
BB...B...BB - Row 14:
.BB..B..BB. - Row 15:
..BBBBBBB.. - Row 16:
.....B..... - Row 17:
....BBB.... - Each tall sprig has 63 X.
Frame Strip Chart (5 rows, 4-st repeat)
- The frame strip is a band of two solid lines with a row of small diamonds between them. Rep the 4 sts along the whole length of the band.
- Row 1:
BBBB - Row 2:
.B.. - Row 3:
BBB. - Row 4:
.B.. - Row 5:
BBBB - Corner square (5 x 5), used where two frame strips meet:
BBBBB/B...B/B.B.B/B...B/BBBBB - Start the repeat right after a corner square. The solid lines run the full length; a part repeat just before the next corner or the head edge is fine.
Cross-Stitch Technique
- Each TSS forms a small square between two vertical bars. One X covers one square, from corner to corner.
- Thread the tapestry needle with an arm’s length of indigo. Start on the WS, leaving a 10 cm tail to weave in later.
- Work all the half stitches along a row of the chart first (bottom left to top right), then come back along the same row and cross them (bottom right to top left). All top stitches must slant the same way.
- Keep the tension relaxed so the Tunisian fabric doesn’t pucker.
- Don’t carry yarn across the back for more than 3 squares. Fasten off and start again for longer gaps.
- For a band running up the side of the bed, turn the chart on its side as described in each step below.
Placing the Frames
- Outer frame: a U shape near the hem. Foot band: rows 4-8, columns 4-248. Left band: columns 4-8, rows 4-278. Right band: columns 244-248, rows 4-278.
- Inner frame: a U shape along the edge of the mattress. Foot band: rows 30-34, columns 30-222. Left band: columns 30-34, rows 30-278. Right band: columns 218-222, rows 30-278.
- Work a corner square at each of the four places where a foot band meets a side band: columns 4-8 and 244-248 on rows 4-8, and columns 30-34 and 218-222 on rows 30-34.
- On the side bands, turn the frame chart on its side so the solid lines run up the length of the bed.
Placing the Border Sprigs
- The tall sprigs sit between the two frames, with their flowers toward the mattress and their stems toward the hem.
- Foot band (rows 11-27): place the chart upright, with chart Row 1 on row 27 and chart Row 17 on row 11. Work 15 tall sprigs, starting at columns 30, 43, 56, 69, 82, 95, 108, 121, 134, 147, 160, 173, 186, 199 and 212. (Each sprig is 11 columns wide with 2 columns between sprigs)
- Left band (columns 11-27): turn the chart on its side so chart Row 1 lies on column 27 and chart Row 17 on column 11. Work 19 tall sprigs, each 11 rows long, starting on rows 30, 43, 56 and every 13 rows after that, with the last starting on row 264.
- Right band (columns 225-241): mirror the left band, with chart Row 1 on column 225 and chart Row 17 on column 241, on the same rows.
- Corner squares (columns 11-27 and 225-241, rows 11-27): work one small sprig upright in each, in columns 15-23 on the left and 229-237 on the right, with chart Row 1 on row 25 and Row 12 on row 14.
- In all: 53 tall sprigs and 2 small sprigs in the border.
Placing the Field Sprigs
- The small sprigs cover the top of the bed in 11 offset rows. Place each chart upright, with chart Row 1 on the highest row.
- Sprig rows sit on rows 40-51, 60-71, 80-91, 100-111, 120-131, 140-151, 160-171, 180-191, 200-211, 220-231 and 240-251.
- Rows 1, 3, 5, 7, 9 and 11 of sprigs (counting from the foot): 8 sprigs each, starting at columns 45, 67, 89, 111, 133, 155, 177 and 199.
- Rows 2, 4, 6, 8 and 10 of sprigs: 7 sprigs each, starting at columns 56, 78, 100, 122, 144, 166 and 188.
- In all: 83 field sprigs. Mark the starting square of each sprig in a row before stitching it, and check the spacing.
Shell Edging
- Rnd 1: with cream and the 6.5 mm hook, RS facing, join in a foot corner. 3 sc in corner st, sc in next 249 sts, 3 sc in corner st; 276 sc along the side row ends; 3 sc in corner st, sc in next 249 sts, 3 sc in corner st; 276 sc along the other side. Join. (1,062 sts)
- Rnd 2: ch 1, *sc in next st, sk next 2 sts, 5 dc in next st, sk next 2 sts; rep from * around. Join and fasten off. (177 shells)
Pillow Sham Fronts (make 2)
- With cream and the Tunisian hook, ch 90. Work Rows 1-55 in TSS. Bind off. (90 sts, about 75 x 50 cm)
- Number the columns 1-90 and the rows 1-55 from the bottom.
- Frame: work the frame strip on rows 4-8 and rows 48-52 (columns 9-82), and on columns 4-8 and 83-87 (rows 9-47), with a corner square at each corner.
- Sprigs: work 3 tall sprigs upright, starting at columns 21, 40 and 59, with chart Row 1 on row 37 and chart Row 17 on row 21.
Pillow Sham Backs (make 2 sets)
- Upper back: with cream and the Tunisian hook, ch 90. Work Rows 1-34 in TSS. Bind off. (90 sts)
- Lower back: with cream, ch 90. Work Rows 1-30 in TSS. Bind off. (90 sts)
- The bind-off edges are the open edges of the envelope. Together the two pieces give about 8 cm of overlap.
Sham Assembly
- Lay a sham front WS up. Place the lower back on top, RS up, with its foundation edge along the bottom. Place the upper back on top, RS up, with its foundation edge along the top, overlapping the lower back. Pin all edges.
- Rnd 1: turn so the front faces you. With cream and the 6.5 mm hook, join in a corner through all layers. 3 sc in corner st, sc in next 88 sts, 3 sc in corner st; 53 sc evenly along the side; 3 sc in corner st, sc in next 88 sts, 3 sc in corner st; 53 sc evenly along the other side. Join. (294 sts)
- Rnd 2: ch 1, *sc in next st, sk next 2 sts, 5 dc in next st, sk next 2 sts; rep from * around. Join and fasten off. (49 shells)
- Rep with the second sham.
Finishing
Weave in all ends on the WS. Run each indigo tail under the backs of three or four stitches of the same motif, so no blue shows through the cream. Hide the cream ends in the seams between strips.
Wet block the bedspread on a large flat surface, pinning the edges straight and the frames square. Let it dry completely, which may take two days with this much bulky yarn. Block the shams the same way, then put the pillows in through the back opening. On the bed, line up the inner frame with the edges of the mattress.
Tips for Success
- Use a Tunisian hook one or two sizes larger than the yarn label suggests. TSS is dense and curls badly with a small hook.
- Work the frames first. They form a grid you can count from, which makes placing the sprigs faster and more accurate.
- Place a locking marker every 20 rows along each strip edge as you crochet. Counting rows later is much easier.
- Choose a colorfast indigo yarn and wash a test swatch with cream before you start. Blue that bleeds into the cream is impossible to fix.
- Stitch with the bedspread flat on a large table, rolling up the parts you are not working on.
Common Mistakes to Avoid
- Missing the last stitch of a TSS row. Always work under both strands of the last bar, or the strip narrows and the seams won’t line up.
- Cross stitches slanting different ways. Even one reversed X shows clearly in a repeat pattern. Always work all half stitches first, then cross them in the same direction.
- Turning the side sprigs the wrong way. If the flowers point toward the hem, the side bands won’t match the foot band. Check that chart Row 1 is always on the side nearest the mattress.
- Field sprigs drifting out of line. This happens when counting from the wrong edge. Always count columns from the left and rows from the foot, RS up.
- Puckered motifs. Stitching too tightly pulls the fabric in. Keep each X relaxed and steam any puckers when blocking.
Ways to Customize This Pattern
- Change the color: red on cream gives a classic Rajasthani print look, and dark green on ivory is softer.
- Work the field sprigs in a lighter blue and the border in indigo for a two-tone design.
- Make a table runner from one strip with a frame on both long sides and a single row of tall sprigs.
- Use worsted weight yarn and a 6 mm Tunisian hook for a finer, lighter coverlet. You’ll need more strips and the motifs come out smaller.
- Skip the field sprigs for a plain center with just the framed border, which is much quicker to stitch.
Frequently asked questions
Tunisian simple stitch makes an even grid of nearly square cells, which is perfect for cross stitch. That grid is what gives the sprigs their neat, block-printed look.
Yes, as long as you count the columns across all three strips carefully. Stitching after joining is easier, because some motifs cross the seams and the bands stay perfectly aligned.
Bulky yarn cross stitches are sturdy. Weave every end in well on the back, and they will last as long as the base fabric.
Wash it on a gentle cold cycle inside a large laundry bag, or by hand in a bathtub, and dry it flat. Use a color catcher for the first few washes in case the indigo releases any dye.
The finished Indigo Block Print Bedspread and Shams Crochet Pattern

