Intarsia Maple Leaf Column Table Runner Crochet Pattern
Beginner Friendly
Perfect for those just starting their crochet journey, with clear instructions and simple techniques
Single-Day Project
A satisfying project you can complete in a single afternoon or evening.
Handmade Gift
A beautiful keepsake — free forever. Read online or print at home.
About This Intarsia Maple Leaf Column Table Runner Crochet Pattern
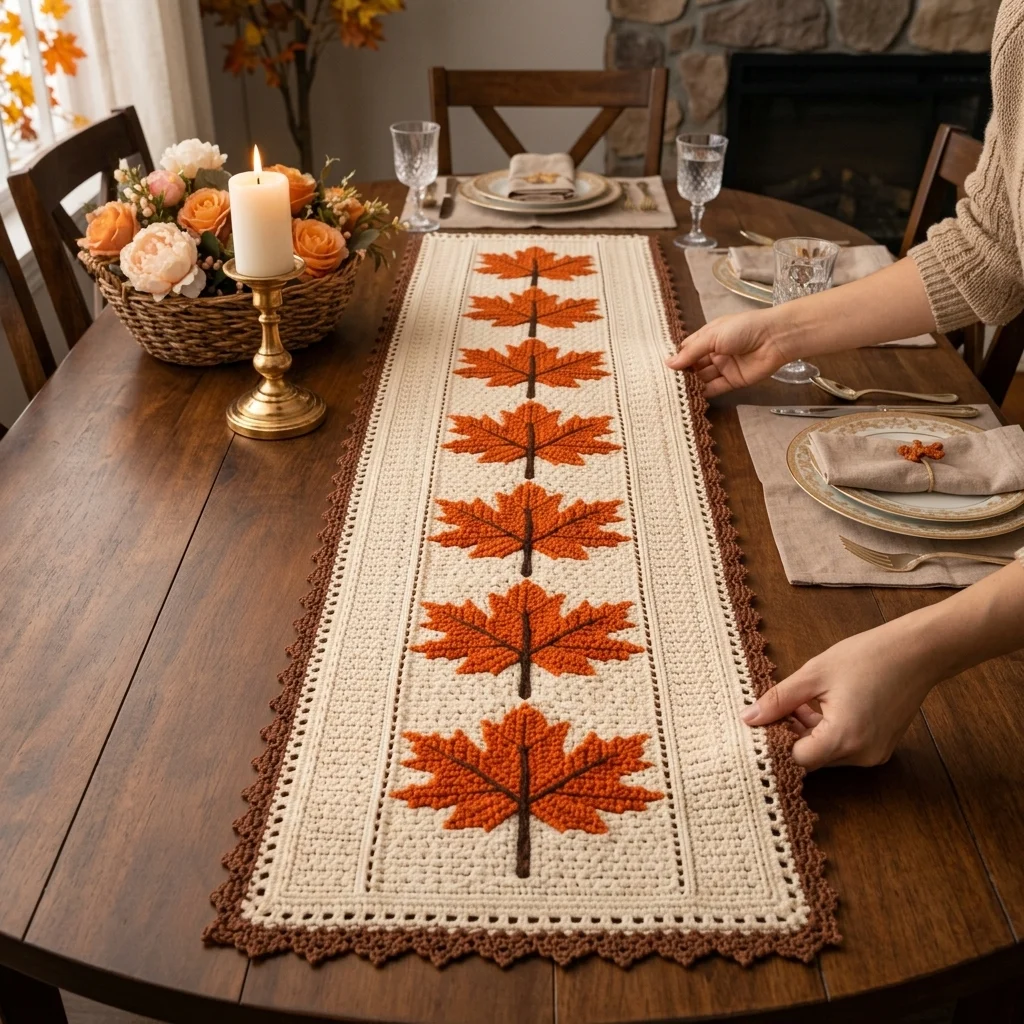
This crochet maple leaf table runner pattern places 6 large intarsia maple leaves in rust orange with brown veining down the center of a dense cream moss-stitch panel, flanked on both sides by a narrow open filet-lace strip, and finished all around with a scalloped shell border in warm brown. Unlike a joined-motif design, this whole runner is worked as one continuous piece from side to side, with the leaf color changes managed entirely through intarsia bobbins.
What makes this design distinctive is the three-column construction worked simultaneously across every row: a textured cream moss stitch panel down the center carrying the intarsia leaves, bordered on both sides by a completely different open lace stitch, all worked together in the same rows rather than as separate joined pieces. That combination, solid textured center against airy lace edges, gives the runner a tailored, finished look closer to a woven textile than a typical crochet motif piece. Expect to spend 20-24 hours total across the main panel and the brown border.
This is an advanced pattern, best suited to someone comfortable running 3 distinct stitch patterns across a single row at once, in addition to intarsia colorwork for the leaves, rather than someone wanting a single uniform stitch throughout.
Materials
- Worsted weight cotton yarn, cream ~220g, center panel and side lace strips
- Worsted weight yarn, rust orange ~80g, leaves
- Worsted weight yarn, dark brown ~20g, leaf veins and stems
- Worsted weight yarn, brown ~70g, border
- Crochet hook 4.5 mm (US 7)
- Bobbins or yarn butterflies for intarsia color management
- Tapestry/yarn needle
- Steam iron and pressing cloth, or blocking mat and pins
- Sharp scissors
Abbreviations
chchainsl stslip stitchscsingle crochethdchalf double crochetdcdouble crochetmoss st*sc 1, ch 1, skip 1; rep from *, offsetting each row by 1 stch-spchain spacest(s)stitch(es)reprepeatMCmain color (cream)CCcontrast color (rust or brown, as noted)FOfasten offFoundation and Three-Column Setup
- With cream, ch 91. Row 1: work the outer 18 sts on each side in filet mesh (dc, ch 1, skip 1 ch, dc in next ch, rep across each 18-st section), and the center 55 sts in moss stitch (sc 1, ch 1, skip 1, rep across).
- Row 2: continue both stitch patterns as established, filet mesh on both outer columns, moss stitch across the center, keeping the same column widths throughout. 91 sts maintained.
- Rows 3-6: continue in pattern, keeping all 3 columns consistent, to establish a clean plain section before the first leaf begins.
Intarsia Leaf Block (worked into the center moss-stitch column; repeat for all 6 leaf positions)
- On the row where a leaf’s stem begins, work the outer lace columns in cream as normal, work the center column in cream moss stitch up to the leaf’s position, then switch to dark brown CC on a bobbin for 1-2 sts to start the stem.
- Work 3-4 rows in dark brown, keeping the stem narrow, twisting cream and brown bobbins together at each color change to avoid holes.
- Switch to rust orange CC for the leaf body. Next 4 rows: increase the rust block by 2-3 sts per side each row to build the leaf’s lower lobes, still twisting bobbins at every join.
- Next 3 rows: work even across the rust block’s broadest width, adding thin dark brown accent sts within the block on 1-2 rows to suggest the leaf’s veining as shown in the photo.
- Final 4 rows: decrease the rust block by 2-3 sts per side each row to taper the leaf to a point at the top, FO both CC bobbins, and continue the center column in plain cream moss stitch.
Main Panel Repeat
- Continue the 3-column pattern down the runner’s length, working a plain cream moss-stitch section of 8-10 rows between each leaf, then repeating the intarsia leaf block, until all 6 leaves are complete and evenly spaced.
- Work a final plain section of 6 rows in all 3 columns after the last leaf to match the panel’s start.
- FO after the final row, leaving a long tail for the border join.
Border
- With brown, join with sl st in a corner of the panel.
- Round 1: ch 1, sc evenly around the entire panel, working 3 sc in each corner st to keep it flat and square.
- Round 2 (shell scallop): *sk 2 sts, 5 dc in next st, sk 2 sts, sl st in next st; rep from * evenly around, adjusting slightly at the corners so scallops stay even in size.
- Join with sl st to first st and FO. Weave in all ends.
Finishing
Weave in every bobbin tail on the wrong side individually, since the leaves each use 2 contrast colors across several rows. Steam-block the finished runner face-down on a towel, pinning the outer edges square and opening the filet mesh columns so their ch-sps sit even, while keeping the moss-stitch panel and leaves lying flat without stretching. Let it dry completely flat before moving it to the table.
Tips for Success
- Chart the leaf shape against your actual moss-stitch row gauge before starting; a leaf charted at the wrong scale will either run out of column width or leave excess plain space around it.
- Keep the two outer lace columns identical in width and stitch count throughout; any drift between them becomes very visible once the border is added.
- Twist bobbins at every single color change within the leaf block, including the small brown veining accents, to avoid holes.
- Work a plain practice leaf on a swatch before starting the full runner, to confirm your increase and decrease rate produces a leaf shape you’re happy with.
- Space leaves evenly by counting plain rows between them rather than estimating by eye, so all 6 leaves land at consistent intervals.
Common Mistakes to Avoid
- Letting the moss stitch and filet lace columns drift in width row to row throws off the whole panel’s alignment. Fix: count stitches in each column separately every few rows.
- Skipping the twist at small brown veining accents within the leaf leaves tiny holes that weaken the fabric. Fix: twist bobbins at every color change, no matter how small.
- Increasing and decreasing the leaf body unevenly, more on one side than the other, produces a lopsided leaf. Fix: always adjust both sides of the rust block by the same amount per row.
- Working the border scallops at an inconsistent count around the corners distorts the rectangle. Fix: adjust scallop spacing only right at the corners, keeping the straight sides consistent.
- Blocking the lace columns and moss-stitch center at the same tension flattens the lace’s open look. Fix: pin the lace columns open more assertively than the solid center during blocking.
Ways to Customize This Pattern
- Reduce to 4 leaves for a shorter runner suited to a smaller table.
- Swap the rust orange leaves for deep red or gold for a different autumn palette.
- Work the entire center panel in a single color without the intarsia leaves for a simpler, textured-only version.
- Widen the two outer lace columns for a more prominent lace frame around the leaf column.
- Scale the whole design down with a finer yarn and smaller hook for a matching set of placemats using the same 3-column construction.
Frequently asked questions
Yes. The two outer lace columns continue in their own stitch pattern throughout the entire panel, completely independent of what’s happening in the center column, including during every leaf.
Very little per leaf, just a few stitches of dark brown worked within the rust block on 1-2 rows. The dark brown yarn amount listed covers both the stems and all 6 leaves’ veining accents.
Yes. Work the entire center column in plain cream moss stitch throughout, skipping the leaf blocks entirely, for a simpler textured panel framed by the same lace side columns.
This usually means one of the 3 columns gradually gained or lost stitches over the length of the panel. Recount all 3 column widths together every 10-15 rows to catch and correct any drift early.
The finished Intarsia Maple Leaf Column Table Runner Crochet Pattern