Interlaced Leaf Lace Crochet Curtain Pattern
Advanced
For experienced crocheters who enjoy complex shaping, fine detail, and ambitious construction
Single-Day Project
A satisfying project you can complete in a single afternoon or evening.
Handmade Gift
A beautiful keepsake — free forever. Read online or print at home.
About This Interlaced Leaf Lace Crochet Curtain Pattern
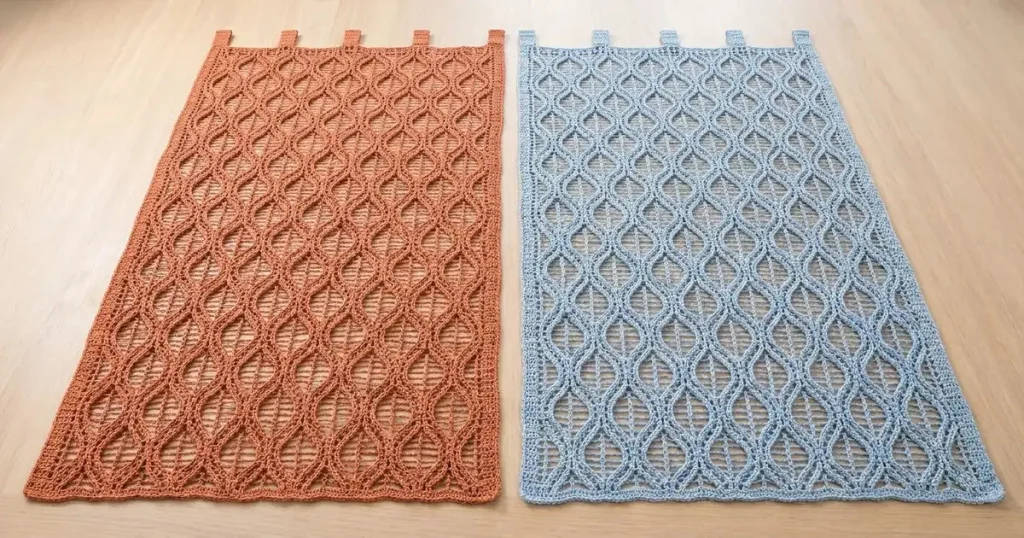
This leaf lace crochet curtain pattern combines an airy rectangular mesh panel with raised, interlocking leaf diamonds and five narrow hanging tabs. The reference shows two matching panels in warm terracotta and pale powder blue, each with a close border framing the open center. Make either color individually or work the pair for a coordinated window treatment.
The construction uses a counted filet foundation, sixty separately crocheted outline cords, carefully mapped relief placement, and reinforced tabs. Allow approximately 30–40 hours per panel, including sewing and blocking. This advanced project suits crocheters who enjoy precise assembly and dimensional surface work. The instructions create an original interpretation of the photographed lace; its exact underlying stitch pattern cannot be established from the image alone.
Materials
- Sport-weight mercerized cotton Approximately 1,000–1,200 m per panel; terracotta for one panel and powder blue for the other. Use one dye lot per color.
- Crochet hook 3.0 mm, or size needed for the blocked mesh gauge
- Spare hook for outline cords Adjust separately if necessary to obtain the specified cord length
- Tapestry needle and removable stitch markers For joining cords, marking grid coordinates, and attaching tabs
- Blocking mat, rustproof pins, measuring tape, and contrasting waste thread For a full-size placement grid
- Curtain rod Up to approximately 18 mm diameter for the specified tabs
Abbreviations
chchainscsingle crochetdcdouble crochetsl stslip stitchst / stsstitch / stitchesRS / WSright side / wrong sideUS crochet terminology. A mesh cell consists of ch 2 followed by 1 dc. Turning ch 3 counts as the first dc; turning ch 1 never counts as a stitch. Work into the top of a turning ch 3 wherever it serves as the last dc of a row.
Gauge Swatch and Construction Plan
- Swatch Row 1: Ch 21. Dc in the fourth ch from the hook and in each remaining ch. Including the turning chain, there are 19 dc.
- Swatch Row 2: Ch 3, turn; repeat [ch 2, skip 2 sts, dc in next st] 6 times. There are 6 mesh cells and 7 dc posts.
- Swatch Rows 3–14: Ch 3, turn; repeat [ch 2, dc in next dc] 6 times. Maintain 6 cells and 7 posts on every row.
- Wash and block without pulling the mesh diagonally. The six-cell width and twelve-row height of the open portion should each measure 10 cm. Change hook size if needed.
- The main panel contains 24 mesh cells across and 80 mesh rows vertically. At gauge, its open area measures approximately 40 × 66.7 cm. The foundation and border bring the finished panel to approximately 43 × 70 cm, excluding tabs.
- All parts of one panel use the same color. For the photographed pair, repeat every section once in terracotta and once in powder blue.
Filet Mesh Foundation
- Foundation Row: Ch 75. Dc in the fourth ch from the hook and each remaining ch. There are 72 worked dc plus the turning chain, giving 73 sts.
- Mesh Row 1: Ch 3, turn; repeat [ch 2, skip 2 sts, dc in next st] 24 times. There are 24 cells, 25 dc posts, and 48 chains.
- Mesh Rows 2–80: Ch 3, turn; repeat [ch 2, dc in next dc] 24 times. Each row has 24 cells and 25 posts. The final dc goes into the top of the previous turning chain.
- Do not fasten off. Mark the upper-left corner as viewed from your chosen RS. The mesh may be reversible at this stage, but every cord will be attached to that same face.
Counted Panel Border
- Border Round 1, top: Ch 1 without turning. Work 1 sc in the first dc, then [2 sc in the next ch-2 space, 1 sc in the next dc] 24 times. This gives 73 top-edge sc. Ch 2 for the corner.
- Border Round 1, first side: Work 2 sc around each of the 80 mesh-row ends and 2 sc around the foundation-row end: 162 side-edge sc. Ch 2 for the corner.
- Border Round 1, bottom: Work 1 sc into each of the 73 foundation-chain positions beneath the foundation stitches, including the base of the turning chain: 73 sc. Ch 2 for the corner.
- Border Round 1, second side: Work 2 sc around each of the 81 row ends: 162 sc. Ch 2 and join with a sl st to the first sc. Total: 470 sc and four ch-2 corner spaces. Side stitches sit around row ends; horizontal stitches sit in stitch or chain bases.
- Border Round 2: Ch 1. Sc in each sc around; in every corner space work [sc, ch 2, sc]. Join to the first sc. Total: 478 sc and four ch-2 corner spaces.
- Border Round 3: Repeat Round 2. Total: 486 sc and four ch-2 corner spaces. Fasten off and weave in the border tail.
- Wet-block the panel square before adding relief work. The top and bottom edges between corner spaces each contain 77 sc; each side contains 166 sc. Count these edges independently before proceeding.
Raised Outline Cords — Make 60 per Panel
- Leave a 25 cm starting tail. Ch 49 loosely.
- Row 1: Working into the back bumps, sc in the second ch from the hook and each remaining ch: 48 sc.
- Row 2: Ch 1, turn; sl st in each of the 48 sc. Keep these stitches loose enough that the strip remains flat. Fasten off, leaving a 70 cm sewing tail.
- Block the strip to 19.2 cm long. This corresponds to approximately 25 sc per 10 cm along its length. Adjust the cord hook independently of the mesh hook if necessary; retain the 48-stitch count.
- Bring the ends together without twisting. Sew the short ends together edge to edge with the starting tail, forming a closed outline with 48 stitch positions around it. Do not overlap the ends.
- Mark positions 1, 13, 25, and 37 around the ring. These divide it into four equal 12-stitch sections. Keep the long tail available for attaching the outline to the panel.
Map the Leaf Diamond Grid
- Lay the blocked mesh RS up. Number its vertical post lines x = 0 through x = 24 from left to right. Number its horizontal mesh boundaries y = 0 through y = 80 from bottom to top. The y = 0 boundary lies along the top of the solid foundation row.
- Run removable waste-thread guides along x = 0, 4, 8, 12, 16, 20, and 24, and along y = 0, 8, 16, 24, 32, 40, 48, 56, 64, 72, and 80. These create sixty placement rectangles.
- Within each rectangle, locate the midpoint of its top, right, bottom, and left sides. Each rectangle is four cells wide and eight mesh rows high, approximately 6.7 × 6.7 cm at gauge.
- For an exact coordinate rule, let c be the column number 0–5 and r be the tier number 0–9. Its four outline points are top (4c + 2, 8r + 8), right (4c + 4, 8r + 4), bottom (4c + 2, 8r), and left (4c, 8r + 4).
- Pin one cord ring into each rectangle, placing its four markers at those four points. Shape the sections into gently bowed sides with pointed top and bottom ends. Keep the mesh visible inside each outline.
Attach and Interlace the Relief Motifs
- Begin at the bottom-left rectangle. Place cord position 1 at the top point, position 13 at the right point, position 25 at the bottom point, and position 37 at the left point. The end join should sit at the top point.
- Using its long tail, couch the cord onto the mesh with small stitches around the cord edge and the nearest mesh post or chain strand. Place approximately one attachment every two cord stitches, adding an extra stitch at every point. Catch existing yarn strands; do not stretch a stitch across an open cell.
- At a side midpoint that falls between two mesh posts, anchor around the horizontal ch-2 strand. This is expected: top and bottom points lie on post lines, while the middle of a sloping section may lie on a chain span.
- Work left to right across each tier, then continue upward. Adjacent motifs meet at their side points; successive tiers meet at their top and bottom points.
- At each shared junction, slide the new cord tip just beneath the attached tip when the sum of its column and tier numbers is even; lay it just above when that sum is odd. Secure both tips together and to the mesh with two small stitches. Keep this tiny overlap within one cord width.
- Complete all 60 motifs: six columns in each of ten tiers. Secure each sewing tail on the WS through several mesh posts, then weave it back through the cord. Remove the waste-thread grid after checking the full alignment.
Reinforced Hanging Tabs — Make 5 per Panel
- Row 1: Leave a 40 cm sewing tail. Ch 7; sc in the second ch from the hook and each remaining ch: 6 sc.
- Rows 2–24: Ch 1, turn; sc in each st: 6 sc per row. Fasten off after Row 24, leaving another 40 cm tail.
- Block each strip to approximately 2.5 × 10 cm. The tab gauge is approximately 24 sc and 24 rows per 10 cm. Adjust the tab hook separately if needed.
- Number the 77 top-border stitches from left to right, excluding corner spaces. Mark five six-stitch attachment groups: sts 1–6, 19–24, 36–41, 54–59, and 72–77.
- For each tab, place its first 1 cm against the WS of its marked group and sew along both the upper and lower edges of that overlap. Bend the strip into a loop and place its last 1 cm over the same attachment area on the WS.
- Sew the second end firmly through the border and the first tab end, keeping the front neat. A 10 cm strip with two 1 cm overlaps leaves an approximately 8 cm loop circumference and projects about 4 cm above the panel. Check the first finished loop on your rod before attaching the remaining four.
Finishing
Weave in every remaining tail on the wrong side, keeping the open cells clear. Soak the completed curtain according to the cotton yarn label, press out excess water in a towel, and pin the border into a rectangle approximately 43 × 70 cm. Arrange all five tabs evenly and smooth each raised outline with your fingers. Let the panel dry completely before lifting it.
Hang the panel on its rod and check that the top edge carries the weight evenly. If one tab pulls more strongly than the others, resew that attachment before regular use. For the two-color arrangement in the reference, finish the terracotta and powder-blue panels to matching dimensions and hang them side by side.
Tips for Success
- Keep the mesh gauge square in physical measurements: four cells across must equal eight rows vertically. This makes the sixty motifs align without pulling the panel.
- Complete and attach one outline before crocheting the other fifty-nine. Its blocked fit checks the relationship between your mesh and cord gauges.
- Pin an entire tier before sewing it. Shared points should line up along the same horizontal boundary.
- Use a blunt tapestry needle for couching so you catch mesh strands without splitting the mercerized cotton.
- Support the panel flat while attaching cords. Letting it hang from your lap can lengthen the mesh before the relief is secured.
Common Mistakes to Avoid
- Losing the final mesh cell: work the last dc into the turning-chain top and confirm 24 spaces after every row.
- Making tight slip stitches on the cords: this shortens and curls the strips. Undo the slip-stitch row and rework it loosely, using a larger hook if needed.
- Pulling a short cord into position: this puckers the mesh. Correct the cord gauge so the blocked strip reaches 19.2 cm comfortably.
- Counting border corners as top-edge stitches: exclude the ch-2 spaces when marking the five tab groups; the top edge contains exactly 77 sc.
- Sewing only through the outer border loop at a tab: spread each attachment over its full 1 cm overlap to reduce local stretching.
Ways to Customize This Pattern
- Use the photographed color pairing: one terracotta panel and one powder-blue panel, with matching cords and tabs on each.
- Make a shorter café curtain with 48 mesh rows and six motif tiers. Keep the width, border instructions across the top and bottom, and tab positions unchanged; the first border round then uses 98 sc per side, giving 342 sc overall.
- Use unbleached cotton for a softer neutral curtain while retaining the strong relief shadows of the raised outlines.
- Work the outline cords in a slightly deeper shade of the panel color for a subtle two-tone lattice. Keep the same fiber and blocked cord dimensions.
- Fit a thicker rod by adding tab rows in multiples of two. Each two extra rows adds approximately 0.8 cm to the loop circumference at the stated tab gauge.
Frequently asked questions
No. It is an original construction inspired by the reference’s rectangular curtain panels, open ground, raised leaf diamonds, close borders, and five tabs. The relief here is made with separately attached cords.
They create a clearly raised lattice while allowing the mesh foundation to remain regular. Their placement and alternating junction overlaps produce the interlaced appearance.
Yes, if all three measurements match. Check them independently: the mesh controls panel size, the cords control puckering, and the tabs control rod clearance.
Follow the yarn label, support the wet panel fully, and reshape it flat. Avoid hanging it while wet because the mesh and tab attachments can stretch under the added weight.
The finished Interlaced Leaf Lace Crochet Curtain Pattern

