Irish Lace Daisy and Poinsettia Table Runner Pattern
Beginner Friendly
Perfect for those just starting their crochet journey, with clear instructions and simple techniques
Single-Day Project
A satisfying project you can complete in a single afternoon or evening.
Handmade Gift
A beautiful keepsake — free forever. Read online or print at home.
About This Irish Lace Daisy and Poinsettia Table Runner Pattern
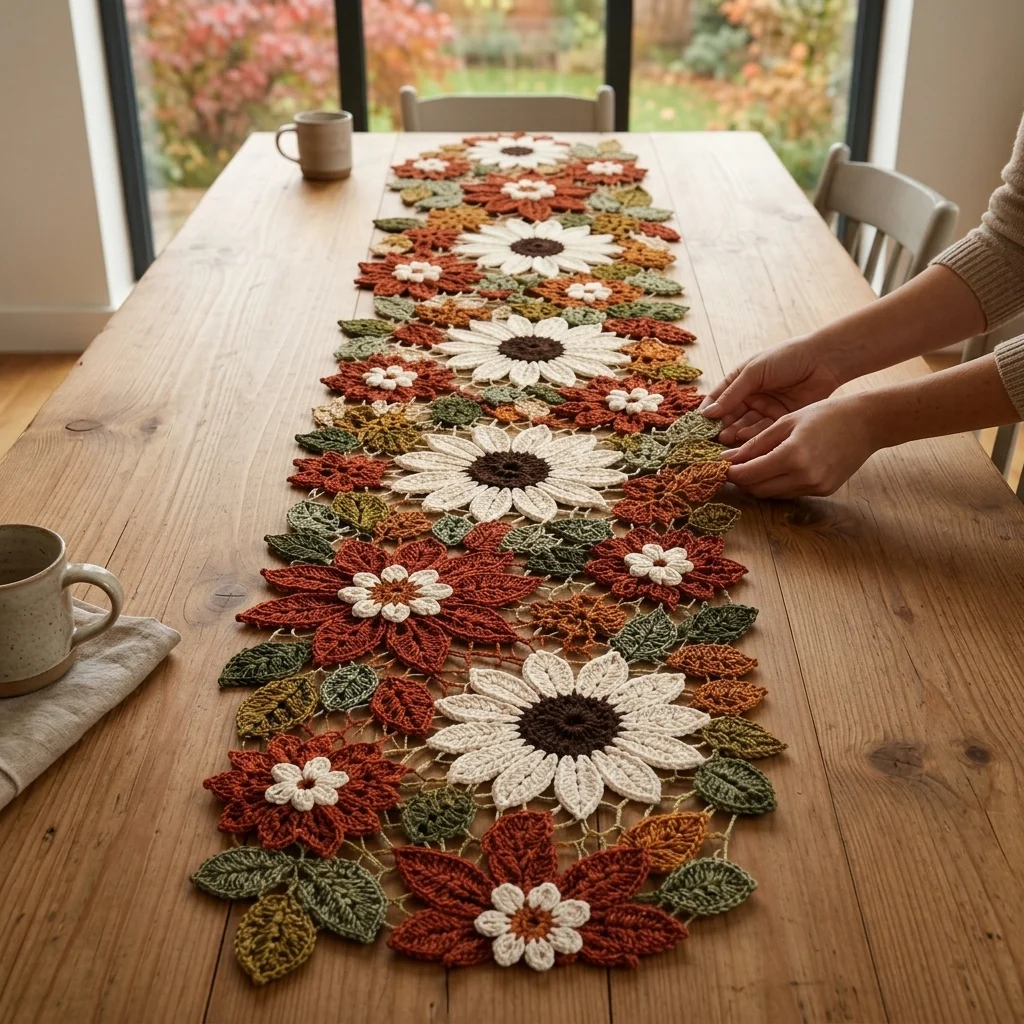
This crochet daisy table runner pattern packs a huge amount of texture into one oval strip: 4 large white daisies with dark brown centers, 3 layered rust-red poinsettias, and roughly 10 small accent flowers in white and rust, all set into a background so densely covered in small crocheted leaves that almost none of the underlying net mesh shows through. It’s built the Irish lace way, every motif made separately, then arranged and tacked onto the mesh by eye.
What makes this design distinctive is the sheer density of the leaf background. Rather than a light scattering of leaves around a few flowers, this pattern calls for dozens of small leaves in olive, sage, and warm gold, packed edge to edge so the mesh reads as a solid textured field, with the large daisies and poinsettias rising clearly above it. That contrast, between the flat, pointed white daisy petals and the ruffled, multi-layered poinsettias, is what gives the runner its rich, almost embroidered look. Expect to spend 34-40 hours total; this is one of the longest and most motif-heavy projects in this style.
This is an advanced pattern, best suited to someone experienced with Irish lace assembly and comfortable with a large volume of repetitive small motifs, rather than someone wanting a quick project.
Materials
- Fingering weight cotton yarn, cream ~120g, mesh background
- Fingering weight yarn, white ~50g, daisy petals
- Fingering weight yarn, dark brown ~20g, daisy centers
- Fingering weight yarn, rust red ~50g, poinsettia petals
- Fingering weight yarn, mustard gold ~10g, poinsettia centers
- Fingering weight yarn, olive green ~40g, leaves
- Fingering weight yarn, sage green ~40g, leaves
- Fingering weight yarn, warm gold ~30g, leaves
- Crochet hook, small 2.75 mm (US C/2), for mesh
- Crochet hook, larger 3.5 mm (US E/4), for motifs
- Tapestry/yarn needle
- Steam iron and pressing cloth, or blocking mat and pins
- Straight pins, for positioning motifs before sewing
- Sharp scissors
Abbreviations
chchainsl stslip stitchscsingle crochethdchalf double crochetdcdouble crochettrtreble/triple crochetMRmagic ringch-spchain spaceincincrease (2 sc in one st)st(s)stitch(es)reprepeatFOfasten offDaisy Motif (make 4)
- With dark brown, 8 sc in MR, inc around (16 sts), sl st to join, FO leaving a short tail. This is the flat center.
- With white, join in any st of the center. Round 1 (petals): *ch 5, sl st in 2nd ch from hook, sc 2, hdc 1, sl st in same base st; rep from * around all 16 sts to form 16 long pointed petals.
- FO leaving a long tail for attaching. Repeat for 4 daisies total.
Poinsettia Motif (make 3)
- With mustard gold, 8 sc in MR. Sl st to join, FO leaving a short tail. This is the small flat center.
- With rust red, join in any st of the center. Round 1 (inner petals): *ch 4, sl st in 2nd ch from hook, sc 2, sl st in same base st; rep from * around all 8 sts. 8 petals.
- Round 2 (outer petals): join rust red behind Round 1, in the base sts between petals. *ch 6, sl st in 2nd ch from hook, sc 2, hdc 2, sl st in same base st; rep from * around. 8 larger, longer petals layered behind the first.
- Round 3 (third layer): join rust red once more behind Round 2. *ch 8, sl st in 2nd ch from hook, sc 2, hdc 2, dc 2, sl st in same base st; rep from * around for a final, longest layer of 8 petals.
- FO leaving a long tail for attaching. Fold each successive round back and down from the one before it so all 3 layers show clearly.
Small Accent Flowers (make approximately 10: mix of white and rust)
- Ch 2. Round 1: 6 sc in 2nd ch from hook, do not join, work in a continuous spiral.
- Round 2: *ch 2, sl st in same st, sl st in next st; rep from * around all 6 sts to form 6 small petals.
- FO leaving a short tail for attaching. Repeat for approximately 10 flowers total, mixed white and rust.
Leaf Motif (make approximately 90: mix of olive, sage, and warm gold)
- Ch 7. Starting in 2nd ch from hook: sl st, sc 1, hdc 1, dc 1, 3 dc in last ch.
- Continue down the other side: dc 1, hdc 1, sc 1, sl st in last ch.
- FO leaving a short tail for attaching. Repeat for approximately 90 leaves total, mixing all 3 colors throughout; this large quantity is what fills the background so densely.
Background Net Mesh
- With cream and the smaller hook, ch 71. Row 1: dc in 6th ch from hook, *ch 3, skip 2 ch, dc in next ch; rep from * across. 22 open ch-3 spaces.
- Row 2: ch 6, turn, dc in first dc, *ch 3, dc in next dc; rep from * across, ending dc in top of turning ch.
- Rep Row 2 until the panel measures approximately 105 cm long, keeping the open net consistent throughout.
- FO after the final row, leaving a long tail for the edging join.
Oval Shaping and Edging
- With cream, join at one short end of the net panel. Round 1: sc evenly around the entire panel, working extra sc sts at each short end curve to shape it into a rounded oval.
- Round 2: ch 1, sc in each st around, continuing the curve shaping at both ends.
- Join with sl st to first st and FO. Weave in all ends. This border will be almost entirely hidden under leaves once assembly is complete, so it can stay simple.
Assembly
- Lay the 4 daisies and 3 poinsettias down the center line of the blocked oval mesh, alternating them roughly as shown in the photo, spaced evenly along the full length, and pin.
- Sew each daisy and poinsettia down firmly through its center into the mesh below.
- Tuck a small accent flower beside or between several of the large flowers, pinning about 10 of them across the whole runner in the gaps between daisies and poinsettias.
- Beginning at one end, pack leaves densely around and between every flower, overlapping leaf edges generously so no mesh shows through anywhere on the surface, working outward from the center flowers toward both oval edges.
- Continue layering leaves until the entire background, edges included, is covered, then whipstitch every leaf down at 1-2 points into the mesh or into neighboring leaves as you go.
Finishing
Once every flower and leaf is attached, turn the runner over and check for any leaf held by only a single stitch; add a second point of contact anywhere that feels loose, since this piece will be handled often. Weave in all remaining tails. Steam-block gently from the back, being careful not to flatten the poinsettia’s 3 layered petal rounds or the daisy’s pointed petals, and let the whole piece dry completely flat before use.
Tips for Success
- Make far more leaves than you think you’ll need before starting assembly; running short partway through is much harder to fix than having a few extra.
- Work leaf placement outward from the large flowers toward the oval’s edges, rather than starting at the edges, so density stays even across the whole surface.
- Fold each poinsettia’s outer 2 rounds back deliberately after attaching; this is what creates its layered, dimensional look rather than a flat rosette.
- Mix all 3 leaf colors as you place them rather than grouping by color, so the background reads as a blended field rather than color-blocked sections.
- Check flower spacing from a distance every few motifs; up close it’s easy to crowd one area and leave another too sparse.
Common Mistakes to Avoid
- Underestimating leaf quantity leaves visible gaps of bare mesh once the flowers are placed. Fix: make at least 90 leaves before starting to arrange, and more if your motifs run larger.
- Sewing poinsettia layers down flat against each other loses the dimensional, ruffled look. Fix: fold and tack each outer round back and slightly down after attaching.
- Placing large flowers in a perfectly even, mathematically spaced line looks stiff against such a dense, organic background. Fix: allow slight natural variation in spacing between flowers.
- Leaving daisy petals pressed flat during blocking flattens their sharp points. Fix: steam gently and avoid pressing directly on daisy or poinsettia petals.
- Joining leaves only to the mesh and not to each other leaves gaps that open up with handling. Fix: whipstitch overlapping leaf edges to each other as well as to the mesh underneath.
Ways to Customize This Pattern
- Reduce to 2 daisies and 1 poinsettia with a proportionally smaller leaf field for a shorter centerpiece mat.
- Swap the rust poinsettias for a second daisy color, such as pale yellow, for an all-daisy version.
- Use only 2 leaf colors instead of 3 for a slightly less busy, more cohesive background.
- Arrange the large flowers in a circular cluster instead of a line for a round centerpiece version.
- Add small crocheted berries tucked among the leaves near each large flower for extra texture.
Frequently asked questions
Yes, roughly that many is what it takes to fully cover the mesh background at this size. Make them in batches as you go, and keep placing until no mesh is visible anywhere on the surface.
Yes. Two poinsettias instead of three still reads well against this dense a background; just distribute your remaining large flowers a bit more evenly across the runner’s length.
Attach the large flowers first, then work leaves outward around them rather than into the space right next to fragile petals last. This limits how much handling the finished daisies get during the busiest part of assembly.
This almost always comes down to leaf density. If mesh is still visible after your first full pass, make and add more leaves in the gaps rather than stretching your existing leaves further apart.
The finished Irish Lace Daisy and Poinsettia Table Runner Pattern

