Irish Lace Red Sunflower Vine Table Runner Crochet Pattern
Beginner Friendly
Perfect for those just starting their crochet journey, with clear instructions and simple techniques
Single-Day Project
A satisfying project you can complete in a single afternoon or evening.
Handmade Gift
A beautiful keepsake — free forever. Read online or print at home.
About This Irish Lace Red Sunflower Vine Table Runner Crochet Pattern
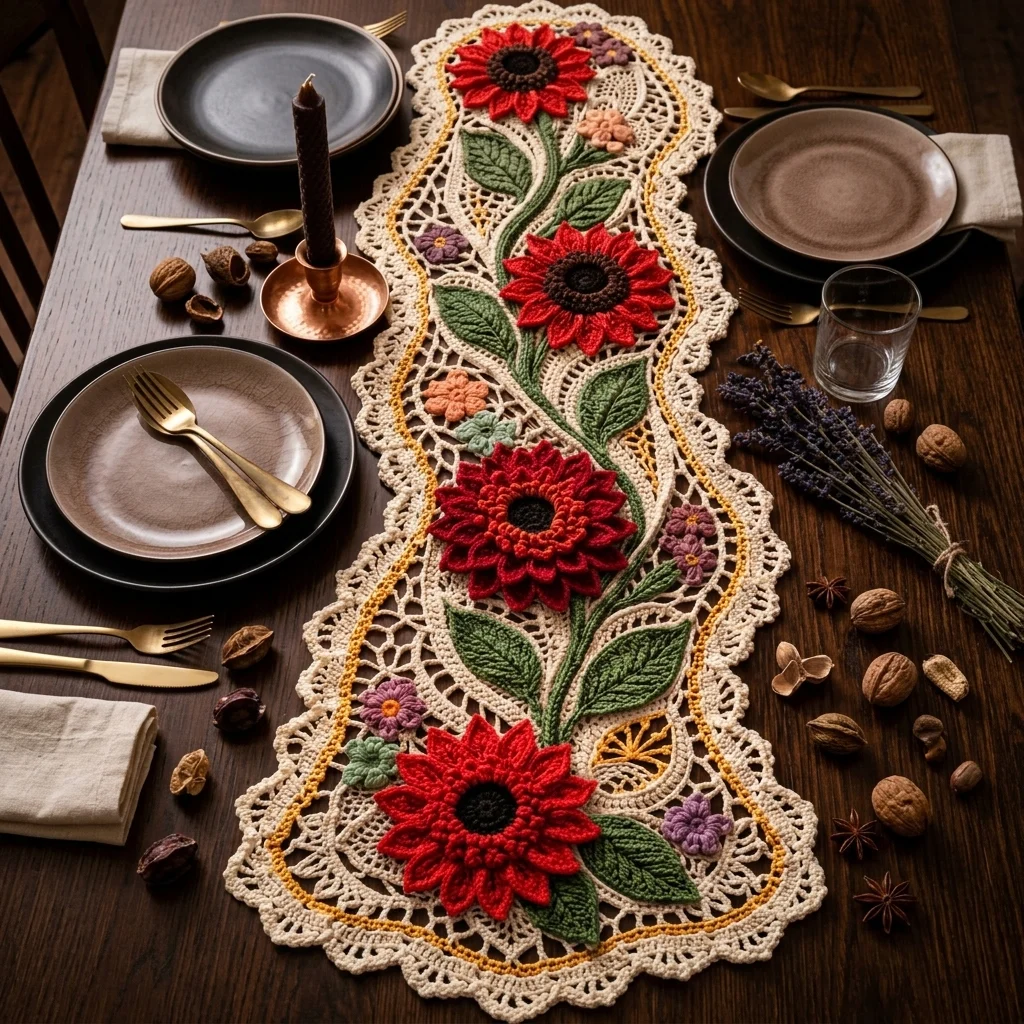
This crochet sunflower lace table runner pattern layers 3 bold red sunflowers with near-black centers and one deep red layered dahlia along a winding green vine, set over an open cream net mesh background edged in a scalloped border. Small accent flowers in lavender and peach scatter through the open mesh on either side of the vine, and a fine gold thread winds alongside it for a subtle metallic accent.
What makes this design distinctive is the color contrast: rather than an all-neutral or monochrome palette, this piece pairs saturated red flowers and rich green leaves directly against plain cream lace, so the florals read as clear, graphic focal points rather than blending into the background. Every motif, sunflowers, dahlia, leaves, and small accent flowers, is made completely separately and then arranged onto the mesh by eye, in true Irish lace fashion, so the final placement has real flexibility even while following the overall layout in the photo. Expect to spend 30-36 hours total; this is a long, detailed project built up piece by piece.
This is an advanced pattern, best suited to someone experienced with Irish lace or freeform motif assembly and comfortable working bold, saturated color combinations, rather than someone wanting a strictly row-counted project.
Materials
- Fingering weight cotton yarn, cream ~150g, mesh background and edging
- Fingering weight yarn, deep red ~50g, sunflower and dahlia petals
- Fingering weight yarn, near-black brown ~15g, sunflower centers
- Fingering weight yarn, dark brown/rust ~10g, dahlia center accents
- Fingering weight yarn, olive/forest green ~40g, vine and leaves
- Small amounts of lavender, peach, and sage yarn accent flowers
- Fingering weight yarn, gold/mustard ~10g, couched trim line
- Crochet hook, small 2.75 mm (US C/2), for mesh and edging
- Crochet hook, larger 3.5 mm (US E/4), for motifs
- Tapestry/yarn needle
- Steam iron and pressing cloth, or blocking mat and pins
- Straight pins, for positioning motifs before sewing
- Sharp scissors
Abbreviations
chchainsl stslip stitchscsingle crochethdchalf double crochetdcdouble crochettrtreble/triple crochetMRmagic ringch-spchain spaceincincrease (2 sc in one st)st(s)stitch(es)reprepeatFOfasten offSunflower Motif (make 3)
- With near-black brown, 8 sc in MR. Round 2: inc in each st around (16 sts). Sl st to join, FO leaving a short tail. This is the flat textured center.
- With deep red, join in any st of the center. Round 1 (inner petals): *ch 2, dc 3 in next st, ch 2, sl st in same st; rep from * around all 16 sts. 16 petals.
- Round 2 (outer petals): join deep red in a base st between two inner petals. *ch 3, dc 4 in next base st, ch 3, sl st in same st; rep from * around. 16 larger petals layered behind the first set.
- FO leaving a long tail for attaching. Fold outer petals slightly back so the two rounds separate visually.
Dahlia Motif (make 1)
- With dark brown/rust, 6 sc in MR, inc around (12 sts), sl st to join, FO leaving a short tail.
- With near-black brown, join and work *ch 2, sl st in same st, sl st in next st; rep from * around all 12 sts for a ruffled ring around the center. FO leaving a short tail.
- With deep red, join behind the ruffle. Round 1 (inner petals): *ch 3, sl st in 2nd ch from hook, sc in next ch, sl st in same base st; rep from * around 12 sts.
- Round 2 (outer petals): join deep red behind Round 1. *ch 5, sl st in 2nd ch from hook, sc 2, hdc 1, sl st in same base st; rep from * around.
- FO leaving a long tail for attaching. Fold outer petals back from inner ones for dimension.
Vine and Leaves
- With olive/forest green, ch a length matching your planned motif line, approximately 80 cm, to form the vine’s main spine.
- Sl st back down the entire chain for body and a smooth edge. FO leaving tails at both ends.
- Leaf motif (make 12): ch 9. Starting in 2nd ch from hook: sl st, sc 2, hdc 2, dc 2, 3 dc in last ch, then work back down the other side: dc 2, hdc 2, sc 2, sl st. FO leaving a short tail for attaching.
- Repeat for 12 leaves total, to be tacked along the vine between and around the sunflowers and dahlia.
Small Accent Flowers (make approximately 12: mix of lavender, peach, and sage)
- Ch 2. Round 1: 6 sc in 2nd ch from hook, do not join, work in a continuous spiral.
- Round 2: *ch 2, sl st in same st, sl st in next st; rep from * around all 6 sts to form 6 small petals.
- FO leaving a short tail for attaching. Repeat for approximately 12 flowers total in mixed colors.
Background Net Mesh
- With cream and the smaller hook, ch 71. Row 1: dc in 6th ch from hook, *ch 3, skip 2 ch, dc in next ch; rep from * across. 22 open ch-3 spaces.
- Row 2: ch 6, turn, dc in first dc, *ch 3, dc in next dc; rep from * across, ending dc in top of turning ch.
- Rep Row 2 until the panel measures approximately 100 cm long, keeping the open net consistent throughout.
- FO after the final row, leaving a long tail for the edging join.
Scalloped Wave Edging
- With cream, join at one corner of the net panel. Round 1: sc evenly around the entire panel, working extra sc sts at each short end to round the corners into gentle curves.
- Round 2 (scallop round): *sk 2 sts, 5 dc in next st, sk 2 sts, sl st in next st; rep from * evenly around the entire panel, letting the scallops flow into soft waves along both long sides as shown in the photo.
- Join with sl st to first st and FO. Weave in all ends.
Gold Trim Line
- With gold/mustard yarn, chain a long, single continuous strand, roughly 200 cm, to be couched onto the mesh background alongside the vine, running the length of the panel.
- Lay the chain in position on the blocked mesh, curving it loosely alongside the vine on one side, and pin in place.
- Using a matching thread and needle, tack the chain down at intervals of about 3-4 cm, catching just the mesh background underneath.
Assembly
- Pin the vine down the center of the blocked mesh panel, curving it gently side to side rather than in a straight line.
- Position the 3 sunflowers evenly spaced along the vine, and the dahlia between two of them roughly in the lower half, matching the layout in the photo, and pin.
- Tack the vine to the mesh at intervals, then sew each sunflower and the dahlia down firmly through their centers into the vine and mesh below.
- Tuck and tack the 12 leaves along the vine, 3-4 per flower, angling them outward from the stem.
- Scatter the small accent flowers around the open mesh areas to either side of the central vine, spacing them irregularly, and tack each one down through its center.
Finishing
Once every motif and the gold trim line are attached, steam-block the entire runner face-down on a towel, gently opening the net mesh so the ch-3 spaces sit even, and reshaping the wavy scalloped edge by hand while it’s still slightly damp. Let it dry completely flat. Check the whole surface for any motif tacked at only one point and reinforce it before considering the runner finished.
Tips for Success
- Make every motif before starting the mesh; seeing the bold red flowers against the plain cream ahead of time helps you judge spacing and balance more accurately.
- Curve the vine and gold trim loosely rather than pinning them straight; the organic winding is a key part of this style’s look.
- Fold outer petal rounds back on both the sunflowers and dahlia after attaching; this is what gives each flower real dimension rather than a flat appearance.
- Scatter small accent flowers irregularly, closer together in some spots and further apart in others, rather than evenly spacing them in a grid.
- Block the plain mesh and edging on their own first, before attaching any motifs, so the open net sits flat and even underneath everything else.
Common Mistakes to Avoid
- Attaching motifs before blocking the mesh causes the background to distort once steamed later. Fix: block the plain mesh and edging first, then applique everything else.
- Pinning the vine and gold trim in perfectly straight lines looks stiff rather than lace-like. Fix: curve both loosely from side to side as you pin.
- Spacing the small accent flowers in a visible grid pattern breaks the organic, scattered look. Fix: step back and check the overall spread from a distance before tacking anything down.
- Sewing sunflowers and the dahlia down around their outer edges flattens the petal layers. Fix: stitch through the center only so petal layers stay raised and separated.
- Skipping the couching step and just laying the gold chain loose leaves it prone to snagging. Fix: tack the chain down at regular intervals as instructed.
Ways to Customize This Pattern
- Reduce to 2 sunflowers and skip the dahlia for a simpler, faster version of the same background technique.
- Swap the red palette for gold and rust sunflowers for a softer, more traditional autumn look.
- Use only cream and one accent color throughout for a more restrained, monochrome lace look.
- Shrink the whole piece to a round doily with a single centered sunflower for a smaller matching accessory.
- Swap the accent flower colors for blues and whites for a cooler, spring-toned version.
Frequently asked questions
Some familiarity helps, particularly with sewing separately made motifs onto a background mesh by eye rather than following a strict row-by-row layout. If you’re new to this style, practice arranging and tacking motifs on a small mesh swatch first.
Yes, the runner holds together and looks complete without it. The trim is a decorative accent rather than a structural element, so leaving it out only changes the finished look slightly.
Not very exact at all. This style is meant to look organic and hand-arranged, so use the photo as a general guide for balance, top to bottom and side to side, rather than measuring precise placement.
This is almost always a yarn choice issue rather than a stitch issue. Choose a saturated, true red rather than a brick or dusty red, since the bold color contrast against cream lace is a key part of this design’s impact.
The finished Irish Lace Red Sunflower Vine Table Runner Crochet Pattern

