Irish Lace Sage Leaf and Cream Flower Table Runner Pattern
Beginner Friendly
Perfect for those just starting their crochet journey, with clear instructions and simple techniques
Single-Day Project
A satisfying project you can complete in a single afternoon or evening.
Handmade Gift
A beautiful keepsake — free forever. Read online or print at home.
About This Irish Lace Sage Leaf and Cream Flower Table Runner Pattern
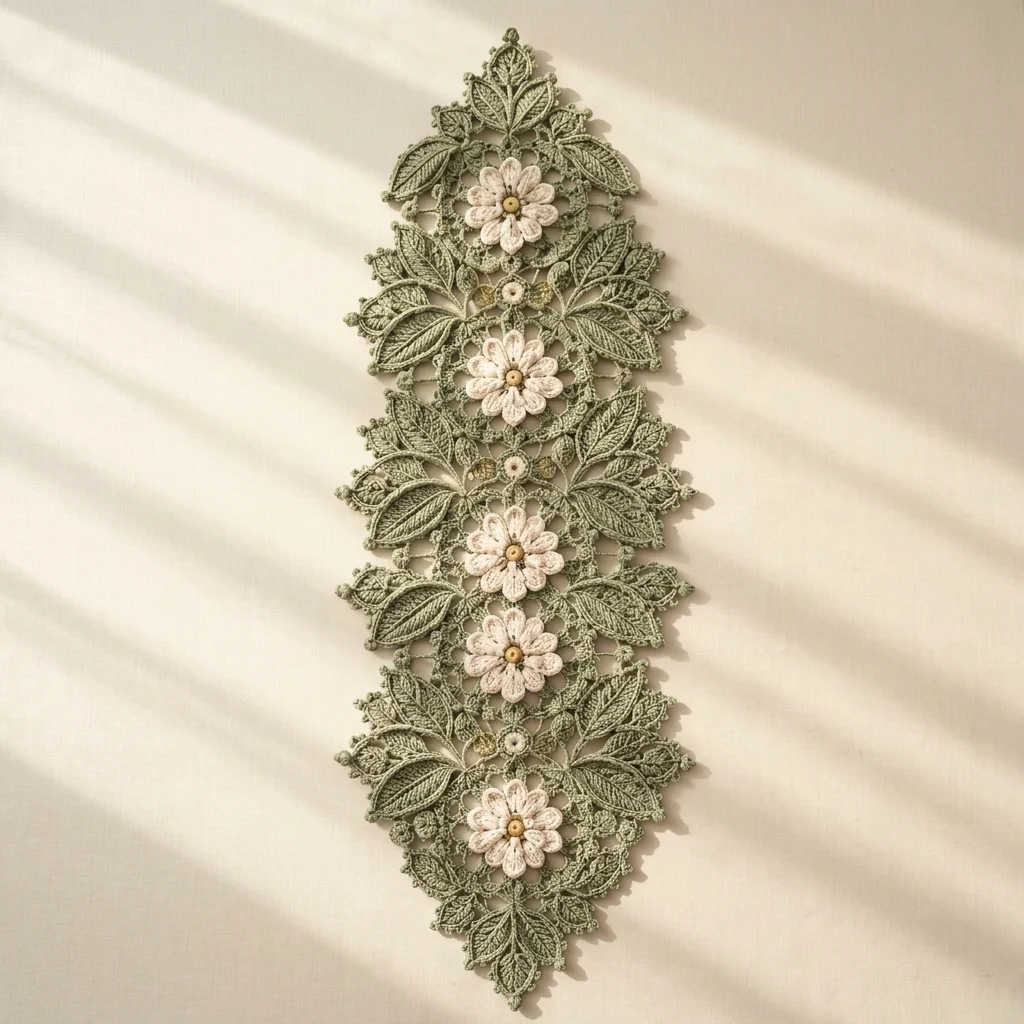
This crochet Irish lace table runner pattern builds a dense sage green field of picot-edged leaves in graduated sizes, tapering to a pointed tip at both the top and bottom ends, with four cream flowers featuring warm gold centers spaced evenly down the center line. Small bud-like accent motifs fill the gaps between the large flowers, so almost no plain background mesh shows through anywhere on the piece.
What makes this design distinctive is the picot detailing worked into every leaf edge, tiny bobble-like points along each lobe that catch the light and give the sage green background a frosted, textured look rather than a smooth surface. Tapering both ends to a point, rather than finishing in straight or rounded edges, gives the runner an elegant, formal silhouette closer to a traditional lace runner than a casual motif strip. Expect to spend 32-38 hours total; this is a long, detail-heavy project built up leaf by leaf and flower by flower.
This is an advanced pattern, best suited to someone experienced with Irish lace, picot stitches, and freeform motif arrangement, rather than someone wanting a row-counted, predictable layout.
Materials
- Fingering weight cotton yarn, sage green ~180g, leaves and background mesh
- Fingering weight yarn, cream ~60g, flower petals
- Fingering weight yarn, gold/mustard ~15g, flower centers
- Small amount of tan/light brown yarn small bud accents
- Crochet hook, small 2.5 mm (US B/1), for mesh
- Crochet hook, larger 3.25 mm (US D/3), for leaves and flowers
- Tapestry/yarn needle
- Steam iron and pressing cloth, or blocking mat and pins
- Straight pins, for positioning motifs before sewing
- Sharp scissors
Abbreviations
chchainsl stslip stitchscsingle crochethdchalf double crochetdcdouble crochettrtreble/triple crochetMRmagic ringpicotch 2, sl st in first ch of the 2ch-spchain spacest(s)stitch(es)reprepeatFOfasten offCream Flower Motif (make 4)
- With gold, 8 sc in MR. Sl st to join, FO leaving a short tail. This is the flat textured center.
- With cream, join in any st of the gold center. Round 1 (inner petals): *ch 3, sl st in 2nd ch from hook, sc in next ch, sl st in same base st; rep from * around all 8 sts. 8 petals.
- Round 2 (outer petals): join cream behind Round 1, in the base sts between petals. *ch 5, sl st in 2nd ch from hook, sc 2, hdc 1, sl st in same base st; rep from * around. 8 larger petals layered behind the first.
- FO leaving a long tail for attaching. Fold outer petals back from the inner round for dimension. Repeat for 4 flowers total.
Small Bud Accent (make approximately 3, in tan)
- Ch 2. Round 1: 5 sc in 2nd ch from hook, do not join, work in a continuous spiral.
- Round 2: sl st into first sc to close into a small tight bud shape.
- FO leaving a short tail for attaching. Repeat for approximately 3 total, placed between flowers.
Picot-Edge Leaf, Large (make approximately 20, in sage green)
- Ch 10. Starting in 2nd ch from hook: sl st in next ch, then work up one side of the chain, working (sc, picot) in each of the next 4 ch, 3 sc in the last ch to round the tip.
- Continue down the other side: work (sc, picot) in each of the next 4 ch, sl st in last ch.
- Ch 2 more at the base to form a short stem, sl st back down those 2 ch. FO leaving a 15 cm tail for attaching. Repeat for approximately 20 large leaves total.
Picot-Edge Leaf, Small (make approximately 20, in sage green)
- Ch 7. Starting in 2nd ch from hook: sl st in next ch, work (sc, picot) in each of the next 2 ch, 3 sc in the last ch to round the tip.
- Continue down the other side: work (sc, picot) in each of the next 2 ch, sl st in last ch.
- FO leaving a 10-12 cm tail for attaching. Repeat for approximately 20 small leaves total, to fill gaps around the large leaves and near the runner’s pointed ends.
Background Net Mesh
- With sage green and the smaller hook, ch 51. Row 1: dc in 6th ch from hook, *ch 3, skip 2 ch, dc in next ch; rep from * across. 15 open ch-3 spaces.
- Row 2: ch 6, turn, dc in first dc, *ch 3, dc in next dc; rep from * across, ending dc in top of turning ch.
- Rep Row 2 until the panel measures approximately 65 cm long, keeping the open net consistent throughout.
- FO after the final row, leaving a long tail for the point shaping.
Pointed End Shaping
- With sage green, join at one short end of the mesh panel. Work a round of sc evenly across that short end, then begin decreasing 1 st at each side of every subsequent row worked outward from that end, tapering the mesh into a point over approximately 6-8 rows.
- FO at the point, leaving a small tail.
- Repeat the same tapering shape at the opposite short end of the panel, working from the other side of the mesh inward to a matching point.
Assembly
- Lay the blocked mesh panel flat with both pointed ends oriented top and bottom. Position the 4 cream flowers evenly down the center line, and pin.
- Sew each flower down firmly through its center into the mesh below.
- Tuck a small bud accent between each pair of flowers along the center line, and pin.
- Beginning at the top point, densely arrange large and small leaves radiating outward and downward from each flower and from the point tips themselves, overlapping leaf edges generously so very little plain mesh remains visible.
- Continue packing leaves down the full length of the runner, working outward from the center line toward both long edges, until the leaf coverage is even and dense throughout.
Finishing
Once every flower, bud, and leaf is attached, whipstitch each leaf down at 1-2 points into the mesh or into neighboring leaves, checking the back of the piece for any leaf held by only a single stitch. Weave in all remaining tails. Steam-block gently from a slight distance, being careful not to flatten the picot edges or the flower petals, and pin both pointed ends out to crisp, symmetrical tips while the piece is still slightly damp. Let it dry completely flat.
Tips for Success
- Make all your leaves, both sizes, and all 4 flowers before starting to arrange them on the mesh; Irish lace density is much easier to judge with a full pile of finished pieces on hand.
- Work picots at a consistent size across every leaf; uneven picots are especially noticeable once dozens of leaves sit close together.
- Taper both pointed ends slowly over several rows rather than decreasing sharply, for a smooth, elegant point rather than a stepped one.
- Fold flower outer petals back deliberately after attaching, just as with the leaves’ picots, to keep every element on this piece feeling dimensional rather than flat.
- Block the plain mesh and both points on their own before attaching any motifs, so the pointed shape sets properly underneath everything else.
Common Mistakes to Avoid
- Attaching motifs before blocking the mesh and points causes the background to distort once steamed later. Fix: block the plain mesh with both points shaped first, then applique everything else.
- Decreasing too quickly at the pointed ends creates a stubby, abrupt point instead of a graceful taper. Fix: spread the decrease rows out over 6-8 rows as instructed.
- Leaving gaps of visible mesh between leaves breaks the dense, layered Irish lace look. Fix: overlap leaf edges generously and add extra small leaves wherever gaps remain.
- Working picots at inconsistent sizes across different leaves looks messy once assembled. Fix: keep the ch-2 picot length exactly consistent throughout every leaf.
- Sewing flowers down around their outer petals instead of through the center flattens their dimension. Fix: stitch through the center only so petals stay raised.
Ways to Customize This Pattern
- Reduce to 2-3 flowers with a shorter mesh and leaf field for a smaller centerpiece mat instead of a full runner.
- Swap the sage green background for a deeper forest green or dusty blue for a different palette.
- Work the flowers in a pale pink or blush instead of cream for a softer color contrast.
- Finish only one end in a point and the other straight for an asymmetrical runner design.
- Add tiny crocheted seed beads or French knots to the flower centers instead of a crocheted gold round for extra sparkle.
Frequently asked questions
Pointed ends are part of this design’s traditional lace look, but a straight edge works fine structurally. If you prefer, finish one or both ends with a simple sc border instead of the tapering shape.
Roughly 40 leaves total, split between large and small, covers a runner of this size densely. Keep making and adding leaves in gaps until no mesh shows through, since exact numbers vary with individual gauge.
Yes, though the leaves will look plainer and less frosted than in the photo. If you skip picots, work a simple sc edge along each leaf instead for a faster, cleaner alternative.
This usually means decreases were worked unevenly between the two sides. Recount your decrease rows and confirm exactly 1 st was removed at each side per row, matching both edges as you taper toward the tip.
The finished Irish Lace Sage Leaf and Cream Flower Table Runner Pattern

