Irish Lace Textured Maple Leaf Vine Table Runner Pattern
Beginner Friendly
Perfect for those just starting their crochet journey, with clear instructions and simple techniques
Single-Day Project
A satisfying project you can complete in a single afternoon or evening.
Handmade Gift
A beautiful keepsake — free forever. Read online or print at home.
About This Irish Lace Textured Maple Leaf Vine Table Runner Pattern
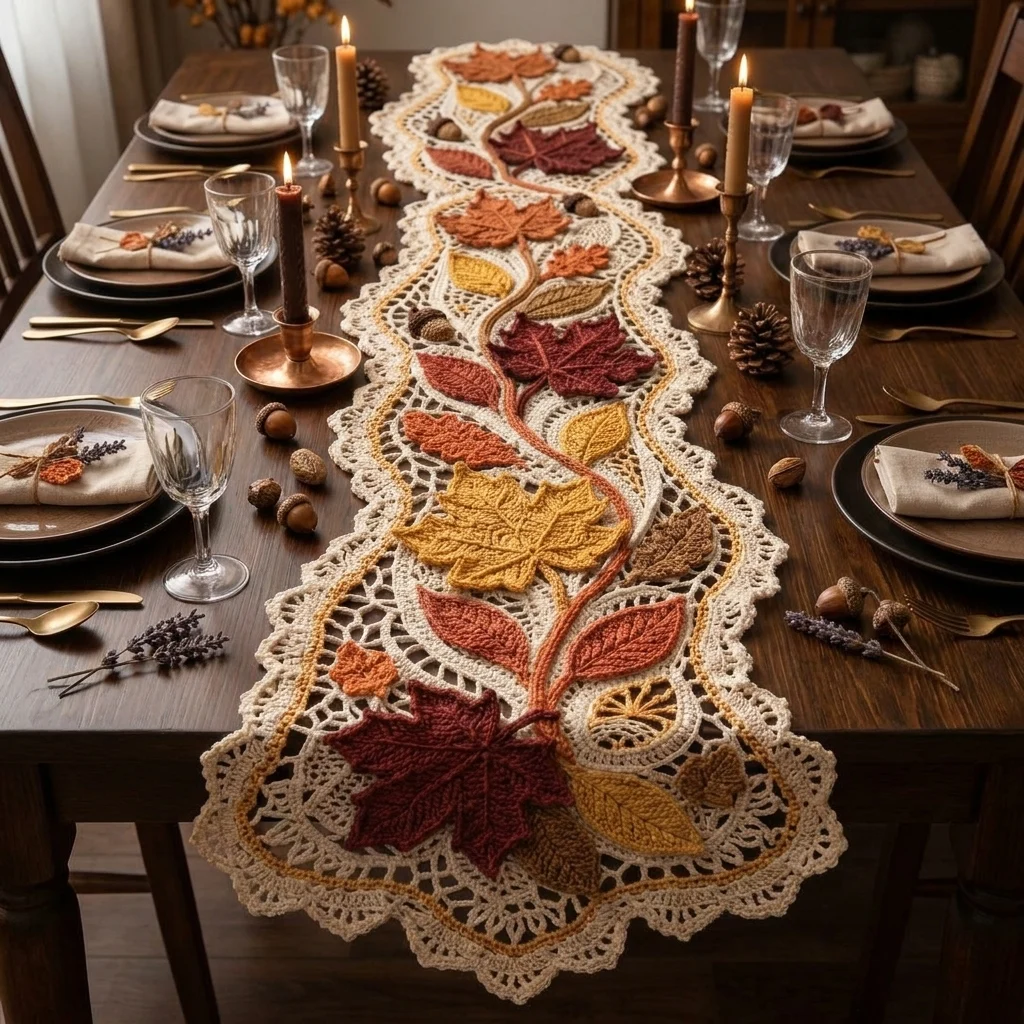
This crochet maple leaf vine table runner pattern climbs 8 large, heavily textured maple leaves, rust, burgundy, and gold, up a single winding vine laid over an open Irish-lace mesh background. Each leaf is worked in raised, ridged stitches so it stands up off the surface with real depth, quite unlike a flat, smooth motif, and the whole piece is framed by a scalloped double border with a hand-couched gold trim line winding alongside the vine.
What makes this design distinctive is the leaf texture itself: each lobe is built with front-post stitches worked in vertical columns to create the deep, ropey veining visible in the photo, rather than a flat chain-and-picot outline. Small acorns and a scattering of tiny accent leaves fill in around the main leaves, and a wide-open filet-and-net mesh, rather than a solid background, keeps the whole runner light despite how much texture sits on top of it. Expect to spend 26-32 hours total, most of it in the 8 large textured leaves.
This is an advanced pattern, best suited to someone comfortable with front-post relief stitches and freeform Irish lace assembly, rather than someone wanting a flat, evenly gridded design.
Materials
- Worsted weight cotton yarn, cream ~140g, mesh background and border
- Worsted weight yarn, rust orange ~40g, leaves
- Worsted weight yarn, burgundy wine ~40g, leaves
- Worsted weight yarn, mustard gold ~40g, leaves
- Worsted weight yarn, amber/tan ~20g, small accent leaves
- Worsted weight yarn, olive green ~20g, vine
- Small amount of brown yarn acorn caps
- Small amount of tan yarn acorn bodies
- Worsted weight yarn, gold/mustard ~15g, couched trim line
- Crochet hook, small 2.75 mm (US C/2), for mesh
- Crochet hook, larger 4 mm (US G/6), for leaves
- Tapestry/yarn needle
- Steam iron and pressing cloth, or blocking mat and pins
- Straight pins, for positioning motifs before sewing
- Sharp scissors
Abbreviations
chchainsl stslip stitchscsingle crochethdchalf double crochetdcdouble crochettrtreble/triple crochetFPdcfront post double crochetMRmagic ringch-spchain spaceincincrease (2 sc in one st)decdecrease (sc2tog)st(s)stitch(es)reprepeatFOfasten offLarge Textured Maple Leaf (make 8: mix of rust, burgundy, and mustard gold)
- Ch 4, sl st in first ch to form a small foundation ring.
- Lobe 1, top center: ch 13. Starting in 2nd ch from hook: sl st, sc 2, hdc 2, dc 4, tr 3 (11 sts). Sl st into ring.
- Lobe 2, upper right: ch 10. Starting in 2nd ch from hook: sl st, sc 2, hdc 2, dc 4 (8 sts). Sl st into ring.
- Lobe 3, lower right: ch 7. Starting in 2nd ch from hook: sl st, sc 2, hdc 3 (5 sts). Sl st into ring.
- Lobe 4, lower left: repeat Lobe 3 exactly. Sl st into ring.
- Lobe 5, upper left: repeat Lobe 2 exactly. Sl st into ring.
- Sl st into base of Lobe 1 to close. Do not FO; continue to the ridging round.
- Ridging round: working back around the outer edge of all 5 lobes, work FPdc around selected stitches down the center of each lobe to raise a ropey vein line from base to tip on every lobe, sl st between veins to travel along the edge.
- Sl st to close, FO leaving a 20-25 cm tail. Repeat to make 8 leaves total.
Small Accent Leaf (make approximately 6, in amber/tan)
- Ch 8. Starting in 2nd ch from hook: sl st, sc 2, hdc 2, dc 1, 3 dc in last ch.
- Continue down the other side: dc 1, hdc 2, sc 2, sl st in last ch.
- FO leaving a short tail for attaching. Repeat for approximately 6 total, tucked among the large leaves.
Vine
- With olive green, ch a length matching your planned motif line, approximately 90 cm, to form the vine’s main spine.
- Sl st back down the entire chain for body and a smooth edge. FO leaving tails at both ends.
Acorns (make approximately 4)
- Body, with tan: 6 sc in MR, inc around (12 sts), sc around even 2 rounds, then dec around back to 6 sts, leaving unstuffed or very lightly stuffed for a flatter accent. FO leaving a short tail.
- Cap, with brown: 6 sc in MR, inc around once (12 sts), sc around even 1 round. FO leaving a short tail.
- Sew the cap over the top of the body to form a complete acorn. Repeat for 4 total.
Background Net Mesh
- With cream and the smaller hook, ch 71. Row 1: dc in 6th ch from hook, *ch 3, skip 2 ch, dc in next ch; rep from * across. 22 open ch-3 spaces.
- Row 2: ch 6, turn, dc in first dc, *ch 3, dc in next dc; rep from * across, ending dc in top of turning ch.
- Rep Row 2 until the panel measures approximately 100 cm long, keeping the open net consistent throughout.
- FO after the final row, leaving a long tail for the edging join.
Scalloped Double Border
- With cream, join at one short end of the net panel. Round 1: sc evenly around the entire panel, working extra sc sts at each short end curve to shape it into a rounded oval.
- Round 2 (scallop round): *sk 2 sts, 5 dc in next st, sk 2 sts, sl st in next st; rep from * evenly around the entire panel, adjusting slightly at the curved ends so scallops stay even.
- Round 3 (second inner scallop, worked just inside Round 2): *sk 1 st, 3 hdc in next st, sk 1 st, sl st in next st; rep from * around to add a smaller inner scallop line just inside the outer one, matching the double-scallop look in the photo.
- Join with sl st to first st and FO. Weave in all ends.
Gold Trim Line
- With gold/mustard yarn, chain a long, single continuous strand, roughly 220 cm, to be couched onto the mesh background in a loose, winding S-curve running alongside the vine from end to end.
- Lay the chain in position on the blocked mesh, curving it loosely on one side of the central vine, and pin in place.
- Using a matching thread and needle, tack the chain down at intervals of about 3-4 cm, catching just the mesh background underneath so the gold line sits visibly on top.
Assembly
- Pin the olive vine down the center of the blocked mesh panel, curving it gently side to side rather than in a straight line.
- Position the 8 large leaves along the vine, alternating rust, burgundy, and mustard so no two adjacent leaves match, angling each one slightly outward from the stem, and pin.
- Tack the vine to the mesh at intervals, then sew each large leaf down firmly at its base into the vine and mesh below.
- Tuck and tack the small accent leaves into the gaps between large leaves, and position the acorns near 3-4 of the leaf bases.
- Add the gold trim line as its own final layer alongside the vine, once all leaves and acorns are secured.
Finishing
Once every leaf, acorn, and the gold trim line are attached, steam-block the entire runner face-down on a towel, being careful not to flatten the raised ridging on the large leaves; steam from a slight distance and let the heat do the work rather than pressing directly. Reshape the double scallop border by hand while still slightly damp, and let the piece dry completely flat. Check the whole surface once more for any leaf held by a single stitch and reinforce before considering the runner finished.
Tips for Success
- Work the FPdc ridging round at an even tension across all 5 lobes on each leaf; uneven ridging is much more visible on a large leaf than a small one.
- Block the mesh and border on their own before attaching anything, so the open net sits flat and even underneath the vine and leaves.
- Curve the vine and gold trim loosely rather than pinning them straight; the winding line is a key part of the finished look.
- Alternate leaf colors strictly along the vine rather than clustering same colors together, so the color rhythm reads clearly along the whole runner.
- Steam leaves from a slight distance rather than pressing directly, to avoid flattening the raised vein texture you worked hard to build.
Common Mistakes to Avoid
- Working the ridging round through the same stitches as the outer edge instead of a fresh FPdc pass loses the raised, ropey vein look. Fix: work FPdc stitches deliberately down the center of each lobe as a distinct final round.
- Attaching leaves before blocking the mesh causes the background to distort once steamed later. Fix: block the plain mesh and border first, then applique everything else.
- Pinning the vine in a straight line looks stiff against the lace background. Fix: curve it gently from side to side as you pin.
- Pressing the iron directly onto textured leaves during blocking flattens the ridging. Fix: steam from slightly above without full contact pressure.
- Skipping the second inner scallop round leaves the border looking plainer than the photo. Fix: work both scallop rounds as instructed for the double-edge look.
Ways to Customize This Pattern
- Reduce to 5 large leaves for a shorter runner suited to a smaller table.
- Swap the gold trim line for a second, thinner vine in a lighter green for a fuller, greener background instead of a metallic accent.
- Use only 2 leaf colors instead of 3 for a more restrained, cohesive palette.
- Skip the acorns and add small crocheted berry clusters instead for a different accent texture.
- Work the leaves in a single solid neutral throughout for a quieter, monochrome version of the same construction.
Frequently asked questions
Front-post stitches naturally draw fabric in more than flat single crochet. If your leaves are coming out noticeably smaller than intended, work the ridging round slightly looser than your instinct, or size up your leaf’s initial lobe chains by 1-2 stitches.
Yes, the runner is complete and holds together without it. The trim is a decorative accent layered on last, not a structural part of the assembly.
Pin it in short sections, adjusting the curve every 10-15 cm rather than pinning the whole length in one go. Stepping back to check the overall S-curve every few pins helps catch any straight stretches early.
Uneven ch-3 spacing during the mesh rows is the most common cause. Recount your chain spaces every few rows as you work, and block firmly with steam and pins to even out any minor inconsistencies afterward.
The finished Irish Lace Textured Maple Leaf Vine Table Runner Pattern

