Ivory Lace Angel Crochet Pattern with Pearl Wings
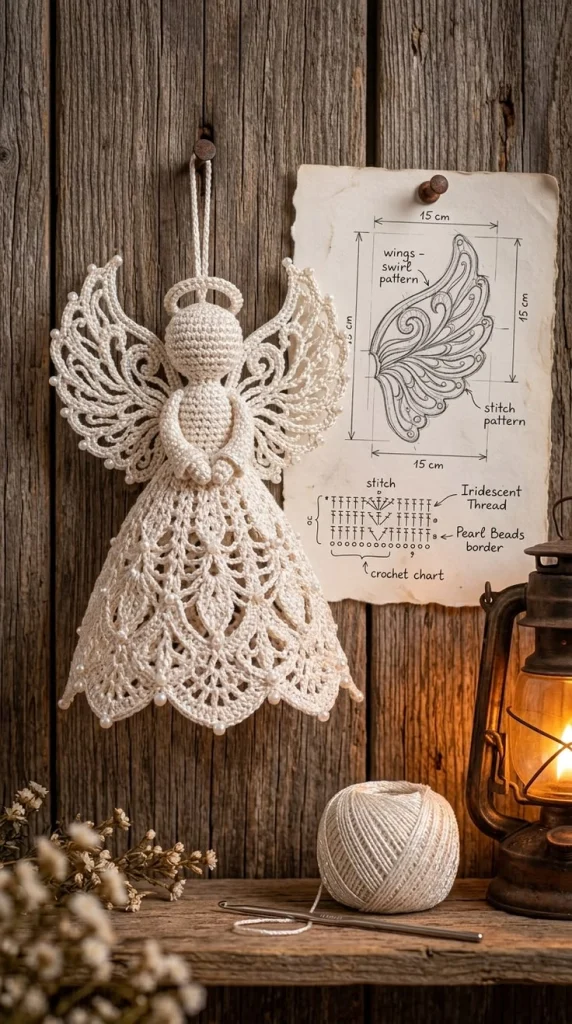
Advanced
For experienced crocheters who enjoy complex shaping, fine detail, and ambitious construction
Weekend Project
A satisfying weekend make — start Friday, finish Sunday, enjoy forever.
Handmade Gift
A beautiful keepsake — free forever. Read online or print at home.
About This Ivory Lace Angel Crochet Pattern with Pearl Wings
This lace angel crochet pattern creates an ivory hanging ornament with a softly rounded head, a raised halo, clasped hands and broad wings filled with curling lace. A flared, scalloped skirt and small pearl accents echo the delicate texture of the reference. The face stays plain, allowing the threadwork to carry the design.
Allow about 16–22 hours of crochet and assembly, plus time for blocking. This advanced project combines tightly worked stuffed shapes, expanding lace, individually shaped wing feathers and sewn scrollwork. It suits crocheters who enjoy careful finishing and building a decorative piece from several separate components.
Materials
- Ivory size 10 crochet cotton Approximately 450–550 m; use the same thread throughout
- 1.5 mm crochet hook Adjust if needed to achieve the solid-fabric gauge
- Polyester stuffing Approximately 12 g
- Ivory pearl beads Approximately 45 beads, 3 mm, plus 8 beads, 5 mm
- Fine ivory sewing thread and beading needle For attaching pearls after blocking
- Tapestry needle, stitch markers and rustproof pins For assembly and blocking
- Blocking board, ruler and washable fabric stiffener Choose a product suitable for cotton
- Smooth 8 mm dowel or pen barrel Temporary halo shaping support
Abbreviations
chchainsl stslip stitchscsingle crochethdchalf double crochetdcdouble crochettrtreble crochetinc2 sc in one stitchdecInvisible single crochet decrease over 2 stitchesMRmagic ringst / stsstitch / stitchesspspaceRSright sideUS crochet terminology. Instructions in parentheses followed by a repeat number are worked that many times. Turning chains do not count as stitches. In joined rounds, join to the first actual stitch; joining slip stitches do not count.
Gauge, Dimensions and Construction
- Solid gauge: 32 sc and 36 rows = 10 cm square, worked flat and measured without stretching. Make a swatch with ch 33 and 32 sc per row for 36 rows. Adjust the hook until the fabric is firm enough to contain stuffing.
- Lace check: work skirt Rounds 1–4 as written and gently spread them flat. The outside circumference should measure approximately 30–33 cm. Lace dimensions are adjusted during blocking rather than by pulling the solid stitches tight.
- Target dimensions: head approximately 3.6 cm across; stuffed torso approximately 5.5 cm long; skirt approximately 13 cm from waist to hem; each blocked wing approximately 10.5 cm wide × 14 cm high. Halo and assembly bring the total height to approximately 25 cm.
- Work the head, torso and arms in continuous rounds, marking the first stitch. Work the skirt in joined rounds and the wing foundations in turned rows. Everything is ivory; no color changes, eyes or facial embroidery are used.
- The ornament has a front and back. The skirt remains hollow, and the wings are stiffened separately before sewing. Beads are sewn on after blocking.
Head
- Round 1: 6 sc in MR. (6)
- Round 2: inc in each st. (12)
- Round 3: (sc, inc) 6 times. (18)
- Round 4: (2 sc, inc) 6 times. (24)
- Round 5: (3 sc, inc) 6 times. (30)
- Round 6: (4 sc, inc) 6 times. (36)
- Rounds 7–12: sc in each st. (36 each round)
- Round 13: (4 sc, dec) 6 times. (30)
- Round 14: (3 sc, dec) 6 times. (24)
- Round 15: (2 sc, dec) 6 times. (18) Stuff firmly, keeping the surface smooth.
- Round 16: (sc, dec) 6 times. (12)
- Round 17: sc in each st. (12) Fasten off with a 30 cm sewing tail. Leave this neck opening unclosed.
Torso
- Begin at the waist. Round 1: 6 sc in MR. (6)
- Round 2: inc in each st. (12)
- Round 3: (sc, inc) 6 times. (18)
- Round 4: (2 sc, inc) 6 times. (24)
- Round 5: (3 sc, inc) 6 times. (30)
- Rounds 6–9: sc in each st. (30 each round)
- Round 10: (3 sc, dec) 6 times. (24)
- Rounds 11–14: sc in each st. (24 each round)
- Round 15: (2 sc, dec) 6 times. (18)
- Rounds 16–18: sc in each st. (18 each round) Stuff the torso firmly, adding small amounts around the shoulder area.
- Round 19: (sc, dec) 6 times. (12)
- Round 20: sc in each st. (12) Fasten off. Keep the opening available for the neck seam.
Arms and Clasped Hands — Make Two
- Start at the hand. Round 1: 6 sc in MR. (6)
- Round 2: (sc, inc) 3 times. (9)
- Rounds 3–4: sc in each st. (9 each round)
- Round 5: (sc, dec) 3 times. (6) Place a tiny pinch of stuffing in the hand only.
- Rounds 6–12: sc in each st. (6 each round)
- Round 13: (sc, inc) 3 times. (9)
- Rounds 14–16: sc in each st. (9 each round) Leave the sleeve mostly unstuffed so it bends naturally.
- Flatten the opening and work 4 sc through both layers, leaving the unmatched edge stitch folded into the seam. Fasten off with a 25 cm tail.
- With separate thread, place two small straight stitches lengthwise on each hand to suggest the joined fingers. Keep these subtle and use the same ivory thread.
Eight-Panel Lace Skirt
- Foundation: ch 48 loosely; join without twisting. Round 1: ch 1, sc in each chain; join. (48 sc) The foundation edge is gathered to the torso later.
- Round 2: ch 1, (sc in next st, ch 5, skip 5 sts) 8 times; join. (8 sc, 8 ch-5 spaces)
- Round 3: sl st into the first space, ch 2. In each ch-5 space work (3 dc, ch 2, 3 dc); ch 1 between groups, including after the last group. Join. (48 dc, 8 ch-2 centers, 8 ch-1 gaps)
- Round 4: ch 2. For each panel, dc in its first 3 dc, work (2 dc, ch 2, 2 dc) in its center, dc in its last 3 dc, ch 2; skip the ch-1 gap. Join. (80 dc, 8 center spaces, 8 ch-2 gaps)
- Round 5: ch 2. For each panel, dc in its first 5 dc, work (dc, ch 2, dc) in its center, dc in its last 5 dc, ch 2; skip the gap. Join. (96 dc, 8 center spaces, 8 gaps)
- Round 6: ch 2. For each panel, (dc in next st, ch 1, skip next st) 3 times, work (2 dc, ch 2, 2 dc) in its center, (skip next st, ch 1, dc in next st) 3 times, ch 3; skip the gap. Join. (80 dc, 48 ch-1 eyelets, 8 center spaces, 8 ch-3 gaps)
- Round 7: ch 2. For each panel, work 1 dc in each of the 5 dc and each of the 3 ch-1 spaces on the first side; work (dc, ch 2, dc) in the center; work 1 dc in each of the 5 dc and each of the 3 ch-1 spaces on the second side; ch 3 and skip the gap. Join. (144 dc: 18 per panel, plus 8 centers and 8 gaps)
- Round 8: ch 2. For each panel, dc in its first 9 dc, work (dc, ch 2, dc) in the center, dc in its last 9 dc, ch 3; skip the gap. Join. (160 dc: 20 per panel, plus 8 centers and 8 gaps)
- Round 9: ch 2. For each panel, (dc in next st, ch 1, skip next st) 5 times, work (2 dc, ch 2, 2 dc) in the center, (skip next st, ch 1, dc in next st) 5 times, ch 3; skip the gap. Join. (112 dc, 80 eyelets, 8 centers, 8 gaps)
- Round 10: ch 2. For each panel, work 1 dc in each of the 7 dc and each of the 5 eyelets on the first side; work (dc, ch 2, dc) in the center; work 1 dc in each of the 7 dc and each of the 5 eyelets on the second side; ch 3 and skip the gap. Join. (208 dc: 26 per panel, plus 8 centers and 8 gaps)
- Round 11: ch 2. For each panel, dc in its first 13 dc, work (dc, ch 2, dc) in the center, dc in its last 13 dc, ch 3; skip the gap. Join. (224 dc: 28 per panel, plus 8 centers and 8 gaps)
- Round 12: ch 2. For each panel, (dc in next st, ch 1, skip next st) 7 times, work (2 dc, ch 2, 2 dc) in the center, (skip next st, ch 1, dc in next st) 7 times, ch 3; skip the gap. Join. (144 dc, 112 eyelets, 8 centers, 8 gaps)
- Round 13: ch 2. For each panel, work 1 dc in each of the 9 dc and each of the 7 eyelets on the first side; work (dc, ch 2, dc) in the center; work 1 dc in each of the 9 dc and each of the 7 eyelets on the second side; ch 3 and skip the gap. Join. (272 dc: 34 per panel, plus 8 centers and 8 gaps)
- Round 14: ch 1. For each panel, sc in its first 17 dc, work (sc, ch 3, sc) in the center, sc in its last 17 dc, then work 2 sc in the gap. Join and fasten off. (304 sc, 8 ch-3 tips)
- Block the skirt with eight distinct pointed scallops. Target a 13 cm waist-to-tip length and approximately 48 cm around the hem. Let the fabric form soft folds instead of stretching it into a flat circle.
Wing Foundations — Make Two
- Make two identical mesh triangles, then turn one over during assembly. Row 1: ch 26, sc in second chain and each remaining chain. (25 sc)
- Row 2: ch 1, turn, sc in first st, (ch 3, skip 2 sts, sc in next st) 8 times. (9 sc, 8 spaces)
- Row 3: ch 1, turn, sl st into first space, sc in that space, (ch 3, sc in next space) 7 times. Leave the edge sc unworked. (8 sc, 7 spaces)
- Row 4: ch 1, turn, sl st into first space, sc in that space, (ch 3, sc in next space) 6 times. (7 sc, 6 spaces)
- Row 5: repeat the shaping method, working into successive spaces only. (6 sc, 5 spaces)
- Row 6: repeat the shaping method. (5 sc, 4 spaces)
- Row 7: repeat the shaping method. (4 sc, 3 spaces)
- Row 8: repeat the shaping method. (3 sc, 2 spaces)
- Row 9: repeat the shaping method. (2 sc, 1 space) Fasten off with a 30 cm tail.
- Orient each triangle with its 25-stitch foundation edge vertical beside the angel. The narrow Row 9 end points outward. Before adding feathers, mark foundation stitches 1, 4, 7, 10, 13, 16, 19, 22 and 25, counting from the intended lower end.
Wing Feather Loops
- Work on the exposed foundation edge of each wing. Join at marked stitch 1. The eight feathers span the eight intervals between the nine markers.
- Feather 1: ch 20, sl st in marked stitch 4. Turn; work 24 sc around the chain loop, enclosing the chain rather than stitching into individual chains. Sl st at the starting anchor; turn and sl st in each of the 24 sc back to stitch 4.
- Feather 2: from stitch 4, ch 24 and anchor at stitch 7. Turn; work 28 sc around the loop, sl st at its starting anchor, turn and sl st in all 28 sc back to stitch 7.
- Feather 3: from stitch 7, ch 28 and anchor at stitch 10. Cover the loop with 32 sc, anchor, then return with 32 sl st as above.
- Feather 4: from stitch 10, ch 32 and anchor at stitch 13. Cover with 36 sc; return with 36 sl st.
- Feather 5: from stitch 13, ch 36 and anchor at stitch 16. Cover with 40 sc; return with 40 sl st.
- Feather 6: from stitch 16, ch 40 and anchor at stitch 19. Cover with 44 sc; return with 44 sl st.
- Feather 7: from stitch 19, ch 44 and anchor at stitch 22. Cover with 48 sc; return with 48 sl st.
- Feather 8: from stitch 22, ch 48 and anchor at stitch 25. Cover with 52 sc; return with 52 sl st. Fasten off.
- Spread the loops outward like overlapping feathers, with the longest at the top. The mesh foundation sits underneath their inner halves. Pin each wing to approximately 10.5 × 14 cm. Curve the uppermost loop upward and the lowest loops gently downward.
- Using sewing thread, tack each feather to the next where their sides touch, approximately one-third of the distance from the foundation to the tip. Add a second tiny tack where each loop crosses the mesh. These connections hold the fan shape after the pins are removed.
Raised Wing Scrolls — Make Two Sets
- Small scroll: ch 25; starting in the second chain, work 2 sc in each of the first 8 chains, then sc in each of the remaining 16 chains. (32 sc) Fasten off with a 35 cm sewing tail.
- Medium scroll: ch 37; starting in the second chain, work 2 sc in each of the first 12 chains, then sc in each of the remaining 24 chains. (48 sc) Leave a 40 cm tail.
- Large scroll: ch 49; starting in the second chain, work 2 sc in each of the first 16 chains, then sc in each of the remaining 32 chains. (64 sc) Leave a 50 cm tail.
- Let the increased ends curl inward. Pin one set onto each wing, mirrored: small curl near the lower third, medium curl in the middle and large curl rising into the upper feather. Direct all straight tails toward the inner foundation edge.
- Sew through the back loops of the cords into the mesh and feather edges wherever they meet. Secure every 5–8 mm and at each curl center. Keep stitches hidden beneath the raised cords, and avoid pulling the mesh out of shape.
Halo and Hanging Loop
- Halo foundation: ch 36 loosely and join without twisting. Round 1: ch 1, sc in each chain; join. (36 sc)
- Round 2: ch 1, sc in each st; join. (36 sc)
- Round 3: sl st in each st; join and fasten off with a 40 cm tail. (36 sl st) Shape into an oval approximately 4 cm wide × 1.5 cm deep.
- Halo support: ch 9, sc in second chain and each remaining chain. (8 sc) Fasten off with tails at both ends. Stiffen around a smooth 8 mm dowel to form a shallow curved support; remove the dowel when dry.
- Hanging cord: ch 90; sl st in second chain and each remaining chain. (89 sl st) Fasten off with a 30 cm tail at each end. Fold into a loop and sew both ends to the upper back of the torso, spanning several stitches. The cord passes behind the head and through the rear of the halo.
Blocking and Pearl Placement
- Wet-block the skirt and both completed wings. Apply fabric stiffener to the wings, halo and halo support according to its label. Use only a light application on the skirt so the folds remain soft. Keep stiffener off the stuffed pieces.
- Dry the wings fully at their target size. Pin the second as a mirror image of the first. Support the skirt over a covered cone or a bowl turned upside down, keeping its waist approximately 4 cm across and its hem approximately 15 cm across.
- Sew one 3 mm pearl at the farthest point of each feather loop: 8 per wing. Add one 3 mm pearl beside each of the three scroll curls: 3 per wing.
- Sew one 5 mm pearl into each of the eight skirt-tip chain spaces. Add sixteen 3 mm pearls to the skirt, two per panel, at the outside ends of the eyelet bands in Round 9. Add six more 3 mm pearls around the front half of the waist seam after assembly. This uses 44 small pearls and 8 large pearls.
- Attach each bead with three thread passes and secure the thread on the reverse. This is a decorative hanging ornament with small attached parts; keep it out of reach of young children.
Finishing
Join the head’s 12-stitch opening to the torso’s 12-stitch opening, matching stitches one for one. Add a little stuffing before closing the final section of seam. Sew the flattened sleeve ends to the torso at Rounds 15–17, one on each side. Curve the arms forward and down, then sew the hands together over the center front at torso Rounds 6–8. Add a small hidden stitch at each elbow to hold the pose.
Run a gathering thread through the skirt’s 48 foundation stitches. Draw the opening around torso Round 4, distribute the eight panels evenly and sew all around. Place the wings behind the shoulders with their foundation edges vertical, overlapping their inner edges by approximately 1 cm at the back. Sew each foundation to the torso from Rounds 8–17, then add a crosswise securing seam through both wing roots. Keep the outer feather loops free.
Sew the curved halo support to the back of the head at Rounds 6–8. Attach the halo to its upper end so it sits just above the crown, and add two small stitches between the halo’s lower front edge and the crown for stability. Fit the hanging cord through the rear of the halo without making the halo carry the ornament’s weight. Add the waist pearls, hide all thread ends and hang the angel to check that the wings sit level.
Tips for Success
- Mark the center space of every skirt panel with a removable marker. Its identity matters more than the joining point as the panels widen.
- When covering feather chains, slide the stitches along the chain before adding the return slip stitches. Even coverage gives smoother outer curves.
- Pin the wing scrolls in place before sewing. Keep their straight tails visible as branching stems rather than stacking all three curls together.
- Stuff the head in small portions. An evenly rounded head contrasts neatly with the open lace and prevents the neck from looking pinched.
- Check the hanging balance before attaching pearls. Small adjustments to the wing-root seams are easier without beads in the way.
Common Mistakes to Avoid
- Working into gap chains on the skirt’s solid rounds adds unwanted width. Skip each inter-panel gap and work only the stated new chains between panels.
- Missing an eyelet in Rounds 7, 10 or 13 makes one panel narrower. Count each side before working the center increase: 8, 12 and 16 dc respectively.
- Pulling the feather return slip stitches tight shortens the loops. Use a relaxed tension or a slightly larger hook for that return pass.
- Attaching wings only at the shoulders lets them rotate forward. Secure the full inner foundation edge and include the crosswise seam through both roots.
- Adding pearls before stiffening can trap glue around their holes. Finish all wet work first, then sew on the beads once the cotton is fully dry.
Ways to Customize This Pattern
- Use warm ecru cotton with cream pearls for a softer antique finish while preserving the reference’s pale palette.
- Replace pearls with tiny sewn cotton knots for a completely matte ornament. Keep the same placement to retain the dotted border.
- Carry a fine pearlescent filament alongside the thread for the halo and scroll cords only. Swatch first because the extra strand changes stiffness.
- For a larger wall hanging, use size 5 cotton and a suitable hook throughout. Recheck gauge and expect different finished dimensions and thread requirements.
Frequently asked questions
They are designed to use stiffened cotton, joined feather loops and sewn scrolls for support. Let them dry completely before removing the pins. If they soften in humid conditions, reblock and reapply the stiffener according to its instructions.
The 48-stitch foundation provides eight equal lace panels. Gathering that edge to the torso creates the full folds visible beneath the hands. Spread the gathers evenly before sewing the skirt down.
Turn one foundation over before arranging its feather loops and scrolls. The mesh is reversible. Pin both wings side by side with their inner edges facing each other, then place the scrolls as mirror images.
Dust it gently or spot-clean the solid pieces. Full washing may remove the stiffener and distort the assembled wings. If a full wash is necessary, follow the thread, bead and stiffener care instructions and plan to reshape the lace afterward.
The finished Ivory Lace Angel Crochet Pattern with Pearl Wings

