Advanced
For experienced crocheters who enjoy complex shaping, fine detail, and ambitious construction
Single-Day Project
A satisfying project you can complete in a single afternoon or evening.
Handmade Gift
A beautiful keepsake — free forever. Read online or print at home.
About This Ivory Lace Angel Crochet Pattern
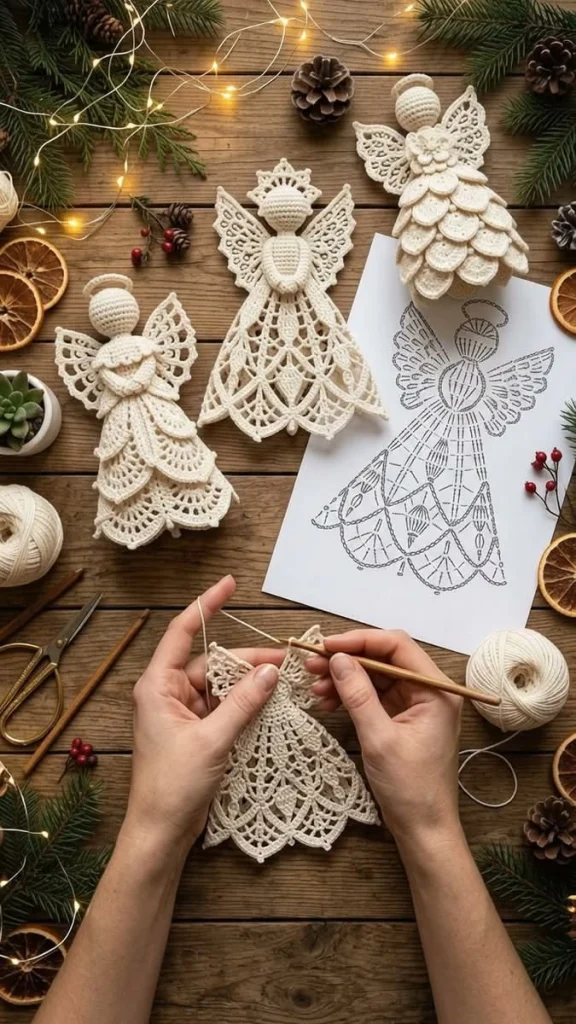
This lace angel crochet pattern creates an ivory ornament with a softly rounded head, a fitted bodice, folded arms, openwork wings, and a sweeping scalloped skirt. Its pointed crown and unembroidered face follow the quiet appearance of the central angel in the reference photograph. Dense crochet gives the upper body structure, while blocked lace supplies the width and movement below.
Allow approximately 10–14 hours of crochet and assembly, plus time for the lace to dry. This advanced project suits crocheters comfortable with fine thread, counted lace, surface crochet, and shaping separate pieces. The skirt and wings need careful blocking, so assemble the angel only after their final shapes have dried.
Materials
- Ivory size 3 crochet cotton Approximately 250–300 m; use the same thread throughout
- 2.0 mm crochet hook Adjust if necessary to obtain the dense-fabric gauge
- Polyester stuffing Approximately 10 g for head, torso, and arms
- Tapestry needle and fine sewing needle For assembly and securing lace details
- Ivory sewing thread For discreet wing and crown attachment
- Stitch markers, scissors, ruler, and rustproof pins Mark the torso front and skirt divisions
- Blocking board and washable fabric stiffener Choose a product suitable for cotton and follow its instructions
- Small plastic-covered cone or rolled card form For shaping the skirt while it dries
Abbreviations
MRmagic ringchchainsl stslip stitchscsingle crochethdchalf double crochetdcdouble crochettrtreble crochetinc2 sc in the same stitchdecinvisible single crochet decrease over 2 stitchesFLOfront loop onlyBLOback loop onlypicotch 3, sl st into the first of those 3 chains; adds no stitch to the working edgest / stsstitch / stitchesGauge, Size, and Construction Notes
- Use US crochet terminology. Dense-fabric gauge: 26 sc and 28 rows measure 10 × 10 cm, worked flat and lightly blocked. Make a swatch of at least 30 sc before starting. Stuffing must not show between stitches.
- Lace checkpoint: after skirt Round 8, block the skirt temporarily over a cone. The distance from its attachment edge to the working edge should be approximately 7–8 cm. The completed skirt should measure approximately 9–10 cm deep and 14–16 cm across when gently flattened.
- Target dimensions after assembly: 18–20 cm from crown tip to skirt hem, head approximately 3.5–4 cm across, and wingspan approximately 15–17 cm. Lace tension and blocking affect these measurements.
- Work head, torso, and arms in continuous rounds. Mark the first stitch and move the marker each round. Skirt and crown rounds are joined; wing rows are turned.
- A starting ch 1 never counts as a stitch. Where specified, ch 3 counts as the first dc. Skirt chain spaces and picots are counted separately from stitches.
- Make one head, one torso, two arms, two wings, one crown, and one attached skirt. Use ivory throughout; no color changes are required.
Head
- Round 1: Work 6 sc in MR. Tighten the ring. (6 sts)
- Round 2: Inc in every st. (12 sts)
- Round 3: Repeat (sc in next st, inc) 6 times. (18 sts)
- Round 4: Repeat (sc in next 2 sts, inc) 6 times. (24 sts)
- Round 5: Repeat (sc in next 3 sts, inc) 6 times. (30 sts)
- Rounds 6–10: Sc in every st for 5 rounds. (30 sts per round)
- Round 11: Repeat (sc in next 3 sts, dec) 6 times. (24 sts)
- Round 12: Repeat (sc in next 2 sts, dec) 6 times. (18 sts) Stuff evenly, maintaining a rounded shape. Do not install safety eyes.
- Round 13: Repeat (sc in next st, dec) 6 times. (12 sts)
- Round 14: Dec 6 times. (6 sts) Finish stuffing through the opening, fasten off, and draw the remaining stitches closed. Bury the tail. The closure becomes the underside of the head.
Torso and Skirt Attachment Loops
- Begin at the neck. Round 1: Work 6 sc in MR. (6 sts)
- Round 2: Inc in every st. (12 sts)
- Rounds 3–4: Sc in every st for 2 rounds. (12 sts per round)
- Round 5: Repeat (sc in next st, inc) 6 times. (18 sts)
- Rounds 6–7: Sc in every st for 2 rounds. (18 sts per round)
- Round 8: Repeat (sc in next 2 sts, inc) 6 times. (24 sts)
- Rounds 9–10: Sc in every st for 2 rounds. (24 sts per round) Mark the center front halfway around Round 10 from the beginning-of-round marker.
- Round 11: Working BLO throughout, repeat (sc in next 2 sts, dec) 6 times. (18 sts) The 24 unused front loops of Round 10 form the skirt attachment edge. Stuff the torso firmly enough to support the head.
- Round 12: Repeat (sc in next st, dec) 6 times. (12 sts)
- Round 13: Dec 6 times. (6 sts) Fasten off and draw closed. Bury the tail inside the torso.
Folded Arms — Make Two
- Begin at the hand. Round 1: Work 6 sc in MR. (6 sts)
- Round 2: Repeat (sc in next 2 sts, inc) twice. (8 sts)
- Rounds 3–4: Sc in every st for 2 rounds. (8 sts per round) Add a small pinch of stuffing to the hand.
- Round 5: Repeat (sc in next 2 sts, dec) twice. (6 sts)
- Rounds 6–11: Sc in every st for 6 rounds. (6 sts per round) Leave the upper arm unstuffed so it can curve naturally across the bodice.
- Flatten the opening, matching the 3 front stitches to the 3 back stitches. Work 3 sc through both layers. Fasten off with a 25 cm sewing tail. Each arm has a rounded hand and a narrow, flexible upper section.
Openwork Skirt
- Hold the torso upright with its neck above the working edge. Join ivory thread to an unused front loop of torso Round 10 at the center back. Round 1: Ch 3, ch 2, skip the next unused loop; repeat (dc in next unused loop, ch 2, skip next unused loop) 11 times. Sl st into the third starting chain. (12 dc and 12 ch-2 spaces; all 24 attachment loops used)
- Round 2: Ch 3, ch 3; repeat (dc in next dc, ch 3) 11 times. Join to the third starting chain. Work into the tops of the dc, leaving the previous chain spaces unworked. (12 dc and 12 ch-3 spaces)
- Round 3: Ch 3, ch 3; repeat (dc in next dc, ch 3) 11 times. Join. (12 dc and 12 ch-3 spaces)
- Round 4: Ch 3, ch 4; repeat (dc in next dc, ch 4) 11 times. Join. (12 dc and 12 ch-4 spaces)
- Round 5: Ch 3, ch 4; repeat (dc in next dc, ch 4) 11 times. Join. (12 dc and 12 ch-4 spaces)
- Round 6: Ch 3, ch 5; repeat (dc in next dc, ch 5) 11 times. Join. (12 dc and 12 ch-5 spaces)
- Round 7: Ch 3, ch 5; repeat (dc in next dc, ch 5) 11 times. Join. (12 dc and 12 ch-5 spaces)
- Round 8: Ch 3, ch 5; repeat (dc in next dc, ch 5) 11 times. Join. (12 dc and 12 ch-5 spaces)
- Round 9: Ch 1, sc in the same dc. Repeat (ch 9, skip the next ch-5 space, next dc, and next ch-5 space, sc in next dc) 5 times. Ch 9, skip the final ch-5 space, next dc, and final ch-5 space; sl st into the first sc. (6 sc and 6 ch-9 arches)
- Round 10: Sl st into the first ch-9 arch. Ch 1. In each of the 6 arches work (sc, hdc, 3 dc, tr, picot, tr, 3 dc, hdc, sc). Leave the 6 anchoring sc unworked. Join to the first sc of this round. (72 sts and 6 picots; 12 sts per scallop) Fasten off and weave in the end.
Raised Skirt Tracery
- Lay the skirt with the center back away from you. Number the 12 vertical dc columns of Round 8 clockwise, starting with the beginning-of-round column. The six Round 9 sc anchors sit over columns 1, 3, 5, 7, 9, and 11. Each scallop is centered below an even-numbered column.
- Make one decorative V above each scallop. Join thread around the post of the Round 8 dc in column 1 with a sl st. Ch 10, then sl st around the post of the Round 4 dc in column 2. Ch 10, then sl st around the post of the Round 8 dc in column 3. Fasten off. This makes 2 chain lengths and 3 attachment points.
- Repeat the previous step across column groups 3–4–5, 5–6–7, 7–8–9, 9–10–11, and 11–12–1. (6 V motifs total) Pass the needle through the back of each attachment point to secure the tails.
- Keep these chains on the outside of the skirt. During blocking, pin each V so its two sides lie smoothly without pulling its upper point downward. The V motifs are decorative and do not change the skirt stitch counts.
Fan Lace Wings — Make Two
- Row 1: In MR, ch 3, then work 7 dc. Tighten the ring enough to form a semicircular fan, leaving the two row ends separate. Turn. (8 dc, including starting ch 3)
- Row 2: Ch 3, dc in the next st, then 2 dc in each of the remaining 6 sts. Turn. (14 dc, including starting ch 3)
- Row 3: Ch 3, dc in the same first st; dc in each of the remaining 13 sts. Turn. (15 dc, including starting ch 3)
- Row 4: Ch 3; repeat (ch 2, skip next st, dc in next st) 7 times. Turn. (8 dc and 7 ch-2 spaces)
- Row 5: Ch 1, sc in first dc; repeat (ch 5, sc in next dc) 7 times, leaving the ch-2 spaces unworked. Turn. (8 sc and 7 ch-5 arches)
- Row 6: Ch 1. In each ch-5 arch work (sc, hdc, 3 dc, picot, hdc, sc), leaving the anchoring sc unworked. (49 sts and 7 picots; 7 sts per arch) Fasten off, leaving a 35 cm tail.
- With the fan lying flat, bring the first and last stitches of Row 1 together and tack them to each other. This gathers the inner edge into a narrow wing root. Do not sew the outer rows together. Weave the MR tail securely through the dense inner rows.
- Block each wing to approximately 7 × 8 cm, with the root at the lower inner corner and the outermost upper picot drawn into a point. Mirror the shapes during blocking by turning one wing over.
Six-Point Crown
- Ch 24 loosely. Without twisting, sl st into the first chain to form a ring. Leave a 25 cm starting tail for attachment.
- Round 1: Ch 1, sc in each chain. Join to the first sc. (24 sts)
- Round 2: Ch 1, sc in every st. Join. (24 sts)
- Round 3: Repeat (skip next st, work dc, tr, picot, and dc in next st; skip next st, sl st in next st) 6 times. (6 points; 18 tall stitches, 6 joining sl sts, and 6 picots) Each repeat uses 4 base stitches.
- Fasten off. Block the crown upright over a plastic-covered cylinder approximately 2.5–3 cm in diameter, opening the points evenly. Use a light application of stiffener and let dry completely.
Blocking and Structural Assembly
- Keep the stuffed torso above the blocking form and place only the skirt over the plastic-covered cone. Apply stiffener to the lace according to the product directions. Pin the six hem picots evenly around the base and smooth the raised V motifs. Let dry fully before removing the form.
- Stiffen and block the wings separately. Support the dense roots while drawing out the lace edges. Keep the picots distinct, and make the two wings the same size.
- Place the head closure over torso Round 1. Sew a continuous circle through the head underside and the 6 neck stitches, then make a second pass through the same seam. Keep the head upright and the center-front marker facing forward.
- Pin the flattened arm ends to the sides of torso Rounds 4–5. Curve both arms forward and downward. Place their rounded hands together at the center front around torso Rounds 8–9. Sew the upper ends securely, tack each elbow to the bodice, and stitch the hands together.
- Position the wing roots on the upper back across torso Rounds 4–7, approximately 1 cm apart. The pointed edges extend upward beside the head, with the fans opening outward. Sew each root firmly along a 1.5–2 cm attachment line using small stitches through the dense wing rows and torso. Add a second line of stitches 5 mm outward from the first to prevent swiveling.
- Center the crown on the top of the head, with one point facing forward. Sew its lower edge to the head at all six intervals between points. Keep the points free.
Finishing
Set the angel upright and check that the skirt supports the torso evenly. If one scallop lifts, lightly dampen that section and pin it back into shape over the form. Adjust the wings at their sewn roots until they frame the head evenly, then bury every remaining tail.
Leave the face plain and keep the finish entirely ivory. The raised skirt chains, curved arms, and pointed wing edges provide the detail. Display the angel on a dry indoor surface; the blocked lace is decorative and will need reshaping after washing.
Tips for Success
- Mark every second dc column of skirt Round 8 before making Round 9. Six evenly spaced anchors produce six equal hem scallops.
- Use the same hand tension for both wings, then pin them together briefly before stiffening to compare their outlines.
- Place a small piece of plastic between the torso and damp skirt during stiffening to keep the stuffing dry.
- Pin the arms before sewing the wings. Their position is easier to adjust while the back remains accessible.
- Keep the raised chain motifs relaxed. They should rest on the mesh rather than shorten the skirt.
Common Mistakes to Avoid
- Working torso Round 11 through both loops removes the skirt attachment edge. Undo that round and work BLO before continuing.
- Adding dc into the skirt chain spaces increases the number of columns. Rounds 2–8 each retain exactly 12 dc; work only into the previous dc tops.
- Making twelve hem arches creates the wrong silhouette. Each Round 9 arch bridges two previous spaces and skips one intervening dc.
- Counting picot chains as edge stitches distorts the shell totals. A skirt scallop has 12 stitches plus its picot; a wing shell has 7 stitches plus its picot.
- Attaching a wing at a single point lets it rotate. Use both attachment lines described in assembly, keeping stitches within its dense root.
Ways to Customize This Pattern
- Use warm cream or pale ecru cotton for a slightly aged appearance while preserving the monochrome lace.
- Make a smaller ornament with size 10 thread and a 1.5 mm hook, keeping all counts unchanged. Establish a new gauge and expect different dimensions.
- For a fuller skirt, block the hem wider while keeping its depth near 9–10 cm; spread all six scallops equally.
- For a hanging display, sew a doubled ivory thread loop through the head behind the crown. Anchor it through several dense stitches, and retain the stiffened skirt and wings.
Frequently asked questions
The stiffened skirt is intended to support the lightweight upper body after the blocking cone is removed. Its success depends on your thread, tension, and stiffener. If the lace softens in humid conditions, display it over a clean, narrow cone concealed beneath the skirt.
Round 9 joins the mesh into larger sections. Each ch-9 arch spans two ch-5 spaces and the dc between them, reducing twelve mesh spaces to six broad scallop foundations.
The reference angels have plain ivory heads without visible facial features or hair. Leave those details off for the closest match; the crown provides the head detail.
Dust it with a soft, dry brush. If washing becomes necessary, follow the cotton and stiffener care instructions, handle the stuffed sections gently, and reshape the skirt, crown, and wings while drying. Reapply compatible stiffener if needed.
The finished Ivory Lace Angel Crochet Pattern

