Ivory Poinsettia Crochet Ornament Pattern
Advanced
For experienced crocheters who enjoy complex shaping, fine detail, and ambitious construction
Single-Day Project
A satisfying project you can complete in a single afternoon or evening.
Handmade Gift
A beautiful keepsake — free forever. Read online or print at home.
About This Ivory Poinsettia Crochet Ornament Pattern
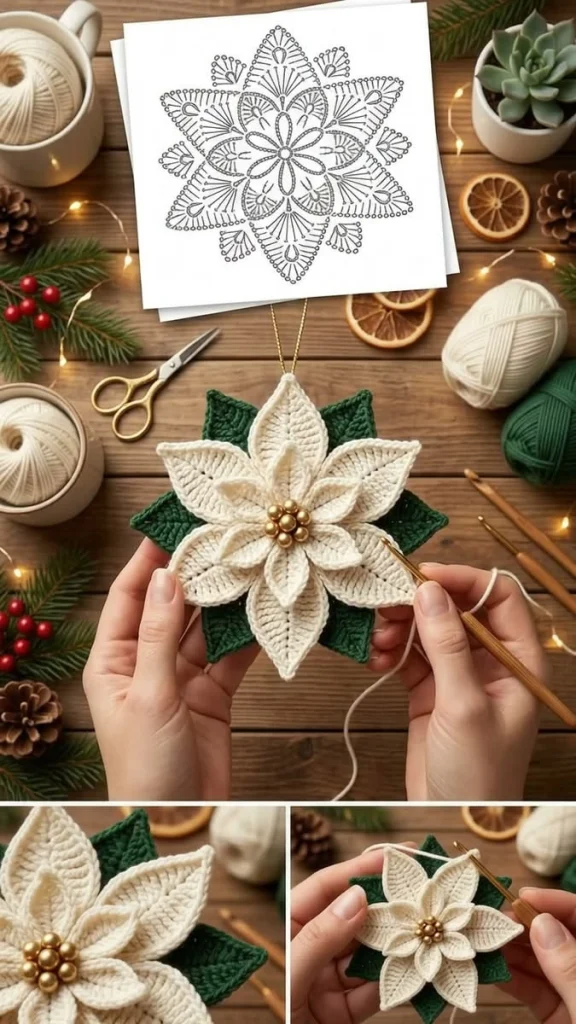
This poinsettia crochet ornament pattern creates a dimensional ivory flower with six broad outer petals, six smaller cupped petals, forest-green leaves, and a golden center. A fine gold hanging loop finishes the ornament, keeping the layered flower as the main feature.
Allow approximately 7–9 hours for crocheting, blocking, surface stitching, and assembly. This advanced project suits crocheters comfortable working around foundation chains, shaping with graduated stitch heights, and sewing several layers together. The flower and leaves remain unstuffed; only the small crocheted golden berries receive a little filling.
Materials
- Ivory DK cotton yarn Approximately 100 m
- Forest-green DK cotton yarn Approximately 60 m
- Golden-yellow DK cotton yarn with a subtle sheen Approximately 12 m for the berry cluster
- Crochet hook 2.75 mm, or size needed for gauge
- Polyester filling A small pinch for each of seven berries
- Gold hanging cord 35 cm
- Tapestry needle, scissors, stitch markers, blocking pins, and blocking mat For shaping and assembly
Abbreviations
chchainsl stslip stitchscsingle crochethdchalf double crochetdcdouble crochettrtreble crochetinc2 single crochet in one stitchdecInvisible single crochet decrease over two stitchesMRmagic ringststitchGauge, Size, and Construction Notes
- Use US crochet terminology. Gauge: 22 sc and 24 rows = 10 × 10 cm after light blocking. For a swatch, ch 23; sc in the second chain from the hook and each chain across, giving 22 sc. Work 23 more rows of 22 sc, beginning each with ch 1 and turning. Turning chains do not count as stitches.
- The finished ornament measures approximately 19 cm across and 3 cm deep. Target blocked component sizes are: large petals 8 × 4 cm, small petals 5 × 2.5 cm, and green leaves 6.5 × 3.5 cm. These are sizing targets; yarn and stitch-height differences affect the result.
- Make six large ivory petals, six small ivory petals, six green leaves, one ivory mounting disk, one green backing disk, and seven golden berries. Work petals and leaves in joined rounds without turning. Work disks and berries in continuous rounds, marking the first stitch.
- Petal counts exclude chains and joining slip stitches. Each petal has a pointed outer end with a ch-2 space and a blunt attachment end with a ch-1 space. The attachment end is beside the beginning of the foundation chain.
Large Ivory Petals — Make 6
- Foundation: With ivory, ch 16. Leave a 20 cm starting tail for shaping the base.
- Round 1: Starting in the second chain from the hook, work sc, hdc, dc, tr in each of the next 9 chains, dc, hdc, sc. All 15 available chains have been used. Ch 2 for the outer tip. Rotate the work and crochet into the unused loops along the opposite side of the foundation: sc, hdc, dc, tr in each of the next 9 chains, dc, hdc, sc. Ch 1 for the base; join with a sl st to the first sc. Count: 30 stitches, one ch-2 tip space, and one ch-1 base space.
- Round 2: Ch 1. Sc in each of the first 15 stitches; work (sc, ch 2, sc) in the tip space; sc in each of the next 15 stitches; work (sc, ch 1, sc) in the base space. Join with a sl st to the first sc. Count: 34 sc, one ch-2 tip space, and one ch-1 base space. Fasten off, leaving a 30 cm sewing tail.
- Shape the base: Fold the petal lengthwise with its right side outward. Using the starting tail, whipstitch the two long edges together over the first 1 cm above the base. Secure the seam and weave in this tail. Open the rest of the petal, leaving a shallow cup at its attachment end.
Small Ivory Petals — Make 6
- Foundation: With ivory, ch 10. Leave a 20 cm starting tail.
- Round 1: Starting in the second chain from the hook, work sc, hdc, dc, tr in each of the next 3 chains, dc, hdc, sc. Ch 2. Along the opposite side of the foundation, work sc, hdc, dc, tr in each of the next 3 chains, dc, hdc, sc. Ch 1 and join with a sl st to the first sc. Count: 18 stitches, one ch-2 tip space, and one ch-1 base space.
- Round 2: Ch 1. Sc in each of the first 9 stitches; work (sc, ch 2, sc) in the tip space; sc in each of the next 9 stitches; work (sc, ch 1, sc) in the base space. Join with a sl st to the first sc. Count: 22 sc, one ch-2 tip space, and one ch-1 base space. Fasten off, leaving a 25 cm sewing tail.
- Shape the base: Fold lengthwise with the right side outward. Whipstitch the opposing long edges together for 1.2 cm above the base using the starting tail. Secure and weave in this tail. Allow the remaining petal to open into a narrow, upright cup.
Forest-Green Leaves — Make 6
- Foundation: With green, ch 13. Leave a 15 cm starting tail.
- Round 1: Starting in the second chain from the hook, work sc, hdc, dc, tr in each of the next 6 chains, dc, hdc, sc. Ch 2. Along the opposite side of the foundation, work sc, hdc, dc, tr in each of the next 6 chains, dc, hdc, sc. Ch 1 and join with a sl st to the first sc. Count: 24 stitches, one ch-2 tip space, and one ch-1 base space.
- Round 2: Ch 1. Sc in each of the first 12 stitches; work (sc, ch 2, sc) in the tip space; sc in each of the next 12 stitches; work (sc, ch 1, sc) in the base space. Join with a sl st to the first sc. Count: 28 sc, one ch-2 tip space, and one ch-1 base space. Fasten off, leaving a 30 cm sewing tail.
- Weave in the starting tail. Keep the leaf bases flat; the green leaves form the supporting layer behind the flower.
Raised Veins and Blocking
- Before blocking, add a raised center vein to every petal and leaf using matching yarn. With the yarn held behind the piece, insert the hook through the base of the central foundation chain and draw up a loop. Insert through the next chain position toward the tip, draw up a loop, and pull it through the loop on the hook. Continue with one loose surface sl st per chain position, stopping before the ch-2 tip space. Fasten off and weave in both ends on the back.
- On each green leaf, embroider three paired side veins. Place the pairs approximately one-quarter, halfway, and three-quarters along the center vein. Work each branch as a straight stitch from the center vein diagonally toward the outer tip, ending one stitch inside the border. Split each long branch into two shorter stitches to prevent snagging.
- Lightly wet the pieces and press out excess water in a towel. Pin the outer tips and edges to the target dimensions. Support the small petals over a rolled towel so their cupped bases remain raised. Let everything dry fully before assembly.
Ivory Mounting Disk — Make 1
- Round 1: With ivory, work 6 sc in MR. Pull the ring closed. Count: 6 sc.
- Round 2: Inc in each stitch around. Count: 12 sc.
- Round 3: Repeat (sc, inc) 6 times. Count: 18 sc.
- Round 4: Repeat (2 sc, inc) 6 times. Count: 24 sc. Sl st in the next stitch and fasten off. Weave in the ends. The disk should measure approximately 3.5 cm across.
Green Backing Disk — Make 1
- Round 1: With green, work 6 sc in MR. Count: 6 sc.
- Round 2: Inc in each stitch around. Count: 12 sc.
- Round 3: Repeat (sc, inc) 6 times. Count: 18 sc.
- Round 4: Repeat (2 sc, inc) 6 times. Count: 24 sc.
- Round 5: Repeat (3 sc, inc) 6 times. Count: 30 sc. Sl st in the next stitch and fasten off, leaving a 60 cm sewing tail. Weave in the starting tail. The disk should measure approximately 4.5 cm across.
Golden Center Berries — Make 7
- Round 1: With golden-yellow yarn, work 6 sc in MR. Count: 6 sc.
- Round 2: Inc in each stitch around. Count: 12 sc.
- Round 3: Sc in each stitch around. Count: 12 sc. Add a small pinch of filling, keeping the berry firm without stretching the fabric.
- Round 4: Dec 6 times. Count: 6 sc. Fasten off, leaving a 25 cm tail. Thread the tail through the front loops of the remaining 6 stitches and pull closed. Each berry should be approximately 1 cm across. Keep the closure on the underside for attachment.
Layered Flower Assembly
- Lay the ivory mounting disk right side up. Mark its outer round into six groups of 4 stitches. Treat the disk as a clock face, with the top at 12 o’clock.
- Position the six green leaves behind the mounting disk, with tips pointing toward 1, 3, 5, 7, 9, and 11 o’clock. Place each leaf base approximately 5 mm inside the disk edge. Sew each base securely to the disk with its green tail, making two passes across the base. Keep stitches on the front within the area the petals will cover.
- Arrange the six large ivory petals on the front, with tips pointing toward 12, 2, 4, 6, 8, and 10 o’clock. Place each base approximately 5 mm from the disk center, distributing the bases evenly around it. Sew across each base and along both sides of its pinched seam. The green tips should show in the gaps between the ivory petals.
- Position the six small ivory petals above the large petals, with tips pointing toward 1, 3, 5, 7, 9, and 11 o’clock. Bring their bases together at the center. Sew each base through the mounting disk and catch the underlying large-petal bases for support. Keep the outer two-thirds of each small petal free.
- Sew one golden berry at the center. Arrange the other six in a ring around it, with their sides touching lightly. For every berry, pass its tail through the disk and back through the underside of the berry at least twice. Add a small joining stitch between neighboring berries to keep the cluster compact. Secure all tails on the back.
- Attach the hanging cord at the back directly behind the 12 o’clock large petal. Pass the cord through two firm stitches in the mounting disk, tie the ends together to form a loop with approximately a 12 cm drop, and leave 2 cm ends beyond the knot. Sew over the knot and ends with green yarn to anchor them before covering the back.
- Center the green backing disk over the rear assembly. Using its long tail, whipstitch all 30 edge stitches to the leaf bases or mounting disk beneath, whichever lies directly underneath each stitch. Keep the needle clear of the front petal surfaces. Secure the tail and bury it between the disks. Do not stuff the backing.
Finishing
Lift the small petals gently around the golden cluster and spread the large petals into an even six-pointed flower. Adjust the green leaves so a pointed section shows between each pair of large ivory petals. Bury any remaining tails inside the covered mounting area.
Hang the ornament and check its balance. If it leans, move the cord’s attachment slightly toward the heavier side before securing it again. Store the flower flat with tissue beneath the raised petals to preserve their shape.
Tips for Success
- Mark the ch-2 tip and ch-1 base spaces immediately after Round 1; their different sizes make the second round and later placement easier to follow.
- Keep surface slip stitches loose enough that the central vein does not shorten or curl the petal.
- Pin all six large petals together on the blocking mat and compare their lengths before they dry.
- Use short anchoring stitches through the mounting disk when attaching the small petals. Long stitches across their faces flatten the cupped shape.
- Pin the entire flower arrangement before sewing, checking that the green points remain visible from the front.
Common Mistakes to Avoid
- Adding extra stitches at the foundation-chain ends makes the petals ruffle. Work only the listed stitches and use the chain spaces to turn around each end.
- Missing the first stitch after a tip space produces uneven sides. Mark that stitch before working the stitches inside the tip space.
- Pinching too much of a large petal hides its broad shape. Limit its base seam to 1 cm and reopen the fabric above the seam.
- Overfilling the berries makes the cluster bulky. Remove filling until each berry remains small and its stitches close without gaps.
- Sewing the backing on before securing the cord hides the strongest attachment point. Anchor the loop to the mounting disk first, then cover its ends.
Ways to Customize This Pattern
- Use warm white for the large petals and pale cream for the small petals to emphasize the two layers while retaining the reference palette.
- Substitute deep red for the ivory yarn to create a traditional red poinsettia with the same green leaves and golden center.
- Use sport-weight cotton and a 2.25 mm hook for a smaller ornament. Make one sample petal first and scale the assembly placement to its measured length.
- Replace the hanging cord with a securely sewn brooch bar on the backing disk for a dimensional floral pin.
Frequently asked questions
The petals, leaves, and backing are unstuffed. Their shape comes from graduated stitch heights, pinched bases, raised veins, and layered assembly. Only the seven golden berries contain filling.
The leaves need to sit between the large petals. Place the large petals at the even-numbered clock positions and the leaves at the odd-numbered positions. Before sewing, move each leaf outward slightly if its point is still covered, keeping at least 5 mm of its base securely overlapped with the disk.
Yes. Seven lightweight gold beads approximately 8–10 mm across give a smoother center closer to the reference finish. Sew each bead individually through the mounting disk with strong matching thread, arranging one in the center and six around it. Keep a beaded ornament out of reach of small children.
No. Firm cotton fabric, blocked edges, and the layered backing provide the intended support. If your petals droop, check gauge and shorten any loose attachment stitches before considering a light application of cotton-safe fabric stiffener.
The finished Ivory Poinsettia Crochet Ornament Pattern

