Kilim Crochet Blanket Pattern
Beginner Friendly
Perfect for those just starting their crochet journey, with clear instructions and simple techniques
Single-Day Project
A satisfying project you can complete in a single afternoon or evening.
Handmade Gift
A beautiful keepsake — free forever. Read online or print at home.
About This Kilim Crochet Blanket Pattern
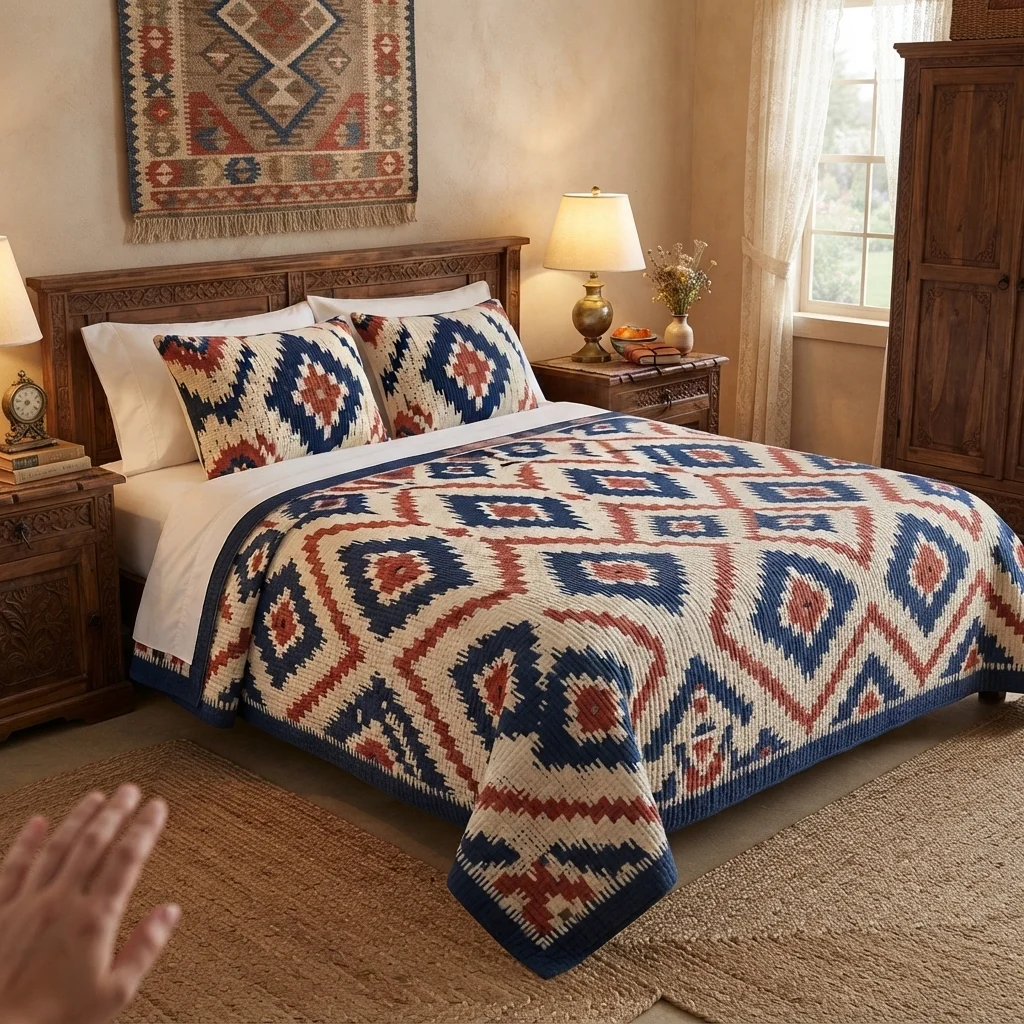
This kilim crochet blanket pattern turns the bold diamonds of a woven rug into a heavy, cozy throw. Each diamond has a rust center with a cream dot, a cream ring, a thick navy ring and a cream background, and a thin rust line runs from diamond to diamond so the whole blanket reads as one connected kilim design.
It is an advanced pattern because every row uses three colors. You work flat tapestry single crochet from a chart, carrying the unused colors inside your stitches, across 205 rows of 164 stitches, then frame the blanket with a navy border. The chart is written as short color runs, so it is easy to count, but it asks for steady tension and attention for the whole project. Plan on 55 to 65 hours in total.
It suits crocheters who are comfortable carrying more than one color and who want a graphic, southwestern-style blanket for a bed with natural wood and white linen. The finished throw is about 147 x 181 cm. Each diamond block is 41 stitches wide, so the size changes in steps of about 34 cm.
Materials
- Chunky cotton-blend yarn, cream (C) about 1.6 kg, estimated
- Chunky cotton-blend yarn, navy (N) about 0.7 kg, estimated, includes the border
- Chunky cotton-blend yarn, rust (R) about 0.35 kg, estimated
- Crochet hook 6.0 mm
- Yarn needle
- Stitch markers one every 41 rows, and one for the center row
- Flat surface and pins for blocking
Abbreviations
chchainscsingle crochetsl stslip stitchst(s)stitch(es)RSright sideFOfasten offCcream yarnNnavy yarnRrust yarnC20, R2the letter is the color, the number is how many sc to work in it (C20 = 20 sc in cream)( )xrepeat the stitches in brackets the number of times givenHow to Read the Chart
- The blanket is 4 diamond blocks wide and 5 blocks tall. Every block is 41 stitches wide and 41 rows tall, so every row has 164 stitches (4 x 41) and the blanket has 205 rows (5 x 41).
- Each chart row below is one block wide and is written as runs of color, from one edge to the other. Work the row 4 times across to fill the blanket.
- Every row reads the same from either end, so it does not matter whether it is a right-side or a wrong-side row.
- Change color on the last pull-through of the last stitch of a run. Pick the new color up from underneath the old one, which twists the two yarns and closes the gap.
- Carry the unused colors loosely along the top of the stitches and crochet over them. If a color is not needed for more than 20 stitches, drop it and pick it up where it returns.
- Where two blocks meet, two runs of the same color join into one longer run. For example, in chart row 1 the cream at the end of one block joins the cream at the start of the next, to make 40 stitches in a row.
Diamond Chart (41 rows, 41 stitches each)
- Row 1: C20 R1 C20 (41)
- Row 2: C19 R3 C19 (41)
- Row 3: C18 R2 C1 R2 C18 (41)
- Row 4: C17 R2 C3 R2 C17 (41)
- Row 5: C16 R2 C5 R2 C16 (41)
- Row 6: C15 R2 C7 R2 C15 (41)
- Row 7: C14 R2 C9 R2 C14 (41)
- Row 8: C13 R2 C11 R2 C13 (41)
- Row 9: C12 R2 C6 N1 C6 R2 C12 (41)
- Row 10: C11 R2 C6 N3 C6 R2 C11 (41)
- Row 11: C10 R2 C6 N5 C6 R2 C10 (41)
- Row 12: C9 R2 C6 N7 C6 R2 C9 (41)
- Row 13: C8 R2 C6 N9 C6 R2 C8 (41)
- Row 14: C7 R2 C6 N11 C6 R2 C7 (41)
- Row 15: C6 R2 C6 N6 C1 N6 C6 R2 C6 (41)
- Row 16: C5 R2 C6 N6 C3 N6 C6 R2 C5 (41)
- Row 17: C4 R2 C6 N6 C2 R1 C2 N6 C6 R2 C4 (41)
- Row 18: C3 R2 C6 N6 C2 R3 C2 N6 C6 R2 C3 (41)
- Row 19: C2 R2 C6 N6 C2 R5 C2 N6 C6 R2 C2 (41)
- Row 20: C1 R2 C6 N6 C2 R7 C2 N6 C6 R2 C1 (41)
- Row 21 (center row): R2 C6 N6 C2 R4 C1 R4 C2 N6 C6 R2 (41)
- Rows 22-41: repeat rows 20 down to 1 in reverse order (row 22 = row 20, row 23 = row 19, and so on, row 41 = row 1).
- Check the chart: every row adds up to 41, and the chart is the same top to bottom and left to right. The navy ring is widest on row 21, with 6 navy stitches on each side of the center.
Blanket Body
- Foundation: with C, ch 165.
- Row 1: sc in the 2nd ch from the hook and in each ch across, following chart row 1 four times across (164). Ch 1 and turn.
- Rows 2-205: ch 1, turn, and sc in each st across, following the next chart row four times across (164 in every row). After chart row 41, start again at chart row 1. Five repeats of the chart give 205 rows.
- Place a stitch marker in the turning chain of chart row 21 of every repeat, which is rows 21, 62, 103, 144 and 185. These are the center rows of each block row.
- Check your body: every row must have exactly 164 stitches, the blanket should measure about 137 cm wide and 171 cm tall, and the rust lattice should line up in straight lines between the diamonds.
- After row 205, do not FO. Cut C and R and go straight into the border with N.
Navy Border (N)
- Round 1: with the RS facing you and row 205 at the top, join N in the top right corner stitch. Ch 1 and work 3 sc in this st. Sc in each of the next 162 sts across the top. Work 3 sc in the top left corner st.
- Work 203 sc evenly down the left side, one in each row end between the corners. Work 3 sc in the first st of the foundation edge (the bottom left corner), 162 sc across the foundation edge and 3 sc in the last st (the bottom right corner). Work 203 sc up the right side. Join with a sl st to the first sc (742).
- Rounds 2-6: ch 1, sc in each st around, working 3 sc in the middle st of each 3-sc corner group. Join with a sl st at the end of each round. Each round adds 8 stitches: round 2 has 750, round 3 has 758, round 4 has 766, round 5 has 774 and round 6 has 782.
- FO and weave in the end.
- Check your border: after round 6 there are 172 stitches between the corner groups along the top and foot and 213 down each side. The border should be about 5 cm wide, and the corners should lie flat without cupping or ruffling.
Finishing
Weave in all ends along the back of the stitches, following them for at least 8 cm. Because each row has several color changes, join new balls of yarn only at the end of a row, so the ends stay in the border. Tack any carried strand that looks loose on the back with a few small stitches.
Block the blanket by laying it flat on towels, pinning the corners and edges to about 147 x 181 cm, and misting it with water. Let it dry fully before moving it. Blocking relaxes the carried yarn and straightens the diamond lines. Drape the blanket with the head under the pillows and the foot hanging over the bed, and it will look like the photo.
Tips for Success
- Tick off every chart row and keep the chart next to your work. Mark the center row of each block row, since the pattern changes direction there.
- Count the stitches by runs. Each run is a short, quick count, and the total of 164 checks itself at the end of every row.
- Wind each color into its own center-pull ball and keep the three balls in separate bags or bowls so they do not tangle.
- Keep the same tension on all three colors, and spread the stitches on your hook after every change, so the fabric lies flat.
- Look at the blanket from a few steps back every 20 rows. Crooked diamonds are easier to spot from a distance.
Common Mistakes to Avoid
- Pulling the carried yarn tight puckers the blanket and narrows it. Keep the strands loose and crochet over them.
- Forgetting to twist the yarns at a color change leaves small holes between the runs. Pick the new color up from underneath every time.
- Losing your place in the chart shifts the diamonds by one row. Tick off each row and check the markers every 41 rows.
- Counting the ch 1 turning chain as a stitch makes the rows 165 wide. The turning chain never counts.
- Working a different number of stitches in the border corners makes it ripple. Use exactly 3 sc in each corner stitch on every round.
Ways to Customize This Pattern
- Swap navy, cream and rust for charcoal, ivory and mustard, or for forest green, oatmeal and terracotta, and keep the same chart.
- Work the rust rings in cream to get a calmer navy and cream blanket with only one accent color.
- Make a baby blanket 2 blocks wide and 3 blocks tall: ch 83 for 82 stitches, work 123 rows, and add 4 border rounds, for about 75 x 108 cm.
- Make a matching pillow cover from a single block: ch 42, work chart rows 1-41 once (41 stitches), add 4 border rounds and sew it to a plain navy back with a button closure.
- Make the blanket larger by adding one more column of blocks (41 stitches, about 34 cm) or one more row of blocks (41 rows, about 34 cm), and recalculate the border from the new counts.
Frequently asked questions
The amounts above are estimates of about 2.65 kg in all. Cream makes up about 75 percent of the chart, navy about 14 percent and rust about 12 percent, plus extra navy for the border. Weigh your half-block swatch, scale it up by area, and add about 15 percent, because carrying colors uses extra yarn.
Add or remove whole blocks. Each block adds 41 stitches (about 34 cm) across or 41 rows (about 34 cm) down. The foundation chain is always the stitch count plus 1. For the border, recalculate round 1 as the stitches across minus 2 along the top and foot, and the rows minus 2 down each side.
Yes, for any color that comes back within about 20 stitches. Crocheting over the unused yarn hides it inside the stitches, so the back stays neat and you have almost no ends to weave in. For longer gaps, drop the yarn and pick it up where it returns.
With a washable cotton blend, wash it on a gentle cycle in cool water, press out the water without wringing, and lay it flat to dry. Rust and navy can bleed onto the cream, so wash it with a color catcher the first time, and never hang a wet blanket this heavy.
The finished Kilim Crochet Blanket Pattern

