Lace Medallion Crossbody Phone Bag Crochet Pattern
Beginner Friendly
Perfect for those just starting their crochet journey, with clear instructions and simple techniques
Single-Day Project
A satisfying project you can complete in a single afternoon or evening.
Handmade Gift
A beautiful keepsake — free forever. Read online or print at home.
About This Lace Medallion Crossbody Phone Bag Crochet Pattern
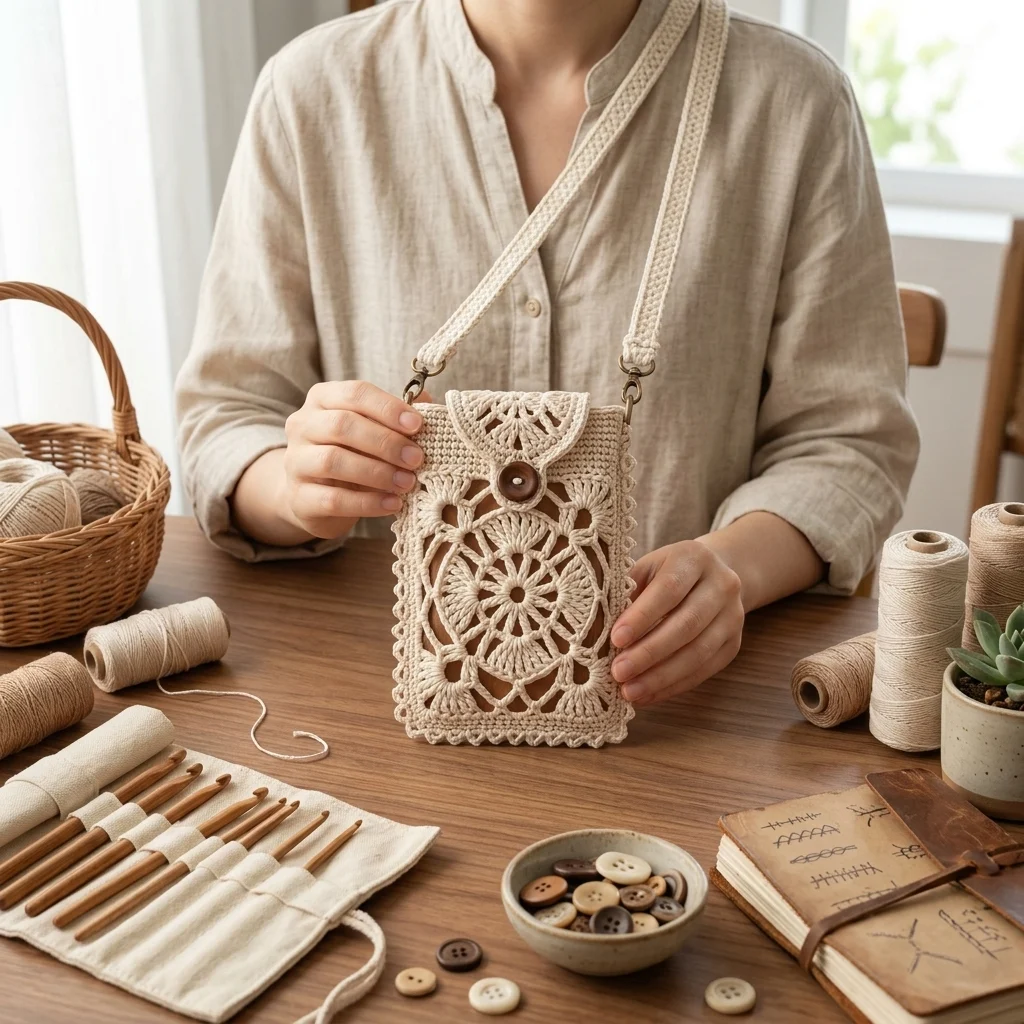
This crochet crossbody phone bag pattern builds a small, structured pouch just large enough for a phone and a few essentials, with a solid crocheted body worked in the round and a front panel opened up into a detailed lace medallion. A rounded flap, worked in the same open lace style and closed with a wooden button, finishes the top, and a long, sturdy double-layer strap lets it hang crossbody.
What makes this design distinctive is the contrast between the bag’s solid, closely worked sides and back and the front panel’s genuinely intricate medallion lace, built from a central starburst surrounded by concentric rounds of shells, picots, and open mesh. That combination gives the bag real structure to hold its shape while still showing off detailed lacework where it’s most visible. Expect to spend 12-16 hours total between the lace front panel, the solid body, the flap, and the long strap.
This is an advanced pattern, best suited to someone comfortable following a doily-style lace chart and confident assembling a lined or semi-structured bag shape, rather than someone making their first crochet bag.
Materials
- Worsted weight cotton yarn, cream ~250g, entire bag
- Crochet hook 3.5 mm (US E/4)
- 1 wooden or shell button ~2.5 cm diameter
- 2 small metal swivel clasps or D-rings for attaching the strap
- Fabric for lining ~30 x 45 cm, optional but recommended
- Sewing needle and matching thread for lining
- Tapestry/yarn needle
- Steam iron and pressing cloth, or blocking mat and pins
- Sharp scissors
Abbreviations
chchainsl stslip stitchscsingle crochethdchalf double crochetdcdouble crochettrtreble/triple crochetMRmagic ringch-spchain spacepicotch 3, sl st in first ch of the 3st(s)stitch(es)reprepeatFOfasten offFront Lace Medallion Panel
- Ch 8, sl st in first ch to form a ring. Round 1: ch 3 (counts as first dc), 23 dc into the ring. Sl st to join. (24 sts)
- Round 2: *ch 5, skip 2 sts, sl st in next st; rep from * around to form 8 ch-5 loops.
- Round 3 (shell petals): in each ch-5 loop, work (sc, hdc, 3 dc, hdc, sc) to form 8 rounded shells. Sl st to join.
- Round 4: working behind Round 3, join in the base st between two shells. *ch 6, sl st in same base st; rep from * around to form 8 larger loops.
- Round 5 (outer shells): in each ch-6 loop, work (sc, hdc, dc, 3 tr, dc, hdc, sc) to form 8 larger shells layered behind the first set. Sl st to join.
- Round 6 (open mesh transition): *ch 4, skip 1 st, sl st in next st; rep from * around the outer edge of Round 5 to begin transitioning into a squared shape.
- Rounds 7-9: continue working in filet-style mesh, gradually building out 4 straight sides and rounding the 4 corners slightly, until the panel measures approximately 15 cm x 20 cm, matching your bag’s planned front panel size.
- FO leaving a long tail. This becomes the bag’s front panel once blocked.
Back and Side Panel (worked as one piece, in solid sc)
- Ch 33. Row 1: sc in 2nd ch from hook and in each ch across. 32 sts. This forms the base width of the bag.
- Rows 2-40: ch 1, turn, sc in each st across, working straight up to build the back panel and continuing up both sides to form the bag’s side walls in one continuous piece, folding the fabric at 2 points to create the box shape as you go.
- FO leaving a long tail for seaming.
Flap
- With cream, ch 25. Row 1: sc in 2nd ch from hook and in each ch across. 24 sts.
- Rows 2-8: ch 1, turn, sc in each st across, working straight to build the base of the flap.
- Row 9 (begin rounding): ch 1, turn, dec 1 st at each end of the row.
- Rows 10-14: continue decreasing 1-2 sts at each end every row to round the flap into a smooth curve, tapering to a point or gentle curve at the tip.
- Switch to an open lace edging for the final 2 rows: work a scalloped shell trim (*sk 1 st, 3 dc in next st, sk 1 st, sl st in next st; rep from *) around the curved edge only, to echo the front panel’s lace texture.
- FO leaving a long tail for attaching to the bag’s back top edge.
Assembly, The Bag Body
- Fold the back and side panel piece at the marked points to form the bag’s back, two sides, and base, whipstitching the side seams closed from the base upward.
- Whipstitch the blocked front lace medallion panel to the front opening of the assembled body, matching edges carefully so the lace sits centered and square.
- Attach the flap to the top back edge of the bag, sewing it securely along its straight top edge.
Strap
- Ch a foundation chain approximately 4 sts wide. Row 1: sc across.
- Work back and forth in sc for approximately 115 cm, or your preferred crossbody drop length, keeping the strap width consistent throughout.
- Work a second identical strip, then whipstitch the two strips together along both long edges for a doubled, sturdy strap.
- FO leaving tails at both ends for attaching to the swivel clasps or directly to the bag’s top corners.
Finishing
If lining the bag, cut a piece of fabric to match the assembled body’s interior dimensions, adding a small seam allowance, and hand-sew it in place inside the bag before attaching the front panel if that step is easier for you. Sew the button securely to the center front of the bag, positioned so the flap’s curved point reaches it snugly when closed; the flap itself, worked in open lace, functions as its own buttonhole. Attach the strap to both top corners of the bag, using swivel clasps if desired for a removable strap. Steam-block the front lace medallion gently before final assembly if it wasn’t already blocked, so the lace sits flat and even against the bag’s solid sides.
Tips for Success
- Block the front lace medallion to your exact target size before attaching it; a panel that shrinks or stretches after attachment will pucker the whole front of the bag.
- Line the bag if using a lightweight cotton yarn; a lining helps the open lace front panel keep its shape and keeps small items from poking through the open mesh.
- Check the flap’s curve against the button and bag opening before finishing its final rows, adjusting the taper rate if the point doesn’t line up with the button’s position.
- Work both strap strips to the exact same length before whipstitching them together; a mismatched strap will twist when worn.
- Reinforce strap attachment points with a few extra stitches, since this is where the bag bears weight during wear.
Common Mistakes to Avoid
- Attaching the front lace panel before blocking it to size causes the whole bag front to warp once blocked afterward. Fix: block the lace panel to its final dimensions first, then attach it to the body.
- Making the flap’s curve too shallow leaves it unable to close snugly over the button. Fix: check the flap against the bag and button placement before finishing the last few rows.
- Skipping a lining lets the phone and other contents show through the open lace front. Fix: add a simple fabric lining sewn in before final assembly.
- Working the two strap strips to different lengths causes the strap to twist and hang unevenly. Fix: measure both strips against each other before whipstitching them together.
- Attaching the strap with only a few loose stitches risks it tearing loose under the bag’s weight. Fix: reinforce both attachment points generously.
Ways to Customize This Pattern
- Adjust the strap length to a shoulder-bag drop instead of a longer crossbody length.
- Work the solid body panel in a contrasting color from the cream lace front for a two-tone look.
- Add a small interior pocket to the lining for cards or a lipstick.
- Swap the wooden button for a decorative crocheted button covered in the same yarn.
- Scale the whole bag up slightly for a small everyday crossbody instead of a phone-sized bag.
Frequently asked questions
A lining is strongly recommended given the open lace front panel; without one, small items can slip through the mesh and the phone screen may show through. The solid back and sides hold their shape well even unlined.
Measure your phone’s height, width, and depth before starting the back and side panel, and adjust the starting chain and row count so the finished interior has a little extra room beyond your phone’s exact dimensions.
Yes. Attach the strap using a slide buckle or adjustable strap hardware instead of sewing it directly to the bag corners, which lets you shorten or lengthen the crossbody drop as needed.
This usually means the panel wasn’t blocked to its full intended size before measuring. Steam-block the lace firmly, pinning the mesh open and the shells spread, and remeasure against your bag opening before attaching.
The finished Lace Medallion Crossbody Phone Bag Crochet Pattern

