Lavender and Sage Flower Crochet Curtains
Advanced
For experienced crocheters who enjoy complex shaping, fine detail, and ambitious construction
Weekend Project
A satisfying weekend make — start Friday, finish Sunday, enjoy forever.
Handmade Gift
A beautiful keepsake — free forever. Read online or print at home.
About This Lavender and Sage Flower Crochet Curtains
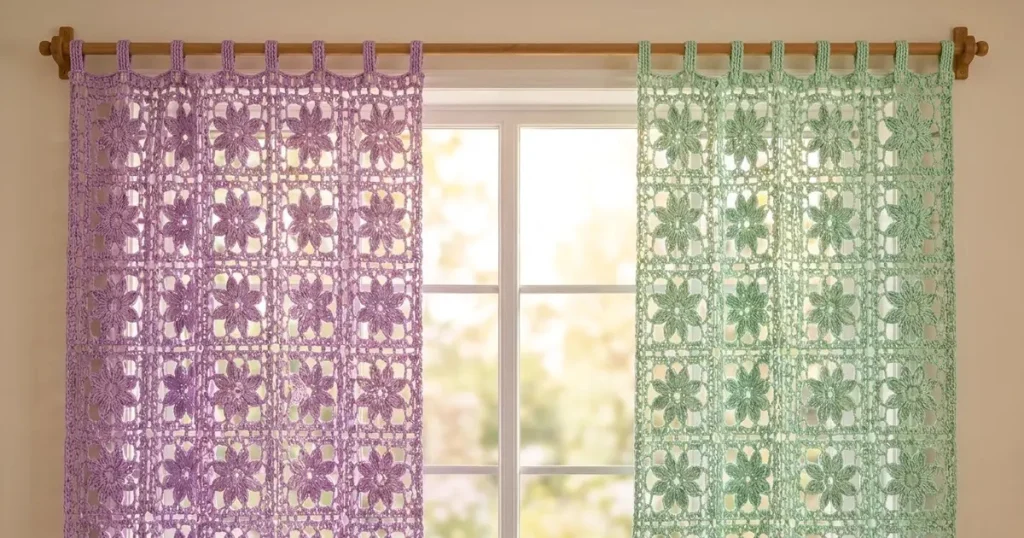
This flower crochet curtain pattern recreates the airy look of the reference with lavender and sage panels, eight-petal flowers, open square frames, and narrow hanging tabs. Each panel uses one color throughout, allowing the raised petals and the light coming through the lace to define the design.
The flowers are worked separately as framed motifs, blocked, and sewn into two rectangular panels. Working behind the petals, keeping the frames square, and joining the lace evenly make this an advanced project suited to crocheters comfortable with fine cotton and careful finishing. Allow approximately 45–65 hours for the pair, including assembly and blocking.
Materials
- Fine / sport mercerized cotton in dusty lavender Approximately 1,600 m; buy matching dye lots
- Fine / sport mercerized cotton in soft sage green Approximately 1,600 m; use the same yarn range as the lavender
- 3.0 mm crochet hook Adjust as needed for the blocked motif gauge
- Tapestry needle and scissors For flat seams, tab attachment, and concealed ends
- Locking stitch markers Mark corners, rear anchors, and tab positions
- Blocking mats, rustproof pins, and measuring tape Enough space to block individual squares accurately
- Smooth curtain rod Up to approximately 3 cm diameter for the specified tabs
Abbreviations
chchainsl stslip stitchscsingle crochetdcdouble crochettrtreble crochetMRmagic ringRSright sideWSwrong sideGauge, Size, and Construction
- Use US crochet terminology. A supporting gauge is approximately 22 dc and 10 rows per 10 cm after wet blocking; the controlling gauge is one complete seven-round motif measuring 12 × 12 cm.
- Make 30 lavender squares for the left panel and 30 sage squares for the right panel. Each panel contains five columns and six rows, giving a nominal motif field of 60 × 72 cm before its border.
- The two border rounds add approximately 1 cm to the width and 1 cm to the height of the field overall. The reinforced upper edge adds approximately another 1 cm in height. The finished fabric panel is approximately 62 × 73 cm; the folded tabs add approximately 8 cm above it, making an overall hanging length of about 81 cm. These measurements are approximate because lace blocking and cotton relaxation affect the result.
- Beginning ch 1 never counts as a stitch. Beginning ch 3 counts as the first dc where stated. Slip-stitch joins and positioning slip stitches do not count toward totals. Do not turn motif rounds.
- For each tr, yarn over twice, insert the hook, pull up a loop, then yarn over and pull through two loops three times. Keep all three trebles of each petal the same height.
Eight-Petal Flower Centers — Make 30 in Each Color
- Round 1: Work 8 sc in an MR. Close the ring and join with a sl st to the first sc. Do not pull the center so tightly that the stitches overlap. Count: 8 sc.
- Round 2: Ch 1, work 2 sc in each stitch around; join to the first sc. Count: 16 sc.
- Round 3: Ch 1. Repeat the following eight times: sc in the next stitch; in the following stitch work (ch 3, 3 tr, ch 3, sl st). Join to the first sc. Each repeat consumes two Round 2 stitches and makes one petal. Count: 8 separating sc and 8 petals, each containing 3 tr and two ch-3 chains.
- Fasten off. Mark the eight separating sc from Round 3 on the back of the flower. These are the anchors for the frame; the treble tops and petal chains remain free.
Open Square Frames — Complete All 60 Motifs
- Round 4: With the flower RS facing, hold the petals forward. Join matching yarn with a sc into a marked separating sc from Round 3, inserting beneath both top loops from behind the petals. Repeat (ch 5, sc in the next marked separating sc) seven times; ch 5 and join to the first sc. Keep every chain arch behind the petals. Count: 8 sc and 8 ch-5 arches.
- Round 5: Sl st into the first ch-5 arch. Ch 3, counting as the first dc, then work (2 dc, ch 3, 3 dc) in that arch; ch 1. In the next arch work (3 dc, ch 2, 3 dc); ch 1. Repeat [(3 dc, ch 3, 3 dc) in the next arch, ch 1; (3 dc, ch 2, 3 dc) in the next arch, ch 1] three times. Join to the top of the beginning ch 3. Count: 48 dc, four corner ch-3 spaces, four side ch-2 spaces, and eight ch-1 spaces.
- Round 6: Ch 1. Work 1 sc in every dc, 1 sc in each ch-1 space, 2 sc in each side ch-2 space, and (2 sc, ch 2, 2 sc) in each corner ch-3 space. Join to the first sc. Count: 80 sc and four corner ch-2 spaces, with 20 sc between consecutive corner spaces.
- Round 7: Ch 3, counting as the first dc. Work 1 dc in every remaining sc and (2 dc, ch 2, 2 dc) in every corner ch-2 space. Join to the top of the beginning ch 3 and fasten off. Count: 96 dc and four corner ch-2 spaces, with 24 dc along each side between corner spaces.
- Wet-block each motif to 12 × 12 cm, measuring between the outside edges. Pin the corners and side midpoints, spread the eight petals evenly, and allow the squares to dry completely. Weave in the center and frame ends without cinching the lace.
Join the Lavender and Sage Panels
- Arrange the 30 lavender motifs RS up in five columns and six rows. Arrange the sage motifs in the same way. Keep every flower facing forward and every square oriented consistently.
- Join neighboring squares with matching yarn using a flat mattress seam. With their edges touching, alternate passing the needle beneath the outermost top loop of one edge stitch and then the corresponding loop on the opposite edge. Match all 24 dc along each shared side. Draw the seam closed only enough to bring the edges together.
- At each end of a seam, secure the two corresponding corner chain spaces together with one loose overcast stitch. Do not gather the spaces into a tight knot. Join each horizontal row of five squares first, then join the six rows together, matching the five columns.
- At a four-square intersection, pass the yarn once through all four corner spaces to stabilize their meeting point. Keep the crossing flat and preserve a small opening. Secure the yarn on the WS.
- Check each assembled panel against a 60 × 72 cm rectangle before adding the border. Correct any tight seam now; the border will not remove a ridge caused by overtight stitching.
Panel Borders — Work Separately on Each Panel
- Round 1: Join matching yarn with a sc in the upper-left outside corner space; work 1 more sc, ch 2, and 2 sc in that same space. Continue clockwise, working 1 sc in every perimeter dc. At each meeting of two motifs along a straight edge, work 2 sc in the first motif’s corner space and 2 sc in the next motif’s corner space. At each of the remaining three outside panel corners, work (2 sc, ch 2, 2 sc). Join to the first sc. Count: 616 sc and four corner ch-2 spaces; 140 sc between corner spaces on each short edge and 168 sc between corner spaces on each long edge.
- Round 2: Ch 1, sc in every sc, and work (sc, ch 2, sc) in every corner space. Join and fasten off. Count: 624 sc and four corner ch-2 spaces; 142 sc between corner spaces on each short edge and 170 sc between corner spaces on each long edge.
- Lay the panel flat. The border should follow the rectangular outline without cupping or rippling. If necessary, adjust only the border hook size and rework these two rounds, preserving the stated counts.
Reinforced Upper Edges
- Designate one short edge as the top. With RS facing, join matching yarn in the upper-right corner ch-2 space so you can work across the top edge toward the left.
- Row 1: Ch 1, work 1 sc in that corner space, sc in each of the 142 top-edge stitches, and 1 sc in the upper-left corner space. Turn. Count: 144 sc.
- Rows 2–4: Ch 1, sc in each stitch across; turn after Rows 2 and 3. Count: 144 sc in each row. Fasten off after Row 4.
- With the RS facing, number these 144 upper-edge stitches from left to right. Mark eight tab attachment spans: stitches 1–6, 21–26, 40–45, 60–65, 80–85, 100–105, 119–124, and 139–144. These spans place one tab near each end and six evenly distributed between them.
Hanging Tabs — Make Eight in Each Color
- Foundation: Ch 7, leaving a 25 cm sewing tail.
- Row 1: Sc in the second chain from the hook and in each remaining chain; turn. Count: 6 sc.
- Rows 2–48: Ch 1, sc in all 6 stitches; turn after every row except Row 48. Count: 6 sc per row. Fasten off, leaving a 25 cm sewing tail. Each tab has 48 rows total.
- Wet-block each strip to approximately 2.5 cm wide × 18 cm long. If your row gauge produces a different length, add or remove an even number of rows to reach 18 cm; the width remains 6 stitches.
- Fold each strip in half with its two short ends aligned. Overlap both ends onto the back of the reinforced upper edge by approximately 1 cm, centered over the appropriate six-stitch span. The folded tab should project approximately 8 cm above the curtain.
- Using the tails, sew each end separately to the reinforced edge across its full width. Add a second horizontal line of stitching approximately 7 mm below the first, passing through the tab ends and header. Keep the folded upper portion open for the rod. Repeat for all eight tabs on each panel.
Finishing
Secure all yarn ends through several stitches on the back, changing direction once before trimming. Check the flower centers, seam intersections, and tab attachment points individually. The petals should remain free above their chain supports, with no seam yarn crossing the flower fronts.
Wet-block the finished panels flat to matching dimensions, supporting the entire fabric when moving it. Straighten the borders and align the tabs without pulling them longer. Once completely dry, slide the lavender panel onto the left side of the rod and the sage panel onto the right. Let the curtains settle before deciding whether either lower edge needs a small blocking adjustment.
Tips for Success
- Mark the eight separating sc immediately after making each flower. Finding those anchors later is harder once the petals curl over them.
- Keep Round 4 chains behind the flowers throughout Round 5. A chain caught across a petal will pull that petal backward when blocked.
- Block a small batch of squares at a time using the same 12 cm template. Uniform squares make the long panel seams easier to keep straight.
- Check tab fit around your actual rod before sewing all sixteen tabs. The specified loop suits a smooth rod approximately 3 cm in diameter or smaller.
- Hang the dry panels for a day before the final display adjustment. Cotton can relax under its own weight, especially in an open lace fabric.
Common Mistakes to Avoid
- Making seven or nine petals: each petal repeat consumes exactly two of the 16 Round 2 stitches. Count eight separating sc before starting the rear arches.
- Putting corner groups in adjacent Round 4 arches: Round 5 must alternate corner and side groups. Mark every other arch before working it if the flower obscures the supports.
- Counting the beginning ch 3 twice: it is already the first dc in Rounds 5 and 7. An extra dc at the join changes the side counts and makes assembly uneven.
- Skipping the paired corner spaces along a straight panel edge: each motif junction receives 4 sc in Border Round 1, split as 2 sc in each space. Omitting these stitches draws the border inward.
- Attaching tabs only to the outermost row: sew through the reinforced header with two lines of stitching so the curtain’s weight is distributed across several rows.
Ways to Customize This Pattern
- Make both panels lavender or both sage for a single-color window treatment, keeping the raised flowers and open frames unchanged.
- Use a slightly deeper shade for Flower Rounds 1–3 and a paler matching shade for the frames. Change yarn at the start of Round 4.
- Shorten the curtains by removing whole motif rows. Each removed row reduces the nominal fabric length by 12 cm; work the border using the same stitch-placement rules.
- Increase the width by adding whole motif columns. Each column adds approximately 12 cm; redistribute tabs so the spaces between their centers remain approximately 8–9 cm.
- Lengthen the hanging loops for a thicker rod by adding an even number of tab rows. Keep the 1 cm attachment overlap and check the folded loop on the rod before sewing.
Frequently asked questions
The frame begins on chain arches behind the petals. This leaves the eight petals raised and clearly outlined while the square supports their weight. Attaching the frame to the treble tops would change both the shape and the stitch distribution.
Yes, but the same seven-round motif will usually be smaller. Block one sample and measure it before calculating the number of columns and rows. The listed 60-motif layout and finished dimensions apply to a 12 cm square.
In Border Round 1, each side has 28 sc per motif along that side, measured between the outside corner spaces. Round 2 adds 2 sc to each side. For a panel five motifs wide, this gives 140 then 142 stitches across; for six motifs tall, it gives 168 then 170 stitches down.
The open flower frames filter light but leave clear gaps, especially when the room is lit at night. Use them with a separate blind or a lightweight inner curtain when you need more coverage.
Follow the cotton yarn’s care label. Support the full panels while wet, reshape them flat, and let them dry completely before hanging. Avoid hanging them wet, which can stretch the lace and tabs unevenly.
The finished Lavender and Sage Flower Crochet Curtains

