Advanced
For experienced crocheters who enjoy complex shaping, fine detail, and ambitious construction
Single-Day Project
A satisfying project you can complete in a single afternoon or evening.
Handmade Gift
A beautiful keepsake — free forever. Read online or print at home.
About This Lavender Lace Crochet Bedspread
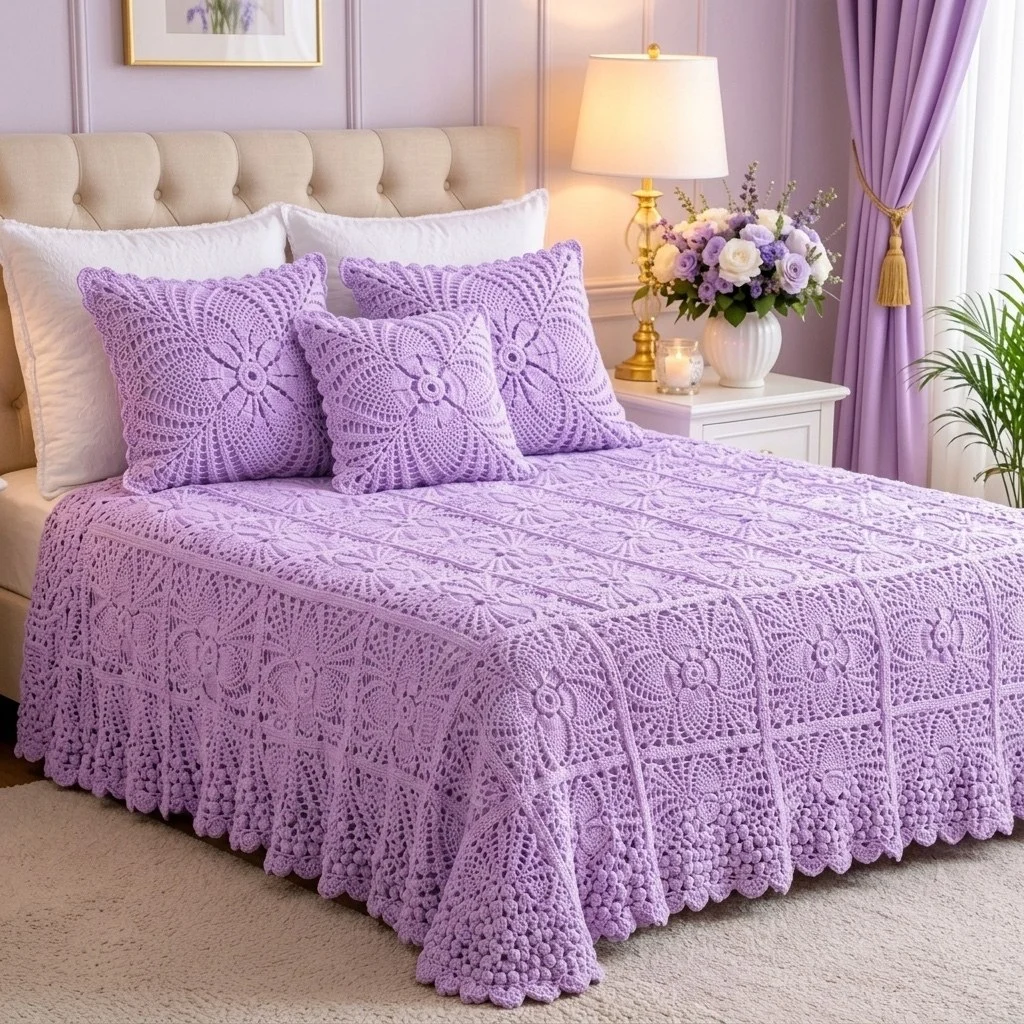
This lavender lace crochet bedspread pattern makes a full queen-size cover worked from 72 separate motif squares, two different ones, joined with raised sashing bands and finished with a deep pineapple skirt and a popcorn scallop hem. Half the squares are popcorn flower medallions with a solid centre that catches the light; the other half are open pineapple squares that let the sheet colour show through. Alternating them in a checkerboard is what gives the finished spread its rhythm instead of looking like one repeated block.
The construction is genuinely multi-piece. You make the squares first, block them all to the same 20 cm, then build eight vertical columns of nine squares with a ridged sashing band crocheted directly between each pair. The columns are joined to each other with a wider vertical sashing, and only then do you work the border, the seven-row pineapple skirt and the popcorn trim around three sides. Every round here has a stated stitch count, and the skirt math depends on the border round landing on exactly 912 stitches, so the counts are worth respecting.
Plan on 70 to 100 hours. A single flower square takes most crocheters 35 to 45 minutes once the pattern is memorised, so the 72 squares are the bulk of it, and they are perfectly portable. The skirt and the 678 popcorns at the hem are the slow part and want a quiet evening. This is a project for someone who is comfortable reading lace instructions, counting chain spaces and keeping track of a layout chart — not a weekend make, but a piece that outlives the bed it was made for.
Materials
- DK (light worsted) mercerised cotton in lavender approx. 2,400 g / 24 x 100 g balls / about 4,500 m — buy the full amount in one dye lot
- 4.0 mm crochet hook main hook for squares, sashing, skirt
- 4.5 mm crochet hook optional, for the sashing rows if yours pull tight
- Tapestry needle blunt, large eye, for ends and seams
- Stitch markers at least 8, to mark corners and column order
- Blocking mats and rustproof pins a 60 x 60 cm set of foam mats is enough to block 4 squares at a time
- Spray bottle with cool water for wet-blocking the squares
- Tape measure to check each square at 20 cm
- Scissors
- Notebook or printed grid to track the A/B checkerboard layout
Abbreviations
begbeginningBLOback loop onlychchaindcdouble crochet (US)hdchalf double crochetlploopMRmagic ringPCpopcorn: 5 dc in same st, drop loop, insert hook in first dc, pick up dropped loop, pull throughreprepeatRSright sidescsingle crochet (US)skskipsl stslip stitchspspacest(s)stitch(es)V-stV-stitch: (dc, ch 2, dc) in same st or spaceWSwrong sideFlower Square (Motif A) — make 36
- R1: MR, ch 3 (counts as dc), 15 dc in ring, sl st to top of beg ch-3, pull ring closed. (16 dc)
- R2: Ch 3, 4 dc in same st, drop loop, insert hook in top of beg ch-3 and pull dropped loop through (beg PC made), ch 2; *sk next st, PC in next st, ch 2; rep from * 6 more times, sl st to top of first PC. (8 PC, 8 ch-2 sps)
- R3: Sl st into first ch-2 sp, ch 3, 4 dc in same sp, ch 1; *5 dc in next ch-2 sp, ch 1; rep from * 6 more times, sl st to top of beg ch-3. (8 shells = 40 dc, 8 ch-1 sps)
- R4: Ch 1, sc in each of the 5 dc of the shell, ch 3 over the ch-1 sp; rep around, sl st to first sc. (40 sc, 8 ch-3 sps)
- R5: Sl st into next ch-3 sp, ch 3, (2 dc, ch 3, 3 dc) in same sp (corner made); *ch 5, sk 5 sc, sc in next ch-3 sp, ch 5, sk 5 sc, (3 dc, ch 3, 3 dc) in next ch-3 sp; rep from * twice more, ch 5, sk 5 sc, sc in next ch-3 sp, ch 5, sk 5 sc, sl st to top of beg ch-3. (4 corners, 4 side sc, 8 ch-5 lps)
- R6: Sl st to corner ch-3 sp, ch 3, (2 dc, ch 2, 3 dc) in same corner sp; *5 dc in next ch-5 lp, dc in next sc, 5 dc in next ch-5 lp, (3 dc, ch 2, 3 dc) in next corner sp; rep from * twice more, 5 dc in next ch-5 lp, dc in next sc, 5 dc in next ch-5 lp, sl st to top of beg ch-3. (68 dc — 17 dc per side — 4 ch-2 corner sps)
- R7: Sl st to corner ch-2 sp, ch 3, (dc, ch 2, 2 dc) in same sp; *dc in each of next 17 dc, (2 dc, ch 2, 2 dc) in next corner sp; rep from * twice more, dc in each of next 17 dc, sl st to top of beg ch-3. (84 dc — 21 dc per side — 4 ch-2 corner sps)
- R8: Sl st to corner ch-2 sp, ch 1, (sc, ch 3, sc) in same sp; *[ch 3, sk 2 dc, sc in next dc] 7 times, ch 3, (sc, ch 3, sc) in next corner sp; rep from * twice more, [ch 3, sk 2 dc, sc in next dc] 7 times, ch 3, sl st to first sc. (8 ch-3 lps per side plus 1 ch-3 lp at each corner = 36 lps)
- R9: Sl st into corner ch-3 lp, ch 3, (2 dc, ch 2, 3 dc) in same lp; *3 dc in each of the next 8 ch-3 lps, (3 dc, ch 2, 3 dc) in next corner lp; rep from * twice more, 3 dc in each of the next 8 ch-3 lps, sl st to top of beg ch-3. (120 dc — 30 dc per side — 4 ch-2 corner sps)
- R10 (joining round): Ch 1, sc in each dc around, working 3 sc in each corner ch-2 sp, sl st to first sc. (132 sc — 30 sc per side plus 3 corner sc) Fasten off, leaving a 15 cm tail.
- Weave in the starting tail through the back of the popcorn round so it is hidden, then set the square aside unblocked until you have all 72.
Pineapple Square (Motif B) — make 36
- R1: MR, ch 3 (counts as dc), 15 dc in ring, sl st to top of beg ch-3, pull ring closed. (16 dc)
- R2: Ch 3, dc in same st, 2 dc in each st around, sl st to top of beg ch-3. (32 dc)
- R3: Ch 1, sc in first st, *ch 5, sk 3 sts, sc in next st; rep from * 6 more times, ch 5, sk last 3 sts, sl st to first sc. (8 sc, 8 ch-5 lps)
- R4: Sl st to centre of first ch-5 lp, ch 3, 6 dc in same lp (7-dc fan), ch 3, sc in next lp, ch 3; *7 dc in next lp, ch 3, sc in next lp, ch 3; rep from * twice more, sl st to top of beg ch-3. (4 fans, 4 sc, 8 ch-3 sps)
- R5: Ch 1, sc in first dc of fan, [ch 3, sk 1 dc, sc in next dc] 3 times, ch 3, sc in next ch-3 sp, ch 5, sc in next ch-3 sp, ch 3; *sc in first dc of next fan, [ch 3, sk 1 dc, sc in next dc] 3 times, ch 3, sc in next ch-3 sp, ch 5, sc in next ch-3 sp, ch 3; rep from * twice more, sl st to first sc. (4 pineapples of 3 ch-3 lps each, 4 ch-5 corner sps)
- R6: Sl st into first pineapple lp, ch 1, sc in same lp, ch 3, sc in next lp, ch 3, sc in next lp, ch 3, sc in next ch-3 sp, ch 3, (3 dc, ch 3, 3 dc) in corner ch-5 sp, ch 3, sc in next ch-3 sp, ch 3; *sc in first lp of next pineapple, ch 3, sc in next lp, ch 3, sc in next lp, ch 3, sc in next ch-3 sp, ch 3, (3 dc, ch 3, 3 dc) in corner ch-5 sp, ch 3, sc in next ch-3 sp, ch 3; rep from * twice more, sl st to first sc. (4 pineapples of 2 lps each)
- R7: Sl st into first pineapple lp, ch 1, sc in same lp, ch 3, sc in next lp, ch 3, sc in next ch-3 sp, ch 3, dc in each of next 3 dc, (2 dc, ch 3, 2 dc) in corner ch-3 sp, dc in each of next 3 dc, ch 3, sc in next ch-3 sp, ch 3; *sc in first lp of next pineapple, ch 3, sc in next lp, ch 3, sc in next ch-3 sp, ch 3, dc in each of next 3 dc, (2 dc, ch 3, 2 dc) in corner ch-3 sp, dc in each of next 3 dc, ch 3, sc in next ch-3 sp, ch 3; rep from * twice more, sl st to first sc. (4 pineapples of 1 tip lp each, 5 dc on each side of every corner sp)
- R8 (squaring round): Sl st to corner ch-3 sp, ch 3, (dc, ch 2, 2 dc) in same sp; *dc in each of next 5 dc, 3 dc in next ch-3 sp, dc in next sc, 3 dc in next ch-3 sp, 2 dc in pineapple tip lp, 3 dc in next ch-3 sp, dc in next sc, 3 dc in next ch-3 sp, dc in each of next 5 dc, (2 dc, ch 2, 2 dc) in next corner ch-3 sp; rep from * twice more, then work the side sequence once more, sl st to top of beg ch-3. (120 dc — 30 dc per side — 4 ch-2 corner sps)
- R9 (joining round): Ch 1, sc in each dc around, working 3 sc in each corner ch-2 sp, sl st to first sc. (132 sc — 30 sc per side plus 3 corner sc) Fasten off, leaving a 15 cm tail.
- Check: this square must measure the same 20 cm as the Flower Square after blocking. If it comes out larger, drop to a 3.75 mm hook for Motif B only.
Blocking the Squares
- Weave in all tails on every square before blocking. Ends trapped under a wet-blocked lace motif are nearly impossible to hide later.
- Soak or heavily mist each square with cool water until the cotton is evenly damp, not dripping.
- Pin each square to the blocking mat at all four corners first, measuring 20 cm along each edge, then pin out the mid-point of each side so the edges stay straight rather than bowed.
- On the Pineapple Squares, pin out the four pineapple tips and the eight ch-3 side spaces so the lace opens up properly.
- Leave to dry fully — 12 to 24 hours for cotton. Stack the dry squares in two piles, 36 Flower and 36 Pineapple.
- Lay out the checkerboard on a bed or floor before joining: 8 columns across, 9 squares down, alternating A and B in both directions. Columns 1, 3, 5 and 7 begin with a Flower Square; columns 2, 4, 6 and 8 begin with a Pineapple Square.
Column Sashing Band — worked 8 times per column
- Hold the first square of the column with RS facing and the top edge (one 30-sc side) toward you. Join yarn in the first of the 30 sc, ignoring the 3 corner sc at each end.
- Row 1 (RS): Ch 1, sc in each of the 30 sc across. Turn. (30 sc)
- Row 2: Ch 3 (counts as dc), dc in each st across. Turn. (30 dc)
- Row 3 (ridge row): Ch 2 (counts as hdc), working in BLO, hdc in each st across. Turn. (30 hdc) The unworked front loops form the raised line you can see running between the squares.
- Row 4: Ch 3 (counts as dc), dc in each st across. Turn. (30 dc)
- Row 5: Ch 1, sc in each st across. Do not turn, do not fasten off. (30 sc)
- Joining row: Hold the next square of the column behind the band, WS together, lining up its 30-sc bottom edge with Row 5. Ch 1, then sc through the back loop of each Row 5 st and the back loop of the matching square st together, 30 times. (30 joined sc) Fasten off and weave in.
- Repeat the whole band — Rows 1 to 5 plus the joining row — between every pair of squares in the column: 8 bands per column of 9 squares.
- Make 8 columns this way, keeping the A/B alternation correct. Each finished column measures about 20 cm wide by 204 cm long.
Vertical Sashing and Joining the Columns
- Lay column 1 flat with RS facing and the long right-hand edge toward you. Join yarn at the top corner of that edge.
- Row 1 (RS): Ch 1, work 30 sc along each square edge (9 squares) and 5 sc evenly along each sashing band row-end (8 bands). Turn. (310 sc) Count this row twice — every later number depends on it.
- Row 2: Ch 3 (counts as dc), dc in each st across. Turn. (310 dc)
- Row 3 (ridge row): Ch 2 (counts as hdc), BLO hdc in each st across. Turn. (310 hdc)
- Row 4: Ch 3 (counts as dc), dc in each st across. Turn. (310 dc)
- Row 5: Ch 1, sc in each st across. Do not turn, do not fasten off. (310 sc)
- Joining row: Hold column 2 behind the sashing, WS together, matching its long left edge to Row 5. Work 310 sc through both layers, taking the back loop of the sashing st and the matching stitch of the column together — 30 sts per square, 5 sts per band. (310 joined sc) Fasten off and weave in.
- Repeat for the remaining joins: 7 vertical sashings in total, joining columns 1-2, 2-3, 3-4, 4-5, 5-6, 6-7 and 7-8.
- The assembled panel now measures about 181 cm wide by 204 cm long. Lay it flat and check that the sashing lines run straight; a wavy sashing means that row was worked too loosely and should be redone with a 4.0 mm hook instead of 4.5 mm.
Border Foundation Round
- Decide which short end is the head of the bed — that edge stays plain, because it sits under the pillows. The opposite short end is the foot.
- Round 1 (RS): Join yarn in the top right corner of the head edge. Ch 1 and work as follows.
- Across the head edge: 30 sc along each of the 8 square edges and 5 sc along each of the 7 vertical sashing ends. (275 sc)
- 3 sc in the corner. (3 sc)
- Down the first long side: 30 sc along each of the 9 square edges and 5 sc along each of the 8 band ends, plus 2 extra sc worked anywhere along the side as increases. (312 sc — this must be a multiple of 8 for the skirt)
- 6 sc in the foot corner. (6 sc)
- Across the foot edge: 275 sc as for the head edge, plus 1 extra sc as an increase. (276 sc)
- 6 sc in the second foot corner. (6 sc)
- Up the second long side: 312 sc, worked exactly as the first side. (312 sc)
- 3 sc in the last corner, sl st to first sc. (3 sc) Total: 1,193 sc. Do not fasten off.
- Round 2: Ch 1, sc in each st around, working 3 sc in each of the two head corners and 3 sc in each of the two foot corners. Sl st to first sc. (1,205 sc) Fasten off and weave in.
- Mark the two foot corners with stitch markers. The skirt is worked over one long side, both foot corners, the foot edge and the second long side: 312 + 6 + 276 + 6 + 312 = 912 sts. That is exactly 114 repeats of 8.
Pineapple Skirt — worked over 912 stitches on three sides
- Row 1 (RS): Join yarn in the first st of the long side at the head end. Ch 1, *sc in next st, sk 3 sts, 11 dc in next st, sk 3 sts; rep from * 113 more times, ending in the last st of the opposite long side. Turn. (114 sc, 114 fans of 11 dc — 912 sts used)
- Row 2 (WS): Ch 1, sc in the last st worked of Row 1 (edge anchor), ch 3, then over the first fan: sc in dc 1, [ch 3, sk 1 dc, sc in next dc] 5 times; *ch 3, V-st in next Row 1 sc, ch 3, sc in dc 1 of next fan, [ch 3, sk 1 dc, sc in next dc] 5 times; rep from * across, ch 3, sc in edge st. Turn. (114 pineapples of 5 ch-3 lps each, 113 V-sts)
- Row 3: Ch 1, sc in edge st, ch 3, sc in first lp of pineapple, [ch 3, sc in next lp] 4 times; *ch 3, V-st in ch-2 sp of next V-st, ch 3, sc in first lp of next pineapple, [ch 3, sc in next lp] 4 times; rep from * across, ch 3, sc in edge st. Turn. (4 lps per pineapple, 113 V-sts)
- Row 4: Work as Row 3, closing one more loop on each pineapple. Turn. (3 lps per pineapple, 113 V-sts)
- Row 5: Work as Row 3. Turn. (2 lps per pineapple, 113 V-sts)
- Row 6: Work as Row 3. Turn. (1 tip lp per pineapple, 113 V-sts)
- Row 7 (closing row): Ch 1, sc in edge st, ch 3, sc in the single tip lp of the first pineapple; *ch 3, V-st in ch-2 sp of next V-st, ch 3, sc in tip lp of next pineapple; rep from * across, ch 3, sc in edge st. Turn. (114 tip sc, 113 V-sts) The pineapples are now closed and the skirt measures about 11 cm deep.
- Do not fasten off. Check that you still have 114 pineapple tips — one dropped V-st will show as a gap in the next row.
Popcorn Scallop Trim
- Row 1 (RS): Ch 1, sc in first tip sc; *ch 9 carrying the chain over the V-st, sc in next tip sc; rep from * across. Turn. (114 sc, 113 ch-9 arches)
- Row 2 (scallops): Ch 1, sc in first sc; *in next ch-9 arch work [PC, ch 2] 5 times then PC (6 popcorns), sc in next sc; rep from * across. (113 scallops, 678 popcorns total) Fasten off.
- Push every popcorn firmly to the RS with your thumb as you make it — popcorns that stay flat will not read as the bobbled edge in the photograph.
- Each scallop measures about 5 cm wide and hangs about 2 cm below the skirt, bringing the total skirt drop to roughly 12 cm.
Head-End Edge
- Row 1 (RS): Join yarn at the left end of the head edge, in the first st after the corner. Ch 1, sc in each of the 275 sts across. Turn. (275 sc)
- Row 2: Ch 2 (counts as hdc), BLO hdc in each st across. Turn. (275 hdc) This gives the head end the same ridged line as the sashing.
- Row 3: Ch 1, sc in each st across. Do not turn. (275 sc)
- Row 4 (crab stitch): Ch 1, working backwards from left to right, reverse sc in each st across. (275 reverse sc) Fasten off and weave in.
- This edge is deliberately flat and skirtless so the bedspread tucks neatly under the pillows without bulk.
Finishing
Weave in every remaining end on the wrong side, running the tails along a sashing row or through the back of a dc group rather than across an open lace space where they will show. Trim close, but not flush — cotton tails work loose if cut too short.
Block the whole bedspread once more now that it is assembled. Spread a clean sheet on a bed or a carpeted floor, lay the spread out flat and mist it evenly with cool water until it is damp through. Pat it into a true rectangle, measuring 181 cm across the square panel and 204 cm down, then pin the skirt out all the way around so each scallop sits in a smooth arc and each pineapple opens fully. Pinning the scallops individually is slow and it is the step that makes the hem look finished rather than ruffled. Leave to dry for a full day with a fan on it if the room is humid.
The finished bedspread measures about 205 cm wide by 216 cm long, which gives a queen bed a 12 cm drop on both sides and at the foot, with the plain head edge sitting under the pillows. Wash it on a cool gentle cycle in a mesh bag, never wring it, and dry it flat — hanging a wet cotton bedspread this size will stretch the skirt out of shape permanently.
Tips for Success
- Block every square to exactly 20 cm before any joining. A 5 mm drift per square becomes 4 cm of error across eight columns, and no amount of final blocking will straighten it.
- Work from several balls in rotation rather than finishing one before opening the next. Even within a single dye lot, mercerised cotton can shift slightly, and rotating spreads the difference invisibly.
- Close every popcorn with the right side facing you and give it a push forward with your thumb before moving on. On the flower centres and the 678 hem popcorns, this is the difference between texture and a lumpy row.
- Count the 30 sc along each square edge every single time you start a sashing band. The 310-stitch column edge and the 912-stitch skirt base are built on that figure and there is no graceful way to fudge it later.
- Keep a printed 8 x 9 grid and tick off each square as it goes into a column. Once four columns are joined it is very hard to spot a misplaced motif, and very annoying to unpick one.
Common Mistakes to Avoid
- Working the sashing bands tighter than the squares. This pulls the columns in and makes the long edges cup. If your sashing rows measure less than 20 cm across the 30 sts, switch to the 4.5 mm hook for those five rows only.
- Forgetting the BLO on Row 3 of each sashing band. Worked through both loops, the band is still structurally fine but the raised ridge disappears and the squares read as one blurry field instead of separate blocks.
- Skipping the extra increases in Border Round 1 — the 2 per long side and 1 on the foot edge. Without them the skirt base is 909 stitches, not 912, and the 8-stitch pineapple repeat will not come out even.
- Losing a pineapple loop in the skirt rows. Each pineapple should drop by exactly one ch-3 loop per row: 5, 4, 3, 2, 1. Count the loops on three or four pineapples at the end of every row rather than discovering an uneven hem at Row 7.
- Joining the squares with a tight sc through both whole stitches. It makes a hard ridge that fights the drape. Take only the back loop of each layer, as written, so the seam stays flat and flexible.
Ways to Customize This Pattern
- Make it for a single bed with 6 columns of 7 squares (42 squares). The head and foot edges then measure 6 x 30 + 5 x 5 = 205 sc, and each column edge 7 x 30 + 6 x 5 = 240 sc. Add increases in Border Round 1 so each long side is a multiple of 8 before starting the skirt.
- Work all 36 Pineapple Squares in a paler lilac and keep the Flower Squares, sashing and skirt in the main lavender for a soft two-tone checkerboard.
- Skip the skirt entirely and work the Popcorn Scallop Trim directly onto Border Round 2 all the way around for a flat coverlet or sofa throw at 181 x 204 cm.
- Make matching cushion covers like the ones in the photograph: four Flower Squares joined 2 x 2 for the front, four more for the back, joined with a single round of sc and a short popcorn scallop along the lower edge. One cover takes about 3 hours.
- Crochet an heirloom table topper by working the same two motifs in size 10 cotton thread with a 1.75 mm hook. Each square comes out around 8 cm, so a 4 x 4 layout with the skirt makes a 40 cm centrepiece.
Frequently asked questions
About 2,400 g of DK cotton, which is roughly 24 balls of 100 g or 4,500 m, for the queen size given here. The squares use around 1,500 g of that, the sashing about 400 g, and the skirt and popcorn trim the remaining 500 g — the popcorns alone eat far more yarn than their size suggests. Buy the whole amount in one dye lot at the start, because matching lavender cotton two months into a project is close to impossible.
You can, but the result is a different thing. Acrylic will not hold a block, so the pineapples stay half-closed and the scallops never crisp up, and a bedspread this size in acrylic gets heavy and clingy on the bed. If you want the crisp lace look in the photograph, mercerised cotton or a cotton-linen blend is the right choice. If cost is the issue, a cotton-acrylic blend at 50/50 is a reasonable compromise that still blocks adequately.
The 11-dc fans in Row 1 are deliberately set over 8 stitches, which builds in a little fullness so the skirt skims the mattress edge rather than clinging to it. If yours flares dramatically, your fans are too loose — try the skirt rows one hook size down. If it is pulling in and the corners cup instead, you probably missed the 6 sc worked into each foot corner of Border Round 1, which is what lets the skirt turn the corner.
Yes, and the math still works because both motifs end on 132 sc with 30 sc per side. Seventy-two Flower Squares gives a denser, warmer, more solid spread; seventy-two Pineapple Squares gives a much lighter, more openwork cover that shows the sheet colour underneath. The alternating layout exists mainly for contrast, so this is purely a look decision — just keep the 20 cm blocked measurement identical either way.
Add one column and one row of squares: 9 columns of 10 squares, or 90 motifs. The head and foot edges then measure 9 x 30 + 8 x 5 = 310 sc, and each long side 10 x 30 + 9 x 5 = 345 sc. Work Border Round 1 as written but add increases so each long side is a multiple of 8, keep the 6 sc foot corners, and recalculate the skirt base before starting Row 1 of the pineapples. The finished size comes out around 226 x 238 cm, and you should budget about 3,000 g of yarn.
The finished Lavender Lace Crochet Bedspread

