Lavender Lace Hanging Pocket Organizer Crochet Pattern
Advanced
For experienced crocheters who enjoy complex shaping, fine detail, and ambitious construction
Single-Day Project
A satisfying project you can complete in a single afternoon or evening.
Handmade Gift
A beautiful keepsake — free forever. Read online or print at home.
About This Lavender Lace Hanging Pocket Organizer Crochet Pattern
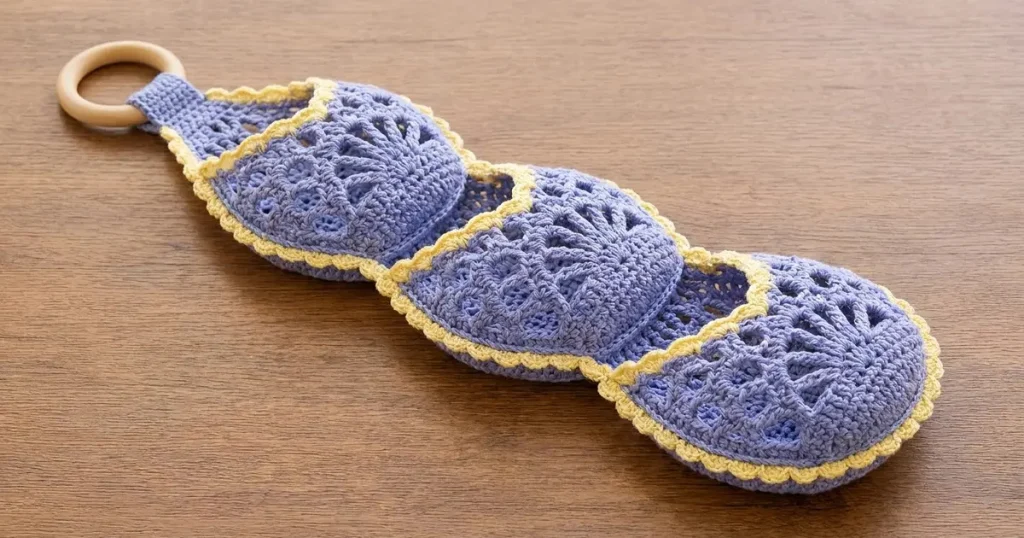
This crochet hanging organizer pattern creates three rounded lavender pockets with butter-yellow scalloped borders and a natural wooden hanging ring. The lace fronts combine solid crochet bands with small openwork fans, echoing the layered, curved shapes in the reference photo.
Allow about 10–14 hours for the separate circular backings, shaped lace fronts, reinforced connections, and hand-sewn assembly. This advanced project suits crocheters who enjoy precise blocking, working into chain spaces, and matching pieces made in different stitch patterns. The pockets are intended for lightweight, dry accessories; their openwork fronts make them especially useful for items larger than the lace openings.
Materials
- DK cotton yarn in dusty lavender Approximately 150 g / 360 m
- DK cotton yarn in pale butter yellow Approximately 35 g / 84 m
- Crochet hook 3.0 mm, or size needed for gauge
- Smooth wooden ring Approximately 7 cm outside diameter, with a 5 cm opening
- Locking stitch markers At least 8
- Tapestry needle and scissors For seams and finishing
- Blocking mat, rustproof pins, and measuring tape For matching the circular and semicircular pieces
Abbreviations
chchainscsingle crochethdchalf double crochetdcdouble crochetsl stslip stitchinc2 sc in the same stitchMRmagic ringRSright sideWSwrong sidest / stsstitch / stitchesCircular Backings — Make 3 in Lavender
- Round 1: Work 6 sc in an MR. Tighten the ring. Continue in a spiral, marking the first stitch of each round. (6 sts)
- Round 2: Inc in each stitch. (12 sts)
- Round 3: Repeat (sc in next stitch, inc) 6 times. (18 sts)
- Round 4: Repeat (sc in next 2 stitches, inc) 6 times. (24 sts)
- Round 5: Repeat (sc in next 3 stitches, inc) 6 times. (30 sts)
- Round 6: Repeat (sc in next 4 stitches, inc) 6 times. (36 sts)
- Round 7: Repeat (sc in next 5 stitches, inc) 6 times. (42 sts)
- Round 8: Repeat (sc in next 6 stitches, inc) 6 times. (48 sts)
- Round 9: Repeat (sc in next 7 stitches, inc) 6 times. (54 sts)
- Round 10: Repeat (sc in next 8 stitches, inc) 6 times. (60 sts)
- Round 11: Repeat (sc in next 9 stitches, inc) 6 times. (66 sts)
- Round 12: Repeat (sc in next 10 stitches, inc) 6 times. (72 sts)
- Sl st in the next stitch and fasten off; this finishing slip stitch does not create an additional stitch. Block each backing to an 11 cm circle. With the RS facing, designate one perimeter stitch as the left midpoint. Number the circumference clockwise from that stitch so stitches 1–36 follow the lower semicircle and stitches 37–72 follow the upper semicircle. Mark stitches 1, 36, 54, and 55.
Semicircular Lace Pocket Fronts — Make 3 in Lavender
- Row 1: In an MR, ch 2, work 6 dc. Turn. Leave the stitches arranged as a semicircle, with the first and last stitches forming its straight upper edge. Tighten the ring only enough to close the central hole. (6 sts)
- Row 2: Ch 2, work 2 dc in each stitch. Turn. (12 sts)
- Row 3: Ch 2. Repeat (work dc, ch 1, dc all in the next stitch; skip the next stitch) 6 times. Turn. (12 dc and 6 ch-1 spaces; 18 positions)
- Row 4: Ch 2. Working into stitches and into ch-1 spaces, repeat (2 dc in the next position, dc in each of the next 2 positions) 6 times. Turn. (24 sts)
- Row 5: Ch 2. Repeat (dc in next stitch, ch 1, skip next stitch, dc in next stitch, 2 dc in next stitch) 6 times. Turn. (24 dc and 6 ch-1 spaces; 30 positions)
- Row 6: Ch 2. Working into stitches and into ch-1 spaces, repeat (2 dc in next position, dc in each of the next 4 positions) 6 times. Do not turn. (36 sts along curved edge)
- Fasten off, leaving a 75 cm sewing tail. Block each front to an 11 cm straight upper edge and a depth of 5.5 cm. The 36 curved-edge stitches will match the backing’s 36 lower-half stitches one for one.
Yellow Pocket Opening Borders — Make on All 3 Fronts
- Foundation row: With the front’s RS facing and its straight edge uppermost, join yellow at the right-hand corner. Work toward the center, placing 2 sc around each of the 6 dc row ends; work 1 sc into the center at the MR; then place 2 sc around each of the 6 row ends on the other half. Turn. (25 sts)
- Scallop row: Ch 1, sl st in the first stitch. Repeat (skip next stitch, 3 hdc in next stitch, skip next stitch, sl st in next stitch) 6 times. Fasten off. This uses all 25 foundation stitches and creates 6 scallops.
- Weave in the yellow ends along the border’s WS. Keep the lavender curved-edge sewing tail available. Lightly dampen and flatten the opening border without stretching it.
Join Each Pocket Front to Its Backing
- Place one backing RS up. Lay one lace front RS up over its lower half, with both straight-edge corners at the backing’s marked midpoints. The pocket cavity lies between the two pieces; neither piece is folded.
- Pin the first and last curved-edge stitches of the front to backing stitches 1 and 36. Pin the center of the curved edge at the bottom of the backing. Distribute the remaining stitches evenly.
- Using the lavender tail, whipstitch each of the front’s 36 curved-edge stitches to the corresponding backing stitch, passing through both loops of each piece. Keep the seam flexible. Leave the entire yellow-trimmed straight edge open.
- At each opening corner, make 3 small reinforcing stitches through the border end and backing. Secure the yarn on the WS and weave in the tail. Repeat for the remaining 2 pockets.
Yellow Outer Scalloped Borders — Work Around Each Pocket
- Foundation round: With the pocket front facing you, join yellow at backing stitch 1. Ch 1, work 1 sc in each of the 72 backing perimeter stitches, inserting the hook beneath the stitch loops alongside the seam on the lower half. Do not catch any additional part of the pocket opening. Join with sl st to the first sc. (72 sts)
- Scallop round: Ch 1. Repeat (sl st in next stitch, 3 hdc in next stitch, sl st in next stitch) 24 times. Join with sl st to the first sl st and fasten off. Each repeat uses 3 foundation stitches; there are 24 scallops.
- Weave in ends. Block the finished pocket units to approximately 12–13 cm wide, allowing the scallops to settle without pulling the lace flat under tension.
Reinforced Joining Tabs — Make 2 in Lavender
- Row 1: Ch 7, sc in the second chain from the hook and each remaining chain. Turn. (6 sts)
- Rows 2–8: Ch 1, sc in each stitch. Turn after each row except Row 8. (6 sts each row)
- Fasten off, leaving a 50 cm tail. Block each tab to approximately 3 cm wide and 3.6 cm long. These tabs bridge the backs of adjacent pockets and carry the vertical load.
Wooden Ring Strap — Make 1 in Lavender
- Row 1: Ch 9, sc in the second chain from the hook and each remaining chain. Turn. (8 sts)
- Rows 2–18: Ch 1, sc in each stitch. Turn after each row except Row 18. (8 sts each row)
- Fasten off, leaving an 80 cm sewing tail. The strap should measure approximately 4 cm wide and 8 cm long. Pass one short end through the wooden ring and fold the strap in half around the ring, matching its short ends.
- Whipstitch the two short ends together through all 8 pairs of stitches. Leave the sewing tail attached for securing the doubled strap to the top backing.
Assemble the Three-Pocket Column
- Arrange the pockets vertically, with all openings uppermost. Overlap the top of each lower backing behind the bottom of the pocket above by 1 cm. Measure between the lavender backing edges, excluding scallops. Keep all three circular centers on the same vertical line.
- Place one joining tab vertically on the backs across each overlap. Center it on the column. Sew its upper 1.3 cm to the upper backing and its lower 1.3 cm to the lower backing, leaving the central 1 cm spanning the overlap. Sew across both short ends and down the attached side sections, catching backing fabric only.
- At each overlap, make a 2 cm horizontal seam through the two backings, centered behind the pockets. Use small lavender backstitches and keep the needle clear of the lace fronts so the pockets remain usable.
- Center the bottom 2 cm of the doubled ring strap on the WS of the uppermost backing, directly behind its top center. Sew through both strap layers and backing in a rectangle approximately 4 cm wide and 2 cm high; add a diagonal line of stitches across the rectangle. Keep stitches out of the front pocket layer.
- Secure all tails and check that the ring, strap, tabs, and three pocket centers line up. The finished organizer should measure approximately 40 cm from the top of the ring to the bottom scallop, with variation from ring thickness and blocking.
Finishing
Lay the organizer flat and smooth each pocket front into a shallow pouch. The lace should rest against the backing when empty and open gently when filled. Check each opening with your hand to make sure no assembly stitches have caught the front to the back.
Hang the finished piece from its wooden ring and add a few lightweight accessories. If a connection tilts, remove the contents and adjust that tab’s seam before using the organizer. For cleaning, hand-wash the crochet gently while keeping the wooden ring out of the water, support the wet fabric, and dry flat.
Tips for Success
- Block one backing and one lace front before making the remaining pieces. Their matching 36-stitch curved edges matter more than using the same hook for both fabrics.
- Mark each ch-1 space as you finish a lace row. The following solid row works into that space as a full position.
- Pin the curved seam at both corners and the bottom center before sewing. This keeps the lace fans centered on the pocket.
- Make the reinforcing tabs firm and attach them to the backing fabric. Yellow scallops are decorative and should not carry the organizer’s weight.
Common Mistakes to Avoid
- Counting turning chains as stitches adds width to the lace front. Begin each row in the first actual stitch and keep the stated row count.
- Skipping the chain spaces in Rows 4 or 6 makes the front too narrow. Work into every stitch and every ch-1 space as instructed.
- Pulling the curved seam tight flattens and puckers the pocket. Loosen the seam until its length matches the blocked backing semicircle.
- Sewing through all visible layers during final assembly closes part of a pocket. Slide a hand inside the pocket while sewing to keep its front clear of the needle.
Ways to Customize This Pattern
- Use sage cotton with cream scallops while keeping the wooden ring natural for a softer neutral palette.
- Make two pocket units for a shorter organizer; use one joining tab and the same ring strap.
- Add a fourth pocket with one additional joining tab for more lightweight storage, checking that the hanging fixture suits the filled organizer.
- For small accessories, hand-sew a cotton semicircle lining inside each front before joining it to the backing. Cut each lining with a 1 cm seam allowance around an 11 cm-wide, 5.5 cm-deep semicircle, turn the allowance under, and keep the lining below the yellow opening border.
Frequently asked questions
Double crochet can spread more than single crochet, even with the same yarn and hook. Block both pieces first. If the front still exceeds an 11 cm width or 5.5 cm depth, remake it with a smaller hook while retaining all row counts.
Only their two corners are reinforced to the backing. The yellow-trimmed straight edge stays open; the 36-stitch curved edge forms the sewn bottom and sides of each pocket.
The cotton lace, small seams, and hanging strap are intended for lightweight accessories. Heavy items can stretch the openings and pull the column out of shape. Use shallow, light contents and check the seams periodically.
No. The reference shows a functional hanging pocket organizer. Its shape comes from circular backings, semicircular lace fronts, and careful assembly; the pockets remain empty for storage.
The finished Lavender Lace Hanging Pocket Organizer Crochet Pattern

