Lavender Lattice Granny Square Bedspread Pattern
Beginner Friendly
Perfect for those just starting their crochet journey, with clear instructions and simple techniques
Single-Day Project
A satisfying project you can complete in a single afternoon or evening.
Handmade Gift
A beautiful keepsake — free forever. Read online or print at home.
About This Lavender Lattice Granny Square Bedspread Pattern
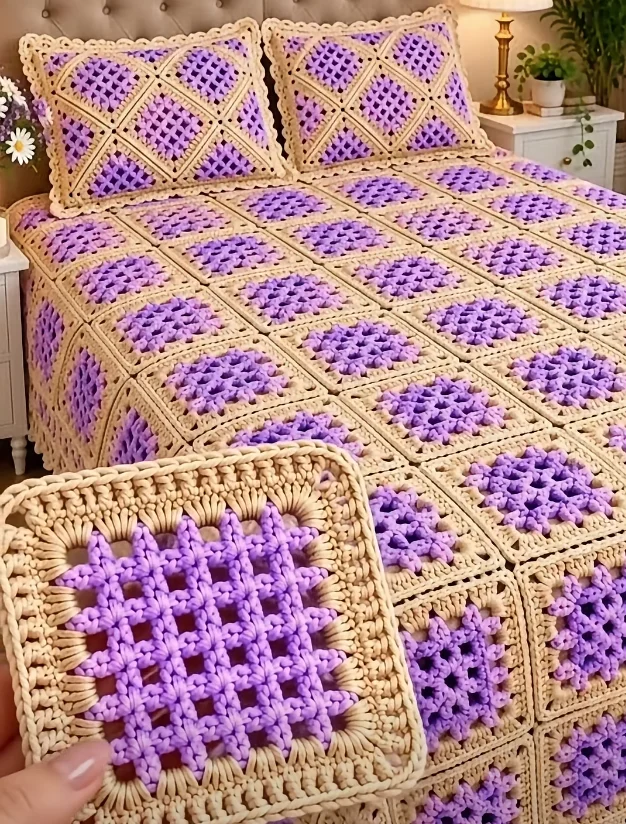
This granny square bedspread pattern makes a full bed cover and a pair of matching pillow shams from one repeated square. Each square has a lavender filet lattice in the center and a cream frame around it. The frame is made of long treble rays, a raised front post ring and a clean single crochet edge. The squares are joined with single crochet on the right side, so a grid of cream ridges frames every lattice window.
Each square takes about 40 minutes once you have the rhythm. That makes the queen-size bedspread (143 squares) a long project of roughly 120 to 140 hours, plus about 20 hours for the shams. The upside is that the work breaks into small, portable pieces you can make anywhere and join at the end.
This is an advanced pattern. You will work filet mesh in rows, switch to rounds, keep exact counts on post stitches, and handle a large joined piece with a five-round border. If you are comfortable reading stitch counts and want a showpiece for the bedroom, this is a satisfying build.
Materials
- Worsted weight cotton or cotton blend, cream about 3 kg (30 x 100 g) for the bedspread, plus 600 g for two shams
- Worsted weight cotton or cotton blend, lavender about 500 g for the bedspread, plus 100 g for two shams
- 4.5 mm (US 7) crochet hook
- Tapestry needle
- Locking stitch markers at least 4
- Two 40 x 60 cm pillow inserts for the shams
- 8 buttons, 20 mm 4 per sham
- Blocking mats and pins, or a spray bottle and towels
- Scissors
Abbreviations
chchainsl stslip stitchscsingle crochethdchalf double crochetdcdouble crochettrtreble crochetFPdcfront post double crochetrev screverse single crochet (crab stitch)skskipsp(s)space(s)st(s)stitch(es)begbeginningreprepeatRS / WSright side / wrong sideLattice Center (Lavender, worked in rows)
- With lavender, ch 20.
- Row 1: Dc in 8th ch from hook, [ch 2, sk next 2 ch, dc in next ch] 4 times. Turn. (6 bars counting the skipped chains as the first bar, 5 ch-2 sps)
- Row 2: Ch 5 (counts as dc and ch 2 throughout), sk first ch-2 sp, dc in next dc, [ch 2, dc in next dc] 3 times, ch 2, sk next 2 ch of turning ch, dc in next ch. Turn. (6 bars, 5 ch-2 sps)
- Rows 3–5: Ch 5, sk first ch-2 sp, dc in next dc, [ch 2, dc in next dc] 3 times, ch 2, sk next 2 ch of turning ch, dc in next ch. Turn. (6 bars, 5 ch-2 sps each row)
- Fasten off. You now have a 5 x 5 grid of open windows. Check that every bar sits directly on top of the bar below. If one drifts into a chain, the lattice will lean.
Frame Rounds (Cream)
- Round 1: With RS facing, join cream with sc in the top of the first bar at one end of Row 5. [2 sc in next ch-2 sp, sc in next dc] 5 times (16 sc), ch 2. Working down the side in row ends: 3 sc in each of next 2 row ends, 4 sc in next row end, 3 sc in each of next 2 row ends (16 sc), ch 2. Working along the foundation chain: sc in base of first dc, [2 sc in next ch-2 sp, sc in base of next dc] 5 times (16 sc), ch 2. Working up the second side: 3 sc in each of next 2 row ends, 4 sc in next row end, 3 sc in each of next 2 row ends (16 sc). Join with hdc to first sc; the hdc forms the last corner sp. (64 sc, 4 corner sps)
- Round 2 (rays): Ch 4 (counts as tr), tr in the corner sp formed by the joining hdc. *[Ch 1, sk next sc, tr in next sc] 8 times, ch 1, (2 tr, ch 2, 2 tr) in next corner sp; rep from * 2 more times, [ch 1, sk next sc, tr in next sc] 8 times, ch 1, 2 tr in first corner sp, join with hdc to top of beg ch-4. (48 tr, 36 ch-1 sps, 4 corner sps)
- Round 3: Ch 3 (counts as dc), dc in corner sp. *Dc in each of next 2 tr, [dc in next ch-1 sp, dc in next tr] 8 times, dc in next ch-1 sp, dc in each of next 2 tr, (2 dc, ch 2, 2 dc) in next corner sp; rep from * 2 more times, dc in each of next 2 tr, [dc in next ch-1 sp, dc in next tr] 8 times, dc in next ch-1 sp, dc in each of next 2 tr, 2 dc in first corner sp, join with hdc to top of beg ch-3. (25 dc per side, 100 dc total)
- Round 4 (raised ring): Ch 3 (counts as dc), dc in corner sp. *FPdc around each of next 25 dc (the beg ch-3 of Round 3 counts as one of them), (2 dc, ch 2, 2 dc) in next corner sp; rep from * 2 more times, FPdc around each of next 25 dc, 2 dc in first corner sp, join with hdc to top of beg ch-3. (29 sts per side, 116 sts total)
- Round 5: Ch 1, sc in corner sp. *Sc in each of next 29 sts, (sc, ch 2, sc) in next corner sp; rep from * 2 more times, sc in each of next 29 sts, sc in first corner sp, ch 2, join with sl st to first sc. Fasten off. (31 sc per side, 124 sc total, 4 ch-2 corner sps)
- Make 143 squares for the bedspread and 24 for two pillow shams (167 total).
Joining the Squares
- Block all squares to the same 20 cm size and let them dry fully.
- Lay them out in 13 rows of 11 squares.
- Horizontal seams: Hold the first square of Row 1 and the first square of Row 2 with WS together, so the seam ridge ends up on the RS. Join cream with sc through both corner ch-2 sps. Sc through both loops of both layers in each of the next 31 sts, then sc through both corner sps at the far end. Without cutting the yarn, pick up the next pair of squares and continue the same way across. (33 sc per square, 363 sc per seam.) Work all 12 horizontal seams this way.
- Vertical seams: Work the 10 vertical seams the same way. At each junction, work 1 sc over the crossing ridge so the intersection lies flat. (33 sc per square plus 12 junction sc = 441 sc per seam.)
Bedspread Border
- Round 1 (cream): Join with sl st in any outer corner sp. Ch 1, 3 sc in the same sp. Sc in each st along the edge. At each seam, sc in the corner sp of each square and 1 sc in the seam between them. Work 3 sc in each outer corner sp. Join with sl st to first sc. (371 sc on each short side and 439 sc on each long side between the 3-sc corners)
- Round 2 (lavender): Join with sl st in the center sc of any corner. Ch 3 (counts as dc), 2 dc in the same st, *dc in each st to next corner center sc, 3 dc in corner center sc; rep from * 2 more times, dc in each st to end, join with sl st to top of beg ch-3. Fasten off. (373 dc on short sides, 441 dc on long sides between corner centers)
- Round 3 (cream): Join with sl st in the center dc of any corner. Ch 3 (counts as dc), 2 dc in the same st, *FPdc around each dc to next corner center, 3 dc in corner center dc; rep from * 2 more times, FPdc around each dc to end, join with sl st to top of beg ch-3. (375 / 443 sts between corner centers)
- Round 4 (cream): Ch 1, 3 sc in same st, *sc in each st to next corner center, 3 sc in corner center; rep from * 2 more times, sc in each st to end, join with sl st to first sc. (377 / 445 sts between corner centers)
- Round 5 (cream): Ch 1, rev sc in each st around, working left to right. Join with sl st to first rev sc. Fasten off.
Pillow Shams (make 2)
- Front panel: Join 6 squares into a panel 3 squares wide and 2 squares tall, using the same WS-together sc seam so the ridges sit on the RS.
- Back panel: Join 6 more squares the same way.
- Hold the panels WS together with the front facing you. Join cream in a corner sp through both layers. Working through both layers, sc around three sides (one short side and both long sides). On each square edge, work 33 sc (31 sts plus 1 sc in each corner sp), and work 1 sc in each seam. Work 3 sc in each corner you turn.
- Opening edge: Continue across the remaining short side through the front panel only. Sc in each st across (about 67 sts), making 4 evenly spaced button loops (ch 5, sk 2 sts). Fasten off. Join cream at the back panel’s open edge, sc across it, and fasten off.
- Edging: Join cream in any corner of the closed sides and work rev sc along the three closed sides. Fasten off.
- Sew 4 buttons to the back panel to line up with the loops.
Finishing
Weave in any remaining ends along the back of the seam ridges, where they stay hidden and secure. With 167 squares you will have a lot of ends, so work through them a row of squares at a time rather than leaving them all for the end.
Lay the bedspread flat on a clean floor or a covered bed, mist it evenly, and pat the squares into straight lines with your hands. Cotton relaxes as it dries, so the lattice windows open up and the seam ridges stand out clearly. Leave it until it is completely dry. Slip the inserts into the shams, button them closed, and set them against the headboard.
Tips for Success
- Crochet over the lavender tails while you work Round 1 and over the cream starting tail in Round 2. That cuts the ends you weave later by about half.
- Put a marker on each corner sp in Round 1 and count 16 sc per side before you move on. The 4-sc middle row end is what keeps the center square instead of rectangular.
- Make all 167 lattice centers in one batch, then all the frames. Your tension stays more even when you repeat one step many times in a row.
- Keep the FPdc in Round 4 relaxed and pull up a slightly taller loop. Post stitches pull in, and a tight Round 4 makes the square cup at the center.
- Join a test strip of four squares before joining everything. It shows whether your seams lie flat or need a looser tension.
Common Mistakes to Avoid
- Working a lattice dc into a chain instead of the dc below. The grid starts to lean. Count 6 bars on every row, and make sure each one sits directly on the bar below.
- Working only 2 sc in the row ends in Round 1. The sides end up shorter than the top and bottom, and the lattice puckers. Use 3 sc per row end with 4 in the middle one.
- Skipping the FPdc around the beginning ch-3 in Round 4. That side ends up with 28 sts instead of 29. Check each side before you join the round.
- Holding squares RS together when joining. The ridge lands on the back of the bedspread. Hold WS together so the cream ridges frame the squares on the front.
- Forgetting the 3-st corners in the border. The border pulls the bedspread corners up into points. Recount at each corner on every round.
Ways to Customize This Pattern
- Swap the lavender for sage, dusty rose or soft blue. For a scrappy version, use a different center color in every square and keep the cream frames consistent.
- Make a throw instead: 35 squares joined 5 across and 7 down, with the same border, comes out at about 108 x 148 cm.
- Fill some lattice windows with 2 dc instead of ch 2 to form solid blocks. This is classic filet. A center block or a small cross gives the squares a motif.
- Use join-as-you-go on Round 5 instead of sc seams for a flatter, seamless look without the raised grid.
- For bigger squares, add one more FPdc round and one more sc round before Round 5. Each round adds 4 sts per side, worked with the same corners.
Frequently asked questions
Yes. A worsted acrylic or acrylic-cotton blend works at the same gauge and makes the bedspread noticeably lighter and warmer. Cotton gives sharper lattice windows and crisper ridges, but a queen bedspread in cotton weighs around 3.5 kg.
For a twin, join 9 squares across and 12 down (108 squares), which finishes at about 188 x 248 cm with the border. For a king, join 13 across and 13 down (169 squares) for about 268 x 268 cm. Adjust the row count if your bed is taller or you want a longer drop.
Cupping usually comes from a tight Round 4, because front post stitches pull the fabric inward. Try working only Round 4 with a 5 mm hook. Curling corners usually ease out with blocking. If they don’t, check that every corner has the full (2 dc, ch 2, 2 dc) or (sc, ch 2, sc) group.
Machine wash cold on a gentle cycle in a large-capacity machine, or hand wash in a bathtub. Squeeze the water out gently without wringing, then dry it flat. Cotton gets very heavy when wet, and hanging it would stretch the squares.
The finished Lavender Lattice Granny Square Bedspread Pattern

