Advanced
For experienced crocheters who enjoy complex shaping, fine detail, and ambitious construction
Weekend Project
A satisfying weekend make — start Friday, finish Sunday, enjoy forever.
Handmade Gift
A beautiful keepsake — free forever. Read online or print at home.
About This Lavender Spiral Crochet Bedspread
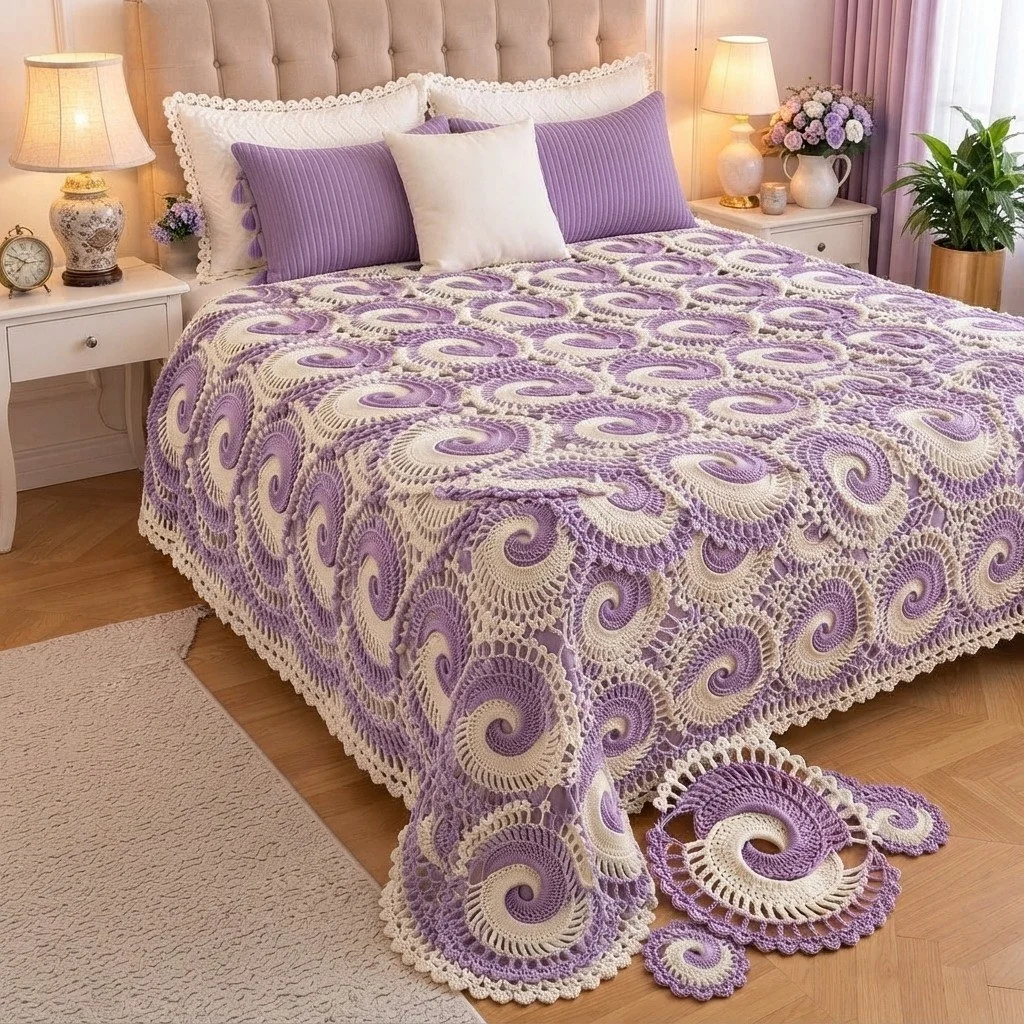
This lavender spiral crochet bedspread pattern is built from one motif repeated across the whole bed: a two-colour spiral centre that swirls from lilac into cream, a dense comb of treble stitches fanning out from it, and a shell-and-picot edge that locks each wheel to its neighbours. The spiral is worked with two balls at once, each colour chasing the other around the ring, which is what gives the finished blanket that pinwheel movement instead of flat concentric stripes. It looks complicated on the bed, but the motif itself is only sixteen rounds and becomes automatic after the third or fourth one.
The motifs are joined as you go on their final round, so there is no seaming marathon at the end — each new wheel is attached at four picots while you work its last round. Small eight-petal rosettes fill the square gaps between four joined wheels, and a three-round lace border finishes the outside edge with the same picot rhythm. Plan on roughly 60 to 80 hours for a full queen-size spread, spread over several weeks; a single motif takes about 25 minutes once you have the spiral under control.
This one is for crocheters who are comfortable with magic rings, treble stitches and join-as-you-go, and who like a long project they can pick up in small pieces. Because it is worked in cotton and joined motif by motif, it is also easy to resize: make fewer rows of motifs for a throw, more for a king bed. The instructions below give every stitch count so you can check your work round by round rather than counting a finished wheel of 96 trebles.
Materials
- DK cotton yarn in lilac (Colour A) approx. 1500 g / 15 balls of 100 g
- DK cotton yarn in cream (Colour B) approx. 1500 g / 15 balls of 100 g
- 3.5 mm crochet hook or size needed for gauge
- Stitch markers at least 4, one for each colour spiral plus spares
- Blunt tapestry needle for weaving in ends
- Blocking mats and rustproof pins enough to block one motif at a time
- Spray bottle with water for wet blocking
- Measuring tape
- Small sharp scissors
Abbreviations
chchainsl stslip stitchscsingle crochet (US)dcdouble crochet (US)trtreble crochet (US)MRmagic ringinc2 stitches in the same stitchpicotch 3, sl st in first of those 3 chst(s)stitch(es)spspaceskskipreprepeatAlilac yarnBcream yarnGauge, Sizing and Motif Count
- Gauge: one finished, blocked Spiral Wheel Motif measures 20 cm (8 in) from picot edge to picot edge.
- Sample as written: 11 motifs across by 13 motifs down, joined in a straight grid, plus the three-round border — approximately 230 x 270 cm, which covers a queen bed with a drop on three sides.
- Total pieces for the sample: 143 Spiral Wheel Motifs and 120 Filler Rosettes.
- To resize: multiply the number of motifs across and down by 20 cm, then add about 10 cm total for the border. A 7 x 9 layout makes a 150 x 190 cm throw and needs 63 motifs and 48 rosettes.
- Tension note: the spiral centre should lie flat with no cupping and no ruffling. If it cups, go up a hook size; if it ruffles, go down one.
Spiral Wheel Motif — Two-Colour Centre (make 143)
- R1: With A, work 6 sc in a MR. Do not join and do not fasten off; drop A and leave the loop live. With B, work 6 sc into the same ring. Pull the ring closed. (12 sts: 6 A, 6 B) Place a marker in the first sc of each colour; move both markers up every round.
- From here each colour works only into the stitches of its own colour, always carrying the working loop over the other colour’s tail. Work A’s segment, drop A, work B’s segment, drop B, and repeat. Each segment grows by 3 sts per round.
- R2: With A: (inc, sc in next st) 3 times. (9 A) With B: (inc, sc in next st) 3 times. (9 B — 18 sts total)
- R3: With A: (inc, sc in next 2 sts) 3 times. (12 A) With B: the same. (12 B — 24 sts)
- R4: With A: (inc, sc in next 3 sts) 3 times. (15 A) With B: the same. (15 B — 30 sts)
- R5: With A: (inc, sc in next 4 sts) 3 times. (18 A) With B: the same. (18 B — 36 sts)
- R6: With A: (inc, sc in next 5 sts) 3 times. (21 A) With B: the same. (21 B — 42 sts)
- R7: With A: (inc, sc in next 6 sts) 3 times. (24 A) With B: the same. (24 B — 48 sts)
- R8: With A: (inc, sc in next 7 sts) 3 times. (27 A) With B: the same. (27 B — 54 sts)
- R9: With A: (inc, sc in next 8 sts) 3 times. (30 A) With B: the same. (30 B — 60 sts)
- R10: With A: (inc, sc in next 9 sts) 3 times. (33 A) With B: the same. (33 B — 66 sts)
- R11: With A: (inc, sc in next 10 sts) 3 times. (36 A) With B: the same. (36 B — 72 sts) Fasten off B only, leaving a 10 cm tail. The disc now shows two interlocking arms, one lilac and one cream, and measures about 10.5 cm across.
- R12 (levelling round, A): Continue with A. Sc in each st around to the step where B’s segment ended, then work 1 sl st into each of the next 2 sts to bring the edge level, and join with sl st to the first sc of this round. (72 sts) Fasten off A, leaving a 10 cm tail. The small step is normal and disappears under the next round.
Spiral Wheel Motif — Fan and Shell Rounds
- R13 (B): Join B with a sl st in any st of R12. Ch 1, sc in the same st, sc in each st around, join with sl st to first sc. (72 sts)
- R14 (B, the comb): Ch 4 (counts as first tr), tr in next st, 2 tr in next st, then *tr in next 2 sts, 2 tr in next st; rep from * 23 times more, join with sl st to top of ch-4. (96 tr) These long stitches are what make the cream rays that fan out from the spiral; keep them loose and even rather than tight.
- Fasten off B, leaving a 10 cm tail.
- R15 (A, shells): Join A with a sl st in any tr. Ch 1, sc in the same st. *Sk 3 tr, 7 dc in next tr, sk 3 tr, sc in next tr; rep from * 11 times more, omitting the final sc on the last repeat and joining with sl st to the first sc instead. (12 shells of 7 dc, 12 sc)
- Fasten off A, leaving a 10 cm tail.
- R16 (B, picot edge): Join B with a sl st in the sc before any shell. Ch 1. *Sc in first dc of shell, (picot, sc in next dc) 6 times, sl st in next sc between shells; rep from * around all 12 shells, join with sl st to first sc. (12 shells, each carrying 7 sc and 6 picots) Fasten off and weave in all ends.
- For the very first motif only, complete R16 as written — it is the anchor for the whole grid. Every later motif is worked to R16 and then joined using the next section.
- Blocked motif measures about 20 cm across.
Joining the Motifs As You Go
- Lay out your grid plan first: 11 motifs across, 13 down. Work the grid row by row, left to right, so each new motif has at most two neighbours already in place (the one to its left and the one above it).
- Each motif joins to a neighbour at one shell only. Count the shells of the new motif as 1 to 12 starting from the join of R16; the four joining shells are shells 1, 4, 7 and 10 — these point left, up, right and down.
- Work R16 of the new motif as written until you reach a shell that must be joined. On that shell: sc in first dc, (picot, sc in next dc) twice, then make the third picot as a joining picot — ch 1, sl st into the corresponding centre picot of the finished neighbour’s shell, ch 1, sl st back into the first of those chains, sc in next dc.
- Make the fourth picot the same way, joining into the next picot of the neighbour’s shell, then finish the shell with (picot, sc in next dc) twice and sl st in next sc. Two joined picots per shell keep the join flat and stop the motifs from rocking.
- Continue R16 normally over all unjoined shells, join with sl st to the first sc, fasten off and weave in the end before moving on. Weaving in as you go is far faster than facing 143 motifs’ worth of ends later.
- When the grid is complete you will have a square gap between every set of four joined motifs: 10 gaps across by 12 gaps down, 120 gaps in all. Each gap takes one Filler Rosette.
Filler Rosette (make 120)
- R1: With A, work 6 sc in a MR, join with sl st to first sc. (6 sts)
- R2: Ch 1, 2 sc in each st around, join. (12 sts)
- R3: Ch 1, (sc in next st, 2 sc in next st) 6 times, join. (18 sts)
- R4: Ch 1, (sc in next 2 sts, 2 sc in next st) 6 times, join. (24 sts)
- R5: Ch 1, (sc in next 2 sts, 2 sc in next st) 8 times, join. (32 sts) Fasten off A.
- R6 (B, petals and joining round): Join B with a sl st in any st. *Sl st in next st, sk 1 st, work (3 dc, ch 2, 3 dc) in next st, sk 1 st; rep from * 7 times more, join with sl st to the first sl st. (8 petals)
- To join as you work R6: hold the rosette in the gap between four motifs. Petals 1, 3, 5 and 7 attach to the four surrounding motifs — replace the ch 2 at the top of those petals with ch 1, sl st into the centre picot of the nearest free shell of the motif, ch 1. Petals 2, 4, 6 and 8 stay free with their ch-2 tops and sit in the diagonal corners of the gap.
- Fasten off and weave in both ends. Repeat for all 120 gaps.
Lace Border
- Work the border in one continuous round around the whole outer edge of the joined grid, after all rosettes are in place.
- B1 (A): Join A with a sl st in the centre picot of any free shell along an edge. Ch 1, sc in that picot. *Ch 5, sc in the centre picot of the next free shell; rep from * all the way around. Where two motifs meet at a join, work ch 7 instead of ch 5 to span the dip. At each of the four outer corners, work ch 7, sc in the next picot, ch 7 to turn the corner without pulling. Join with sl st to first sc.
- B2 (B): Join B in any ch-5 sp. Ch 1. *(Sc, 5 dc, sc) in ch-5 sp; rep from * around, working (sc, 7 dc, sc) in every ch-7 sp instead. Join with sl st to first sc. Fasten off B.
- B3 (A): Join A in the first sc of any fan. Ch 1, sc in the same st. *Sc in each dc of the fan to the centre dc, picot in the centre dc, sc in each remaining dc of the fan, sc in next sc; rep from * around, join with sl st to first sc. Fasten off.
- Weave in the border ends along the back of the stitches rather than across the lace, where they would show.
Finishing
Go over the whole spread on a flat surface and check every join. Any motif that rocks or sits proud of its neighbours usually has only one joining picot instead of two, or has been joined at the wrong shell; it is quicker to undo R16 of that one motif and rework it than to try to flatten it later. Check the filler rosettes too — each one should be pulled taut at all four joining petals so the gap reads as a square flower, not a hole.
Block the finished spread in sections. Spread it over a bed or a clean floor covered with a sheet, spray each section until the cotton is evenly damp, and pat the motifs into shape so the wheels are round and the border picots sit in a straight line. Pin the outer edge at every corner fan and let it dry fully, which takes a day or two for a piece this size. Blocking is what opens up the treble comb and makes the spirals read clearly from across the room, so do not skip it. Once dry, turn the spread over and trim any ends you missed. The finished piece drapes best with the cream border edge hanging free rather than tucked under a mattress.
Tips for Success
- Keep both markers in the two-colour spiral at all times. The only reliable way to know where a colour’s segment starts is the marker — the stitches themselves blur once you are past round 6.
- Always carry the resting colour behind the working stitches in the same direction. If you sometimes cross over and sometimes under, the back of the spiral gets a visible ridge that shows through the lace.
- Work the 96 trebles of R14 slightly loosely and with a long yarn-over draw. Tight trebles pull the comb into a cone and the motif will never block flat.
- Batch your work: make 20 spiral centres through R12, then do all the fan and shell rounds, then join. Switching tasks less often is noticeably faster over 143 motifs.
- Count your shells on R15 before starting R16. Eleven or thirteen shells instead of twelve throws off the four joining points and the motif will not fit the grid.
Common Mistakes to Avoid
- Working both colours into the same stitches in the spiral. Each colour must stay in its own segment; if the stitch counts per colour drift apart, rip back to the last round where both read the same number and restart from there.
- Increasing 6 times per colour per round instead of 3. That doubles the growth rate and the disc ruffles badly by round 5. Each colour segment grows by exactly 3 stitches per round.
- Skipping the levelling round (R12). Without it the stepped spiral edge carries into the treble comb and the motif ends up visibly lopsided on one side.
- Joining at only one picot per shell. One join point lets the motifs pivot, and the grid goes diamond-shaped as it grows. Use two adjacent picots on every joining shell.
- Leaving the ends until the end. With 143 motifs you have well over 700 tails; weave each motif’s ends in before you start the next one.
Ways to Customize This Pattern
- Make a single motif into a round mat: work R1–R16 as written, then add one extra round of (sc, 5 dc, sc) fans in lilac around the picot edge for a 25 cm table or floor mat that matches the spread.
- Shade the spiral. Work the lilac arm in three tones — pale lilac for rounds 1–4, mid lilac for 5–8, deep plum for 9–12 — keeping cream constant, so the wheels look like they deepen outward.
- Reverse the colour order on every second motif, starting the spiral with cream in the magic ring instead of lilac, for a checkerboard effect across the bed.
- Work the whole spread in a single colour and let the two-strand spiral show only as texture, then edge the border in a contrast shade for a quieter, more modern version.
- Turn it into matching pillow covers: join 4 motifs plus 1 filler rosette into a square, make two panels, and sc them together around three sides over a 45 cm pillow form.
Frequently asked questions
Yes, for rounds 1 to 11. The two arms grow at the same time, each colour working its own segment while the other waits on a live loop. You cannot get the same interlocking swirl by working one colour and then the other — that produces concentric rings instead. Use two separate balls, or two ends of the same ball for the cream if you prefer, and keep them on opposite sides of your lap so they do not twist.
Count in 20 cm units. A double bed with a side drop takes about 10 motifs across by 12 down — 120 motifs and 99 rosettes. A king takes about 13 across by 13 down — 169 motifs and 144 rosettes. Always make and block one motif first and measure it, because a half-centimetre difference per motif adds up to more than 6 cm across a full bed.
You can, but the look changes. Cotton holds the treble comb open and keeps the picot edge crisp after blocking; acrylic is softer and the fan rays tend to collapse into each other, which blurs the spiral. If you use acrylic, go down to a 3.25 mm hook to firm up the fabric, and expect the finished spread to be a little larger and much heavier than the cotton version.
Wash it cold on a gentle or hand-wash cycle, never with agitation at high speed. The joining picots take the strain, so put the spread in a large mesh laundry bag or a flat sheet tied into a bundle. Dry it flat, reshaping the motifs while damp; hanging it wet over a line stretches the lace border out of square and it will not fully recover.
Almost always the joining shells are not evenly spaced. The four joining points must be shells 1, 4, 7 and 10 of twelve — every third shell, at the compass points. If you join at shells that are two apart on one side and four apart on the other, the motif rotates slightly and each new row pushes the error further. Undo the last round of the offending motifs and recount the shells before rejoining.
The finished Lavender Spiral Crochet Bedspread

