Lavender Swirl Medallion Bedspread and Cushions Crochet Pattern
Beginner Friendly
Perfect for those just starting their crochet journey, with clear instructions and simple techniques
Single-Day Project
A satisfying project you can complete in a single afternoon or evening.
Handmade Gift
A beautiful keepsake — free forever. Read online or print at home.
About This Lavender Swirl Medallion Bedspread and Cushions Crochet Pattern
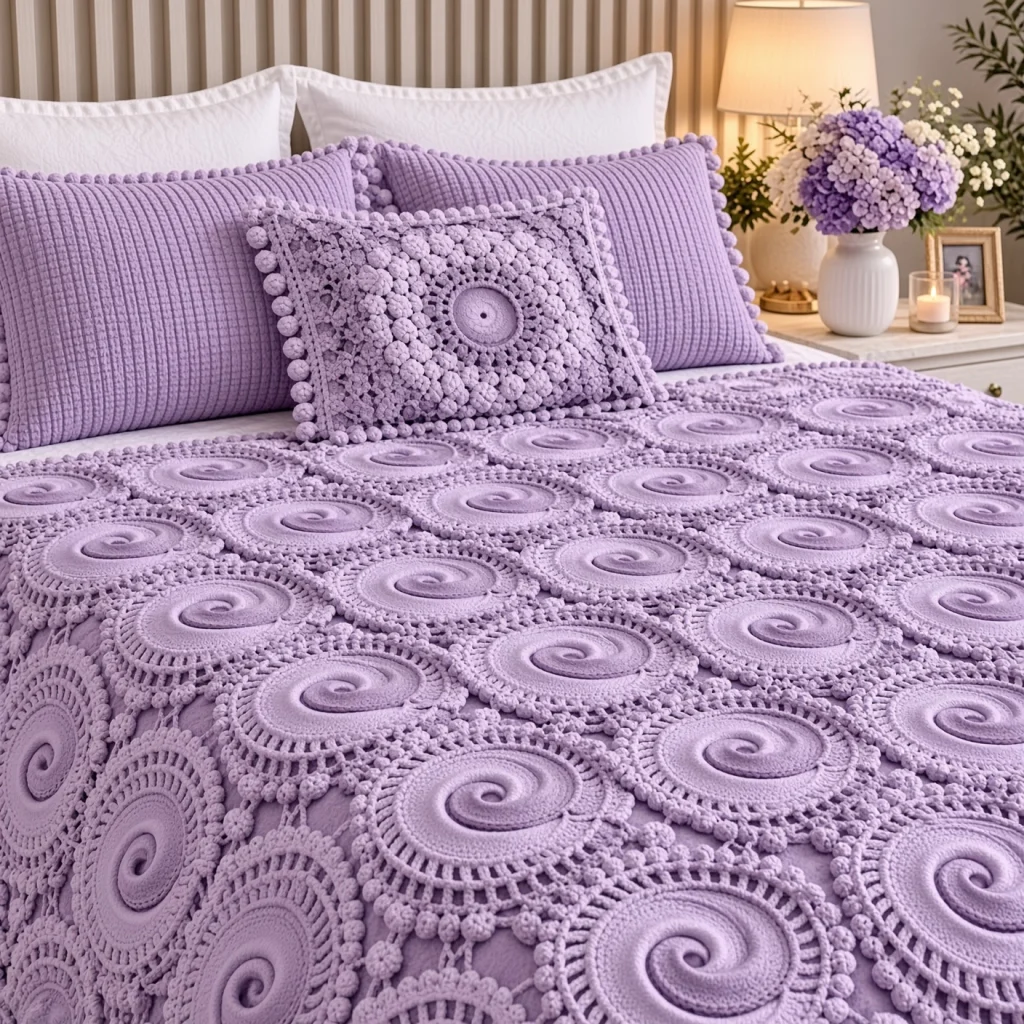
This lavender spiral crochet bedspread is made from 59 round medallions, each with a soft swirl at its center that turns like a seashell. Two close shades of lavender make the spiral show without breaking the calm, single-color look. Around the swirl, two rings of tall spokes open up like a wheel, and a ring of 48 bobbles finishes each edge. The medallions are set in a honeycomb, with little bobble rosettes filling the gaps, and ribbed shams and a medallion cushion complete the set.
The swirl is worked with two balls of yarn at once. Each shade works over the other shade’s stitches from the round before, then waits while the other catches up, so the rounds climb into a spiral without any sewing. The spoke rings and bobble edge are worked in the main lavender, and the medallions are joined as you go through the spaces between the bobbles.
The set takes about 125 to 145 hours, around an hour and three quarters per medallion. It suits a crocheter who is comfortable with bobbles, tall stitches and handling two balls of yarn at once.
Materials
- Worsted weight cotton blend, lavender (main) about 3,600 m (18 skeins of 100 g / 200 m)
- Worsted weight cotton blend, light lilac about 700 m (4 skeins)
- 5 mm crochet hook
- Locking stitch markers at least 2, for holding the dropped loops
- Tapestry needle and scissors
- Two 50 x 75 cm pillows and one 40 cm square cushion form
Abbreviations
MRmagic ringchchainscsingle crochethdchalf double crochetdcdouble crochettrtreble crochetsl stslip stitchbobble(yarn over, insert hook in st or sp, pull up a loop, yarn over, pull through 2 loops) 4 times in the same place, yarn over, pull through all 5 loopsBLOback loop onlyskskipspspacest(s)stitch(es)rndroundreprepeatJAYGjoin as you goRS / WSright side / wrong sideTwo-Shade Spiral (Rnds 1-7)
- How it works: in every rnd, pick up one shade and work over the other shade’s sts from the previous rnd, then drop it and do the same with the other shade. Each shade always covers half the circle.
- Rnd 1: with lavender (A), MR, ch 1, sc, hdc, 4 dc in ring. Drop A and put a marker in its loop. With light lilac (B), pull up a loop in the ring, ch 1, sc, hdc, 4 dc in ring. Drop B. Pull the ring tight. (6 sts in each shade, 12 sts)
- Rnd 2: pick up A, 2 dc in each of the next 6 sts (B’s sts). Drop A. Pick up B, 2 dc in each of the next 6 sts (A’s sts). Drop B. (12 sts in each shade, 24 sts)
- Rnd 3: with each shade in turn, *dc in next st, 2 dc in next st; rep from * 5 more times. (18 sts in each shade, 36 sts)
- Rnd 4: with each shade in turn, *dc in next 2 sts, 2 dc in next st; rep from * 5 more times. (24 sts in each shade, 48 sts)
- Rnd 5: with each shade in turn, *dc in next 3 sts, 2 dc in next st; rep from * 5 more times. (30 sts in each shade, 60 sts)
- Rnd 6: with each shade in turn, *dc in next 4 sts, 2 dc in next st; rep from * 5 more times. (36 sts in each shade, 72 sts)
- Rnd 7 (taper): with each shade in turn, (dc in next 5 sts, 2 dc in next st) 5 times, hdc in next 2 sts, 2 hdc in next st, sc in next 2 sts, sl st in next st. Fasten off both shades. (42 sts in each shade, 84 sts)
Spoke Rings (Rnds 8-11)
- Rnd 8: join lavender in any st, ch 1, *sc in next 6 sts, 2 sc in next st; rep from * 11 more times, join. (96 sc)
- Rnd 9: ch 4 (counts as tr), ch 2, sk next st, *tr in next st, ch 2, sk next st; rep from * 46 more times, join to top of ch 4. (48 tr spokes, 48 ch-2 sps)
- Rnd 10: ch 1, *sc in tr, 2 sc in next ch-2 sp; rep from * 47 more times, join. (144 sc)
- Rnd 11: ch 4 (counts as tr), ch 3, sk next 2 sts, *tr in next st, ch 3, sk next 2 sts; rep from * 46 more times, join to top of ch 4. (48 tr spokes, 48 ch-3 sps)
Bobble Edge (Rnd 12, first medallion only)
- Rnd 12: sl st in first ch-3 sp, ch 2, bobble in same sp (the ch 2 stands in for the first yarn over), ch 2, *bobble in next ch-3 sp, ch 2; rep from * 46 more times, join to top of first bobble. Fasten off. (48 bobbles, 48 ch-2 sps)
- Sp positions: hold the medallion RS up and turn it so the ch-2 sp after the first bobble points left, at 9 o’clock. That is sp 1. Counting in the direction you worked, sp 9 points down and left, sp 17 down and right, sp 25 right, sp 33 up and right and sp 41 up and left. Sps 5, 13, 21, 29, 37 and 45 point into the gaps between neighbors.
Joining As You Go (Rnd 12 for all other medallions)
- Work Rnds 1-11 as usual. On Rnd 12, plan your starting point so sp 1 will face left in the finished layout.
- Join stitch: in a sp that needs joining, replace the ch 2 with: ch 1, sl st in the matching ch-2 sp of the neighbor, ch 1. Then continue the round as written.
- Sp 1 joins to sp 25 of the medallion on the left.
- Sp 9 joins to sp 33 of the medallion below and to the left.
- Sp 17 joins to sp 41 of the medallion below and to the right.
- For a firmer join, also join the sp on each side of each of these (for example, sps 48 and 2 to the left neighbor’s sps 26 and 24).
Honeycomb Layout
- The medallions are set in offset rows: 9 rows, alternating 7 and 6 medallions. (59 medallions)
- Row 1 (7 medallions): the first medallion is worked plain. Medallions 2-7 join sp 1 to the medallion on the left.
- Row 2 (6 medallions): each medallion sits between two medallions of Row 1. Medallion 1 joins sp 9 to Row 1 medallion 1 and sp 17 to Row 1 medallion 2. Medallions 2-6 also join sp 1 to the medallion on the left.
- Row 3 (7 medallions): medallion 1 joins only sp 17, to Row 2 medallion 1. Medallions 2-6 join sp 1 to the left, sp 9 to the Row 2 medallion below left and sp 17 to the Row 2 medallion below right. Medallion 7 joins sp 1 to the left and sp 9 to Row 2 medallion 6.
- Rows 4-9: rep Rows 2 and 3 alternately, ending with a Row 3.
- Turn every medallion so its spiral turns the same way. The joined bedspread measures about 217 x 245 cm, with a scalloped edge of bobbles.
Bobble Fillers (make 96)
- Each filler goes in a small triangular gap where three medallions meet. There are 12 gaps between each pair of rows.
- Rnd 1: with lavender, MR, ch 1, 6 sc in ring, join. (6 sts)
- Rnd 2: hold the filler in a gap. Ch 2, bobble in same st, *ch 3, sl st in the gap-facing ch-2 sp of the medallion beside it (sp 5, 13, 21, 29, 37 or 45), ch 3, bobble in next st, ch 3, bobble in next st; rep from * 2 more times, ending the last rep with ch 3 and joining to the top of the first bobble. Fasten off. (6 bobbles, joined to 3 medallions)
Ribbed Shams (make 2)
- Gauge for the shams: 14 hdc and 9 rows = 10 cm in hdc BLO.
- Front: with lavender, ch 72. Row 1: hdc in 3rd ch from hook and in each ch across. (70 hdc) Rows 2-68: ch 2 (does not count as a st), turn, hdc in BLO of each st across. Fasten off. (about 50 x 75 cm)
- Back pieces (make 2 per sham): ch 72. Work Row 1 as for the front. Rows 2-38: ch 2, turn, hdc in BLO of each st across. Fasten off. (about 50 x 42 cm)
Sham Assembly
- Lay a front WS up. Place one back piece on top, RS up, lined up with the left edge, and the other lined up with the right edge, overlapping in the middle. Pin all edges.
- Rnd 1: turn so the front faces you. Join lavender in a corner through all layers. 3 sc in each corner, 104 sc evenly along each long side and 68 sc evenly along each short side. Join. (356 sts)
- Rnd 2: ch 1, *sc in next 3 sts, bobble in next st; rep from * around, join. Fasten off. (89 bobbles)
- Rep with the second sham.
Medallion Cushion
- Front and back (make 2): with lavender, ch 58. Row 1: hdc in 3rd ch from hook and in each ch across. (56 hdc) Rows 2-36: ch 2, turn, hdc in BLO of each st across. Fasten off. (about 40 cm square)
- Make one extra medallion with Rnd 12 worked plain, and sew it to the center of the front through the bobbles.
- Hold the front and back WS together. Rnd 1: join in a corner through both layers, 3 sc in each corner and 56 sc evenly along each side. Insert the cushion form before closing the last side. Join. (236 sts)
- Rnd 2: ch 1, *sc in next 3 sts, bobble in next st; rep from * around, join. Fasten off. (59 bobbles)
Finishing
Weave in all ends on the WS, hiding the spiral tails in their own shade and the main ends along the solid sc rounds rather than the open spokes.
Wet block the bedspread on a large flat surface. Pin each medallion round, open the spokes evenly and set every bobble along the edge. Let it dry completely. Block the shams and cushion the same way before inserting the pillows.
Tips for Success
- Choose two shades that are close but clearly different, such as lavender and light lilac. Too similar and the swirl disappears; too different and the bedspread loses its soft look.
- Always slip a marker into the dropped loop. With two live loops at once, it’s easy for one to pull out.
- Count each shade’s sts at the end of every spiral rnd. Both shades should always have the same number.
- Pull each bobble firmly closed. Loose bobbles flatten and the edge loses its beaded look.
- Make the spirals for several medallions first, then work all the rings and edges. Repeating one step many times keeps the medallions even.
Common Mistakes to Avoid
- Working over your own shade. Each shade must always work over the other’s sts. If one arm grows wider, it worked into its own sts.
- A spiral that cups. If the center bowls, your dc are too tight. Go up a hook size for Rnds 1-7.
- Missing the taper in Rnd 7. Without the graded sts, each arm ends in a sudden step instead of a smooth curve.
- Joining the wrong sp. Joining sp 8 instead of sp 9 tilts the medallion and the rows drift. Count from sp 1 before each join.
- Fillers that pull. If a filler distorts the medallions around it, make its arms ch 4 instead of ch 3.
Ways to Customize This Pattern
- Use other pairs of close shades, such as sage and mint, blush and rose, or two blues, for the same soft look.
- Make the spiral in strongly contrasting colors, like purple and white, for a bolder bedspread.
- Change the size: each medallion adds 31 cm in width, and each extra row adds about 27 cm in length.
- Make a round table topper of 7 medallions: one in the center and six around it, with six fillers.
- Leave off the bobble edge and finish each medallion with a round of picots for a lighter, lacier version.
Frequently asked questions
The spiral only shows because the two arms are different colors. Using two close shades lets the swirl appear while keeping the soft, single-color look of the bedspread.
It follows one simple rule: each ball works over the other ball’s stitches, then waits. After two or three rounds, it becomes an easy rhythm.
Yes. Work Rnd 12 plain on every medallion, lay them out in the honeycomb, and sew the matching sps together. Then add the fillers. Joining as you go is faster and gives neater joins.
Wash it on a gentle cold cycle inside a large laundry bag, or by hand, and dry it flat. Pin the medallions round again while damp so the spokes stay open and the bobbles sit evenly.
The finished Lavender Swirl Medallion Bedspread and Cushions Crochet Pattern

