Lavender Tulip Hanging Toilet Roll Holder Crochet Pattern
Advanced
For experienced crocheters who enjoy complex shaping, fine detail, and ambitious construction
Weekend Project
A satisfying weekend make — start Friday, finish Sunday, enjoy forever.
Handmade Gift
A beautiful keepsake — free forever. Read online or print at home.
About This Lavender Tulip Hanging Toilet Roll Holder Crochet Pattern
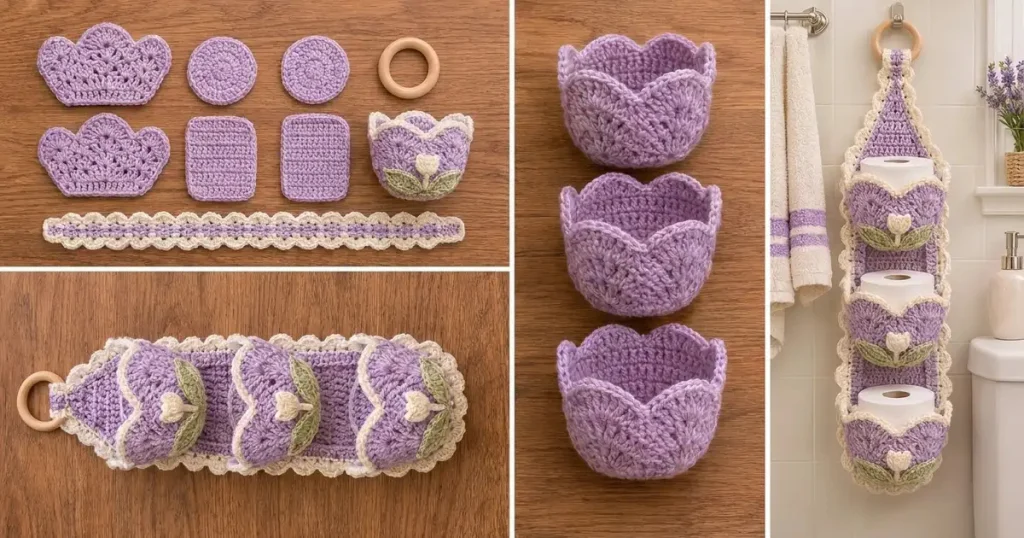
This hanging toilet roll holder crochet pattern creates a lavender bathroom organizer with three open flower cups, cream scalloped edging, and small tulip appliqués. A wooden ring supports the tapered backing, while overlapping petals give each pocket the layered floral shape shown in the reference.
Allow approximately 14–18 hours for the crochet, embroidery, and careful assembly. This advanced project combines flat and circular construction, shaped appliqués, fitted seams, and reinforced suspension. It is designed for three standard toilet rolls measuring approximately 10–11 cm in diameter and 9–10 cm high; measure your rolls before committing to all three cups.
Materials
- Worsted cotton yarn Approximately 450 g lavender, 100 g cream, and 25 g sage; choose yarn around 160 m per 100 g
- Crochet hook 3.5 mm, or size needed for gauge
- Solid wooden ring Approximately 7 cm outside diameter, with a smooth, sealed surface
- Cotton webbing 10 mm wide, approximately 140 cm, for backing and suspension reinforcement
- Sewing supplies Tapestry needle, sewing needle, matching strong thread, scissors, stitch markers, and ruler
- Blocking supplies Mat, rustproof pins, and three approximately 11 cm diameter cylindrical forms
- Wall hook Securely mounted and rated to support the finished organizer and three rolls
Abbreviations
chchainst / stsstitch / stitchessl stslip stitchscsingle crochethdchalf double crochetdcdouble crochetinc2 single crochet in the same stitchsc2togsingle crochet 2 stitches togetherMRmagic ringBLOback loop onlyRSright sideGauge, Dimensions, and Construction Notes
- Use US crochet terminology. Blocked gauge is 18 sc and 22 rows per 10 cm. Make a swatch at least 15 cm square, wash it as you will wash the holder, and measure the center.
- The backing is approximately 12.2 cm wide and 58.6 cm long before edging. Finished width across its scallops is approximately 15 cm. The ring and folded tab bring the overall length to approximately 70 cm.
- Each cup has a 66-stitch base approximately 11.7 cm across and a wall approximately 6.4 cm high before its scalloped rim. Fit is intended to be relaxed around a standard roll, with the roll projecting above the cup.
- Work cup rounds continuously unless instructed to join. Mark the first stitch. For flat pieces, ch 1 and turn between rows unless another turning chain is specified. Turning chains never count as stitches.
- Counts in parentheses are completed stitch counts. Instructions in square brackets are repeated as directed. Change color on the final pull-through of the preceding stitch when instructed.
Lavender Backing
- Row 1: With lavender, ch 23. Sc in the second chain from the hook and each remaining chain. (22 sts)
- Rows 2–120: Ch 1, turn, sc in each stitch. (22 sts each row)
- Row 121: Ch 1, turn, sc2tog, sc 18, sc2tog. (20 sts)
- Row 122: Ch 1, turn, sc2tog, sc 16, sc2tog. (18 sts)
- Row 123: Ch 1, turn, sc2tog, sc 14, sc2tog. (16 sts)
- Row 124: Ch 1, turn, sc2tog, sc 12, sc2tog. (14 sts)
- Row 125: Ch 1, turn, sc2tog, sc 10, sc2tog. (12 sts)
- Row 126: Ch 1, turn, sc2tog, sc 8, sc2tog. (10 sts)
- Row 127: Ch 1, turn, sc2tog, sc 6, sc2tog. (8 sts)
- Row 128: Ch 1, turn, sc2tog, sc 4, sc2tog. (6 sts)
- Row 129: Ch 1, turn, sc2tog, sc 2, sc2tog. (4 sts) Fasten off.
- Mark the front of the backing. Count all placement rows upward from the straight bottom edge, which is Row 1.
Cream Backing Border
- Foundation round: With the front facing, join cream at the lower left corner. Work 22 sc across the bottom foundation edge, 129 sc up the first side with one stitch in each row end, 4 sc across the top, and 129 sc down the other side. Join to the first sc. Do not add corner stitches. (284 sts)
- Scallop round: Ch 1, [sc in the next st, skip 1 st, 5 dc in the next st, skip 1 st] 71 times. Join to the first sc. (71 scallops; 426 sts) Fasten off.
- Block the border flat, spreading shells around the lower corners. Leave the four-stitch top edge visible enough to attach the suspension tab.
Round Cup Bases — Make Three
- Round 1: With lavender, work 6 sc in MR. (6 sts)
- Round 2: Inc in each stitch. (12 sts)
- Round 3: [Sc 1, inc] 6 times. (18 sts)
- Round 4: [Sc 2, inc] 6 times. (24 sts)
- Round 5: [Sc 3, inc] 6 times. (30 sts)
- Round 6: [Sc 4, inc] 6 times. (36 sts)
- Round 7: [Sc 5, inc] 6 times. (42 sts)
- Round 8: [Sc 6, inc] 6 times. (48 sts)
- Round 9: [Sc 7, inc] 6 times. (54 sts)
- Round 10: [Sc 8, inc] 6 times. (60 sts)
- Round 11: [Sc 9, inc] 6 times. (66 sts) Do not fasten off; continue into the cup wall.
Cup Walls and Scalloped Rims — Complete All Three
- Round 12: Sc in BLO around. (66 sts) The unused front loops form a defined base fold.
- Rounds 13–25: Sc in both loops of every stitch. (66 sts each round)
- After Round 25, sl st in the next stitch to level the round. This slip stitch is a join and does not count. Mark this location as the center back of the cup.
- Round 26: Ch 1, beginning in the joined stitch, [sc in the next st, skip 2 sts, 5 dc in the next st, skip 2 sts] 11 times. Join to the first sc. (11 scallops; 66 sts) Fasten off lavender.
- Round 27: Join cream in the first sc of Round 26. Ch 1, sc in every stitch around; join to the first sc. (66 sts) Fasten off.
- Close the magic-ring center securely and weave in its tail in two directions. Block the cups over cylindrical forms, keeping the base flat and the rim open.
Overlapping Flower Petals — Make Nine
- Each cup receives three semicircular petals. Work these in turned rows with lavender.
- Row 1: Work 7 dc in MR. Pull the ring closed into a semicircle, leaving a sewing tail. (7 sts)
- Row 2: Ch 2, turn, [2 dc in the next st] 6 times, dc in the last st. (13 sts)
- Row 3: Ch 2, turn, [dc in the next st, 2 dc in the next st] 6 times, dc in the last st. (19 sts)
- Row 4: Ch 1, turn, sc in the first st, [skip 2 sts, 5 dc in the next st, skip 2 sts, sc in the next st] 3 times. (19 sts; 3 scallops) Fasten off lavender.
- Row 5: With RS facing, join cream at the beginning of Row 4. Ch 1, sc in all 19 stitches across the scalloped arc. (19 sts) Fasten off, leaving a tail for tacking the petal.
- Draw the starting tail securely through the center again. Block each petal with its straight lower edge flat; do not stretch the scallops.
Petal Placement on Each Cup
- With the center-back marker facing away from you, mark the center front opposite it, between wall stitches 33 and 34. Place a temporary vertical thread here from the base fold to the rim.
- Place one petal on each side of the center-front thread. Set their gathered centers approximately 2.5 cm to either side of the thread and 1 cm above the base fold. Angle their cream arcs upward and outward.
- Sew each side petal along its straight edge and lavender row ends to the cup wall. Leave the cream scalloped arc free; secure only its two endpoints to prevent curling.
- Place the third petal centrally over the lower inner edges of the first two. Position its gathered center on the center-front thread, approximately 5 mm above the base fold, with its scalloped arc pointing upward.
- Sew the central petal along its straight edge and side row ends. Tack the ends of its cream arc to the underlying petals. All three petals are decorative overlays; the continuous cup wall carries the roll.
Sage Leaves — Make Six
- With sage, ch 9. Beginning in the second chain from the hook, work sl st, sc, hdc, dc, dc, hdc, sc, then 3 sc in the last chain. (10 sts worked)
- Continue along the opposite side of the foundation chain, using the seven remaining chain positions: sc, hdc, dc, dc, hdc, sc, sl st. (17 sts around the complete leaf) Fasten off with a 25 cm sewing tail.
- Use the tail to embroider a loose line of running stitches along the leaf center. Draw it up slightly to form a shallow fold, then secure without flattening the leaf.
- Make a pair for each cup. Set their narrow starting ends together at the lower center front and angle their rounded ends outward. Sew along the center vein and lower edge, leaving the outer upper edge slightly raised.
Cream Tulip Buds and Embroidered Stems — Make Three
- Bud Row 1: With cream, ch 5. Sc in the second chain from the hook and each remaining chain. (4 sts)
- Bud Row 2: Ch 1, turn, inc, sc 2, inc. (6 sts)
- Bud Row 3: Ch 1, turn, sc in each stitch. (6 sts)
- Bud Row 4: Ch 1, turn, [sc, hdc, sc] in the first st, sl st in the next st, [sc, dc, sc] in the next st, sl st in the next st, sl st in the next st, [sc, hdc, sc] in the last st. (12 sts) Fasten off with a sewing tail.
- Pin one bud above the meeting point of each leaf pair, with its three points upright. Sew around the sides and bottom, then add one tiny anchoring stitch at each upper point.
- With sage yarn, embroider a stem in backstitch from the bottom of the bud to the leaf junction. Add two short cream straight stitches from the bud base toward the spaces between its points to suggest folded petals.
Suspension Tab and Wooden Ring
- Row 1: With lavender, ch 5. Sc in the second chain from the hook and each remaining chain. (4 sts)
- Rows 2–28: Ch 1, turn, sc in each stitch. (4 sts each row) Fasten off, leaving a 50 cm sewing tail. The tab measures approximately 12.7 cm before folding.
- Cut two 60 cm lengths of cotton webbing. Turn under 1 cm at both ends of each length. Position them vertically on the back of the backing, approximately 2 cm apart and centered as a pair. Ease their upper ends inward so both finish behind the four-stitch top edge.
- Sew both long edges of each webbing strip to the backing with matching thread, catching yarn strands without showing stitches on the front. Add transverse stitching at the cup attachment levels: Rows 8, 23, 48, 63, 88, and 103.
- Cut an 18 cm webbing length and turn under 1 cm at both ends. Center it lengthwise on the back of the crocheted tab, allowing equal webbing extensions beyond both tab ends. Sew it securely along both edges.
- Pass the tab through the wooden ring and fold it in half with the lavender facing outward. Overlap both crocheted tab ends onto the top 2 cm of the backing. Sew them firmly through the backing and the vertical webbing ends.
- Lay the projecting webbing ends down the rear of the backing and sew each with a rectangle crossed by an X. Use the remaining lavender tail to cover visible joining stitches across the front.
Attach the Three Cups
- Lay the backing RS upward with Row 1 at the bottom. Position the lowest cup with its rear base fold centered on Row 8 and its rear upper wall at Row 23. Keep the flower decoration facing outward.
- For the middle cup, align the rear base fold with Row 48 and the rear upper wall with Row 63. For the highest cup, use Rows 88 and 103. The base attachment levels are approximately 18.2 cm apart.
- For each cup, mark the 13 rear wall stitches centered on the center-back marker. Flatten only this rear segment against the backing; the remainder of the cup projects forward.
- With doubled lavender yarn, sew the rear base fold to the backing across those 13 stitches, taking small backstitches through the fabric and catching the webbing where the seam crosses it.
- Sew the corresponding 13 stitches of wall Round 25 horizontally to the upper placement row. Keep the scalloped rim above this seam free.
- Sew a vertical seam down each end of the attached rear segment, from Round 25 to the base fold. These four seams create a reinforced rectangular attachment area. Secure the tails into the seams.
- Place a roll in each cup while the backing is lying flat. Check that the openings remain accessible and the cups sit squarely. Adjust any tilted seam before securing the final tails.
Finishing
Weave in all remaining ends, remove placement threads, and smooth the leaves and petal edges by hand. If the assembled piece needs further blocking, support the cups on forms and let everything dry fully before hanging.
Hang the empty organizer from a securely fixed hook, then add the rolls one at a time while checking the ring, tab, and cup seams. The backing should stay straight and the cups should hold their shape. Store dry rolls away from direct splashes, and remove the wooden ring from prolonged soaking when washing the crochet.
Tips for Success
- Measure the first base after Round 11. It should lie flat and measure approximately 11.7 cm across before you begin the wall.
- Keep the same center-back marker throughout each cup so the wall join and attachment seams stay behind the roll.
- Pin all three petal overlays before sewing. Their cream arcs should overlap visibly without pulling the cup inward.
- Use a curved tapestry needle if the finished cup makes the rear attachment seams awkward to reach.
- Check the webbing and upper cup seams again after the organizer has held three rolls for a day; reinforce any area that begins to pull.
Common Mistakes to Avoid
- A ruffled base usually means loose tension or extra increases. Count 66 stitches at Round 11 and compare the diameter with gauge before continuing.
- A narrow cup can catch the paper as you lift the roll. Test the undecorated cup first; remake it with a slightly larger hook if your rolls need more clearance.
- Sewing through the entire scalloped rim makes the opening stiff and uneven. Attach the rear wall through Round 25 and leave the rim free.
- Placing the cup seams only in the crochet can stretch the backing. Catch the reinforcement strips wherever the horizontal seams cross them.
- Pulling the leaf embroidery too tightly twists the appliqué. Loosen the center stitches until the leaf rests in a shallow fold.
Ways to Customize This Pattern
- Use dusty rose for the cups and backing while keeping the cream borders and sage leaves.
- Make the tulip buds pale yellow and add one darker yellow stitch at each bud base.
- For a two-roll version, work only 80 straight backing rows before beginning the nine taper rows. Attach cups at Rows 8–23 and 48–63, and shorten the vertical webbing to fit.
- For jumbo rolls, choose a hook that gives the completed 66-stitch base the required diameter, then swatch and recalculate backing dimensions before assembling. Larger gauge also changes cup depth and yarn use.
Frequently asked questions
The written size is intended for rolls approximately 10–11 cm across. Jumbo rolls vary considerably. Make and fit one cup first; its opening must allow the roll to pass through without compressing the paper.
No. Each pocket is a complete round cup with a flat base and continuous wall. The three overlapping petals are sewn onto its front, giving the floral appearance while the cup supports the roll.
A long crocheted strip can lengthen under three loaded cups. The webbing connects the cup attachment levels to the suspension tab and helps the organizer retain its intended spacing.
Follow the yarn and webbing care labels, but the fixed wooden ring makes gentle hand washing of the textile portion the practical choice. Keep the ring out of the water, reshape the cups, and dry the organizer flat with their openings supported.
The finished Lavender Tulip Hanging Toilet Roll Holder Crochet Pattern

