Layered 3D Flower Blanket Crochet Pattern
Advanced
For experienced crocheters who enjoy complex shaping, fine detail, and ambitious construction
Single-Day Project
A satisfying project you can complete in a single afternoon or evening.
Handmade Gift
A beautiful keepsake — free forever. Read online or print at home.
About This Layered 3D Flower Blanket Crochet Pattern
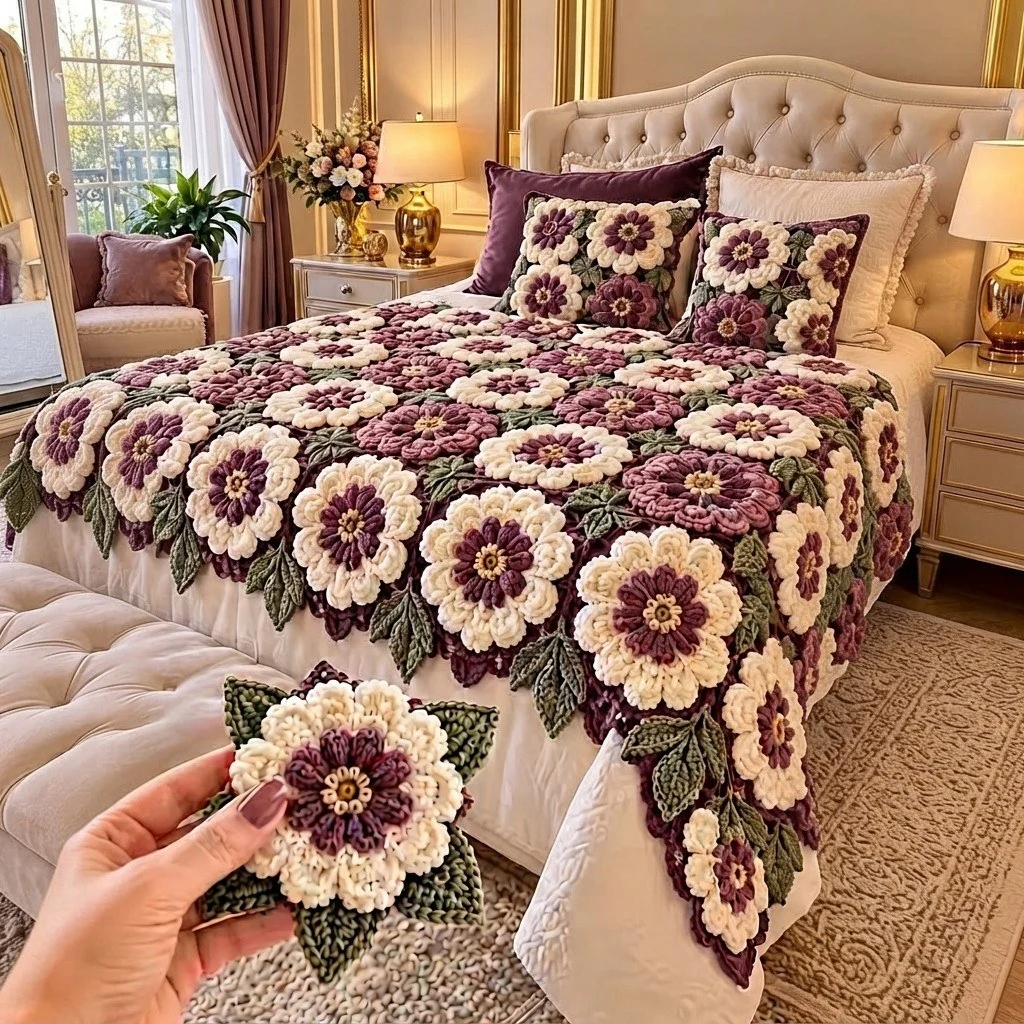
This 3D flower blanket crochet pattern builds a full throw out of thirty solid squares, each one carrying a five-layer flower and a set of pointed sage leaves. The flowers are not sewn-on appliqués. Each petal layer is worked directly into the free front loops of the round below, so the blossom grows out of the square in real tiers — a tight plum eye at the centre, two short inner rings, a dusty rose middle ring, and two wide cream rounds that flare out past the edges of the square. That is what gives the finished blanket the deep, upholstered look you see in the photo instead of a flat granny-square surface.
It is a long project, not a hard one in any single moment. Every technique here is ordinary — single crochet, double crochet, working in back loops only, magic ring — but you repeat them thirty times and the construction order matters. Each square is finished completely (base, flower, leaves) before you join, which means you can work it in short sittings and still see progress. Expect roughly 30 to 40 hours for the full throw at bulky weight: about 50 minutes per flowered square once you have the rhythm, plus three or four hours for joining and the scalloped border.
This one suits a confident crocheter who wants a heirloom-scale piece and does not mind counting. If you have made textured squares before and you are comfortable finding front loops two rounds down, you will be fine. The two colourways alternate across the blanket like a checkerboard, so you can start with a single square as a test piece — it makes a good cushion front or a thick trivet on its own if you decide not to commit to the whole throw.
Materials
- Bulky (#5) acrylic or acrylic-wool blend in cream approx. 1400 m / 1530 yd
- Bulky (#5) yarn in deep plum approx. 900 m / 985 yd
- Bulky (#5) yarn in dusty rose approx. 500 m / 545 yd
- Bulky (#5) yarn in sage green approx. 450 m / 490 yd
- Bulky (#5) yarn in pale gold approx. 60 m / 65 yd, flower centres only
- 6.0 mm (J) crochet hook main hook
- 5.5 mm (I) crochet hook optional, for the leaves
- Blunt tapestry needle large eye for bulky yarn
- Stitch markers at least 8, for round starts and square corners
- Rust-proof pins for blocking and for pinning leaves before sewing
- Sharp scissors
Abbreviations
MRmagic ringchchainst(s)stitch(es)sl stslip stitchscsingle crochethdchalf double crochetdcdouble crochetBLOback loop onlyFLfront loop (the free loop left from an earlier round)skskipreprepeat[ ]work instructions in brackets the stated number of times( )stitch count at the end of a roundBase Square (make 30, cream)
- R1: with cream and the 6.0 mm hook, 8 sc in MR. Pull the ring closed. (8)
- R2: [3 sc in next st, sc in next st] 4 times. The centre st of each 3-sc group is a corner — mark all 4. (16)
- R3: [3 sc in corner st, sc in next 3 sts] 4 times, moving markers up as you go. (24)
- R4: [3 sc in corner st, sc in next 5 sts] 4 times. (32)
- R5: [3 sc in corner st, sc in next 7 sts] 4 times. (40)
- R6: [3 sc in corner st, sc in next 9 sts] 4 times. (48)
- R7: [3 sc in corner st, sc in next 11 sts] 4 times. (56)
- R8: [3 sc in corner st, sc in next 13 sts] 4 times. (64)
- R9: [3 sc in corner st, sc in next 15 sts] 4 times. (72)
- Sl st into the next st, fasten off, and leave a 40 cm tail wound on a bobbin or clipped aside — you will use it later for joining. Weave in the starting tail only.
- Each side of the finished square now has 17 sts plus one shared corner st at each end. Make 30 squares in total.
Flower Base — Colourway A (make 15)
- R1: with pale gold, 8 sc in MR. Pull closed. Change to deep plum in the last st. (8)
- R2: with deep plum, working in both loops, 2 sc in each st around. (16)
- R3: in BLO only, [sc in next st, 2 sc in next st] 8 times. The front loops of R2 stay free — do not work into them yet. (24)
- R4: change to dusty rose. In BLO only, [sc in next 2 sts, 2 sc in next st] 8 times. (32)
- R5: change to cream. In BLO only, [sc in next 3 sts, 2 sc in next st] 8 times. (40)
- R6: in BLO only, [sc in next 4 sts, 2 sc in next st] 8 times. (48)
- Sl st into the next st and fasten off cream, leaving a 60 cm tail for sewing the flower to its square later.
- You now have four free front-loop rounds available (R2 = 16 FL, R3 = 24 FL, R4 = 32 FL, R5 = 40 FL) plus the finished R6 (48 sts). Keep the disc flat and do not block it yet.
Flower Base — Colourway B (make 15)
- R1: with pale gold, 8 sc in MR. Pull closed. Change to cream in the last st. (8)
- R2: with cream, working in both loops, 2 sc in each st around. (16)
- R3: in BLO only, [sc in next st, 2 sc in next st] 8 times. (24)
- R4: change to dusty rose. In BLO only, [sc in next 2 sts, 2 sc in next st] 8 times. (32)
- R5: change to deep plum. In BLO only, [sc in next 3 sts, 2 sc in next st] 8 times. (40)
- R6: in BLO only, [sc in next 4 sts, 2 sc in next st] 8 times. (48)
- Sl st into the next st and fasten off deep plum, leaving a 60 cm tail for sewing. Colourway B is identical in construction to A — only the colour placement is swapped, so the petal layers below are worked the same way.
Petal Layers (work on every flower base)
- Layer 1 — innermost. Turn the disc face up and find the 16 free front loops of R2. Join deep plum for colourway A, or cream for colourway B, with a sl st in any front loop. [Ch 1, 4 dc in next FL, ch 1, sl st in next FL] 8 times. 8 small petals. Sl st to the joining st and fasten off. (uses 16 FL)
- Layer 2. Find the 24 free front loops of R3. Join the same colour as Layer 1 in any front loop. [Ch 2, 3 dc in next FL, 3 dc in next FL, ch 2, sl st in next FL] 8 times. Sl st to join and fasten off. (uses 24 FL)
- Layer 3. Find the 32 free front loops of R4. Join dusty rose in any front loop. [Ch 2, 2 dc in next FL, 3 dc in next FL, 2 dc in next FL, ch 2, sl st in next FL] 8 times. Sl st to join and fasten off. (uses 32 FL)
- Layer 4. Find the 40 free front loops of R5. Join cream for colourway A, or deep plum for colourway B, in any front loop. [Ch 3, 2 dc in next FL, 3 dc in next FL, 3 dc in next FL, 2 dc in next FL, ch 3, sl st in next FL] 8 times. Sl st to join and fasten off. (uses 40 FL)
- Layer 5 — outermost. Work into both loops of the 48 sts of R6. Join the same colour as Layer 4 in any st. [Ch 3, 2 dc in next st, 3 dc in next st, 3 dc in next st, 2 dc in next st, ch 3, sl st in next 2 sts] 8 times. Sl st to join and fasten off, leaving the long tail. (uses 48 sts)
- Offset check: the 8 petals of each layer should sit between the petals of the layer below, not stacked on top of them. If they line up exactly, start the next layer one front loop further along before you fasten off.
- Weave in all short layer tails on the wrong side of the disc. Do not trim the long outer tail. The finished flower measures about 15-16 cm across.
Leaves (make 60, sage green)
- With sage and the 5.5 mm hook, ch 9.
- R1, first side: working into the back bumps, sc in 2nd ch from hook, hdc in next ch, dc in next 3 chs, hdc in next ch, sc in next ch. (7 sts worked)
- R1, tip: 3 sc in the last ch.
- R1, second side: working along the remaining loops of the foundation chain, sc in next ch, hdc in next ch, dc in next 3 chs, hdc in next ch, sc in next ch. Sl st into the first sc of the round. (17)
- R2: ch 1, sc in each of the next 8 sts up the first side, 3 sc in the centre st of the tip, sc in each of the next 8 sts down the second side. Sl st into the first sc. (19)
- Fasten off, leaving a 25 cm tail for sewing. Pinch the base of the leaf closed with one stitch of the tail so it cups slightly instead of lying flat.
- Make 60 leaves. The finished leaf is about 8 cm long.
Attaching Flowers and Leaves
- Centre a flower on a base square, wrong side down, lining up the four marked square corners with the gaps between four of the outer petals.
- Thread the flower’s long tail. Sew through R6 of the flower base and into the square, working all the way around in a running backstitch, one stitch every 2 sts of R6. Keep the petal layers lifted out of the way — stitch only through the flat base round.
- Sew a second, smaller circle of stitches through R3 of the flower base into the square. This anchor round stops the middle of the flower from lifting after washing.
- Pin two leaves to each square, at opposite corners, with the pointed tips angled outward past the square edge and the leaf bases tucked under the outermost petal layer.
- Sew each leaf down along its centre chain only, from base to about two thirds of the way up. Leave the tip free so it stands away from the surface.
- Repeat for all 30 squares. Set aside the remaining leaves — they are added over the joins later.
Joining the Squares
- Lay the squares out 5 across and 6 down, alternating colourway A and colourway B like a checkerboard. Take a photo of the layout before you move anything.
- Join in rows first. Hold two squares wrong sides together and, using the 40 cm tail left from R9, whip stitch through the back loops only of both squares, one stitch per st pair, 17 sts plus the corner st at each end.
- Fasten off at each seam end and weave the tail into the seam itself, not into the square face.
- Continue until you have 6 rows of 5 joined squares.
- Join the rows the same way, matching corner sts exactly where four squares meet. Pull the first two stitches of each new seam snug so no hole opens at the junction.
- The joined panel measures roughly 85 x 102 cm before the border.
- Sew the remaining leaves over the seams: place one leaf at each point where four squares meet, base centred over the junction, tip angled toward a corner. Sew along the centre chain only.
Border
- R1: join deep plum with a sl st in any outer corner of the blanket. Ch 1, sc evenly around the whole edge, working 1 sc in each st along each square side and 3 sc in each of the 4 outer corners. Where two squares meet along an edge, work 1 sc into the seam. Sl st to the first sc.
- Count the total and, if needed, add or skip a single st on one straight side so the total is a multiple of 4.
- R2: ch 1, sc in each st around, 3 sc in each corner st. Sl st to the first sc. Keep the total a multiple of 4.
- R3, scallop round: ch 1, sl st in the first st, then [sk 1 st, 5 dc in next st, sk 1 st, sl st in next st] around, placing one full scallop at each corner. Sl st into the base of the first scallop.
- Fasten off and weave in the ends along the back of the border round.
Finishing
Steam block the blanket face down over a thick towel. Set the iron to hover — never press, or the petals will flatten permanently. Work in sections, letting the steam relax the base squares so the seams lie flat, then lift each petal layer with your fingers while the yarn is still warm so it dries standing up. Pay particular attention to the outermost cream and plum layers, which tend to curl under their own weight.
Check every leaf tip once the blanket is dry. Any leaf that flops forward needs one extra anchoring stitch about 2 cm up from its base, worked through the back of the centre chain into the square below. Finally, run your hand under the blanket and feel for loose joining tails; bulky yarn works itself free easily, so re-weave anything that has started to slip and trim the ends to 2 cm rather than flush.
Tips for Success
- Mark the four corner stitches of each base square with a different colour marker from your round-start marker. On a 9-round square it is very easy to lose a corner, and a square with uneven sides will not join cleanly.
- Work all 30 flower bases before you start any petal layers. Batching the layers means you keep the same tension across the whole blanket and only change colours five times instead of 150 times.
- When working into the free front loops, tilt the disc toward you and push the finished round away with your thumb. The loops hide under the next round and are much easier to find from the front at a slight angle.
- Leave the 40 cm joining tail on every square from the start. Attaching new yarn at each seam adds 60 extra ends to weave in across the finished throw.
- Weigh your yarn as you go. One complete square uses about 55-60 g in total — if you are running ahead of that, your tension is loose and the blanket will grow beyond the stated size.
Common Mistakes to Avoid
- Working the increase rounds in both loops instead of BLO. If you do, there are no free front loops left and the petals cannot be added. Check after R3 of the flower base — you should clearly see a ridge of free loops below your hook. If you missed it, frog back to that round.
- Stacking petal layers directly on top of each other. Each layer has 8 petals, so they can land in exactly the same positions and the flower looks sparse and flat. Offset each layer by one or two front loops when you join the new colour.
- Pulling the ch-2 and ch-3 petal bridges tight. Those chains are what lets each petal lift and cup; worked tightly, the layer presses flat against the one below. Keep them loose and slightly longer than feels right.
- Sewing through the petals when attaching the flower to the square. Catch only the flat base rounds (R6 and R3), or the layers will be pinned down and lose their depth.
- Pressing the finished blanket with an iron. Bulky acrylic flattens and goes shiny and will not recover. Hover-steam only, and lift the petals by hand as they cool.
Ways to Customize This Pattern
- Make a cushion front instead: work 4 squares, join them 2 x 2, add only the first two border rounds, and sew to a plain backing panel for a 40 cm cover that matches the throw.
- Add a third colourway. Keep the pale gold centre, then work cream for R2-R3, deep plum for R4, and dusty rose for R5-R6. Scattered among the other two it breaks up the checkerboard and looks less regimented.
- Scale the blanket. 4 x 5 squares makes a ~70 x 85 cm lap throw; 6 x 7 squares makes a ~103 x 120 cm double-bed cover. Allow about 60 g of yarn and 4 extra leaves per added square.
- Soften the leaves by swapping sage for a pale eucalyptus green and working R2 of the leaf in the same cream as the outer petals, for a light outlined edge.
- Drop Layer 5 and finish at Layer 4 for a shallower, lighter blanket that drapes better over an armchair — the flower then measures about 13 cm instead of 16 cm, so work one extra round on the base square to fill the gap.
Frequently asked questions
You can, but it is harder to keep flat. Work the base square first, then join the pale gold in the centre of the square, working the flower base rounds through the square fabric as you go. The risk is that the square puckers, because the flower base grows at a different rate than the square underneath. Sewing the two pieces separately gives a flatter, more even blanket, and it lets you lay out and swap colourways before anything is permanent.
Machine wash cold on a gentle cycle in a large mesh bag, with no fabric softener. Spin on the lowest setting, then dry flat — never hang it, because the wet weight of bulky yarn will stretch the squares out of shape. Once it is nearly dry, go over the petals with your fingers and lift each layer; they settle back into their tiers as the yarn dries.
About 55-60 g at bulky weight for a complete square with its flower and two leaves. Roughly 25 g goes into the base square, 25 g into the five petal layers, and 8 g into the leaves. For the full 30-square throw plus border, budget around 1.9 kg total, which is why the cream figure in the materials list is so much higher than the others — cream is used for every base square as well as half the outer petals.
Almost always one of three things: the increase rounds were worked in both loops so the petals have no free loops to lift from, the ch-2 and ch-3 bridges between petals were worked too tightly, or the layers were stacked instead of offset. Lay a finished flower on the table and look at it from the side — you should see five distinct steps. If you see two or three, check your bridges first, since loosening them is the easiest fix on the next square.
Yes, with a 4.5 mm hook. Each square will come out around 13 cm instead of 17-18 cm, so you need 7 across and 8 down (56 squares) for the same finished size, and about the same total weight of yarn. The petals will be finer and more ruffled, which suits a lighter, more delicate look, but it adds roughly 15 hours to the project.
The finished Layered 3D Flower Blanket Crochet Pattern

