Layered Dahlia Flower Granny Square Bedspread
Advanced
For experienced crocheters who enjoy complex shaping, fine detail, and ambitious construction
Weekend Project
A satisfying weekend make — start Friday, finish Sunday, enjoy forever.
Handmade Gift
A beautiful keepsake — free forever. Read online or print at home.
About This Layered Dahlia Flower Granny Square Bedspread
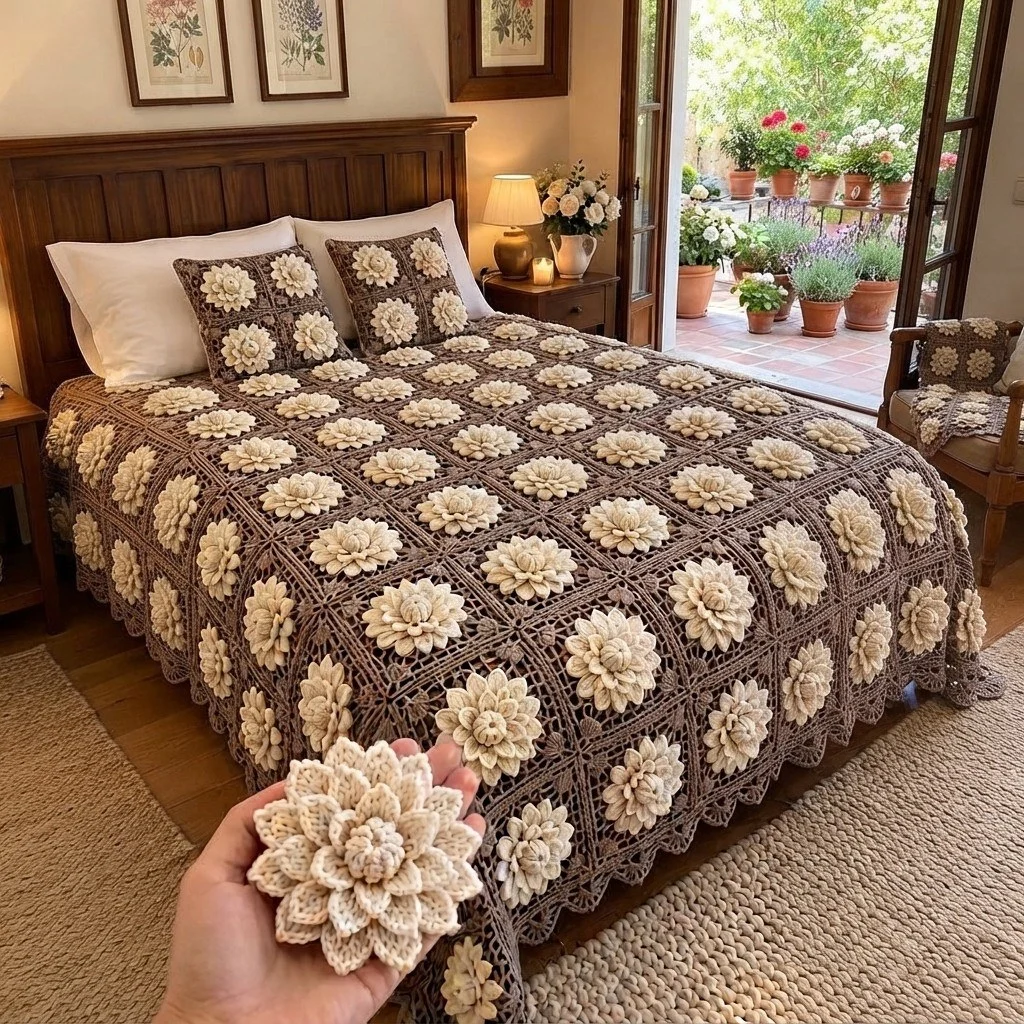
This 3D flower granny square blanket turns one repeated motif into a full bedspread: a cream dahlia with six stacked layers of petals, sitting in the middle of a taupe square with a soft lacy edge. Each flower is built on a single flat disc worked entirely in back loops, which leaves a free front loop on every round. Those free loops become the petal layers, worked from the outside in, so each new ring of petals sits a little higher than the last and the whole bloom stands up off the fabric without any stuffing, wire or glue.
The square itself is quick once the flower is done. A taupe round picks up the leftover back loops behind the bloom, three double crochet rounds turn the circle into a square, and a chain-3 mesh round both frames the flower and does the joining. Squares are joined as you go on that last round, so there is no sewing marathon at the end — only a scalloped border once the whole panel is assembled. One square takes roughly 45 minutes: about 25 for the flower and 20 for the taupe frame and join.
This is an advanced make, not because any single stitch is hard, but because of the back-loop discipline and the sheer count. You need to track which front loops belong to which round, keep your corners square across 168 motifs, and block honestly. It suits a crocheter who already works comfortably in the round, enjoys texture work, and wants a long, calm project to pick up and put down over a few months. Expect 60 to 80 hours for a double-bed cover, less if you make the smaller throw version.
Materials
- Worsted/aran weight cotton in cream approx. 2400 g total, ~14 g per flower
- Worsted/aran weight cotton in warm taupe approx. 3400 g total, ~20 g per square, plus 300 g for the border
- 4 mm hook or the size that gives you a firm, non-gappy fabric
- Blunt tapestry needle for ends and the border join
- Stitch markers at least 6, for marking free front loops
- Blocking mats and rust-proof pins squares must be blocked before joining
- Sharp scissors
- Measuring tape
Abbreviations
MRmagic ringchchainsl stslip stitchscsingle crochethdchalf double crochetdcdouble crochettrtreble crochetinc2 stitches in the same stitchBLOback loop onlyFLOfront loop onlyflfree front loop left from an earlier roundspspacest(s)stitch(es)reprepeatFlower Base Disc (cream)
- Rnd 1: 6 sc in MR. Pull the ring closed. (6 sts)
- Rnd 2: working in BLO, inc in each st around. (12 sts)
- Rnd 3: working in BLO, (sc in next st, inc in next st) rep 6 times. (18 sts)
- Rnd 4: working in BLO, (sc in next 2 sts, inc in next st) rep 6 times. (24 sts)
- Rnd 5: working in BLO, (sc in next 3 sts, inc in next st) rep 6 times. (30 sts)
- Rnd 6: working in BLO, (sc in next 4 sts, inc in next st) rep 6 times. (36 sts) Sl st to the first st of the round and do not fasten off.
- Check before continuing: you should now have free front loops available on Rnd 1 (6 loops), Rnd 2 (12), Rnd 3 (18), Rnd 4 (24) and Rnd 5 (30), plus both loops of Rnd 6 (36). The disc should lie flat and measure about 8 cm across.
Petal Layers (cream, worked outside in)
- Layer 1 — outer petals, worked in FLO of Rnd 6 only (36 loops, 12 petals): *sl st in FLO of next st, ch 1, (dc, tr, dc) all in FLO of next st, ch 1, sl st in FLO of next st*, rep from * 11 more times. (12 petals) Sl st to join, fasten off and weave in. The back loops of Rnd 6 stay untouched for the taupe frame.
- Layer 2 — worked in the free front loops of Rnd 5 (30 loops, 10 petals): join cream in any fl. *sl st in next fl, ch 1, 3 dc in next fl, ch 1, sl st in next fl*, rep from * 9 more times. (10 petals) Fasten off.
- Layer 3 — worked in the free front loops of Rnd 4 (24 loops, 8 petals): join cream in any fl. *sl st in next fl, ch 1, (hdc, dc, hdc) in next fl, ch 1, sl st in next fl*, rep from * 7 more times. (8 petals) Fasten off.
- Layer 4 — worked in the free front loops of Rnd 3 (18 loops, 6 petals): join cream in any fl. *sl st in next fl, ch 1, (hdc, dc, hdc) in next fl, ch 1, sl st in next fl*, rep from * 5 more times. (6 petals) Fasten off.
- Layer 5 — worked in the free front loops of Rnd 2 (12 loops, 4 petals): join cream in any fl. *sl st in next fl, ch 1, (sc, hdc, sc) in next fl, ch 1, sl st in next fl*, rep from * 3 more times. (4 petals) Fasten off.
- Layer 6 — centre bud, worked in the free front loops of Rnd 1 (6 loops, 6 tiny petals): join cream in any fl. *sl st in next fl, ch 1, 2 hdc in the same fl, ch 1, sl st in the same fl*, rep from * 5 more times. (6 petals) Fasten off, pull the tail through to the back and weave in.
- Petal total: 46. Push each layer toward the centre with your fingers so the layers stack and the bloom sits proud of the disc. The finished flower should measure about 10 cm across and 2 cm deep.
Squaring the Block (taupe)
- Rnd 7: turn the flower face down. Join taupe in any remaining back loop of Rnd 6, working behind the outer petals. Ch 1, sc in each of the 36 remaining back loops around. Sl st to join. (36 sc)
- Mark the corner stitches now: st 1, st 10, st 19 and st 28 of Rnd 7. There are 8 stitches between each pair of markers.
- Rnd 8: sl st into the first marked st. Ch 3 (counts as dc), (dc, ch 2, 2 dc) in the same st — first corner made. Dc in next 8 sts. *(2 dc, ch 2, 2 dc) in next marked st, dc in next 8 sts*, rep from * twice more. Sl st to the top of the ch-3. (48 dc and 4 corner ch-2 sps; 12 dc along each side)
- Rnd 9: sl st into the next corner ch-2 sp. Ch 3, (dc, ch 2, 2 dc) in the same sp, *dc in each of the next 12 dc, (2 dc, ch 2, 2 dc) in next corner sp*, rep from * twice more, dc in each of the last 12 dc. Sl st to join. (64 dc; 16 dc along each side)
- Rnd 10: sl st into the next corner ch-2 sp. Ch 3, (dc, ch 2, 2 dc) in the same sp, *dc in each of the next 16 dc, (2 dc, ch 2, 2 dc) in next corner sp*, rep from * twice more, dc in each of the last 16 dc. Sl st to join. (80 dc; 20 dc along each side) Fasten off only on your very first square, so you can check it; on later squares carry straight on to the mesh round.
- The block should now measure about 15.5 cm square before the mesh round and should lie flat with square, un-flared corners.
Mesh Round (taupe) — First Square Only
- Rnd 11: sl st into any corner ch-2 sp. Ch 1, (sc, ch 3, sc) in the same corner sp.
- *[ch 3, skip 2 dc, sc in next dc] 6 times, ch 3, skip the last 2 dc, (sc, ch 3, sc) in next corner sp*, rep from * twice more.
- Final side: [ch 3, skip 2 dc, sc in next dc] 6 times, ch 3, skip the last 2 dc, sl st to the first sc. Fasten off and weave in.
- Count check: 7 ch-3 sps along each side plus 1 ch-3 sp at each corner — 32 ch-3 sps in total. Finished square: about 17 cm.
Join-As-You-Go Mesh Round — All Remaining Squares
- Work Rnds 1-10 of a new square, then begin Rnd 11 at the corner where the new square will meet an existing one.
- At a joining corner: sc in the corner sp, ch 1, sl st into the matching corner ch-3 sp of the finished square, ch 1, sc back into the same corner sp of the new square.
- Along a joining side: work ch 1, sl st into the matching ch-3 sp of the neighbouring square, ch 1, then skip 2 dc and sc in the next dc — in place of each plain ch 3. Repeat for all 7 side spaces, then join at the next corner in the same way.
- Sides that face open air are worked as plain ch 3, exactly as on the first square.
- At a four-square intersection, slip stitch into the corner space of the square diagonally opposite as well, so all four corners are anchored to the same point and no hole forms.
- Layout: 12 squares across by 14 squares down gives a finished panel of about 204 x 238 cm, which covers a double bed with a drop on three sides. Work the panel in rows, completing each row left to right before starting the next.
Scalloped Border (taupe)
- Rnd 1: join taupe in any outer corner ch-3 sp of the panel. Ch 1, (sc, ch 3, sc) in that corner sp, *ch 3, sc in next ch-3 sp*, rep along the edge, and at every seam between two squares work ch 3, sc into the seam join itself. This gives 8 ch-3 sps for every square edge. Work (sc, ch 3, sc) in each of the four outer corner sps. Sl st to join.
- Rnd 2: sl st into the first ch-3 sp. Ch 1, *sc in next ch-3 sp, 7 dc in next ch-3 sp*, rep from * all the way around, working 9 dc in each of the four corner ch-3 sps for a fuller corner scallop. Sl st to the first sc. (4 scallops per square edge)
- Rnd 3: ch 1, sc in the same st, *sc in each of the next 3 dc, (sc, ch 2, sc) in the centre dc of the scallop, sc in each of the next 3 dc, sc in next sc*, rep around, working 4 sc on each side of the ch-2 picot on the 9-dc corner scallops. Sl st to join, fasten off and weave in securely.
- The finished border adds about 5 cm all round: roughly 214 x 248 cm overall.
Finishing
Weave in every end on the wrong side, running tails under three or four stitches in one direction and two back the other way. Cotton tails work loose under the weight of a bedspread, so do not skip the backtrack. Trim close, never flush, so nothing pops through to the front.
Block the panel in sections. Lay it face up on a clean sheet, spray the taupe background until it is evenly damp — keeping the petals as dry as you can — and pin the square grid straight, corner to corner, so the join lines run true. Let it dry flat, then flip it and fluff each bloom by pushing the petal layers inward with your fingertips. The petals keep their lift because of the back-loop construction, so they do not need pressing; in fact, never press them with an iron, as a hot plate will flatten the stack permanently. Finish by walking the length of the bedspread and checking each four-square intersection for a loose anchor stitch, tightening any you find with a needle and a short length of taupe.
Tips for Success
- Mark the free front loops of Rnd 5 and Rnd 4 with stitch markers while you work the base disc. Once the outer petals are on, those loops disappear under the layers and they are slow to find again.
- Work each petal layer slightly tighter than your usual tension. Loose petals flop sideways instead of standing up, and the whole look of this blanket depends on them standing.
- Keep the ch-1 at each side of a petal snug. Those two chains set how far the petal lifts off the disc; long chains give a floppy, fringed look rather than a bloom.
- Make the flowers in batches of ten, then do the taupe frames in a second batch. It is faster, and your flower tension stays consistent across the whole bedspread.
- Count Rnd 7 every single time. If you accidentally skip or double a back loop, the 36 stitches no longer split into four corners with eight between, and the square will not sit square.
Common Mistakes to Avoid
- Working the base disc in both loops. If you forget BLO on Rnds 2-6, there are no free front loops left and no petals are possible. Check after Rnd 3: you should clearly see a ridge of loops sitting on the surface.
- Working the petals from the centre outward. The inner layers must go on last or they end up buried. Always start with Rnd 6 and work inward, layer by layer.
- Using the Rnd 6 back loops for the outer petals. The outer petals go into the front loops only; the back loops belong to taupe Rnd 7. Get this backwards and the taupe frame sits on top of the flower instead of behind it.
- Flaring corners on Rnds 8-10. If a square ruffles at the corners, you are adding too many stitches into the corner space — it is always exactly (2 dc, ch 2, 2 dc), never more.
- Joining squares without blocking first. Unblocked cotton squares vary by half a centimetre or so, and those differences compound into wavy rows that no amount of later blocking will fully straighten.
Ways to Customize This Pattern
- Make a 45 cm cushion front from four joined squares, back it with a plain taupe double crochet panel worked to the same size, and join with a sc seam leaving one side open.
- Work a lap throw instead: 5 squares by 6 squares plus the border gives about 95 x 112 cm and takes roughly 15 hours.
- Shade the blooms instead of keeping them all cream — work Layers 1 and 2 in cream, Layers 3 and 4 in oatmeal and Layers 5 and 6 in soft caramel for a gently graded dahlia.
- Swap the background for sage, dusty rose or deep slate and keep the cream flowers; the taupe-to-cream contrast is what makes the texture read, so keep the background several shades darker than the petals.
- Make a flatter, faster version by leaving out Layers 5 and 6 and working a 4-dc cluster bobble in the centre instead. The square still reads as a flower but comes down to about 30 minutes each.
Frequently asked questions
Each finished square is about 17 cm. For a single bed, 9 across by 13 down (117 squares) gives roughly 153 x 221 cm. For a double, 12 by 14 (168 squares) gives about 204 x 238 cm. For a king, 14 by 15 (210 squares) gives about 238 x 255 cm. Add about 5 cm all round for the scalloped border, and add a square to the width for every extra 17 cm of drop you want over the sides.
They compress while wet, then recover. Wash cool on a gentle cycle in a large machine or a bathtub, support the weight when you lift it so the joins do not stretch, and dry flat rather than hanging. Once dry, run your hands over the surface and push the petal layers back toward their centres. What does permanently flatten them is tumble drying on heat or ironing, so avoid both.
Yes, but the blooms will look softer and slightly less sculptural, because acrylic has less body to hold the petal curve. If you use acrylic, go down to a 3.75 mm hook to firm up the fabric, and expect the finished bedspread to be lighter and warmer. A cotton-acrylic blend is a good middle ground and makes the weight more manageable for a full-size cover.
Almost always it is the three double crochet rounds, not the flower. Tension drifts on Rnds 8-10 when you are working on autopilot. Measure every square across Rnd 10 before adding the mesh round: it should be about 15.5 cm. If a square is small, work that one on a half-size larger hook from Rnd 8; if it is large, drop a half size. Blocking can correct a couple of millimetres, no more.
You can sew them, but with 168 squares the join-as-you-go mesh round saves many hours and gives a flatter, stronger seam. If you prefer to sew, work Rnd 11 as plain chain-3 mesh on every square, then whip stitch through matching ch-3 spaces with taupe, keeping your tension loose enough that the seam stays flexible under its own weight.
The finished Layered Dahlia Flower Granny Square Bedspread

