Layered Flower Statement Necklace Crochet Pattern
Beginner Friendly
Perfect for those just starting their crochet journey, with clear instructions and simple techniques
Single-Day Project
A satisfying project you can complete in a single afternoon or evening.
Handmade Gift
A beautiful keepsake — free forever. Read online or print at home.
About This Layered Flower Statement Necklace Crochet Pattern
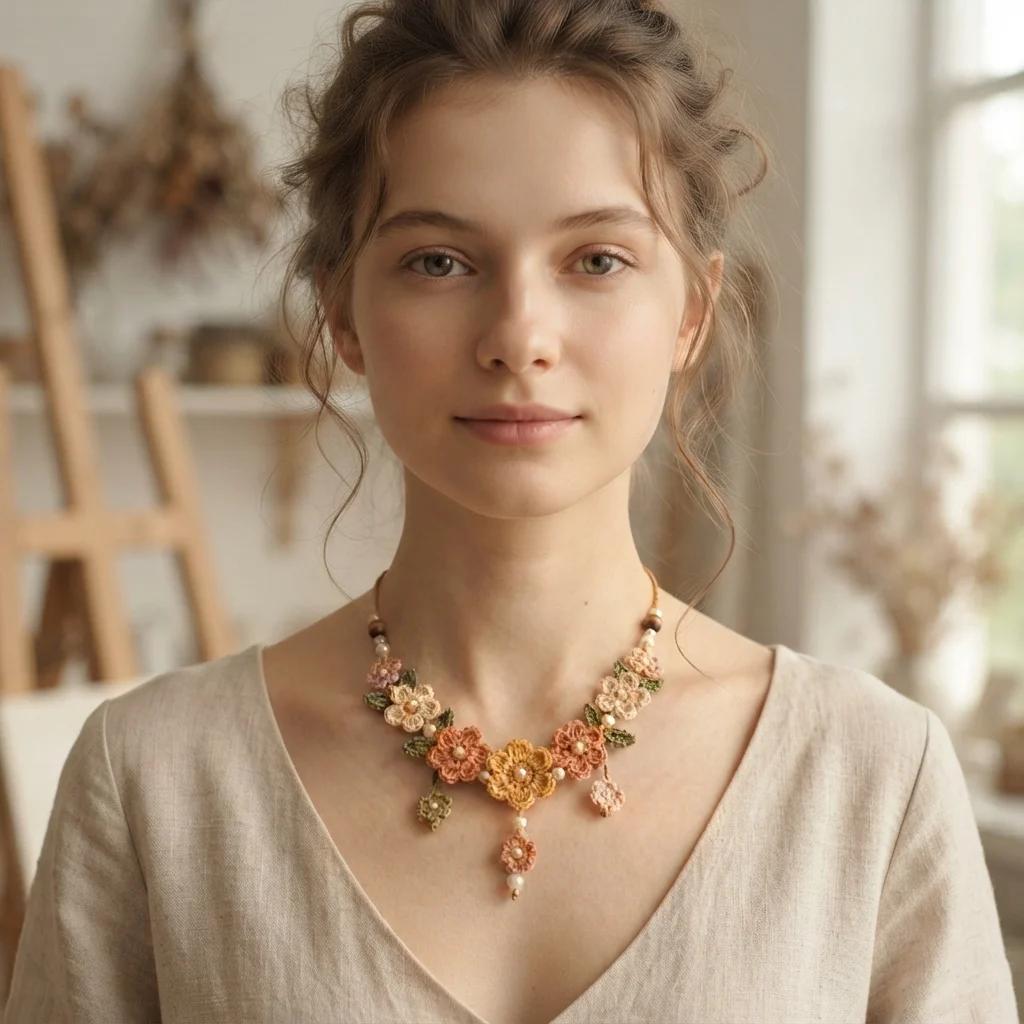
This crochet flower necklace pattern strings 7 small layered flowers, in dusty rose, cream, and rust, along a beaded cord, each flower paired with a tiny sage leaf sprig and small pearl bead accents. The two center flowers hang slightly lower than the rest, and a small dangling pendant made from 2 stacked mini blooms drops from the very center, giving the necklace its soft, V-shaped silhouette.
What makes this design distinctive is the scale: every flower is worked in fine thread or fingering weight cotton at true jewelry size, with two rounds of small, neatly shaped petals rather than the larger, looser petals typical of home décor motifs. Threading pearl beads directly into the cord between flowers, rather than only using them as accents, is what gives the piece its finished, boutique-jewelry look rather than reading as a miniaturized doily. Expect to spend 8-10 hours total across the flowers, leaves, and beaded cord assembly.
This is an advanced pattern, best suited to someone comfortable working fine thread or lace-weight yarn at a small scale and confident threading beads into a finished cord, rather than someone working with worsted weight motifs for the first time.
Materials
- Size 10 crochet thread or fingering weight cotton, dusty rose ~5g, 3 flowers
- Size 10 crochet thread or fingering weight cotton, cream ~5g, 2 flowers
- Size 10 crochet thread or fingering weight cotton, rust/terracotta ~5g, 2 flowers plus pendant
- Size 10 crochet thread, mustard gold ~2g, 1 center flower
- Size 10 crochet thread, sage/olive green ~5g, leaf sprigs
- Small pearl or glass seed beads ~30-40 beads, 3-4 mm
- 2 wooden or bone beads ~8 mm, for the cord near the clasp
- Fine waxed cord or thin cotton cord ~50 cm, for the necklace strand
- Steel crochet hook 1.5 mm (thread) or 2.25 mm (fingering weight)
- Necklace clasp and jump rings
- Beading needle, if beads have very small holes
- Tapestry/yarn needle
- Sharp scissors
Abbreviations
chchainsl stslip stitchscsingle crochethdchalf double crochetdcdouble crochetMRmagic ringch-spchain spacest(s)stitch(es)reprepeatFOfasten offSmall Flower Motif (make 7: 3 dusty rose, 2 cream, 1 rust, 1 mustard for the center)
- With a contrast center color (mustard or a deeper shade of the petal color), 6 sc in MR. Sl st to join, FO leaving a short tail.
- With petal color, join in any st of the center. Round 1 (inner petals): *ch 2, dc 2 in next st, ch 2, sl st in same st; rep from * around all 6 sts. 6 small petals.
- Round 2 (outer petals): join petal color behind Round 1, in a base st between two inner petals. *ch 3, dc 3 in next base st, ch 3, sl st in same st; rep from * around. 6 slightly larger petals layered behind the first.
- FO leaving a long tail for stringing. Repeat for all 7 flowers in the colors listed.
Leaf Sprig (make approximately 10, in sage/olive green)
- Ch 6. Starting in 2nd ch from hook: sl st, sc 1, hdc 1, 3 dc in last ch.
- Continue down the other side: hdc 1, sc 1, sl st in last ch.
- FO leaving a short tail for attaching. Repeat for approximately 10 leaves total, 1-2 per flower.
Pendant Drop (make 1, using 2 mini flowers)
- Work 2 small flowers exactly as the main flower motif above, using rust for the upper piece and a slightly smaller petal round (5 sts instead of 6) for the lower piece, so the pendant tapers toward its tip.
- Stack the smaller flower directly beneath the larger one, with a short length of thread connecting them, then thread a single pearl bead below the lower flower and secure with a small knot to finish the drop.
Preparing the Beaded Cord
- Cut the fine cord to approximately 50 cm, leaving room for the clasp at both ends.
- Thread on 1 wooden bead near each end, about 8-10 cm in from where the clasp will attach, to mark where the necklace’s floral section begins on each side.
- Thread on 3-4 pearl beads just past each wooden bead, spacing them a few cm apart, to sit between the cord and the first flower on each side.
Assembly
- Lay the beaded cord out flat. Position the 7 flowers along the front section of the cord in this order from one side to the other: dusty rose, cream, rust, mustard (center), rust, cream, dusty rose, so the mustard center flower sits at the necklace’s lowest point.
- Sew or thread each flower onto the cord through its center back, securing firmly so it can’t slide, and space them so the two center-most flowers (rust) sit slightly lower than the outer ones, building the soft V-shape shown in the photo.
- Tuck 1-2 leaf sprigs behind each flower and tack them to the cord alongside it.
- Thread a few small pearl beads directly onto the cord in the gaps between flowers for extra sparkle along the strand.
- Attach the finished pendant drop to the very center of the cord, just below the mustard center flower, so it hangs as the lowest point of the necklace.
Finishing
Attach a clasp and jump ring to each end of the cord once all flowers, leaves, and beads are in place. Try the necklace on and adjust flower spacing slightly if the V-shape doesn’t sit evenly, since fine thread pieces can shift a little during assembly. Steam very lightly from a distance if the flowers need reshaping, taking care not to let the iron touch the beads or cord directly.
Tips for Success
- Work at a slow, even tension throughout; fine thread shows tension inconsistencies much more than worsted weight yarn.
- Secure each flower to the cord with several small stitches through its center back rather than a single pass, since a necklace gets handled and worn often.
- Check your bead hole size against your thread and needle before starting; some fine seed beads need a proper beading needle to thread through comfortably.
- Lay the whole necklace out flat and check the V-shape symmetry before permanently attaching anything, adjusting flower spacing as needed.
- Make a couple of spare leaf sprigs beyond your count; having extras makes final placement adjustments easier.
Common Mistakes to Avoid
- Spacing flowers unevenly along the cord throws off the necklace’s symmetrical V-shape. Fix: lay the full necklace out flat and check both sides match before sewing anything down permanently.
- Attaching flowers with only 1-2 stitches risks them spinning or falling off the cord with wear. Fix: secure each flower with several stitches through a stable point on its back.
- Skipping a test flower before committing to all 7 often means discovering a sizing or tension issue partway through. Fix: always make one test flower first at this fine gauge.
- Using beads with holes too small for your needle and thread causes frustrating snags during assembly. Fix: check bead compatibility with your materials before starting.
- Making the pendant drop the same size as the main flowers makes it blend in rather than stand out as a focal point. Fix: keep the pendant’s lower flower slightly smaller as instructed.
Ways to Customize This Pattern
- Reduce to 5 flowers for a shorter, more delicate necklace with a subtler V-shape.
- Swap the blush, cream, and rust palette for cool blues and greys for a different color story.
- Skip the pendant drop for a simpler necklace with just the floral strand.
- Make matching earrings using a single small flower motif with a short leaf sprig.
- Use a metallic thread blend for a subtle sparkle throughout the flowers.
Frequently asked questions
Yes, fingering weight works well and is easier to handle for most crocheters than very fine thread. The finished flowers will be slightly larger, so consider using 5-6 flowers instead of 7 if you want to keep a similar overall necklace length.
Sew through the flower’s center back into the cord with several secure stitches, ideally catching the cord’s fibers directly rather than just looping thread around it. A drop of clear fabric glue at the attachment point adds extra security if needed.
Use a jump ring threaded through a small loop tied at each end of the cord, then attach your clasp to the jump ring. This keeps the connection secure without needing to crochet directly onto metal findings.
At this fine gauge, small tension shifts are very visible. Work slowly and check that both petal rounds on each flower use the same stitch count and are worked at a consistent tension before moving to the next flower.
The finished Layered Flower Statement Necklace Crochet Pattern

