Layered Pink Flower Granny Square Crochet Pattern
Beginner Friendly
Perfect for those just starting their crochet journey, with clear instructions and simple techniques
Single-Day Project
A satisfying project you can complete in a single afternoon or evening.
Handmade Gift
A beautiful keepsake — free forever. Read online or print at home.
About This Layered Pink Flower Granny Square Crochet Pattern
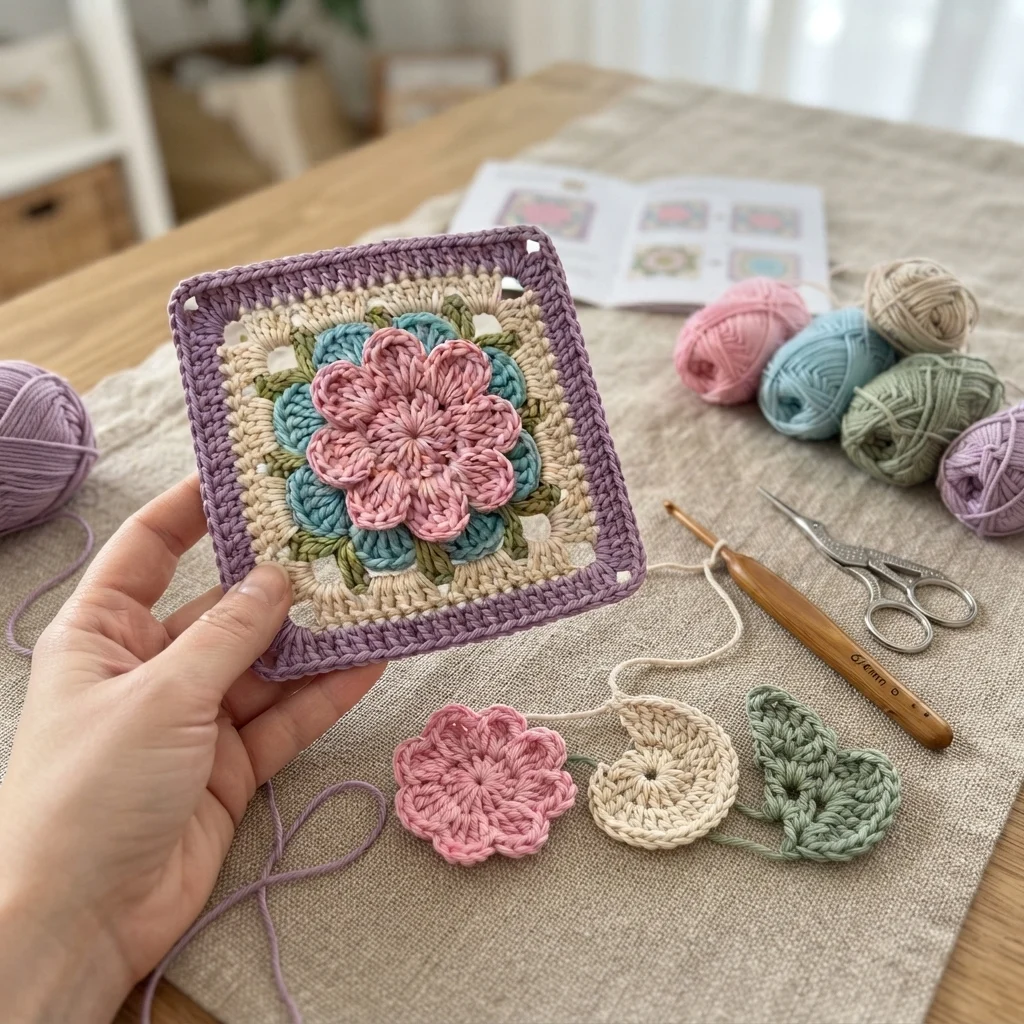
This crochet flower granny square pattern builds a multicolor base square in teal, olive green, cream, and a purple outer border, then tops it with a fully dimensional 3D flower in dusty pink, built from two full rounds of rounded petals that rise clearly off the square’s surface. The colorful layered rounds underneath peek out around the flower’s edges rather than disappearing beneath it, so both the base and the flower read as equally important parts of the design.
What makes this design distinctive is how the flower sits proud of the square rather than lying flat against it: the two petal rounds are worked with enough stitches per petal that they naturally dome outward, and attaching the flower through its center only, rather than around its outer edge, is what keeps that raised shape intact once sewn on. Paired with a base that cycles through 4 distinct colors before the flower is even added, this square carries real visual complexity in a compact, single-motif format. Expect to spend 2-3 hours per square between the base and the flower.
This is an advanced pattern, best suited to someone comfortable managing a multi-color granny square base and confident attaching a raised 3D flower so it keeps its dimension rather than flattening, rather than someone wanting a simple flat flower square.
Materials
- Worsted weight yarn, teal ~10g per square
- Worsted weight yarn, olive green ~10g per square
- Worsted weight yarn, cream ~15g per square
- Worsted weight yarn, purple ~15g per square
- Worsted weight yarn, dusty pink ~15g per square, flower
- Crochet hook 4.5 mm (US 7)
- Tapestry/yarn needle
- Steam iron and pressing cloth, or blocking mat and pins
- Sharp scissors
Abbreviations
chchainsl stslip stitchscsingle crochethdchalf double crochetdcdouble crochetMRmagic ringch-spchain spacest(s)stitch(es)reprepeatFOfasten offGranny Square Base (make 1 per square)
- With teal, ch 4, sl st in first ch to form a ring. Round 1: ch 3 (counts as first dc), 2 dc in ring, ch 2, *3 dc in ring, ch 2; rep from * 2 more times (4 corner groups total). Sl st to join, FO.
- Round 2, with olive green: join at any corner ch-2 sp. Ch 3, (2 dc, ch 2, 3 dc) in same sp, *ch 1, (3 dc, ch 2, 3 dc) in next corner sp; rep from * around. Sl st to join, FO.
- Round 3, with cream: join at any corner. Ch 3, (2 dc, ch 2, 3 dc) in same sp, *ch 1, 3 dc in next ch-1 sp, ch 1, (3 dc, ch 2, 3 dc) in next corner sp; rep from * around. Sl st to join, FO.
- Round 4, with purple: join at any corner. Repeat Round 3’s structure, adding 1 more ch-1 space between corner groups on each side to widen the square into its final outer border. Sl st to join, FO leaving a short tail.
3D Flower Center (make 1 per square)
- With dusty pink, 8 sc in MR. Sl st to join. (8 sts)
- Round 2: inc in each st around. Sl st to join, FO leaving a short tail. (16 sts) This small flat round forms the base the petals will build from.
- Round 1 of petals: join dusty pink in any st of the base round. *ch 2, dc 3 in next st, ch 2, sl st in same st; rep from * around all 16 sts. 16 small, rounded petals.
- Round 2 of petals: join dusty pink behind Round 1, in the base sts between the first petals. *ch 3, dc 4 in next base st, ch 3, sl st in same st; rep from * around. 16 larger petals layered behind the first round.
- FO leaving a long tail for attaching. Fold the outer petal round slightly back and up from the inner round so the flower domes outward rather than lying flat.
Assembly
- Center the finished flower on top of the blocked granny square base.
- Sew the flower down through its very center only, using several small stitches, so the surrounding petals stay raised and free rather than being pulled flat against the square.
- Check that the colorful base rounds remain visible around the flower’s outer edge once attached, as shown in the photo, rather than being fully covered.
Finishing
Weave in all remaining tails on the wrong side of the square. Steam the flower gently from the back only, helping the petals sit open and slightly domed without flattening them, and avoid pressing the iron directly onto the front of the flower. If making multiple squares for a larger project, block each base to the same finished size before attaching flowers, and repeat the full process for every additional square needed.
Tips for Success
- Keep the 4 base color rounds consistent in size and tension across every square if making a set, since any variation becomes obvious once multiple squares sit side by side.
- Sew the flower down through its center only, never around the outer petal edges, to preserve its raised, domed shape.
- Fold the outer petal round back and slightly upward after working it, rather than leaving it lying flat against the inner round, for real dimension.
- Block the plain base square before attaching the flower, so the base lies flat and even underneath the dimensional centerpiece.
- If making a set for a blanket, work all the bases first, then all the flowers, to keep tension and sizing consistent across the whole batch.
Common Mistakes to Avoid
- Sewing the flower down around its outer edge instead of just the center flattens the whole bloom against the square. Fix: stitch through the center only, leaving the petals free.
- Working both petal rounds at the same size loses the layered, domed effect. Fix: keep Round 2 noticeably larger than Round 1 so the two layers separate visually.
- Skipping a block on the base before attaching the flower makes positioning the center harder to judge accurately. Fix: block the plain square first, then center and attach the flower.
- Letting the base’s color rounds vary in tension between multiple squares creates a mismatched set. Fix: keep consistent tension and round order across every square you make.
- Pressing an iron directly onto the front of the flower during blocking flattens its raised shape. Fix: steam from the back only, holding the iron slightly away from the fabric.
Ways to Customize This Pattern
- Swap the pink flower for a different color to match a specific project palette.
- Change the 4 base colors to a different combination while keeping the same round structure.
- Scale the whole square up or down for use as a coaster, a pillow panel, or a full blanket unit.
- Add a small contrasting center dot to the flower’s very middle for extra detail.
- Make a full set of squares, rotating flower color while keeping the base consistent, for a coordinated multi-color blanket.
Frequently asked questions
This square works well on its own as a coaster, a small mat, or a framed decorative piece. Make as many as you like and join them only if you want a larger blanket or pillow.
A 4×5 grid of 20 squares at this size produces a throw roughly 70-75 cm x 90 cm; scale the grid up for a larger blanket, keeping each square’s finished size consistent.
This almost always means it was stitched down around its outer edge rather than just the center. Remove any outer-edge stitches and re-attach through the center point only, so the petals can stay raised and free.
You can simplify to 2-3 colors if you prefer, though the 4-round sequence is what gives the base its layered, detailed look peeking out from under the flower. If reducing, keep the outermost border round distinct from the inner rounds for contrast.
The finished Layered Pink Flower Granny Square Crochet Pattern

