Lily of the Valley Bedspread and Pillow Shams Crochet Pattern
Beginner Friendly
Perfect for those just starting their crochet journey, with clear instructions and simple techniques
Single-Day Project
A satisfying project you can complete in a single afternoon or evening.
Handmade Gift
A beautiful keepsake — free forever. Read online or print at home.
About This Lily of the Valley Bedspread and Pillow Shams Crochet Pattern
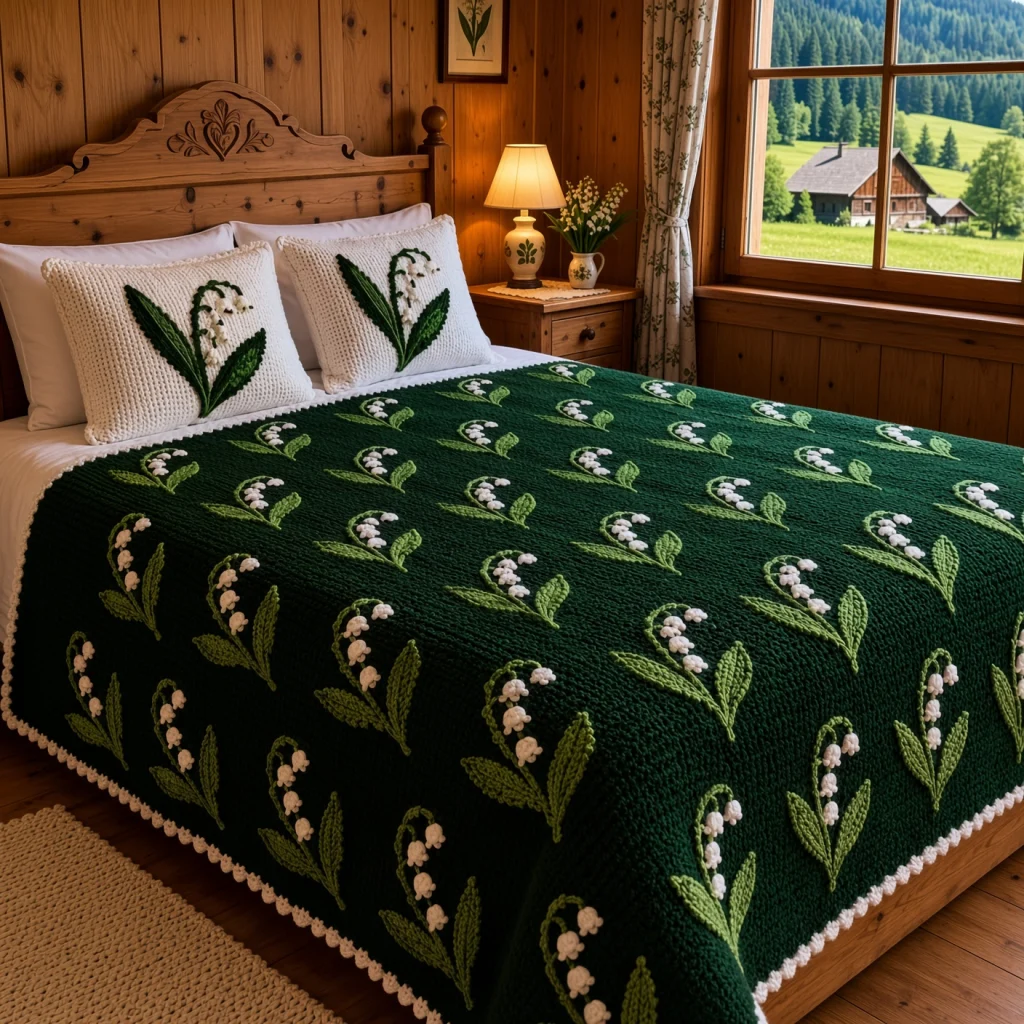
This lily of the valley crochet bedspread scatters 52 sprigs of spring flowers across a deep forest green base. Each sprig has an arching stem, a row of little white bells hanging from it and two pointed leaves with a raised center vein. A cream puff-stitch border frames the edge, and two cream pillow shams each carry one large sprig with dark green leaves, reversing the colors of the bedspread.
The base is worked in linen stitch, which gives a dense, woven texture that shows off the 3D flowers. The stems are crocheted straight onto the finished base with surface slip stitch, so they curve exactly where you want them, and the bells and leaves are made separately and sewn on. The sprigs are set in offset rows, so they look scattered and natural rather than stiff.
The full set takes around 200 to 230 hours. The base is long but simple, and the bells and leaves are small, quick pieces to make in between. It suits a crocheter who is comfortable with large projects, working around a foundation chain and careful sewing.
Materials
- Worsted weight yarn, forest green about 4,850 m (25 skeins of 100 g / 200 m), for the base and sham leaves
- Worsted weight yarn, cream about 1,850 m (10 skeins of 100 g / 200 m), for bells, shams and border
- Worsted weight yarn, leaf green about 350 m (2 skeins of 100 g / 200 m), for leaves and stems
- 5 mm crochet hook
- Locking stitch markers about 60, for marking sprig positions
- Tapestry needle and scissors
- Two pillows 50 x 70 cm, for the shams
Abbreviations
MRmagic ringchchainscsingle crochethdchalf double crochetdcdouble crochettrtreble crochetsl stslip stitchsurf sl stsurface slip stitch: yarn held behind the work, insert hook from the front, pull up a loop and draw it through the loop on hookpuff stpuff stitch: (yarn over, insert hook in st, pull up a loop) 4 times, yarn over, pull through all 9 loops, ch 1 to closeskskipspspacest(s)stitch(es)rndroundreprepeatRS / WSright side / wrong sideLinen Stitch Panels (make 3)
- With forest green, ch 118.
- Row 1 (RS): sc in 2nd ch from hook, *ch 1, sk next ch, sc in next ch; rep from * across. (117 sts: 59 sc, 58 ch-1 sps)
- Row 2: ch 1, turn, sc in first sc, sc in next ch-1 sp, *ch 1, sk next sc, sc in next ch-1 sp; rep from * to last sc, sc in last sc. (117 sts: 60 sc, 57 ch-1 sps)
- Row 3: ch 1, turn, sc in first sc, *ch 1, sk next sc, sc in next ch-1 sp; rep from * to last 2 sc, ch 1, sk next sc, sc in last sc. (117 sts: 59 sc, 58 ch-1 sps)
- Rows 4-500: rep Rows 2 and 3 alternately, ending with a Row 2. (117 sts in every row)
- Place a marker at the end of every 20th row. These help when seaming and placing the sprigs.
- Fasten off. Each panel measures about 73 x 250 cm. Block all three to the same length.
Joining the Panels
- Lay the panels side by side, RS up, with all foundation edges at the same end. This end is the foot of the bedspread.
- Hold two panels RS together and, with forest green, sl st through both layers in each row end, matching the markers. (500 sl st)
- Join the third panel the same way. The bedspread is now 351 sts wide and 500 rows long.
- Grid: lay the bedspread RS up with the foot toward you. Number the columns 1-351 from left to right, counting every sc and every ch-1 sp, and the rows 1-500 from the foot.
Bells and Buds (make 220 bells and 110 buds)
- You need 4 bells and 2 buds for each bedspread sprig, and 6 bells and 3 buds for each sham.
- Bell Rnd 1: with cream, MR, ch 1, 5 sc in ring, join with sl st to first sc. (5 sts)
- Bell Rnd 2: ch 1, 2 sc in each st around, join. (10 sts)
- Bell Rnd 3: ch 1, sc in each st around, join. (10 sts)
- Bell Rnd 4: *sl st in next st, ch 2, sl st in same st, sl st in next st; rep from * 4 more times. (5 points)
- Fasten off leaving a 20 cm tail. Pull the starting tail out through the top of the bell to use for sewing. The bell is about 2 cm across, with the open end and its five points facing down.
- Bud Rnd 1: with cream, MR, ch 1, 5 sc in ring, join. (5 sts)
- Bud Rnd 2: ch 1, sc in each st around, join. (5 sts) Fasten off leaving a 20 cm tail. Thread the tail through the front loops of Rnd 2 and pull tight to close the bud into a ball.
Leaves (make 104 small and 4 large)
- Small leaf (bedspread): with leaf green, ch 20.
- Side 1: sl st in 2nd ch from hook, sc in next ch, hdc in next ch, dc in next 3 ch, tr in next 7 ch, dc in next 3 ch, hdc in next ch, sc in next ch, 3 sc in last ch. (18 sts plus 3 sc at the base)
- Side 2: working in the free loops on the other side of the chain, sc in next ch, hdc in next ch, dc in next 3 ch, tr in next 7 ch, dc in next 3 ch, hdc in next ch, sc in next ch, sl st in next ch. (18 sts)
- Tip: ch 3, sl st in the first sl st of Side 1. Fasten off leaving a 30 cm tail. The leaf is about 11 cm long.
- Vein: with forest green, work surf sl st along the center chain from the base to the tip.
- Large leaf (shams): with forest green, ch 30. Side 1: sl st in 2nd ch from hook, sc in next ch, hdc in next ch, dc in next 4 ch, tr in next 15 ch, dc in next 4 ch, hdc in next ch, sc in next ch, 3 sc in last ch. Side 2: in the free loops, sc in next ch, hdc in next ch, dc in next 4 ch, tr in next 15 ch, dc in next 4 ch, hdc in next ch, sc in next ch, sl st in next ch. Tip: ch 3, sl st in the first sl st. (28 sts on each side) Work the vein in leaf green. The leaf is about 17 cm long.
Sprig Layout
- There are 8 rows of sprigs, alternating 7 and 6 sprigs. (52 sprigs) Each position below is the base of a stem, given as (column, row).
- Rows of 7 sprigs: stem bases at columns 18, 68, 118, 168, 218, 268 and 318, on rows 40, 160, 280 and 400.
- Rows of 6 sprigs: stem bases at columns 43, 93, 143, 193, 243 and 293, on rows 100, 220, 340 and 460.
- Mark every stem base with a locking marker before working any stems, then check the whole layout looks even.
Working Each Sprig
- Stem: with leaf green, RS facing, hold the yarn behind the work at the stem base. Work 20 surf sl st straight up, one per row.
- Arch: work 6 surf sl st moving up one row and right one column each, then 4 surf sl st moving right one column each, then 6 surf sl st moving down one row and right one column each. Fasten off and pull the tail to the WS. (36 surf sl st)
- Leaves: sew one small leaf on each side of the stem, with the bases touching the base of the stem and the tips leaning out at about 30 degrees. Sew around the edge of each leaf with small stitches.
- Bells: starting where the arch begins to curve, sew 4 bells and then 2 buds under the arch, evenly spaced, so they hang from the stem. Use the bell tail to make one or two stitches into the stem, leaving a few millimeters so each bell sways slightly.
- The buds go at the end of the arch, where the stem curves down.
- Rep for all 52 sprigs.
Puff Border
- Rnd 1: with cream, RS facing, join in a foot corner. 3 sc in corner st, sc in next 349 sts, 3 sc in corner st; 398 sc evenly along the side (about 4 sc for every 5 rows); 3 sc in corner st, sc in next 349 sts, 3 sc in corner st; 398 sc evenly along the other side. Join with sl st. (1,506 sts)
- Rnd 2: ch 1, *sc in next st, puff st in next st; rep from * around. Join and fasten off. (753 puffs)
Pillow Sham Fronts (make 2)
- With cream, ch 114.
- Rows 1-100: work in linen stitch as for the panels, ending with a Row 2. Fasten off. (113 sts, about 70 x 50 cm)
- Stem: with leaf green, start at column 46, row 25. Work 30 surf sl st straight up. Arch: 8 surf sl st moving up and right, 6 moving right, 8 moving down and right. (52 surf sl st)
- Sew one large leaf on each side of the stem, bases at the stem base, tips leaning out.
- Sew 6 bells and then 3 buds under the arch, as for the bedspread sprigs.
Pillow Sham Backs (make 2 sets)
- Upper back: with cream, ch 114. Work Rows 1-60 in linen stitch, ending with a Row 2. (113 sts)
- Edge row: ch 1, turn, sc in each sc and ch-1 sp across. Fasten off. (113 sc)
- Lower back: with cream, ch 114. Work Rows 1-54 in linen stitch, ending with a Row 2. (113 sts)
- Edge row: ch 1, turn, sc in each sc and ch-1 sp across. Fasten off. (113 sc)
- The sc rows are the open edges of the envelope. Together the pieces are 14 rows taller than the front, giving about 7 cm of overlap.
Sham Assembly
- Lay a sham front WS up. Place the lower back on top, RS up, with its foundation edge along the bottom. Place the upper back on top, RS up, with its foundation edge along the top, overlapping the lower back. Pin all edges.
- Rnd 1: turn so the front faces you. With cream, join in a corner through all layers. 3 sc in corner st, sc in next 111 sts, 3 sc in corner st; 78 sc evenly along the side; 3 sc in corner st, sc in next 111 sts, 3 sc in corner st; 78 sc evenly along the other side. Join. (390 sts)
- Rnd 2: ch 1, *sc in next st, puff st in next st; rep from * around. Join and fasten off. (195 puffs)
- Rep with the second sham.
Finishing
Weave in all ends on the WS. Run the cream bell tails under the leaf green stem stitches on the back so they don’t show through the dark base, and hide the leaf ends under the leaves themselves.
Lay the bedspread flat and lightly steam it from above, holding the iron a few centimeters away so you don’t flatten the bells. Gently shape each bell so its points face down and each leaf lies flat. Steam the shams the same way, then put the pillows in through the back opening.
Tips for Success
- Make the bells in batches of 20 or 30 while you work on the panels. With 330 bells and buds, spreading them out keeps the project from stalling at the end.
- Work the stems before sewing anything. If a stem goes off course, it is easy to pull out and redo while nothing is attached to it.
- Keep the surf sl st relaxed. A tight stem puckers the base and the arch loses its shape.
- Sew all the sprigs with the bedspread flat on a table, rolling up the finished part so its weight doesn’t pull on the stitches.
- Use a slightly darker green than the base for the leaf veins on the bedspread if your forest green is very dark, so the veins still show.
Common Mistakes to Avoid
- Working sc into the sc in the base. This turns linen stitch into plain sc, and the panel grows taller than the others. Each sc goes into a ch-1 sp, except the first and last stitches.
- Bells that face sideways. If you sew through the side of the bell, it tilts. Always sew through the top of the bell so the open end hangs down.
- Leaves that curl. If the leaf cups, the tr section was worked too tightly. Block the leaves flat with steam before sewing them on.
- Sprigs in uneven rows. Counting from the wrong edge throws off a whole row. Always count columns from the left and rows from the foot, with the RS facing up.
- A ruffled border. Too many sts in Rnd 1 make the border wave. Stick to about 4 sc for every 5 rows along the sides.
Ways to Customize This Pattern
- Reverse the colors on the bedspread: cream base with forest green leaves, to match the shams.
- Make the sprigs denser: rows of sprigs every 40 rows instead of 60 give a fuller, meadow-like look.
- Swap lily of the valley for snowdrops by making the bells longer (add a second Rnd 3) and using one leaf per sprig.
- Make a baby blanket of one panel with 2 sprigs across and 4 rows of sprigs, in a soft cotton.
- Add a few small pink bells among the white ones for the rarer pink lily of the valley.
Frequently asked questions
Surface slip stitch lets you draw the stem straight onto the base and curve it exactly where you want. It also lies flatter and is more secure than a sewn chain, which can twist or snag.
The bells are small and firm and spring back after being sat on. If they flatten, a quick shot of steam and a little shaping with your fingers will bring them back.
Yes. The layout is a guide for an even spread, but you can place the sprigs anywhere. Just mark every stem base first and look at the whole bedspread from a distance before working any stems.
Wash it on a gentle cold cycle inside a large laundry bag, or by hand, and dry it flat. Shape the bells and leaves while it is still damp so they dry in place.
The finished Lily of the Valley Bedspread and Pillow Shams Crochet Pattern

