Lotus Granny Square Crochet Pattern
Beginner Friendly
Perfect for those just starting their crochet journey, with clear instructions and simple techniques
Single-Day Project
A satisfying project you can complete in a single afternoon or evening.
Handmade Gift
A beautiful keepsake — free forever. Read online or print at home.
About This Lotus Granny Square Crochet Pattern
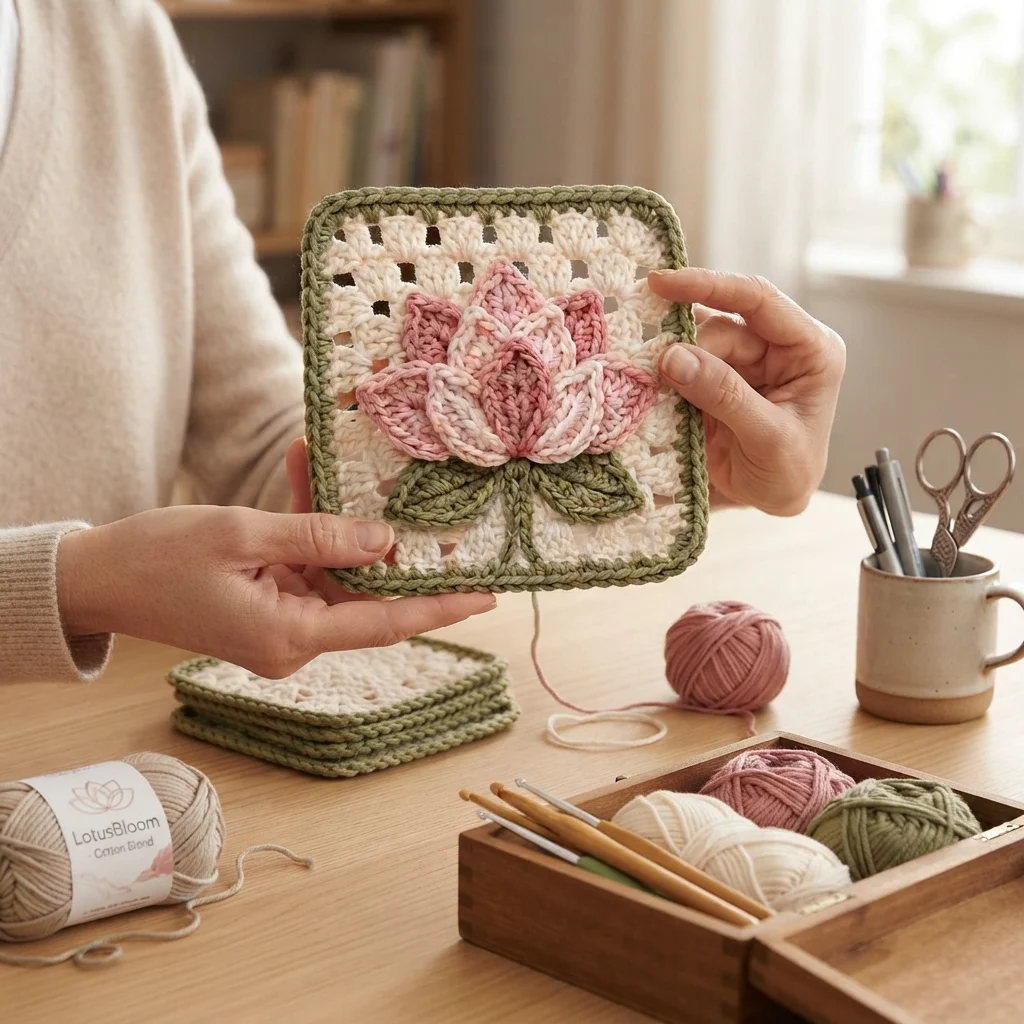
This lotus granny square pattern pairs a classic cream granny square with a layered, three-dimensional lotus flower built from nine separate petals. Two olive leaves and a short stem sit beneath the bloom, and a twisted rope border in the same green frames the whole piece.
The square itself is quick, but the lotus is where the real work is. Each petal is a small ridged piece with its own shaping, and you sew them down in layers so the flower sits up off the background. Plan on about five to six hours in total, including blocking and assembly.
This pattern suits crocheters who are comfortable reading rounds, working increases and decreases in rows, and sewing small pieces on neatly. Make one as a coaster, a pillow front, or a statement square in a larger blanket.
Materials
- DK / light worsted cotton blend yarn, cream about 25 g
- Same yarn, olive green about 15 g, for leaves, stem and border
- Same yarn, blush pink about 5 g
- Same yarn, mid pink about 4 g
- Same yarn, deep rose about 2 g
- Light sage or cream yarn scrap for leaf veins
- 3.5 mm crochet hook
- Tapestry needle
- Sewing pins and stitch markers
- Scissors
- Blocking mat and pins for blocking the square
Abbreviations
MRmagic ringchchainsl stslip stitchscsingle crochetdcdouble crochetspspacest(s)stitch(es)inc2 sc in the same stitchdecsc2tog: single crochet 2 stitches togethersc3togsingle crochet 3 stitches togetherBLOback loop onlyrev screverse single crochet, worked left to right*...*repeat the instructions between the asterisks as directedGranny Square Base (cream)
- Make an MR. Ch 3 (counts as first dc), 2 dc in the MR, ch 2. *3 dc in the MR, ch 2; repeat from * 2 more times. Join with a sl st to the top of the beginning ch 3 and pull the MR tight. (4 clusters, 12 dc, 4 corner ch-2 sps)
- Sl st in each of the next 2 dc and into the first ch-2 sp. Ch 3, (2 dc, ch 2, 3 dc) in the same sp for the first corner, ch 1. *(3 dc, ch 2, 3 dc) in the next ch-2 sp, ch 1; repeat from * 2 more times. Join to the top of the beginning ch 3. (4 corners, 24 dc, 4 ch-1 sps)
- Sl st in each of the next 2 dc and into the first corner ch-2 sp. Ch 3, (2 dc, ch 2, 3 dc) in the same sp, ch 1. *3 dc in the next ch-1 sp, ch 1, (3 dc, ch 2, 3 dc) in the next corner sp, ch 1; repeat from * 2 more times, then 3 dc in the last ch-1 sp, ch 1. Join. (4 corners, 4 side clusters, 36 dc, 8 ch-1 sps)
- Sl st into the first corner sp as before. Ch 3, (2 dc, ch 2, 3 dc) in the same sp, ch 1. *(3 dc in the next ch-1 sp, ch 1) 2 times, (3 dc, ch 2, 3 dc) in the next corner sp, ch 1; repeat from * 2 more times, then (3 dc in the next ch-1 sp, ch 1) 2 times. Join. (8 side clusters, 48 dc, 12 ch-1 sps)
- Sl st into the first corner sp. Ch 3, (2 dc, ch 2, 3 dc) in the same sp, ch 1. *(3 dc in the next ch-1 sp, ch 1) 3 times, (3 dc, ch 2, 3 dc) in the next corner sp, ch 1; repeat from * 2 more times, then (3 dc in the next ch-1 sp, ch 1) 3 times. Join. (12 side clusters, 60 dc, 16 ch-1 sps)
- Sl st into the first corner sp. Ch 3, (2 dc, ch 2, 3 dc) in the same sp, ch 1. *(3 dc in the next ch-1 sp, ch 1) 4 times, (3 dc, ch 2, 3 dc) in the next corner sp, ch 1; repeat from * 2 more times, then (3 dc in the next ch-1 sp, ch 1) 4 times. Join and fasten off. (16 side clusters, 72 dc, 20 ch-1 sps)
Rope Border (olive)
- Join olive with a sl st in any corner ch-2 sp. Ch 1, 3 sc in the same sp. *Sc in each dc and in each ch-1 sp along the side (23 sc), 3 sc in the next corner sp; repeat from * 2 more times, then sc in each dc and ch-1 sp along the last side (23 sc). Join with a sl st to the first sc. (104 sc)
- Ch 1, sc in each st around, working 3 sc in the middle st of each 3-sc corner group. Join. (112 sc)
- Ch 1, do not turn. Rev sc in each st around. Join, fasten off and weave in the end. (112 rev sc)
Large Petals (blush pink, make 4)
- Ch 5. Sc in the 2nd ch from hook and in each ch across. Ch 1, turn. (4 sts)
- Work every following row in BLO for the ridged texture. Inc, sc in the next 2, inc. Ch 1, turn. (6 sts)
- Inc, sc in the next 4, inc. Ch 1, turn. (8 sts)
- Sc in each st across. Ch 1, turn. (8 sts)
- Sc in each st across. Ch 1, turn. (8 sts)
- Sc in each st across. Ch 1, turn. (8 sts)
- Dec, sc in the next 4, dec. Ch 1, turn. (6 sts)
- Dec, sc in the next 2, dec. Ch 1, turn. (4 sts)
- Dec, dec. Ch 1, turn. (2 sts)
- Dec. Fasten off, leaving a 25 cm tail for sewing. (1 st)
Middle Petals (mid pink, make 3)
- Ch 5. Sc in the 2nd ch from hook and in each ch across. Ch 1, turn. (4 sts)
- Work every following row in BLO. Inc, sc in the next 2, inc. Ch 1, turn. (6 sts)
- Sc in each st across. Ch 1, turn. (6 sts)
- Sc in each st across. Ch 1, turn. (6 sts)
- Dec, sc in the next 2, dec. Ch 1, turn. (4 sts)
- Dec, dec. Ch 1, turn. (2 sts)
- Dec. Fasten off, leaving a 25 cm tail. (1 st)
Back Petals (deep rose, make 2)
- Ch 4. Sc in the 2nd ch from hook and in each ch across. Ch 1, turn. (3 sts)
- Work every following row in BLO. Inc, sc in the next st, inc. Ch 1, turn. (5 sts)
- Sc in each st across. Ch 1, turn. (5 sts)
- Dec, sc in the next st, dec. Ch 1, turn. (3 sts)
- Sc3tog. Fasten off, leaving a 25 cm tail. (1 st)
Leaves (olive, make 2)
- Ch 6. Sc in the 2nd ch from hook and in each ch across. Ch 1, turn. (5 sts)
- Work every following row in BLO. Inc, sc in the next 3, inc. Ch 1, turn. (7 sts)
- Inc, sc in the next 5, inc. Ch 1, turn. (9 sts)
- Sc in each st across. Ch 1, turn. (9 sts)
- Sc in each st across. Ch 1, turn. (9 sts)
- Sc in each st across. Ch 1, turn. (9 sts)
- Dec, sc in the next 5, dec. Ch 1, turn. (7 sts)
- Dec, sc in the next 3, dec. Ch 1, turn. (5 sts)
- Dec, sc in the next st, dec. Ch 1, turn. (3 sts)
- Sc3tog. Fasten off, leaving a 25 cm tail. (1 st)
- With the sage scrap, embroider one straight stitch up the center of each leaf from base to near the tip for the vein.
Stem (olive)
- Ch 9. Sl st in the 2nd ch from hook and in each ch across. Fasten off, leaving a 25 cm tail. (8 sl sts)
Finishing
Weave in all ends and block the square flat to measure about 16 cm, pinning the corners square. Lay the stem slightly below the center of the square, then sew it down with olive yarn. Place a leaf on each side of the stem base, angled outward, and sew them down along their lower edges.
Build the flower from the back forward. Sew the two deep rose petals side by side, pointing up, just above the stem. Sew the three mid pink petals in front of them in a gentle fan. Finish with the four blush petals in front, angling the two outer petals about 60 degrees from vertical and the two inner petals about 25 degrees. Use a whip stitch along the lower two-thirds of each petal and leave the tips free so the flower lifts off the square. Weave in the tails on the back.
Tips for Success
- Pin every petal in place and photograph the layout before sewing. Overlapping pieces shift once you start stitching.
- Work all petal rows after the first in BLO and keep your tension even, since the ridges only look crisp when the rows are consistent.
- Use a cotton blend for the square so the dc clusters hold their open shape, and block it before attaching the lotus.
- Sew petals with a yarn tail in the same color so the stitches disappear into the ridges.
- If you want a more variegated pink like the photo, work the blush petals in a shaded or hand-dyed yarn.
Common Mistakes to Avoid
- Skipping the corner ch-2 spaces in the granny rounds. If the square starts to curve, check that every corner has its (3 dc, ch 2, 3 dc).
- Working the petal rows in both loops. The ridges disappear and the petals look flat, so rip back and redo in BLO.
- Sewing the petals flat against the square. Leave the upper third of each petal loose so the layers show.
- Skipping blocking. An unblocked square puckers around the border, and the lotus will not sit evenly.
- Pulling the rev sc too tight. Keep it relaxed so the rope edge lies flat and does not ruffle.
Ways to Customize This Pattern
- Switch to a white lotus with pale yellow centers, and use a dark teal border for a dramatic version.
- Add two more rows of granny rounds to turn the square into a pillow front or baby blanket panel.
- Make a set of four squares in different flower colors for matching coasters.
- Add a fifth layer of three tiny deep rose petals at the center for a fuller bloom.
- Join several squares for a blanket, with the lotus square as a centerpiece surrounded by plain cream squares.
Frequently asked questions
About 16 cm (6.25 in) square after blocking with DK cotton and a 3.5 mm hook. A looser tension or thicker yarn will make it larger.
Yes, but use the same weight for the whole piece so the flower stays in proportion. A heavier yarn gives a larger, chunkier lotus that needs a bigger square.
Block them lightly under a damp cloth and pin them flat until dry. Sewing along the lower two-thirds also keeps them in place.
It is rated advanced because of the nine shaped petals and the layered assembly. The granny square base is beginner friendly, so you can make that first and add the lotus later.
The finished Lotus Granny Square Crochet Pattern

