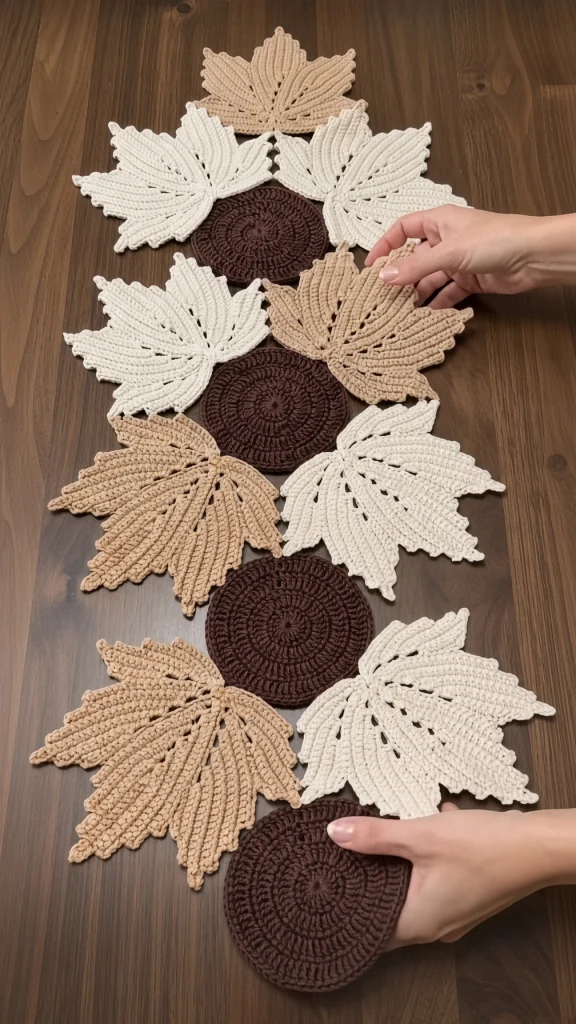
Maple Leaf and Acorn Disc Table Runner
Beginner Friendly
Perfect for those just starting their crochet journey, with clear instructions and simple techniques
Single-Day Project
A satisfying project you can complete in a single afternoon or evening.
Handmade Gift
A beautiful keepsake — free forever. Read online or print at home.
About This Maple Leaf and Acorn Disc Table Runner
This crochet maple leaf table runner pattern builds a whole runner out of nine large maple leaves and four solid chocolate discs, joined directly to one another with no backing fabric underneath. The leaves are worked in three warm neutrals — cream, sandy tan and camel — and each one has five pointed lobes with an openwork fan between the ribs, so light passes through the leaf while the raised vein lines stay solid. The discs sit between them like acorn caps, and their density is what anchors a runner that would otherwise be all air.
The leaf is the technical heart of this project. It starts at the stem, splits into five lobes worked outward, and each lobe is shaped with increases at the rib and chain spaces on either side, then finished with a sawtooth edging round that gives the serrated maple silhouette. Once you have made the first one and understand how the lobes relate to the center vein, the remaining eight go quickly. The discs are straightforward flat circles with a back-loop final round that gives them a crisp rim.
Expect 20 to 26 hours: about 100 minutes per leaf, 45 minutes per disc, and four or five hours for joining and blocking. It is an advanced project because of the leaf construction and because the joining is an arrangement rather than a grid — the pieces overlap and interlock, and where each join falls is a judgment call. The palette is neutral enough to leave out from September through November without looking like a holiday decoration.
Materials
- Worsted weight cotton in cream approx. 260 m (about 140 g) — 4 leaves
- Worsted weight cotton in sandy tan approx. 200 m (about 110 g) — 3 leaves
- Worsted weight cotton in camel approx. 140 m (about 75 g) — 2 leaves
- Worsted weight cotton in dark chocolate brown approx. 220 m (about 120 g) — 4 discs
- 4 mm crochet hook US G-6
- Tapestry needle blunt tip, large enough for worsted cotton
- Rustproof pins 60+; the leaf points need one pin each
- Blocking mats or a towel-covered board at least 110 x 45 cm
- Stitch markers 10-12, essential for marking the five lobes
- Spray starch optional, for holding the leaf points crisp
- Measuring tape and small sharp scissors
Abbreviations
begbeginningchchaindcdouble crochethdchalf double crochetMRmagic ringreprepeatrnd(s)round(s)RSright sidescsingle crochetskskipsl stslip stitchsp(s)space(s)st(s)stitch(es)trtreble crochetWSwrong sideGauge and sizing
- Gauge: 14 sc and 16 rows = 10 cm x 10 cm, blocked.
- One finished maple leaf measures approximately 20 cm from the widest point to the opposite widest point, and 22 cm from stem tip to top lobe tip.
- One finished disc measures 15 cm across.
- Finished runner: approximately 105 cm long by 38 cm wide at its widest, measured to the outer leaf points.
- All instructions use US crochet terminology.
- To lengthen, add units in repeating sets of 2 leaves and 1 disc — each set adds about 24 cm.
Maple leaf: base and lobes (make 9 — 4 cream, 3 sandy tan, 2 camel)
- Row 1 (RS): Ch 8. Sc in 2nd ch from hook and in each ch across. Turn. (7 sc)
- Row 2: Ch 1, sc in first sc, 2 sc in next sc, sc in next 3 sc, 2 sc in next sc, sc in last sc. Turn. (9 sc)
- Row 3 (lobe division): Ch 1, sc in first sc, *ch 3, sk next sc, sc in next sc; rep from * 3 more times. Turn. (5 sc, 4 ch-3 sps) The 5 sc are the base of the 5 lobes. Place a stitch marker in each one.
- Row 4: Ch 1, 2 sc in first marked sc, *3 sc in next ch-3 sp, 3 sc in next marked sc; rep from * across, ending with 3 sc in the last ch-3 sp and 2 sc in the last marked sc. Turn. (25 sc: the center 3 lobes have 3 sc each, the 2 outer lobes 2 sc each, with 3 sc between)
- Row 5: Ch 1, working across, *sc in each sc up to the marked center st of the lobe, 3 sc in the marked st, sc in each remaining sc of the lobe, ch 2, sk next sc; rep from * for each of the 5 lobes, omitting the final ch 2. Turn. (35 sc, 4 ch-2 sps) Move each marker up into the center st of its 3-sc increase.
- Rows 6-11: Rep Row 5, working ch 2 and skipping 1 sc between lobes each time, and working 3 sc into each marked center st. Each row adds 2 sc per lobe, 10 sc per row. (Row 6: 45 sc. Row 7: 55 sc. Row 8: 65 sc. Row 9: 75 sc. Row 10: 85 sc. Row 11: 95 sc)
- Row 12 (shape the lobe points): Ch 1, *sc in each sc of the lobe to 2 sts before the marker, sk 1 sc, 3 sc in the marked st, sk 1 sc, sc in each remaining sc of the lobe, ch 2, sk next sc; rep from * for each lobe, omitting the final ch 2. Turn. (95 sc, 4 ch-2 sps)
- Row 13: Rep Row 12. (95 sc) The lobes now taper rather than widen, forming the points.
- Row 14: Ch 1, *sc in each sc of the lobe to 3 sts before the marker, sk 2 sc, 3 sc in the marked st, sk 2 sc, sc in each remaining sc of the lobe, ch 2, sk next sc; rep from * for each lobe, omitting the final ch 2. Turn. (75 sc, 4 ch-2 sps)
- Do not fasten off. The leaf body is complete and should measure about 18 cm across. Continue directly into the edging.
Maple leaf: veins and edging
- Edging Rnd 1: Ch 1, work sc evenly around the entire leaf: sc in each sc along the top edge of each lobe, 3 sc in each lobe point, 2 sc into each ch-2 sp between lobes, 2 sc into the end of each row down the two side edges, and 3 sc in each stem corner. Sl st to first sc. (approximately 176 sc; the exact number depends on your row-end tension, and any small difference will not be visible)
- Edging Rnd 2 (sawtooth): Ch 1, sc in first sc, *sc in next sc, (sl st, ch 2, sc) in next sc; rep from * around, working 3 sc in the center st of each lobe point so the point stays sharp, sl st to first sc. The repeating small spikes give the serrated maple edge.
- Fasten off, leaving a 50 cm tail for joining.
- Center veins: with the same color, work a line of surface slip stitch up the center of each lobe, starting at the leaf base and running to the lobe point. Insert the hook from the front, pull a loop through, and continue stitch by stitch. Five veins per leaf, one per lobe.
- Side veins: work 2 short surface slip stitch lines on each side of the center lobe vein, angling outward and upward, on the three largest lobes only. That is 12 side veins per leaf.
- Keep all surface slip stitches loose. Tight veins pucker the lobe and the leaf will not lie flat afterward.
- Stem: with the same color, join at the bottom of the leaf base, ch 10, sl st in 2nd ch from hook and in each ch across, sl st into the leaf base. Fasten off and weave in.
- The finished leaf should measure about 20 cm across after blocking. Make 9 in total: 4 cream, 3 sandy tan, 2 camel.
Chocolate disc (make 4)
- Rnd 1: With dark brown, MR, ch 1, 8 sc in ring, pull ring closed, sl st to first sc. (8 sc)
- Rnd 2: Ch 1, 2 sc in each sc around, sl st to first sc. (16 sc)
- Rnd 3: Ch 1, *sc in next sc, 2 sc in next sc; rep from * around, sl st to first sc. (24 sc)
- Rnd 4: Ch 1, *sc in next 2 sc, 2 sc in next sc; rep from * around, sl st to first sc. (32 sc)
- Rnd 5: Ch 1, *sc in next 3 sc, 2 sc in next sc; rep from * around, sl st to first sc. (40 sc)
- Rnd 6: Ch 1, *sc in next 4 sc, 2 sc in next sc; rep from * around, sl st to first sc. (48 sc)
- Rnd 7: Ch 1, *sc in next 5 sc, 2 sc in next sc; rep from * around, sl st to first sc. (56 sc)
- Rnd 8: Ch 1, *sc in next 6 sc, 2 sc in next sc; rep from * around, sl st to first sc. (64 sc)
- Rnd 9: Ch 1, *sc in next 7 sc, 2 sc in next sc; rep from * around, sl st to first sc. (72 sc)
- Rnd 10: Ch 1, *sc in next 8 sc, 2 sc in next sc; rep from * around, sl st to first sc. (80 sc)
- Rnd 11: Ch 1, *sc in next 9 sc, 2 sc in next sc; rep from * around, sl st to first sc. (88 sc)
- Rnd 12: Ch 1, *sc in next 10 sc, 2 sc in next sc; rep from * around, sl st to first sc. (96 sc)
- Rnd 13: Ch 1, working in back loops only, sc in each sc around, sl st to first sc. (96 sc) The back-loop round creates the raised rim visible around each disc.
- Rnd 14: Ch 1, working in both loops, sc in each sc around, sl st to first sc. (96 sc)
- Fasten off, leaving a 50 cm tail for joining. The disc should measure 15 cm across, blocked. Make 4.
Layout and joining
- Block all 9 leaves and all 4 discs before joining. Pin each leaf point out individually so the lobes stay sharp, and pin each disc to a true 15 cm circle. Let everything dry completely.
- Lay the pieces out on your blocking surface in this order from top to bottom: 1 camel leaf pointing up at the top; a pair of cream leaves angled outward; disc 1; a cream leaf and a camel leaf angled outward; disc 2; a tan leaf and a cream leaf angled outward; disc 3; a tan leaf and a tan leaf angled outward; disc 4 at the bottom.
- Angle each leaf pair so the two stems meet near the center line and the lobes fan outward toward the sides, with the discs sitting in the gap the stems leave.
- Overlap each leaf onto its neighboring disc by about 3 cm, with the leaf on top and the disc beneath. Keep this order consistent throughout — leaves always over discs — or the runner will look accidental rather than layered.
- Pin everything down before sewing a single stitch. Step back, look at the whole arrangement, and adjust the colors so no two leaves of the same shade sit adjacent.
- Join with a tapestry needle and the tail of the upper piece: whip stitch along the overlap, catching the edging round of the leaf and the outer round of the disc, working across a span of about 12 stitches.
- Where two leaves touch one another, join them the same way across a span of about 8 stitches, choosing a point where a lobe edge meets a lobe edge rather than a point meeting a flat edge.
- Keep every seam loose enough to lie flat. A tight join pulls a leaf out of shape and the runner will buckle at that point.
- Work down the runner one join at a time, checking after each that the pieces below are still where you pinned them.
- Secure each seam with two small backstitches on the wrong side and weave the tail into the back of the leaf, not across an open space where it would show.
Finishing
Give the assembled runner a final block once every join is sewn. Mist it with water rather than soaking, then pin the whole thing out flat, starting with the center line of discs so the spine is straight, and working outward to the leaf points. Every lobe point gets its own pin, pulled gently outward so the tip stays sharp rather than rounding off.
Check the back once it is pinned. Loose tails between pieces show badly on a runner with this much open space between motifs, so trim anything that has worked its way loose and re-weave it into a solid area.
Let it dry fully, at least twelve hours. If you want the leaf points to hold their shape more firmly, mist lightly with spray starch while still pinned and let it dry a second time — cotton leaves this large will soften at the tips over a season of handling otherwise.
Store the runner rolled around a cardboard tube rather than folded. A crease across a leaf lobe is difficult to block out, and folding tends to bend the points permanently. Hand wash in cool water with mild detergent, squeeze out in a towel without wringing, and re-block flat while damp — never hang it, since the joins will stretch under the weight of the pieces below.
Tips for Success
- Use five stitch markers from Row 3 onward and move them every single row. The lobe centers are where all the shaping happens, and once you lose them mid-leaf there is no way to find them again without ripping back.
- Count 95 sc at the end of Row 11 on every leaf. That is the widest point, and if one leaf comes in at 93 or 97 it will be visibly a different size from the other eight once they are laid side by side.
- Make all four discs in one sitting. Tension drifts between sessions, and four circles that differ by even 5 mm will look uneven down the center line of the runner.
- Work the surface slip stitch veins before joining anything. Once a leaf is sewn to its neighbors you cannot get the hook underneath the fabric cleanly, and the veins are what make this read as a maple leaf rather than a five-pointed star.
- Block every piece individually before joining. This runner has no backing to hide unevenness, so each motif has to be right on its own.
Common Mistakes to Avoid
- Working the ch-2 spaces between lobes into the wrong position. They must fall in the valley between two lobes, directly above the previous row’s ch-2. If they drift sideways, the lobes fuse together and the leaf comes out as a fan rather than five distinct points.
- Skipping the decreases in Rows 12 to 14. Without them the lobes keep widening and end up blunt and rounded. The leaf has to narrow at the tips, and those three rows are what create the taper.
- Discs that cup or ruffle. Cupping means you missed an increase round; ruffling means you added one too many. Count the stitches at the end of each round against the pattern — the number should always be the round number times 8.
- Pulling the surface slip stitch veins tight. Tight veins gather the lobe into a ridge that no amount of blocking will flatten. The vein should sit on the surface with a little slack, not bite into the fabric.
- Joining without pinning the whole layout first. This runner is an arrangement, not a grid, and the third join will look wrong if you did not check it against the ninth before you started. Pin everything, then sew.
Ways to Customize This Pattern
- Work the same nine leaves in rust, burnt orange and gold with the discs in deep brown for a fully saturated autumn version, using exactly the same construction.
- Make a single leaf with its stem as a placemat or a set of four as coasters — the leaf is already stiff enough to hold its shape under a plate once blocked.
- Swap all four discs for a fifth and sixth pair of leaves. The runner becomes lighter and more open, though it loses the visual anchor the brown provides down the center.
- Work the discs in a textured stitch — front post double crochet rounds or a spiral of surface slip stitch — to suggest acorn caps rather than plain circles.
- Add a set of two leaves and one disc for a 129 cm runner, keeping the color rotation going so no two adjacent leaves match.
Frequently asked questions
The ch-2 spaces between lobes are not stacking. Each row’s ch-2 must sit directly above the previous row’s ch-2, in the valley between lobes — if you work it one or two stitches off, the gap closes and the lobes fuse. Count the stitches on each side of the ch-2 before you work it, and make sure the count matches on both sides of every valley.
You can, but the leaves lose most of their character. The open fan between the ribs already suggests structure, and the veins are what turn that into something recognizably maple. If the surface slip stitch feels awkward, an alternative is to embroider straight stitches in the same color with a tapestry needle — the effect is slightly flatter but much easier to control.
Yes. Hold the two pieces with edges overlapping and work a row of slip stitch through both fabrics along the overlap, using the upper piece’s color. It is faster than sewing, but the seam is stiffer and much harder to adjust if the layout shifts, so only do this once every piece is blocked and you are certain of the arrangement.
It will if every piece is blocked individually before joining and every seam is sewn loosely. The failure mode is tight seams, which pull adjacent pieces into each other and make the whole runner ripple. If yours is not lying flat after blocking, find the join that is pulling hardest, undo it, and redo it with more give.
Cotton points will soften over time with handling. Spray starch applied while the runner is pinned during blocking holds them crisp for a season, and re-blocking after each wash restores them. If you want a more permanent solution, work the edging round with a hook a half size smaller than the body, which makes the outer edge denser and less inclined to relax.
The finished Maple Leaf and Acorn Disc Table Runner

