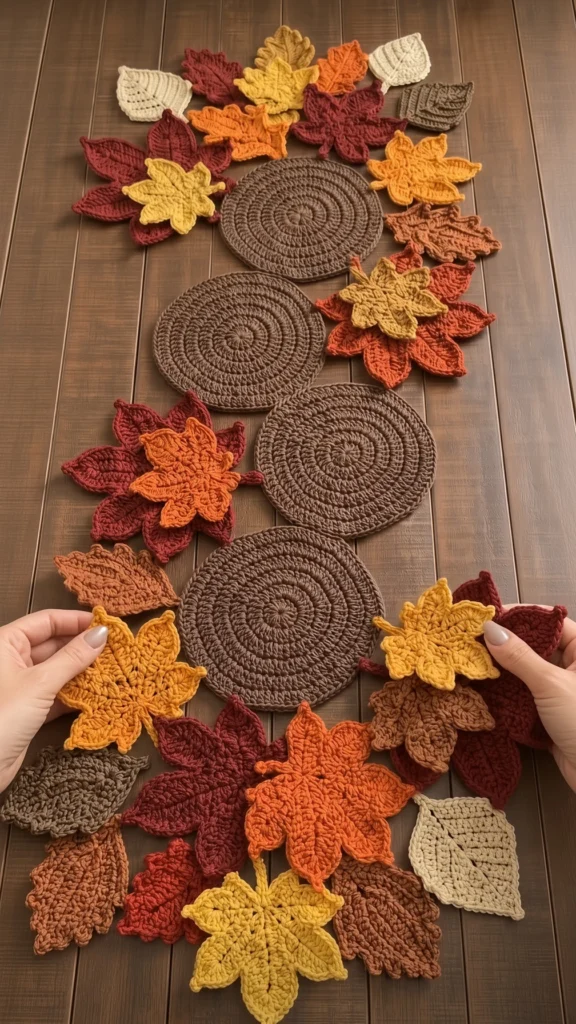
Maple Leaf and Wood Slice Crochet Table Runner
Beginner Friendly
Perfect for those just starting their crochet journey, with clear instructions and simple techniques
Single-Day Project
A satisfying project you can complete in a single afternoon or evening.
Handmade Gift
A beautiful keepsake — free forever. Read online or print at home.
About This Maple Leaf and Wood Slice Crochet Table Runner
This maple leaf crochet table runner pattern has no backing fabric and no mesh base. Four large brown discs run down the center like slices cut from a log, worked in tight spiral rounds so the growth rings show, and everything else is built outward from them: broad five lobed maple leaves, small layered star maples in two colors, and toothy beech leaves with picot edges. The motifs are sewn to each other and to the discs, which is what gives the runner its irregular, scattered outline instead of a straight edge.
The discs are the anchor of the design in more than one sense. They carry the weight, they set the total length, and they are the only pieces where your gauge really matters, since four of them end to end determine how long the runner comes out. They are also the easy part. Fourteen rounds of single crochet with the increases staggered so no spoke lines appear, and each one takes under an hour. The leaves are where the time goes, and there are twenty four of them across three different constructions.
Plan on 16 to 20 hours. This is a good project for someone who is comfortable working spokes and chained points, and who does not mind a long fiddly layout session at the end, because the arrangement is genuinely the design here. Everything is portable except the final assembly. If you have never made a chained spoke leaf before, work one large maple all the way through, including the veins, before you commit to the whole set.
Materials
- Worsted weight cotton, walnut brown 200 g — the four spiral discs
- Worsted weight cotton, burnt orange 50 g — maple leaves and star maples
- Worsted weight cotton, deep burgundy 50 g — maple leaves
- Worsted weight cotton, mustard gold 50 g — maple leaves and star maples
- Worsted weight cotton, golden yellow 40 g — star maples and one maple leaf pair
- Worsted weight cotton, rust 40 g — maple and beech leaves
- Worsted weight cotton, chestnut brown 30 g — beech leaves
- Worsted weight cotton, olive grey 30 g — beech leaves
- Worsted weight cotton, taupe 30 g — beech leaves
- Worsted weight cotton, cream 30 g — beech leaves
- 3.5 mm crochet hook
- 3.0 mm crochet hook for surface slip stitch veins
- Tapestry needle blunt tip
- Stitch markers at least 2, one for the disc round marker
- Blocking mat and rustproof pins you need room for a 110 cm layout
- Spray starch optional
Abbreviations
MRmagic ringchchainsl stslip stitchscsingle crochethdchalf double crochetdcdouble crochetincincrease (2 sc in the same stitch)sc2togsingle crochet 2 stitches togetherBLOback loops onlypicotch 2, sl st in the first of those 2 chst(s)stitch(es)rndroundreprepeatFOfasten off( ) x6work the sequence in brackets 6 timesGauge and Motif Count
- Gauge: 16 sc and 18 rounds measure 10 x 10 cm in continuous rounds. A finished disc measures about 18 cm across.
- Make 4 spiral wood discs in walnut brown.
- Make 8 large maple leaves: 2 burnt orange, 2 deep burgundy, 2 mustard gold, 2 rust.
- Make 6 layered star maples, each one large star plus one small star in a contrasting color.
- Make 10 oval beech leaves: 2 cream, 2 taupe, 2 olive grey, 2 rust, 2 chestnut brown.
- Total 24 leaf motifs plus 4 discs. The discs sit in a line down the center and everything else fills in around them.
Spiral Wood Disc (make 4)
- Work in continuous rounds with walnut brown. Do not join or turn. Place a marker in the first stitch of each round and move it up as you go.
- Rnd 1: 6 sc in MR. (6 sts)
- Rnd 2: inc in each st around. (12 sts)
- Rnd 3: (sc in next st, inc) x6. (18 sts)
- Rnd 4: (sc in next 2 sts, inc) x6. (24 sts)
- Rnd 5: (sc in next 3 sts, inc) x6. (30 sts)
- Rnd 6: (sc in next 4 sts, inc) x6. (36 sts)
- Rnd 7: (sc in next 5 sts, inc) x6. (42 sts)
- Rnd 8: (sc in next 6 sts, inc) x6. (48 sts)
- Rnd 9: (sc in next 7 sts, inc) x6. (54 sts)
- Rnd 10: (sc in next 8 sts, inc) x6. (60 sts)
- Rnd 11: (sc in next 9 sts, inc) x6. (66 sts)
- Rnd 12: (sc in next 10 sts, inc) x6. (72 sts)
- Rnd 13: (sc in next 11 sts, inc) x6. (78 sts)
- Rnd 14: (sc in next 12 sts, inc) x6. (84 sts)
- Rnd 15 (raised rim): working in BLO, sc in each st around. (84 sts) Sl st to the next st. FO, leaving a 40 cm tail.
- Staggering the increases: on rounds 5, 7, 9, 11 and 13, work 3 or 4 plain sc before you begin the bracketed repeat, then finish the round with the leftover plain stitches. The round total stays exactly the same, but the increases no longer stack in six straight lines and the disc reads as growth rings rather than a hexagon.
- The disc will start to cup slightly around round 10. That is normal and blocking will flatten it. If it cups badly and will not press out, your increases are landing in the wrong place, not too few.
Large Maple Leaf (make 8)
- Stem: ch 7. All five spokes are worked from the last chain of this stem, which becomes the leaf base.
- Spoke 1 (short): ch 8, then working back along that chain: sl st in 2nd ch from hook, sc in next 2 ch, hdc in next 2 ch, dc in next 2 ch. (7 sts) Sl st into the leaf base.
- Spoke 2 (medium): ch 10, then working back: sl st in 2nd ch from hook, sc in next 3 ch, hdc in next 3 ch, dc in next 2 ch. (9 sts) Sl st into the leaf base.
- Spoke 3 (long, center): ch 12, then working back: sl st in 2nd ch from hook, sc in next 4 ch, hdc in next 4 ch, dc in next 2 ch. (11 sts) Sl st into the leaf base.
- Spoke 4 (medium): work exactly as Spoke 2. (9 sts) Sl st into the leaf base.
- Spoke 5 (short): work exactly as Spoke 1. (7 sts) Sl st into the leaf base. You now have five spokes fanning out from one point, 43 stitches in total, in the order short, medium, long, medium, short.
- Rnd 2 (outline): ch 1. Working around the outside of the whole leaf, starting up the free chain loops of Spoke 5: sc in the free loop of each ch to the tip, (sc, ch 2, sc) in the tip loop, sc in each st down the worked side back to the base, then sc2tog over the base st of that spoke and the base st of the next spoke. Rep this sequence around all five spokes, working the ch-2 picot at each of the five tips and a sc2tog in each of the four valleys between spokes. Finish with sc down both sides of the stem and sl st to the first sc. (87 sc and 5 ch-2 tips)
- FO, leaving a 30 cm tail.
- Veins: with the 3.0 mm hook and a 40 cm length of the same color, work a line of surface slip stitches from the leaf base up the center of the long spoke, then up the center of each medium spoke. Three veins per leaf. Fasten the ends on the back and trim.
- Repeat 8 times: 2 burnt orange, 2 deep burgundy, 2 mustard gold, 2 rust.
Layered Star Maple (make 6)
- Each star maple is two separate motifs stacked and rotated, a nine point base star with a six point top star in a contrasting color. Suggested pairings: burnt orange base with mustard gold top for three of them, and mustard gold base with golden yellow top for the other three.
- Base star, Rnd 1: 6 sc in MR. (6 sts)
- Base star, Rnd 2: ch 1, 2 sc in each st around, sl st to first sc. (12 sts)
- Base star, Rnd 3: ch 1, (sc in next st, inc) x6, sl st to first sc. (18 sts)
- Base star, Rnd 4 (points): ch 1, *ch 7, then working back along that chain: sl st in 2nd ch from hook, sc in next 2 ch, hdc in next 2 ch, sc in last ch, then sl st in the next 2 sts of Rnd 3; rep from * 8 more times, sl st to the base of the first point. (9 points, 2 sts of Rnd 3 used per point) FO, leaving a 30 cm tail.
- Top star, Rnd 1: with the contrast color, 6 sc in MR. (6 sts)
- Top star, Rnd 2: ch 1, 2 sc in each st around, sl st to first sc. (12 sts)
- Top star, Rnd 3 (points): ch 1, *ch 6, then working back along that chain: sl st in 2nd ch from hook, sc in next 2 ch, hdc in next ch, sc in last ch, then sl st in the next 2 sts of Rnd 2; rep from * 5 more times, sl st to the base of the first point. (6 points, 2 sts of Rnd 2 used per point) FO, leaving a 25 cm tail.
- Stack the top star centrally on the base star and rotate it so its six points fall into the gaps between the nine points below. Sew through the two centers with the top star’s tail, then tack each top point down about a third of the way along so the tips stay free and lift.
- Repeat 6 times.
Oval Beech Leaf (make 10)
- Rnd 1: with your chosen color, ch 13. Sl st in 2nd ch from hook, sc in next ch, hdc in next 2 ch, dc in next 4 ch, hdc in next 2 ch, sc in next ch, 3 sc in the last ch (this is the leaf point). Now working along the opposite side of the same foundation chain: sc in next ch, hdc in next 2 ch, dc in next 4 ch, hdc in next 2 ch, sc in next ch, sl st in the last ch. Sl st to the first sl st to join. (25 sts)
- Rnd 2: ch 1, working in BLO, sc in each st around, placing 3 sc in the center st of the 3-sc point. Sl st to first sc. (27 sts) The unworked front loops of Rnd 1 form the raised central vein.
- Rnd 3 (toothed edge): ch 1, *sc in next 3 sts, picot; rep from * around, sl st to first sc. (27 sc and 9 picots)
- Rnd 4 (stem): ch 5, sl st in 2nd ch from hook and in each ch back to the leaf base, sl st into the base st. FO, leaving a 25 cm tail.
- Side veins: with the 3.0 mm hook and a 30 cm length of the same color, work three short surface slip stitch lines angling out from the central vein on each half of the leaf, six in total. Keep them short, about four stitches each, so they read as veins and not as stripes.
- Repeat 10 times: 2 cream, 2 taupe, 2 olive grey, 2 rust, 2 chestnut brown.
Joining the Discs
- Block all four discs completely flat and dry before joining. A cupped disc will pull the finished runner into a curve that nothing else can correct.
- Lay the discs in a line, edge to edge, with about 1 cm of space between each pair. Slightly offset them left and right rather than stacking them in a dead straight column; the photo layout wanders a little, and it looks more natural.
- With walnut brown and the disc’s own long tail, join each pair with a short bridge: insert the hook into the rim of one disc, ch 4, sl st into the rim of the next disc directly opposite, then sl st back along the chain to the first disc and fasten securely.
- Work three of these bridges between each pair of discs, spaced about 2 cm apart across the contact area, so the join cannot hinge or twist. (9 bridges in total across the three gaps)
- Lift the joined strip by one end. It should hang without the discs flopping sideways. If they swing, add a fourth bridge to each gap.
Finishing
Block every leaf before you assemble anything. Pin the maple leaves with all five lobes pulled fully open and the picot tips stretched to a point, pin the star maples flat with their points radiating evenly, and pin the beech leaves so the two halves are symmetrical and the toothed edge lies flat rather than rolling. Spray with water or spray starch and leave everything to dry completely. Chained points curl toward the back if they are left unblocked, and once a leaf is sewn into the middle of the runner you cannot pin it open on its own.
Lay the joined disc strip down the center of your table, then arrange all 24 leaves around it. Work from the discs outward, letting the leaves overlap each other by about a third and pointing them outward and away from the center so the runner spreads rather than clumps. Keep the largest maples near the widest part of each disc and tuck the smaller star maples and beech leaves into the gaps. Check the color spread from a distance before you commit: the burgundies and rusts are heavy colors and it is easy to end up with a dark half and a bright half. Photograph the layout once you like it.
Sew from the discs outward, in the same order you laid the pieces down. Every leaf must be attached at a minimum of two points, either to a disc rim or to another leaf underneath it, otherwise the runner will sag and gap wherever the connection is single. Use each motif’s own long tail and small whip stitches through the back loops only, catching a stitch of the piece beneath rather than passing the needle through to the front. Attach maple leaves at the stem and at the base of two lobes. Attach beech leaves at the stem and near the point. Attach star maples through the base star only, so the top star stays free to lift.
Once everything is sewn, turn the runner over and check the back for any leaf held by a single stitch, then add a second anchor wherever you find one. Weave in all remaining ends, give the whole piece a final light steam under a cloth, and leave it overnight under a flat weight. If it will sit on a polished surface, sew a few small circles of non slip tape to the back of the discs, where the fabric is thickest and the tape will not show through.
Tips for Success
- Make one disc first and measure it, then make the other three back to back in the same session. Disc gauge drifts noticeably if you make one in January and the next in March, and four discs of slightly different sizes in a straight line is the first thing anyone will notice.
- Count the spokes on every maple leaf before you start Round 2. It has to be five, in the order short, medium, long, medium, short. A leaf with the long spoke off center is unusable and you will not spot it until the outline round is finished.
- Do the surface veins with the smaller 3.0 mm hook. It slides through the fabric far more easily than the 3.5 mm and produces a finer line that looks like a vein rather than a cord laid on top.
- Cut all your 25 to 40 cm assembly tails at the same time and leave them long. Twenty four leaves and four discs means twenty eight sewing tails, and rethreading fresh yarn for each one adds an hour to the finishing.
- Assemble on the table the runner is actually for. A layout that looks generous on the floor often turns out too wide once it is on a 90 cm table with plates on either side.
Common Mistakes to Avoid
- Stacking the disc increases in straight lines. If you work every round starting from the same point, the six increase columns line up and the disc becomes a visible hexagon instead of a circle. Shift the start of the bracketed repeat by a few stitches on the odd numbered rounds from Round 5 onward.
- Working Round 2 of the maple leaf without the valley decreases. Skipping the sc2tog between spokes leaves the leaf with flared, gappy gaps between lobes instead of the sharp notches a maple needs. There must be exactly four of them, one per valley.
- Attaching leaves at a single point. They rotate within a week of normal use and the runner develops holes between motifs. Two anchor points minimum, three for anything on the outer edge where it has less support.
- Sewing the top star of a star maple all the way down. The whole point of the layered construction is that the top star lifts off the base. Tack each top point only a third of the way along its length and leave the tips loose.
- Blocking after assembly instead of before. A finished runner cannot be pinned properly because the motifs overlap in three layers, and the leaves underneath dry creased. Block the pieces, then join.
Ways to Customize This Pattern
- Make a single disc centerpiece. One disc with six maple leaves, two star maples and four beech leaves around it gives a round mat about 40 cm across for the middle of a table, and the construction is identical.
- Stretch it to six discs. Add two more discs and roughly ten more leaves for a runner around 165 cm, which suits a long dining table. Keep the same ratio of about six leaves per disc so the density stays even.
- Change the discs to pumpkins. Work the same 14 round circle in burnt orange, then add five vertical surface slip stitch ribs from center to rim and a small green stem sewn at the top edge. The leaves stay exactly as written.
- Swap the palette to spring. Fresh green, lime and sage maples with cream and pale grey beech leaves, over discs in oatmeal instead of walnut, turns the same pattern into a spring runner without changing a single stitch count.
- Turn the discs into trivets. Work Round 15 in both loops instead of BLO, add a second Round 16 of sc, and use each disc on its own as a hot pad. Two rounds of extra fabric make them thick enough to protect a table.
Frequently asked questions
Yes, provided you follow the two anchor point rule. The strength comes from the discs, which are dense and heavy, and from the overlapping leaves each being sewn to two neighbors. What fails is a leaf attached by one stitch at the outer edge with nothing beneath it. Before you weave in your ends, turn the whole runner over and pull gently on every outer leaf. Anything that lifts away needs another anchor.
Waviness at the edge means too many increases for your tension, usually because you added an extra one somewhere and did not notice. Count Round 14: it must be exactly 84 stitches. If it is 86 or 88, that is the cause. Very slight rippling that flattens under a wet block is normal, but a disc with a genuinely frilled edge has to be unravelled back to the last round you can count accurately.
You can, but the leaves will look noticeably flatter and more like generic appliqué shapes. The veins are what make a maple read as a maple rather than a five pointed star, and on the beech leaves they break up what is otherwise a plain oval. If you want to save time, do the three main veins on the maple leaves and skip the six small side veins on the beech leaves, which are the least visible of the lot.
Hand wash only, in cool water with a mild detergent. The motifs are joined by sewn seams rather than a continuous fabric, so machine agitation strains every one of those joins. Squeeze out the water without wringing, lay the runner flat on a towel, reshape the maple lobes and beech points with your fingers, and let it dry completely flat. Expect to spend ten minutes reshaping, which is the trade off for a runner with no straight edges.
Cotton is strongly preferred here because the discs need body and the chained leaf points need to hold their shape. Acrylic discs go floppy at 18 cm across and the maple lobes droop instead of standing out. If acrylic is what you have, drop to a 3.25 mm hook for a firmer fabric and consider working an extra round on each disc for weight, but accept that the leaves will need a careful steam block and will soften again over time.
The finished Maple Leaf and Wood Slice Crochet Table Runner

