Maple the Goose Amigurumi Pattern
Beginner Friendly
Perfect for those just starting their crochet journey, with clear instructions and simple techniques
Single-Day Project
A satisfying project you can complete in a single afternoon or evening.
Handmade Gift
A beautiful keepsake — free forever. Read online or print at home.
About This Maple the Goose Amigurumi Pattern
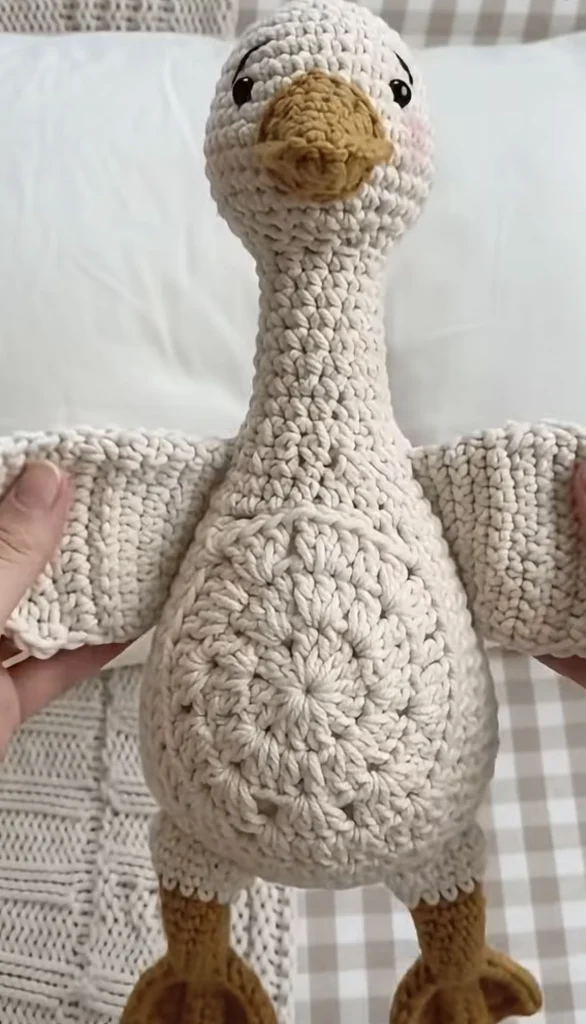
This goose amigurumi pattern makes Maple, a tall cream goose with a long neck, a granny circle sewn onto her belly, flat ribbed wings and webbed mustard feet. The head, neck and body are worked as one continuous piece, so the neck flows into the shoulders without a seam. A row of tiny picots around the base finishes her off.
Plan on 10 to 12 hours, spread over a few sittings. The one-piece body takes about half that time, and the rest goes into the medallion, wings, beak, legs and assembly. She stands about 45 cm tall including her legs, which suits a nursery shelf, a reading chair or a gift for someone who loves farmhouse decor.
This is an advanced pattern. You will shape a long tube with gradual increases, work a granny circle in double crochet, build ridged wings in back loops, and join three toes into a single webbed foot. If you have made a few amigurumi and can keep track of a stitch marker over many rounds, you are ready.
Materials
- Worsted weight cotton, cream about 150 g (260 m)
- Worsted weight cotton, mustard about 30 g (50 m)
- 3.5 mm crochet hook
- 9 mm black safety eyes 1 pair
- Black embroidery thread for the eyelid lines
- Pink embroidery floss for the cheeks
- Polyester fiberfill about 200 g
- Poly pellets in a small nylon pouch optional, for weight in the base
- Stitch markers, sewing pins and a tapestry needle
Abbreviations
MRmagic ringchchainsl stslip stitchscsingle crochetdcdouble crochetinc2 sc in the same stitchdecinvisible decrease (sc2tog through front loops)BLOback loop onlyFLOfront loop onlyspspacest(s)stitch(es)reprepeatHead and Neck (Cream, one piece with the body)
- Round 1: 6 sc in MR. (6)
- Round 2: inc in each st around. (12)
- Round 3: [sc, inc] 6 times. (18)
- Round 4: [2 sc, inc] 6 times. (24)
- Round 5: [3 sc, inc] 6 times. (30)
- Round 6: [4 sc, inc] 6 times. (36)
- Round 7: [5 sc, inc] 6 times. (42)
- Round 8: [6 sc, inc] 6 times. (48)
- Rounds 9–18: sc in each st around. (48)
- Insert the safety eyes between Rounds 11 and 12, 13 sts apart, centered on the side opposite the round’s starting point. Fasten the backs securely.
- Round 19: [6 sc, dec] 6 times. (42)
- Round 20: [5 sc, dec] 6 times. (36)
- Round 21: [4 sc, dec] 6 times. (30)
- Round 22: [3 sc, dec] 6 times. (24) Stuff the head firmly.
- Rounds 23–42 (neck): sc in each st around. (24) Stuff firmly every four or five rounds.
Body (Cream, continue from the neck)
- Round 43: [3 sc, inc] 6 times. (30)
- Rounds 44–45: sc in each st around. (30)
- Round 46: [4 sc, inc] 6 times. (36)
- Rounds 47–48: sc in each st around. (36)
- Round 49: [5 sc, inc] 6 times. (42)
- Round 50: sc in each st around. (42)
- Round 51: [6 sc, inc] 6 times. (48)
- Round 52: sc in each st around. (48)
- Round 53: [7 sc, inc] 6 times. (54)
- Round 54: [8 sc, inc] 6 times. (60)
- Round 55: [9 sc, inc] 6 times. (66)
- Round 56: [10 sc, inc] 6 times. (72)
- Rounds 57–72: sc in each st around. (72) Keep stuffing as you go.
- Round 73: sc BLO in each st around. (72) The unused front loops of Round 72 hold the picot trim later.
- Round 74: [10 sc, dec] 6 times. (66)
- Round 75: [9 sc, dec] 6 times. (60)
- Round 76: [8 sc, dec] 6 times. (54)
- Round 77: [7 sc, dec] 6 times. (48)
- Round 78: [6 sc, dec] 6 times. (42)
- Round 79: [5 sc, dec] 6 times. (36) If using pellets, place the pouch in the base now and add stuffing around it.
- Round 80: [4 sc, dec] 6 times. (30)
- Round 81: [3 sc, dec] 6 times. (24)
- Round 82: [2 sc, dec] 6 times. (18) Finish stuffing.
- Round 83: [sc, dec] 6 times. (12)
- Round 84: dec 6 times. (6) Fasten off, weave the tail through the front loops of the last round, pull closed and hide the end.
Base Picot Trim (Cream)
- Hold the body upside down. Join cream with sl st in any unused front loop of Round 72, just below the ridge made by Round 73.
- Ch 1, *sc FLO in next 2 sts, ch 3, sl st in 3rd ch from hook; rep from * 35 more times, join with sl st to first sc. (72 sc, 36 picots) Fasten off and weave in the ends.
Belly Medallion (Cream)
- Round 1: Ch 3 (counts as dc), 11 dc in MR, join with sl st to top of beg ch-3. (12 dc)
- Round 2: Ch 3 (counts as dc), dc in same st, 2 dc in each st around, join. (24 dc)
- Round 3: Ch 3 (counts as dc), dc in same st, ch 1, sk next st, *2 dc in next st, ch 1, sk next st; rep from * 10 more times, join. (12 groups of 2 dc, 12 ch-1 sps)
- Round 4: Sl st in next dc and into next ch-1 sp, ch 3 (counts as dc), 2 dc in same sp, ch 1, *3 dc in next ch-1 sp, ch 1; rep from * 10 more times, join. (12 groups of 3 dc, 12 ch-1 sps)
- Round 5: Sl st in next 2 dc and into next ch-1 sp, ch 3 (counts as dc), 3 dc in same sp, ch 1, *4 dc in next ch-1 sp, ch 1; rep from * 10 more times, join. (12 groups of 4 dc, 12 ch-1 sps)
- Round 6: Ch 1, sc in each dc and in each ch-1 sp around, join with sl st to first sc. (60 sc) Fasten off, leaving a long tail. Steam or wet-block the medallion flat.
Beak (Mustard)
- Upper beak, Round 1: 6 sc in MR. (6)
- Round 2: [sc, inc] 3 times. (9)
- Round 3: [2 sc, inc] 3 times. (12)
- Round 4: [3 sc, inc] 3 times. (15)
- Round 5: sc in each st around. (15)
- Round 6: [4 sc, inc] 3 times. (18)
- Round 7: sc in each st around. (18)
- Round 8: [5 sc, inc] 3 times. (21)
- Round 9: [6 sc, inc] 3 times. (24) Sl st in next st, fasten off with a long tail. Stuff lightly so the beak keeps a soft, rounded shape.
- Lower bill: Ch 8. Sc in 2nd ch from hook, sc in next 5 ch, 3 sc in last ch. Working along the other side of the foundation chain, sc in next 5 ch, 2 sc in last ch. (16) Join with sl st to first sc and fasten off, leaving a tail.
Wings (Cream, make 2)
- Ch 29.
- Row 1: Sc in 2nd ch from hook and in each ch across. (28)
- Rows 2–26: Ch 1, turn, sc BLO in each st across. (28) Do not fasten off.
- Fold the piece in half lengthwise so the first and last st of every row meet. The fold becomes the top edge of the wing, and the BLO ridges run across it.
- Edging: Ch 1. Working through both layers, sc in each row end along the bottom edge. (26 sc) Work 2 more sc in the same corner, then sc through both layers along the foundation edge to the fold. (14 sc) This closes the wing tip.
- Stuff very lightly through the open Row 26 edge, just enough to give a soft pillow feel. Fasten off with a long tail for sewing.
Legs and Feet (Mustard, make 2)
- Toes (make 3 per foot), Round 1: 4 sc in MR. (4)
- Round 2: [sc, inc] 2 times. (6)
- Rounds 3–4: sc in each st around. (6) Fasten off the first two toes. Keep the third toe on your hook.
- Round 5 (joining): Sc in next 3 sts of toe 3. Place toe 2 beside it and sc in the 3 sts facing you. Sc in all 6 sts of toe 1. Sc in the remaining 3 sts of toe 2, then the remaining 3 sts of toe 3. (18)
- Round 6: sc in each st around. (18)
- Round 7: [sc, dec] 6 times. (12) Use the toe tails to close the small gaps between the toes. Do not stuff the foot, so it stays flat and webbed.
- Rounds 8–22: sc in each st around. (12) Stuff the leg lightly as you go.
- Sl st in next st and fasten off with a long tail for sewing.
Finishing
Place a vertical line of stitch markers down the center front of the body, in line with the space between the eyes. Use it to center everything else. Pin the belly medallion with its top edge at about Round 49 and its bottom edge just above the picot trim, stretching it very slightly top to bottom for an oval shape. Whipstitch it on through the back loops of its last round, using the long tail.
Pin the upper beak centered between the eyes, with its top edge level with the eyes. Sew around the base and add a little stuffing before closing. Sew the lower bill flat underneath, so its rounded end peeks out just below the beak tip. Flatten the open edge of each wing vertically and sew it to the sides of the body between Rounds 52 and 60, so the wings stick out instead of lying flat. Sew the legs to the base at about Round 76, 8 sts apart on either side of center front, with the feet pointing forward.
With black thread, embroider a curved eyelid line above each eye using four or five short straight stitches. With pink floss, work three small horizontal stitches on each cheek, just below and outside each eye, for the blush. Weave in all remaining ends and give the neck a final shaping squeeze so the head sits upright.
Tips for Success
- Tear the fiberfill into small tufts before stuffing the neck. Large clumps leave lumps you can see through the stitches on a narrow tube.
- Use the invisible decrease through front loops on the head and base. The regular sc2tog leaves small gaps that show on cream yarn.
- Block the medallion flat before sewing it on. A blocked circle hugs the curve of the belly instead of popping up at the edges.
- Pin every piece and look at the goose from a few steps away before sewing. Small shifts in wing height or beak position change her expression a lot.
- Keep your tension tight on the body rounds. Cotton has no stretch to hide gaps, and loose stitches let stuffing show through.
Common Mistakes to Avoid
- Working Round 73 through both loops. Without the BLO ridge there is no clean line or front loops for the picot trim. Frog the round and rework it in back loops.
- Setting the eyes too close together. Maple looks cross-eyed. Count 13 sts between the posts before fastening the backs, because they cannot be removed afterward.
- A medallion that ruffles or cups. Recount the groups in Rounds 3 to 5; there should be exactly 12 groups each time. If the count is right but it still ruffles, drop half a hook size.
- Sewing the wings flat against the body. They disappear into the sides. Attach only the open short edge, so the wing stands out like in the photo.
- Stuffing the feet. They turn round instead of webbed. Leave them empty and let the leg stuffing start above Round 7.
Ways to Customize This Pattern
- Make a grey goose with an orange beak and feet, keeping the cream medallion for contrast.
- Tie a gingham ribbon bow at the base of the neck, or crochet a small scarf in rows of 6 sc.
- Replace the round medallion with a small granny square or a heart motif sewn on the belly.
- Use chunky cotton and a 4.5 mm hook to scale Maple up to about 55 cm for a nursery statement piece.
- For a baby-safe version, skip the safety eyes and pellets and embroider closed, sleepy eyes in black yarn instead.
Frequently asked questions
She is designed as a cuddle and shelf goose, so she sits or leans rather than standing on her feet. The pellet pouch in the base helps her sit upright against a pillow. For a standing display piece meant only for adults, you can run pipe cleaners up the legs into the base.
Yes. Worsted acrylic works at the same counts and makes her softer and lighter. Cotton gives crisper stitch definition on the medallion and the wing ridges, which is why the pattern calls for it.
The neck is almost always understuffed. Push small tufts of fiberfill up through the body with the back of a crochet hook or a chopstick, working from the head end downward. If the body is already closed, open the last few rounds of the base, add stuffing, and close again.
With worsted cotton and a 3.5 mm hook, Maple is about 45 cm tall including her legs, with a head about 7.5 cm across and a body about 11 cm across at the widest point.
The finished Maple the Goose Amigurumi Pattern