Mauve Heirloom Floral Crochet Bedspread Pattern
Advanced
For experienced crocheters who enjoy complex shaping, fine detail, and ambitious construction
Single-Day Project
A satisfying project you can complete in a single afternoon or evening.
Handmade Gift
A beautiful keepsake — free forever. Read online or print at home.
About This Mauve Heirloom Floral Crochet Bedspread Pattern
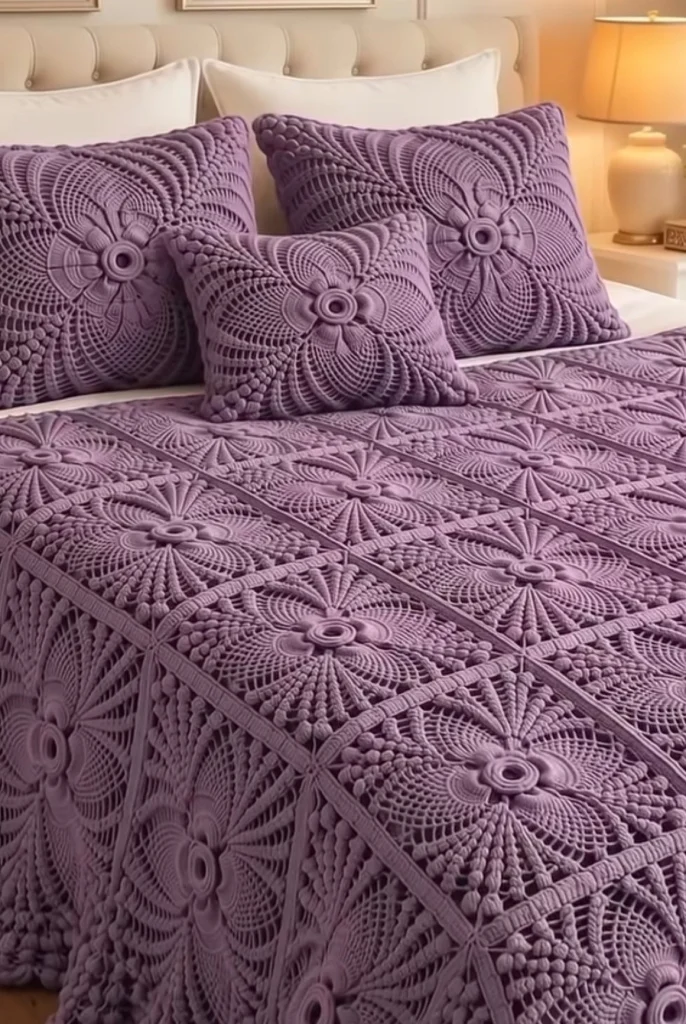
This floral crochet bedspread pattern recreates the dusty mauve color, dimensional flowers, open lace, and textured square construction of the pictured cover. The Mauve Heirloom Bedspread combines ring-centered flowers with radiating mesh, curved raised ribs, and small bobble panels. Everything is worked in one color so the texture remains the focus.
This is an advanced home-textile project for crocheters comfortable with lace shaping, applied details, and careful blocking. Allow approximately 100-140 hours for the full bedspread. The pattern makes thirty separate squares arranged five across and six down, with a narrow finishing border. The matching cushions shown in the photograph are not included.
Materials
- Dusty mauve DK cotton or cotton-blend yarn Approximately 3,000-3,400 g; 6,900-7,820 m at 230 m per 100 g. Use one dye lot.
- 3.5 mm crochet hook Or the size needed for the blocked motif gauge.
- Blunt tapestry needle For joining, attaching details, and securing ends.
- Locking stitch markers At least sixteen for marking the radial posts.
- Blocking mats and rust-resistant pins Large enough for several 36 cm squares.
- Measuring tape and scissors For checking motifs and preparing sewing lengths.
- Small amount of smooth contrasting waste yarn For temporary positioning marks only; remove completely.
Abbreviations
chchainsl stslip stitchscsingle crochethdchalf double crochetdcdouble crochettrtreble crochetincwork 2 sc in the same stitchinvdecinvisible decrease over the front loops of the next 2 stitchesMRmagic ringBLOback loop onlyRSright sideWSwrong sidest / stsstitch / stitchesspspaceBOfive-double-crochet bobble, defined belowPattern Notes, Gauge, and Special Techniques
- Use US crochet terminology. Work the circular and square foundations with the RS facing throughout. Only the small corner panels are turned.
- The target gauge is approximately 21 sc and 24 rows per 10 cm in a separate flat swatch. The decisive gauge is one completed square measuring 36 × 36 cm after washing and blocking. Change hook size if necessary.
- Make thirty foundations, 240 petals, thirty center collars, 120 corner panels, and 240 curved ribs. No stuffing, eyes, or facial details are used because this is a flat bedspread.
- For joined rounds, the starting ch 1 does not count as a stitch. When a round begins with dc or tr, replace its first stitch with ch 3 or ch 4 respectively; that starting chain counts as one stitch. Join to its top with a sl st. Joining slip stitches never count.
- For square rounds, begin inside a corner ch-2 sp. Slip stitch into that space after joining the preceding round. Work the entire corner group there before continuing along the following side.
- Square side counts include the stitches between two neighboring corner spaces, including the corner stitches facing that side. Corner ch-2 spaces are counted separately.
- To make BO: yarn over, insert the hook into the indicated stitch, draw up a loop, yarn over and draw through 2 loops; repeat this partial dc four more times in the same stitch. Yarn over and draw through all 6 loops. BO counts as one stitch. Gently push it toward the RS; do not add a closing chain.
- For reverse sc, work ordinary sc in the opposite direction around the edge without turning the fabric. Keep these stitches loose enough that the border remains flat.
Floral Square Foundation — Make 30
- Foundation: ch 12 and join with a sl st to form a ring, checking that the chain is not twisted.
- Round 1: ch 1, work 24 sc around the ring, and join. Keep the central opening visible. (24 sc)
- Round 2: ch 1, inc in every stitch, and join. (48 sc)
- Round 3: ch 1, sc in BLO of every stitch, and join. The unused front loops form a raised attachment line. (48 sc)
- Round 4: beginning in the first stitch, repeat the following eight times: dc in the next stitch, ch 5, skip 5 stitches. Join. (8 dc, 8 ch-5 spaces)
- Round 5: repeat the following eight times: dc in the next dc, ch 3, dc in the next ch-5 sp, ch 3. Join. Number the resulting posts 1-16 clockwise, beginning with the first dc. (16 dc, 16 ch-3 spaces)
- Round 6: dc in each dc, with ch 4 between neighboring posts. Join. Keep the same post numbering. (16 dc, 16 ch-4 spaces)
- Round 7: dc in each dc, with ch 5 between neighboring posts. Join. (16 dc, 16 ch-5 spaces)
- Round 8: dc in each dc, with ch 6 between neighboring posts. Join. (16 dc, 16 ch-6 spaces)
- Round 9: dc in each dc, with ch 7 between neighboring posts. Join. (16 dc, 16 ch-7 spaces)
- Round 10: dc in each dc, with ch 8 between neighboring posts. Join. (16 dc, 16 ch-8 spaces)
- Round 11: repeat sixteen times: dc in the next dc, work 7 dc around the next ch-8 sp. Join. Mark the stitch worked into each numbered post; these sixteen marked stitches retain post numbers 1-16. (128 dc)
- Round 12: begin in the first marked stitch. Repeat this complete sequence four times: work (3 tr, ch 2, 3 tr) in the next stitch; tr in the next stitch, 2 tr in the next stitch, tr in the next stitch; work (dc in the next stitch, 2 dc in the next stitch) twice; hdc in the next 5 stitches; sc in the next 7 stitches; hdc in the next 5 stitches; work (2 dc in the next stitch, dc in the next stitch) twice; tr in the next stitch, 2 tr in the next stitch, tr in the next stitch. Join. Each repeat consumes 32 old stitches. (172 stitches, 4 corner spaces; 43 stitches per side)
- Round 13: work (2 dc, ch 2, 2 dc) in each corner space and dc in every stitch between corners. Join. (47 dc per side, 4 corner spaces)
- Round 14: work (sc, ch 2, sc) in each corner space. Along each side, repeat (ch 1, skip 1 stitch, sc in the next stitch) twenty-three times, then ch 1 and skip the final stitch before the next corner. Join. (25 sc and 24 ch-1 spaces per side, plus 4 corner spaces)
- Round 15: work (sc, ch 2, sc) in each corner space. Along each side, ch 1, then sc in each of the twenty-four ch-1 spaces with ch 1 between successive sc; after the last sc, ch 1 before the next corner. Do not work into the old side sc. Join. (26 sc and 25 ch-1 spaces per side, plus 4 corner spaces)
- Round 16: work (2 dc, ch 2, 2 dc) in each corner space. Along each side, dc in every sc and work 1 dc in each ch-1 sp. Join. (55 dc per side, 4 corner spaces)
- Round 17: work (sc, ch 2, sc) in each corner space. Along each side, repeat (ch 1, skip 1 stitch, sc in the next stitch) twenty-seven times, then ch 1 and skip the final stitch. Join. (29 sc and 28 ch-1 spaces per side, plus 4 corner spaces)
- Round 18: work (sc, ch 2, sc) in each corner space. Along each side, ch 1, then sc in each of the twenty-eight ch-1 spaces with ch 1 between successive sc; ch 1 after the last sc. Join. (30 sc and 29 ch-1 spaces per side, plus 4 corner spaces)
- Round 19: work (2 dc, ch 2, 2 dc) in each corner space. Along each side, dc in every sc and work 1 dc in each ch-1 sp. Join. (63 dc per side, 4 corner spaces)
- Round 20: work (sc, ch 2, sc) in each corner space. Along each side, repeat (sc in the next 6 stitches, BO in the next stitch) nine times. Join. (65 stitches per side, including 9 bobbles; 4 corner spaces)
- Round 21: work (sc, ch 2, sc) in each corner space. Along each side, repeat (ch 1, skip 1 stitch, sc in the next stitch) thirty-two times, then ch 1 and skip the final stitch. Join. Treat each bobble top as one stitch when counting. (34 sc and 33 ch-1 spaces per side, plus 4 corner spaces)
- Round 22: work (sc, ch 2, sc) in each corner space. Along each side, ch 1, then sc in each of the thirty-three ch-1 spaces with ch 1 between successive sc; ch 1 after the last sc. Join. (35 sc and 34 ch-1 spaces per side, plus 4 corner spaces)
- Round 23: work (2 dc, ch 2, 2 dc) in each corner space. Along each side, dc in every sc and work 1 dc in each ch-1 sp. Join. (73 dc per side, 4 corner spaces)
- Round 24: work (sc, ch 2, sc) in each corner space and sc in every stitch between corners. Join and fasten off. (75 sc per side, 4 corner spaces)
Raised Flower Petals — Make 8 per Square
- Work each petal in a continuous spiral. Mark the first stitch of every round. Leave the petal unstuffed.
- Round 1: work 6 sc in MR. (6)
- Round 2: inc six times. (12)
- Round 3: repeat (sc, inc) six times. (18)
- Round 4: repeat (2 sc, inc) six times. (24)
- Round 5: sc in every stitch. (24)
- Round 6: repeat (2 sc, invdec) six times. (18)
- Round 7: repeat (sc, invdec) six times. (12)
- Round 8: invdec six times. Cut a 30 cm sewing tail, draw it through the front loops of the remaining stitches, and close. (6 before closing)
- Flatten the petal with its closing point at the inner end. Do not crease it sharply; the two fabric layers should retain a soft raised profile.
Raised Center Collar — Make 1 per Square
- Foundation: ch 12 and join into a ring without twisting.
- Round 1: ch 1, work 24 sc around the ring, and join. (24 sc)
- Round 2: ch 1, sc in every stitch, and join. Fasten off with a 40 cm sewing tail. (24 sc)
- Shape the collar into a rounded ring by gently rolling its outer edge toward the WS. Do not close or fill its central opening.
Textured Corner Panels — Make 4 per Square
- These small triangular panels are applied over the corner regions rather than inserted into the foundation. Begin with a 25 cm tail. Ch 1 at the start of each subsequent row does not count.
- Row 1: ch 2, sc in the second chain from the hook. Turn. (1 sc)
- Row 2: ch 1, work 3 sc in the stitch. Turn. (3 sc)
- Row 3: ch 1, work 2 sc in the first stitch, BO in the next stitch, and 2 sc in the last stitch. Turn. (5 stitches)
- Row 4: ch 1, work 2 sc in the first stitch, sc in the next 3 stitches, and 2 sc in the last stitch. Turn. (7 sc)
- Row 5: ch 1, work 2 sc in the first stitch; repeat (BO in the next stitch, sc in the next stitch) twice; BO in the next stitch; work 2 sc in the last stitch. Turn. (9 stitches)
- Row 6: ch 1, work 2 sc in the first stitch, sc in the next 7 stitches, and 2 sc in the last stitch. Turn. (11 sc)
- Row 7: ch 1, sc in the first 2 stitches; repeat (BO in the next stitch, sc in the next stitch) four times; sc in the last stitch. Fasten off with a 35 cm sewing tail. (11 stitches)
- Push all eight bobbles toward the same face. That face is the panel RS.
Curved Raised Ribs — Make 8 per Square
- For the first rib, temporarily mark a curved route beginning at Round 5, post 1; passing through Round 7, post 2 and Round 9, post 3; and ending at Round 11, marked post 4.
- For subsequent ribs, use starting posts 3, 5, 7, 9, 11, 13, and 15. Each route passes through the next post at Round 7, the following post at Round 9, and the third following post at Round 11. Continue numbering from 1 after post 16.
- Foundation: ch 32 loosely. Slip stitch in the second chain from the hook and in each remaining chain. Fasten off with sewing tails at both ends. (31 sl st)
- Check the first rib against its marked route before making the others. The cord must follow the curve without pulling the mesh or forming loose loops. If your chain tension differs, adjust the foundation chain to the measured route; the slip-stitch count is always one fewer than the starting chain count.
- Make eight matching ribs. Lay each one over its marked route and sew it down at the four marked points, then secure it at every intervening mesh intersection. Do not pull sewing stitches across open spaces. Keep all eight curves turning in the same direction.
Decorating and Blocking Each Square
- Lightly pin the foundation into a square before attaching the details. Identify the center of each side and the four corner diagonals with temporary waste-yarn marks.
- Place the eight petals around the central opening. Position their narrow closing ends evenly around Round 2, one at every sixth stitch. The rounded outer ends should reach approximately Round 6.
- Angle every petal slightly clockwise. Let the right edge of each petal overlap the left edge of the next, forming a continuous pinwheel. Pin all eight before sewing.
- Sew each inner end securely to the center disk. Add two small attachment stitches near each outer end, catching a radial post rather than a loose chain. Leave the broad side edges free so the petals stay raised.
- Position the center collar over the inner petal ends, aligned with the foundation opening. Sew through its outer underside and the petal bases. Keep the opening clear and the inner rolled edge raised.
- Attach the eight curved ribs using their numbered routes. Their inner ends may tuck beneath the petals, but the curves should remain visible outside the flower.
- Place one corner panel along each corner diagonal with Row 1 pointing inward. Center its narrow tip over Round 16 and its broad Row 7 edge near Round 20. Keep the panel clear of the outer joining edge.
- Sew each corner panel around its perimeter, taking small stitches into solid posts or stitch tops. Add two hidden central tacks to prevent lifting. Do not draw together the mesh beneath it.
- Wash or dampen the decorated square according to the yarn label. Pin it to 36 × 36 cm, keeping the corners square and the flower rounded. Allow it to dry fully before removing the pins.
Joining the Bedspread
- Arrange the thirty blocked squares five across and six down. Keep every flower and curved-rib arrangement oriented consistently. The unbordered layout measures approximately 180 × 216 cm.
- With RS facing upward, place neighboring squares edge to edge. Match all 75 side stitches and the corner spaces. Use small waste-yarn ties at the midpoint and quarter points to prevent shifting.
- Using matching yarn, mattress stitch the side edges together through corresponding outer stitch loops. Work one matched stitch pair at a time. Keep the seam firm enough to close the gap but flexible enough to lie flat.
- Join the five squares in each row, then join the six completed rows. Do not include the corner ch-2 spaces in the 75-stitch side seams.
- At each interior meeting point, pass a separate sewing length through all four corner spaces twice. Draw them together gently and secure the yarn on the WS without creating a hard knot.
- At each junction along the outer perimeter, tack the two neighboring corner spaces together. Treat that paired opening as one junction space when working the border.
Outer Border
- Round 1: join yarn in an outer corner space. Work (sc, ch 2, sc) in each of the four outer corners. Work 1 sc in every motif edge stitch and 1 sc through each paired junction space along the outer perimeter. Join. Each short side has five sets of 75 edge stitches, four junction stitches, and two corner stitches: 381 sc. Each long side has six sets of 75 edge stitches, five junction stitches, and two corner stitches: 457 sc. (1,676 sc, 4 corner spaces)
- Round 2: work (2 dc, ch 2, 2 dc) in each corner space and dc in every stitch between corners. Join. (385 dc per short side, 461 dc per long side; 1,692 dc and 4 corner spaces)
- Round 3: work (sc, ch 2, sc) in each corner space and sc in every stitch between corners. Join. (387 sc per short side, 463 sc per long side; 1,700 sc and 4 corner spaces)
- Round 4: ch 1 and, without turning, reverse sc in every stitch around, placing 2 reverse sc in each corner ch-2 sp. Join discreetly to the first reverse sc and fasten off. (1,708 reverse sc)
Finishing
Weave each end through several solid stitches on the wrong side, change direction, and pass through a second group of stitches before trimming. Check every petal, collar, rib, and corner panel for loose attachment points. Remove all temporary markers and waste yarn.
Give the completed bedspread a gentle final wash following the yarn label. Support its full weight when lifting it, then spread it flat to dry with the seams straight. Shape the border without flattening the flowers. The finished cover should measure approximately 184 × 220 cm, depending on your final gauge and border tension.
Tips for Success
- Keep a marker in each of the sixteen radial posts through Round 11. These markers make the curved-rib placement much easier to reproduce across thirty squares.
- Make a full-size 36 cm blocking guide. Matching the outer measurements matters more than making every open chain space look identical.
- Pin all eight petals before sewing any of them. Adjust the overlap around the whole flower rather than crowding the final petal into a narrow gap.
- Support lace intersections with a fingertip while attaching ribs and panels. A small sewing stitch should secure the detail without shortening the underlying mesh.
- Check yarn consumption after the first complete square. Multiply its weight by thirty, then allow extra for joining, the border, and a small reserve.
Common Mistakes to Avoid
- Counting the starting chain twice: the initial ch 3 or ch 4 replaces the first dc or tr. Do not also work an extra stitch into that same starting position unless the instructions specify a group.
- Working into old sc during mesh rounds: Rounds 15, 18, and 22 use the ch-1 spaces, not the intervening stitch tops. Working both produces too many stitches and a rippled edge.
- Making tight decorative ribs: a short rib pulls the circular lace into a crease. Measure the pinned route and adjust its chain length before sewing.
- Flattening the petals with perimeter stitching: attach the inner ends and outer tips only. Free side edges preserve the raised, overlapping flower.
- Skipping perimeter junctions: the border needs one sc through each paired junction space. Mark those junctions before starting so the published border counts remain correct.
Ways to Customize This Pattern
- For a smaller cover, arrange twenty squares four across and five down. At the same gauge, it measures approximately 148 × 184 cm with the border. Recalculate border stitches using 75 stitches per square edge, one per junction, and the stated corner groups.
- Keep the same construction but choose a slightly lighter or deeper mauve for a softer or more pronounced tonal effect.
- For a smoother drape, use a tightly plied cotton blend rather than a loosely spun yarn. Match the completed-square gauge before committing to the full quantity.
- Mirror every curved-rib route and reverse the petal overlap to make a counterclockwise version. Apply the change consistently to all thirty squares.
Frequently asked questions
No. It covers the large mauve bedspread only. The raised flower, open lace, and textured corner treatment are developed as flat bedspread squares.
The opening creates the ring-centered appearance visible in the reference. Both the foundation and the separate collar begin with a chain ring. Do not replace either ring with a tightly closed center.
Yes, but attaching 240 petals and the other details is easier while each square can lie independently on a table. Complete at least one decorated, blocked square first so its final gauge is established.
If it lies flat but is uniformly too small or too large, change hook size and remake the sample. If only one area ripples or pulls inward, check that round’s count and chain tension. Blocking should refine the shape, not force a substantial size change.
Follow the yarn label and avoid vigorous agitation. Support the wet cover rather than lifting it by a corner. Dry it flat, reshape the square seams, and gently lift the petal edges back into position.
The finished Mauve Heirloom Floral Crochet Bedspread Pattern

