Meadow Daisy Crochet Curtains Pattern
Advanced
For experienced crocheters who enjoy complex shaping, fine detail, and ambitious construction
Single-Day Project
A satisfying project you can complete in a single afternoon or evening.
Handmade Gift
A beautiful keepsake — free forever. Read online or print at home.
About This Meadow Daisy Crochet Curtains Pattern
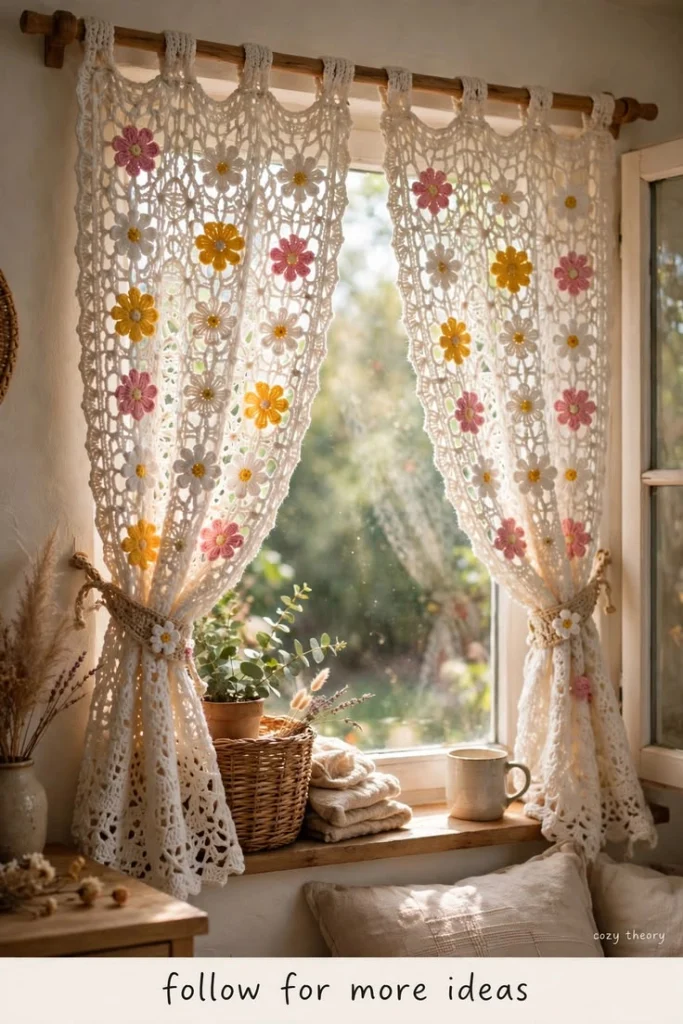
This daisy crochet curtain pattern frames a window with ivory lace and scattered flowers in warm white, dusty pink and golden yellow. Two long rectangular panels gather into crocheted tiebacks, creating the curved inner edges seen in the reference. Separate petals and embroidered flower centers give the surface detail without closing up the airy background.
Allow approximately 35–45 hours for the pair, including the filet panels, flower appliqués, reinforced hanging tabs and finishing. This advanced project suits crocheters comfortable with chart-style counting, working into chain spaces and carefully sewing motifs onto open lace. The instructions create an original interpretation of the photographed curtains, with dimensions controlled by a washed and blocked gauge swatch.
Materials
- Sport-weight cotton, approximately 250 m per 100 g Ivory: 1,800 m; warm white: 180 m; dusty pink: 140 m; golden yellow: 150 m. Allowances include swatching and finishing.
- Crochet hooks 3.0 mm for panels, tabs and tiebacks; 2.5 mm for flowers, or sizes needed for gauge.
- Tapestry needle and small embroidery needle For attaching flowers and working center details.
- Locking stitch markers At least 12, including four for marking filet repeats.
- Blocking mats, rustproof pins and measuring tape Block both panels to identical measurements.
- Curtain rod and two wall-mounted tieback hooks Rod diameter up to 3 cm; install hardware according to its manufacturer’s instructions.
- Scissors and contrasting waste yarn For cutting ends and marking flower placement.
Abbreviations
chchainsl stslip stitchscsingle crochethdchalf double crochetdcdouble crochettrtreble crochetMRmagic ringst / stsstitch / stitchesRSright sideGauge, Dimensions and Filet Method
- Use US crochet terminology. Panel gauge after washing, blocking and hanging: 8 filet cells and 10 rows = 10 × 10 cm with the 3.0 mm hook. One cell spans three stitch positions horizontally.
- For a swatch, ch 40. Row 1: dc in seventh ch from hook, then repeat (ch 2, skip 2 ch, dc in next ch) 11 times. You have 12 cells and 13 vertical posts, counting the starting chain as a post.
- Swatch Rows 2–16: ch 5, turn; dc in next post, then repeat (ch 2, dc in next post) 11 times. Work the last dc into the third chain of the previous turning chain. Measure the central 8 cells and 10 rows after finishing the swatch.
- An open cell is ch 2, skip the two intervening stitch positions, dc in the next boundary post. A filled cell is dc in each of the two intervening positions, then dc in the next boundary post. When the previous cell is open, work its two intervening dc into its ch-2 space.
- At the start of any patterned row, ch 3 counts as the first boundary post. Then work all 32 cells as specified. Turn after every row. Count cells from the working edge of the current row, regardless of which side faces you.
- Each unbordered panel measures approximately 40 × 121 cm. Side borders add approximately 1 cm per side; the bottom scallops add approximately 1 cm. Folded tabs project approximately 8 cm above the panel, making the total hanging length approximately 130 cm.
- A panel always has 32 cells, 33 boundary posts and 97 stitch positions across, whether its cells are open or filled. Flowers should measure approximately 5.5–6 cm across; tieback bands approximately 3 × 45 cm before edging.
Ivory Filet Panels — Make Two
- Row 1: with ivory and the 3.0 mm hook, ch 100. Dc in seventh ch from hook; repeat (ch 2, skip 2 ch, dc in next ch) 31 times. The skipped chains form the first post and first open space. Total: 32 open cells and 33 posts.
- Row 2: ch 3, turn. Across each group of 8 cells, fill cells 4 and 5; work all others open. Repeat this 8-cell sequence four times. Total: 8 filled cells, 24 open cells.
- Row 3: ch 3, turn. In each 8-cell group, fill cells 3 and 6; work all others open. Repeat four times. Total: 8 filled cells, 24 open cells.
- Row 4: ch 3, turn. In each 8-cell group, fill cells 2 and 7; work all others open. Repeat four times. Total: 8 filled cells, 24 open cells.
- Row 5: ch 3, turn. In each 8-cell group, fill cells 1 and 8; work all others open. Repeat four times. Total: 8 filled cells, 24 open cells.
- Row 6: repeat Row 4. Total: 8 filled cells, 24 open cells.
- Row 7: repeat Row 3. Total: 8 filled cells, 24 open cells.
- Row 8: repeat Row 2. Total: 8 filled cells, 24 open cells.
- Row 9: ch 3, turn; work all 32 cells open.
- Rows 10–121: repeat Rows 2–9 fourteen more times. This gives fifteen complete 8-row pattern repeats above the foundation row, for 121 rows total. Fasten off. Mark the top edge and designate one face as the RS.
Panel Borders and Bottom Scallops
- Border Round 1: with RS facing, join ivory at the upper-right corner. Work 97 sc across the top: 1 in each boundary post and 2 in each intervening cell. Ch 2 at the corner. Work 2 sc around each row-end post down the side: 242 sc. Ch 2.
- Continue Round 1: work 97 sc across the foundation edge, placing 1 under each post and 2 in each cell. Ch 2. Work 242 sc up the remaining side, then ch 2 and sl st to the first sc. Total: 678 sc and four ch-2 corners. Do not turn.
- Border Round 2: ch 1, sc in each of the 97 top-edge sc. Work (sc, ch 2, sc) in the corner space. Sc in each of the 242 side-edge sc, then work (sc, ch 2, sc) in the next corner space.
- Across the 97 bottom-edge sc, work sc in the first st, then repeat (skip 2 sts, 5 dc in next st, skip 2 sts, sc in next st) 16 times. This consumes 1 + 16 × 6 = 97 base stitches and makes 16 scallops.
- Complete Round 2: work (sc, ch 2, sc) in the next corner space, sc in each of the 242 remaining side-edge sc, then (sc, ch 2, sc) in the last corner space. Join to the first sc and fasten off. Total around this round: 606 sc, 80 dc and four ch-2 corners.
Reinforced Hanging Tabs — Make Eight
- Row 1: with ivory and the 3.0 mm hook, ch 9. Sc in second ch from hook and each remaining ch. Turn. Total: 8 sc.
- Rows 2–48: ch 1, sc in each st, turn. Total: 8 sc per row. Aim for a strip approximately 3 × 20 cm; wash and block to this measurement before attachment. Fasten off with a 60 cm sewing tail.
- Place four tabs on each panel. Along the original 97 top-edge stitches, mark groups 1–8, 31–38, 60–67 and 90–97. Center one tab over each marked group.
- Fold each strip in half crosswise. Overlap its two short ends by 2 cm down the back of the panel, leaving an approximately 8 cm projecting loop. Sew each end separately through the top border and into the upper filet posts, using two horizontal lines of backstitch and securing both side edges. Keep the loop opening clear.
Eight-Petal Daisy Appliqués — Make Thirty-Eight
- Use the 2.5 mm hook. Make 16 warm-white flowers, 12 dusty-pink flowers and 10 golden-yellow flowers. Reserve two of the white flowers for the tiebacks; the remaining 36 flowers decorate the panels.
- Center Round 1: with golden yellow, work 8 sc in MR. Pull closed and sl st to the first sc. Total: 8 sc. The joining sl st does not count as a stitch.
- Center Round 2: ch 1, work 2 sc in each st; sl st to first sc. Total: 16 sc. Fasten off yellow unless making a golden-yellow flower.
- Petal Round 3: join the petal color in any center stitch. Repeat (ch 3, work 2 tr in the same center stitch, ch 3, sl st in the next center stitch, sl st in the following center stitch) eight times. On the final repeat, the second sl st returns to the first center stitch. Total: 8 petals, each anchored across a pair of center stitches.
- Fasten off with a 45 cm tail for sewing. Spread and flatten each petal. If the center puckers, loosen the magic ring slightly before securing its tail.
- With warm white, embroider five small straight stitches radiating from the middle of each center, keeping them entirely within the yellow disk. Secure the thread on the back. For golden-yellow petals, these stitches help distinguish the center from the petals.
Flower Placement and Attachment
- Block both panels before positioning flowers. Lay each RS up with foundation Row 1 at the bottom and Row 121 at the top. Number the 32 filet columns from left to right as viewed from the RS.
- On the left panel, mark flower centers at Rows 16, 34, 52, 70, 88 and 106. At each of those rows, mark the centers of cells 6, 16 and 26. You now have 18 positions.
- Use these color groups from the lowest row upward, reading left to right: Row 16, yellow/white/pink; Row 34, white/pink/white; Row 52, pink/white/yellow; Row 70, yellow/white/pink; Row 88, white/yellow/white; Row 106, pink/white/yellow. Each panel uses 7 white, 6 pink and 5 yellow flowers.
- For the right panel, use the same row numbers and color groups, but reflect each position across the panel: left-panel cell 6 corresponds to right-panel cell 27, cell 16 to cell 17, and cell 26 to cell 7.
- Pin every flower before sewing. Using its petal-color tail, sew the back of the center to the nearest surrounding filet posts. Then secure four evenly spaced petal tips to nearby posts or chain spaces. Keep stitches relaxed so the background remains flat. Weave tails through the backs of the flower stitches.
Ivory Tieback Bands — Make Two
- Row 1: with ivory and the 3.0 mm hook, ch 9. Sc in second ch from hook and each remaining ch. Turn. Total: 8 sc.
- Rows 2–108: ch 1, sc in each st, turn. Total: 8 sc per row. At a supplementary blocked gauge of 24 sc and 24 rows per 10 cm, the band measures approximately 3.3 × 45 cm.
- Edging Round: ch 1, work 8 sc across the current short edge, ch 1; work 1 sc in each of the 108 row ends down the long edge, ch 1; work 8 sc across the foundation edge, ch 1; work 108 sc up the remaining long edge, ch 1. Sl st to first sc. Total: 232 sc and four ch-1 corners.
- First cord: sl st to the fourth sc of the nearest short edge. Ch 51, sl st in second ch from hook and each remaining ch: 50 sl sts. Sl st back into the same band stitch. Fasten off.
- Second cord: join ivory in the fourth edging sc of the opposite short edge and repeat the first cord. Each cord should measure approximately 20–22 cm.
- Sew one reserved white daisy at the center of each band, attaching its center and four petal tips. Weave in all ends.
Finishing
Wash the completed pieces gently according to the cotton label. Support the panels fully when lifting them from the water, press out moisture in towels and pin both panels to matching measurements. Shape the lower scallops and spread the daisy petals with your fingers. Let everything dry completely.
Slide the four loops of each panel onto the rod. Place the panels at opposite sides of the window, with their flower arrangements mirrored. Wrap a tieback around each panel approximately 35–40 cm above the lower edge, then tie its cords to the corresponding wall hook. Fan the fabric above the band to form the soft curved opening, and allow the lower ends to hang freely. Recheck tab stitching after the curtains have hung for a day.
Tips for Success
- Place a marker after every eighth filet cell. The four repeats then remain easy to check when filled cells blend into the lace.
- Work the two interior stitches of a filled cell around the chain space without pulling it narrow. Consistent cell width keeps the diamond lines straight.
- Block the two panels beside each other and match their row lines before attaching flowers.
- Sew appliqués to several surrounding posts rather than hanging each flower from one chain space. This spreads their weight across the lace.
- Check the rod fit with one finished tab before sewing all eight. Its folded length must accommodate both the rod and the attachment overlap.
Common Mistakes to Avoid
- Losing the final filet cell makes the panel taper. Work the final boundary dc into the third chain of the previous turning chain and count 32 cells after every row.
- Adding chains between filled cells widens the lace. Each filled cell contains exactly three dc after its starting boundary post; add no separating chain.
- Sewing flowers on before blocking can pucker the panel. Block first, then attach each motif while the lace lies flat and relaxed.
- Attaching tabs only to the outer edging can stretch the top. Carry the sewing through both the border and the upper filet posts.
- Pulling the tiebacks very tight hides the flowers and strains the lace. Gather loosely and adjust the wall-hook position for the desired opening.
Ways to Customize This Pattern
- For a wider panel, add multiples of 8 cells. For N cells, begin with 3N + 4 chains, repeat the 8-cell pattern N ÷ 8 times and work 3N + 1 stitches across each horizontal border edge. Each added 8-cell repeat adds approximately 10 cm.
- For a longer panel, add complete 8-row repeats before bordering. Each repeat adds approximately 8 cm. Recalculate each side of Border Round 1 as twice the new total row count.
- Use only warm-white petals with yellow centers for a quieter version while keeping the ivory lace and embroidered center stitches.
- Replace dusty pink with muted terracotta or pale lilac, retaining the original white and golden-yellow flowers.
- Make a matching short valance using 41 panel rows: the foundation row plus five 8-row repeats. Border it in the same way, using 82 sc along each side in Border Round 1.
Frequently asked questions
No. Both panels are rectangles with a constant 32-cell width. The tiebacks gather the fabric to create the sweeping inner edges visible in the reference.
The pair has approximately 84 cm of flat finished width. For decorative side panels, the uncovered central opening can be wider. For full coverage with gentle fullness, aim for a combined curtain width around 1.5 times the rod span and add 8-cell repeats as needed.
This pattern uses sewn appliqués so the panel can be blocked accurately first. Sewing also lets you adjust the flowers around the gathered folds. Keep the flowers separate until the panels reach their final measurements.
Remove the curtains from the rod, hand-wash gently and support the full wet panel. Dry flat to its blocked measurements instead of hanging it wet from the tabs.
The finished Meadow Daisy Crochet Curtains Pattern

