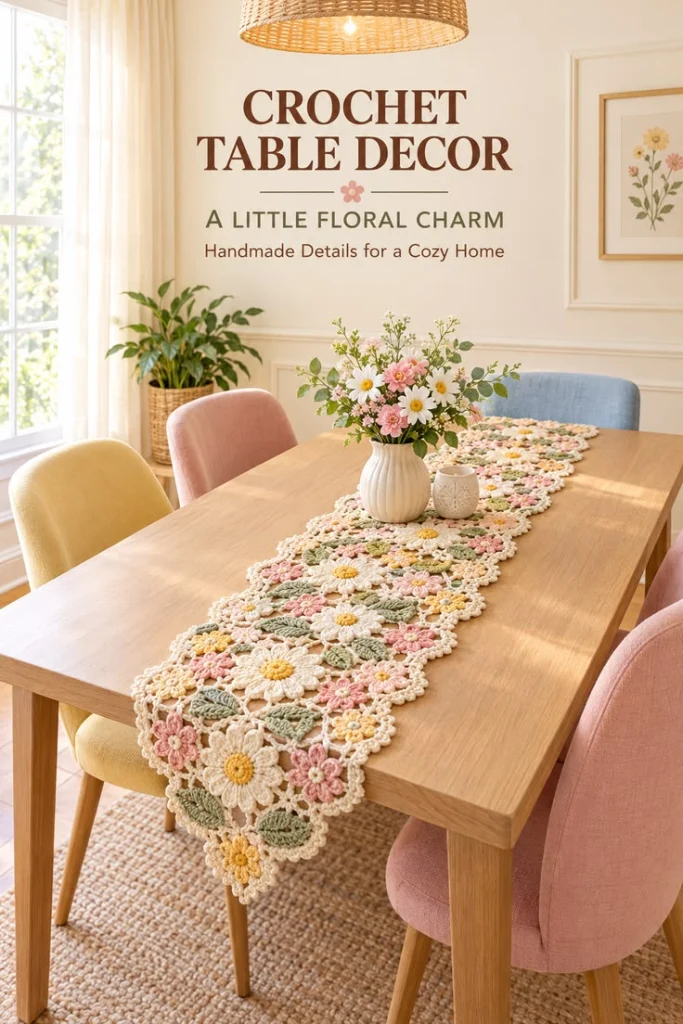
Meadow Daisy Floral Crochet Table Runner
Advanced
For experienced crocheters who enjoy complex shaping, fine detail, and ambitious construction
Single-Day Project
A satisfying project you can complete in a single afternoon or evening.
Handmade Gift
A beautiful keepsake — free forever. Read online or print at home.
About This Meadow Daisy Floral Crochet Table Runner
This floral crochet table runner pattern brings the reference photo’s cream lace, raised daisies, blush blossoms and sage leaves to a long, narrow centerpiece. Golden flower centers and small butter-yellow blooms add warmth, while an open mesh foundation keeps the separate motifs supported and the finished runner practical to handle.
The construction combines a counted mesh panel, individually shaped petals, oval leaves, surface embroidery and a scalloped cream border. Allow approximately 35–45 hours for crocheting, arranging and sewing the pieces. This advanced project suits crocheters comfortable with fine cotton, precise stitch placement and assembling many motifs into a balanced composition.
Materials
- Sport-weight mercerized cotton, approximately 125 m per 50 g Cream: 350 g; blush pink: 100 g; butter yellow: 50 g; golden yellow: 50 g; sage green: 100 g. Total allowance: approximately 1,625 m.
- 3.0 mm crochet hook Adjust as needed to obtain the blocked mesh gauge.
- Tapestry needle and fine sewing needle For motif attachment and embroidered leaf veins.
- Locking stitch markers Mark corners, row intervals and petal starting points.
- Scissors, tape measure and rustproof blocking pins Use a blocking surface at least 35 × 125 cm.
- Colorfast sewing thread matching the motifs Optional for discreet attachment where cotton yarn would be bulky.
Abbreviations
chchainsl stslip stitchscsingle crochethdchalf double crochetdcdouble crochetMRmagic ringBLOback loop onlyst / stsstitch / stitchesRS / WSright side / wrong sideGauge, Dimensions and Construction
- Use US crochet terminology. Turning ch 1 does not count as a stitch. In mesh rows, turning ch 5 counts as one dc and one ch-2 space. Joining slip stitches never count toward round totals.
- Blocked mesh gauge: 5 complete cells across and 5 mesh rows vertically measure 10 × 10 cm. Measure between the centers of the outside posts, excluding the foundation row and edging.
- For a swatch, ch 20. Sc in the second ch from the hook and each remaining ch: 19 sc. Work the mesh-row method below with 6 cells per row for 7 mesh rows. Wet-block, let dry and measure the central 5 cells and 5 rows.
- The full foundation has 15 cells across and 60 mesh rows. Its nominal mesh area is 30 × 120 cm; the foundation and border bring the overall size to approximately 34 × 124 cm.
- Target blocked motif sizes: large daisies approximately 8–9 cm across; small flowers approximately 4.5–5.5 cm across; leaves approximately 6 × 3 cm. Petal gauge can vary independently of mesh gauge, so check the sample arrangement before completing every motif.
- Make 18 large daisies, 17 small flowers and 36 leaves. Block the pieces separately, then sew them onto the blocked foundation with their RS facing upward.
Cream Mesh Foundation
- Foundation: With cream, ch 47 loosely.
- Foundation row: Sc in the second ch from the hook and in every remaining ch. Turn. Count: 46 sc.
- Mesh row 1: Ch 5, skip the first sc and the next 2 sc, dc in the next sc. Repeat (ch 2, skip 2 sc, dc in the next sc) 14 times. Turn. Count: 15 ch-2 spaces and 16 posts, including the turning-chain post.
- Mesh rows 2–60: Ch 5, skip the first dc and first ch-2 space, dc in the next dc. Repeat (ch 2, skip the next ch-2 space, dc in the next dc) 14 times, placing the final dc in the third chain of the previous turning ch 5. Turn after every row except row 60. Each row has 15 cells and 16 posts.
- Fasten off after mesh row 60. Mark the four corners. Weave in the foundation tails before adding the border.
Cream Scalloped Border
- Round 1: With RS facing, join cream at the upper-left corner. Ch 1 and sc in that corner post. Across the top, repeat (2 sc in the next ch-2 space, sc in the next post) 15 times. This gives 46 top-edge stitches, including both corners.
- Continue round 1: Work 2 sc around each of the 60 mesh-row ends down the right side: 120 side stitches. Work 1 sc into each of the 46 foundation stitches across the bottom, including both bottom corners. Work 2 sc around each of the 60 mesh-row ends up the left side: 120 side stitches. Join to the first sc. Count: 332 sc. The four corner stitches belong to the short edges; do not add extra stitches at this stage.
- Round 2: Ch 1. Work 3 sc in each marked corner stitch and 1 sc in every other stitch around. Transfer each corner marker to the middle stitch of its 3-sc group. Join to the first sc. Count: 340 sc.
- Round 3: Ch 1 and sc in the first stitch. Repeat (skip 1 st, 5 dc in the next st, skip 1 st, sl st in the next st) 84 times. For the final repeat, skip 1 st, work 5 dc in the next st, skip the last st and sl st into the first sc. Count: 85 shells, with one sc occupying the initial anchor position. Fasten off.
- Wet-block the foundation to a rectangle, spreading the shells evenly around the corners. Pin the mesh posts into straight lines without stretching individual shells into points.
Large Daisy Centers — Make 18
- Round 1: With golden yellow, work 6 sc in MR. Pull the ring closed. Work in a spiral and mark the first stitch. Count: 6 sc.
- Round 2: Work 2 sc in each stitch around. Count: 12 sc.
- Round 3: Repeat (sc in the next st, 2 sc in the next st) 6 times. Count: 18 sc.
- Round 4: Repeat (sc in each of the next 2 sts, 2 sc in the next st) 6 times. Count: 24 sc.
- Sl st in the next stitch and fasten off, leaving a 25 cm tail for attachment. Flatten the center gently; do not stuff it. The 24 stitches of round 4 form the petal foundation.
Large Daisy Petals — Complete All 18 Flowers
- With the center’s RS facing, join cream with a sl st in any round-4 stitch. Mark that stitch as anchor 1. All petal attachments pass through both loops of the center stitches.
- Petal 1: Ch 7. Working back along this chain, sc in the second ch from the hook, hdc in the next ch, dc in each of the next 2 ch, hdc in the next ch and sc in the last ch. Count: 6 petal stitches. Sl st in the next center stitch, then sl st in the following center stitch. The second slip stitch becomes the next petal’s starting anchor.
- Petals 2–12: Repeat the complete petal-1 instruction 11 times. Each petal advances by 2 center stitches. On petal 12, the final sl st returns to marked anchor 1. Count: 12 petals covering all 24 center-stitch intervals.
- Fasten off, leaving a 50 cm cream tail. Arrange the petals radially, with the smooth RS upward. Each petal has a free tip and a double-crochet fullness near its middle.
Small Five-Petal Flowers — Make 17
- Color allocation: Make 11 flowers with butter-yellow centers and blush petals, and 6 flowers with cream centers and butter-yellow petals.
- Center round 1: With the center color, work 5 sc in MR. Pull closed. Count: 5 sc.
- Center round 2: Work 2 sc in each stitch around. Count: 10 sc. Sl st in the first stitch and fasten off, leaving a 20 cm attachment tail.
- Join the petal color with a sl st in any center stitch and mark this starting anchor.
- Petal 1: Ch 5. Sc in the second ch from the hook, hdc in each of the next 2 ch and sc in the last ch. Count: 4 petal stitches. Sl st in the next center stitch and sl st in the following center stitch.
- Petals 2–5: Repeat petal 1 four more times. The final slip stitch returns to the marked starting anchor. Count: 5 petals, each spanning 2 center-stitch intervals. Fasten off with a 35 cm tail.
- For extra surface definition, use the center-color tail to make five short straight embroidery stitches radiating from the middle toward the petal bases. Keep these stitches inside the center disk and leave the tail available for sewing.
Shaped Sage Leaves — Make 36
- Foundation: With sage, ch 12. Work the first round around both sides of this chain.
- Round 1, first side: Sc in the second ch from the hook, hdc in each of the next 2 ch, dc in each of the next 6 ch, hdc in the next ch and 3 sc in the last ch. This uses all 11 available foundation chains and produces 13 stitches.
- Round 1, second side: Rotate the chain. Working into the unused loops on its opposite side, hdc in the next chain, dc in each of the next 6 chains, hdc in each of the next 2 chains and 2 sc in the chain containing the first sc. Join to the first sc. Count: 24 stitches around the leaf.
- Round 2: Ch 1. Working BLO, sc in each of the first 12 sts. Ch 3 and sl st in the third ch from the hook to form a picot. Sc BLO in each of the remaining 12 sts; make another ch-3 picot in the same way. Join to the first sc. Count: 24 sc and 2 picots. Fasten off with a 45 cm tail.
- The two picots mark the opposite ends. Block each leaf into an elongated oval. With a separate sage strand, embroider a central vein from one pointed end to the other using short backstitches, then add three short diagonal veins on each side. Pass the needle through the fabric without drawing it tight.
Motif Layout and Joining
- Use the unbordered mesh rectangle as the layout grid. Measure x across its 30 cm width from the left mesh edge and y along its 120 cm length from the starting foundation. Border measurements are excluded from these coordinates.
- Place large daisy centers at x = 5, 15 and 25 cm, repeated at y = 10, 30, 50, 70, 90 and 110 cm. This creates 6 groups of 3 daisies, for 18 total. Rotate neighboring flowers slightly so their petals nest naturally.
- Place 10 blush small flowers at x = 10 and 20 cm, repeated at y = 20, 40, 60, 80 and 100 cm. Place the remaining blush flower at x = 15 cm, y = 60 cm.
- Place the 6 butter-yellow small flowers at x = 5, 15 and 25 cm, at both y = 3 cm and y = 117 cm. Keep their petals inside the mesh edges.
- Pair 2 leaves with each large daisy. Tuck one pointed end of each leaf approximately 1 cm beneath opposite sides of the daisy center. Angle the free tips toward nearby open spaces. On the outside columns, point leaves inward or lengthwise so they stay within the border. Alternate the direction of the pairs between successive groups.
- Pin the whole arrangement before sewing. Small overlaps are intentional. If a petal covers an adjacent center, rotate that flower or shift it by no more than one mesh cell while preserving the overall spacing.
- Sew leaves first. Secure each hidden base, then use small stitches along the central vein to connect it to the mesh posts or chains beneath it. Catch the underside of the leaf fabric so attachment stitches remain discreet. Leave the outer leaf edges free.
- Sew each flower center to at least four mesh intersections with its center-color tail. Use its petal-color tail to tack every petal near its widest point to a mesh strand underneath. Where a petal lies above a leaf or another petal, sew through that motif and the mesh together. Leave the final 1 cm of each large petal free to retain relief.
- To move between attachment points, weave the yarn through the underside of the motif or follow an existing mesh strand. Do not carry yarn in straight lines across open mesh cells. Secure and weave every tail through at least 4 cm of matching fabric.
Finishing
Lay the runner flat and check that each flower center is secure and every leaf stays in place when the fabric is gently lifted. Add a discreet tack wherever a petal catches or folds backward. Trim tails only after checking the front and back.
Dampen the assembled runner and block it to approximately 34 × 124 cm. Straighten the foundation first, then smooth the leaves and separate the daisy petals with your fingers. Let it dry completely before removing the pins. Hand-wash in cool water and dry flat; reshape the raised flowers while damp.
Tips for Success
- Mark every tenth mesh row. Six equal 20 cm sections make it easier to keep the daisy groups evenly spaced.
- Keep petal chains relaxed. Tight chains make the long cream petals twist and reduce their finished reach.
- Block leaves before embroidering their veins. This lets you size the stitches to the leaf’s final shape without puckering it.
- Attach motifs while the foundation lies flat on a table. Lift only the small area being sewn, then smooth it back down before tightening the next stitch.
- Use the same cotton yarn range for every color so the mesh, flowers and leaves respond similarly to washing.
Common Mistakes to Avoid
- Losing the last mesh cell: work the final dc into the third chain of the turning ch 5. Count 15 spaces before starting the next row.
- Making too many daisy petals: each petal advances over two center stitches. Mark the starting anchor and stop when the twelfth petal returns to it.
- Adding corner stitches twice: border round 1 has 332 stitches. Add the corner increases only in round 2 to reach 340.
- Pulling the mesh into dimples: loosen tight attachment stitches and distribute each flower’s support among several mesh intersections.
- Stretching the leaves into narrow strips: preserve the rounded sides during blocking and shape only the picots into points.
Ways to Customize This Pattern
- For a quieter palette, use cream petals on all flowers while keeping the golden centers and sage leaves.
- Replace blush with dusty rose and butter yellow with pale peach, keeping the cream foundation to preserve the reference’s soft contrast.
- For a shorter runner, work 40 mesh rows and use four daisy groups at y = 10, 30, 50 and 70 cm. Use 12 daisies and 24 leaves, omit the central extra blush flower, and place small flowers in the three intervening gaps and at both ends. The border becomes 252 stitches in round 1, 260 in round 2 and 65 shells in round 3.
- For a flatter dining surface, tack the large petals approximately 5 mm from their tips instead of leaving the final 1 cm free. Keep the flower centers unstuffed.
Frequently asked questions
Yes. The cream mesh creates the open lace background and supports the separate motifs. Leaves and overlapping petals cover parts of it, but small windows remain throughout the runner.
Twelve narrow petals give the full, layered daisy effect visible in the reference. Their two-stitch attachment spacing fits the 24-stitch center exactly and keeps the petals evenly distributed.
Thicker cotton changes both the mesh size and the flower diameter. Make a complete mesh-and-flower sample first; the listed dimensions and layout depend on the sport-cotton gauge. Changing yarn alone will produce a larger, heavier runner.
Place a stable vase on a flat tray or coaster that spans several motifs, and check that it sits level. Keep narrow glasses and unstable objects away from the raised petals.
The finished Meadow Daisy Floral Crochet Table Runner

