Midnight Bloom Crochet Granny Square Bedspread Pattern
Beginner Friendly
Perfect for those just starting their crochet journey, with clear instructions and simple techniques
Single-Day Project
A satisfying project you can complete in a single afternoon or evening.
Handmade Gift
A beautiful keepsake — free forever. Read online or print at home.
About This Midnight Bloom Crochet Granny Square Bedspread Pattern
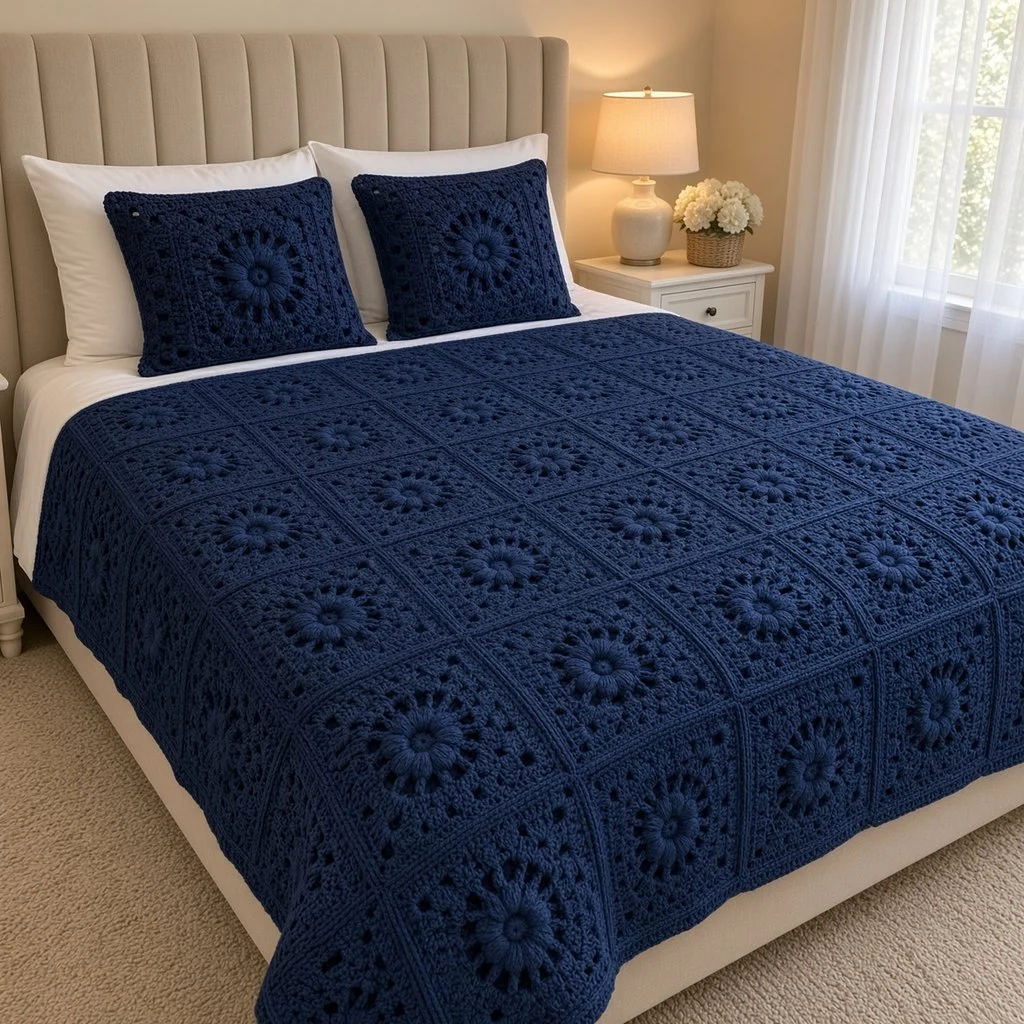
This crochet granny square bedspread pattern turns 80 puff-stitch flower squares into a deep navy cover big enough for a queen bed. Two matching pillow covers finish the set. Each square starts with a raised 16-petal flower. A ring of chain loops comes next, then alternating rounds of lacy mesh and solid double crochet that open the square out to a crisp edge. Worked in one color, the design relies on texture rather than contrast, so the flowers catch the light and read clearly even in a dark shade.
The squares are joined with a single crochet seam worked on the right side. That seam leaves a raised ridge between squares, which gives the bedspread its tailored grid. A ribbed post-stitch border and a reverse single crochet edge keep the outline firm and stop the edges from curling. The pillow covers use the same motif, enlarged with extra mesh and solid rounds, so they match the bedspread without being an exact copy.
Plan on 75 to 85 hours in total. Most of that is the squares, at roughly 45 minutes each once you know the rounds. This is a project for a crocheter who is comfortable with puff stitches, front and back post stitches and careful stitch counting. Because it is built from portable squares, it works well as a long-term project you pick up in short sessions.
Materials
- Worsted weight (#4) yarn in navy about 4,900 m / 5,360 yd in total: roughly 27 skeins of 100 g / 180 m (24 for the bedspread, 3 for the pillows)
- 5 mm (H-8) crochet hook
- 5.5 mm (I-9) crochet hook optional, for joining if your seams pull tight
- 2 pillow inserts 40 x 40 cm (16 x 16 in)
- Tapestry needle
- Stitch markers at least 4
- Blocking mats, rust-proof pins and a spray bottle
- A 24 cm (9.5 in) cardboard square as a blocking template
Abbreviations
MRmagic ringchchainsl stslip stitchscsingle crochetdcdouble crochettrtreble crochetpuffpuff stitch: (yo, insert hook in st, yo, pull up a loop about 1.5 cm tall) 3 times, yo and pull through all 7 loops on hookfpdcfront post double crochetbpdcback post double crochetrev screverse single crochet (crab stitch)skskipspspacest(s)stitch(es)yoyarn overFlower Square (make 80)
- Rnd 1: Make a MR, ch 3 (counts as dc), 15 dc in ring, sl st to top of ch-3. Pull the ring closed tightly. (16 dc)
- Rnd 2: Ch 2 (does not count as a st), puff in same st as join, ch 2, *puff in next st, ch 2* 15 times, sl st to top of first puff. (16 puffs, 16 ch-2 sps)
- Rnd 3: Sl st into first ch-2 sp, ch 1 (does not count), sc in same sp, ch 5, *sc in next ch-2 sp, ch 5* 15 times, sl st to first sc. (16 sc, 16 ch-5 loops)
- Rnd 4 (squaring the circle): Sl st into first ch-5 loop. Ch 4 (counts as tr), (2 tr, ch 3, 3 tr) in same loop for the first corner. Work 4 dc in next loop, 5 dc in next loop, 4 dc in next loop. *Work (3 tr, ch 3, 3 tr) in next loop, 4 dc in next loop, 5 dc in next loop, 4 dc in next loop* 3 times. Sl st to top of beg ch-4. (76 sts: 19 sts per side between corner ch-3 sps)
- Rnd 5 (mesh): Sl st in next 2 tr and into corner ch-3 sp. Ch 6 (counts as dc + ch 3), dc in same sp. *[Ch 1, sk next st, dc in next st] 9 times, ch 1, sk next st, (dc, ch 3, dc) in next corner sp* 3 times. [Ch 1, sk next st, dc in next st] 9 times, ch 1, sk next st, sl st to 3rd ch of beg ch-6. (44 dc, 40 ch-1 sps, 4 corner ch-3 sps)
- Rnd 6 (solid): Sl st into corner ch-3 sp. Ch 3 (counts as dc), (dc, ch 3, 2 dc) in same sp. *Dc in each dc and each ch-1 sp across to next corner, (2 dc, ch 3, 2 dc) in corner sp* 3 times. Dc in each dc and ch-1 sp across, sl st to top of ch-3. (100 dc: 25 per side between corner sps)
- Rnd 7 (mesh): Sl st in next dc and into corner ch-3 sp. Ch 6 (counts as dc + ch 3), dc in same sp. *[Ch 1, sk next st, dc in next st] 12 times, ch 1, sk next st, (dc, ch 3, dc) in next corner sp* 3 times. [Ch 1, sk next st, dc in next st] 12 times, ch 1, sk next st, sl st to 3rd ch of beg ch-6. (56 dc, 52 ch-1 sps, 4 corner sps)
- Rnd 8 (solid): Sl st into corner ch-3 sp and work as Rnd 6. (124 dc: 31 per side between corner sps)
- Rnd 9 (edging): Sl st in next dc and into corner ch-3 sp. Ch 1 (does not count), (sc, ch 2, sc) in same sp. *Sc in each st across to next corner, (sc, ch 2, sc) in corner sp* 3 times. Sc in each st across, sl st to first sc. Fasten off and weave in ends. (132 sc: 33 per side, 4 corner ch-2 sps)
- Block each square to 24 cm (9.5 in) using your cardboard template. Pin the petals of Rnd 2 so they lie flat and evenly spaced, mist with water, and let dry fully.
Joining the Squares
- Lay out the squares 8 across and 10 down, all turned the same way. A simple way to do this is to keep the starting tail of every square in the top-right corner.
- Join the 7 lengthwise seams first. Hold the first two squares of a column pair with wrong sides together. Join yarn in the corner ch-2 sp through both layers, ch 1, and sc in the same sp. Sc through both loops of both layers in each of the 33 sc, then sc in the next corner ch-2 sp. (35 sc per square edge)
- Without fastening off, ch 1. Pick up the next pair of squares and sc in their corner ch-2 sps through both layers. Continue as in step 2 until all 10 pairs in that seam are joined. Fasten off. Repeat for the remaining 6 lengthwise seams.
- Join the 9 widthwise seams the same way, with 8 square pairs per seam. Where you cross an existing seam, work ch 1 over the ridge and do not sc into it, so the intersection stays flat.
- The seam ridge should sit on the right side of the bedspread. Lay the joined piece flat and check that no seam puckers. If one does, undo it and rework it with the 5.5 mm hook.
Border
- Rnd 1: With the right side facing, join yarn in any blanket corner ch-2 sp. Ch 3 (counts as dc), (dc, ch 2, 2 dc) in same sp. Dc in each sc along each square edge, plus 1 dc in each square corner ch-2 sp on either side of every seam. Work (2 dc, ch 2, 2 dc) in each blanket corner. Sl st to top of ch-3. (282 sts on each short side and 352 sts on each long side, counted between blanket corner sps)
- Rnd 2: Sl st in next dc and into corner ch-2 sp. Ch 3 (counts as dc), (dc, ch 2, 2 dc) in same sp. *[Fpdc around next st, bpdc around next st] across to corner, (2 dc, ch 2, 2 dc) in corner sp* around. Sl st to top of ch-3. (286 sts on short sides, 356 on long sides)
- Rnd 3: Sl st in next dc and into corner ch-2 sp. Ch 3, (dc, ch 2, 2 dc) in same sp. *Starting with fpdc, alternate fpdc and bpdc across to corner, (2 dc, ch 2, 2 dc) in corner sp* around. The ribs should line up with Rnd 2. Sl st to top of ch-3. (290 sts on short sides, 360 on long sides)
- Rnd 4: Sl st in next dc and into corner ch-2 sp. Ch 1, 3 sc in corner sp. Sc in each st around, with 3 sc in each corner sp. Sl st to first sc.
- Rnd 5: Ch 1, rev sc in each st around, sl st to first st. Fasten off and weave in ends.
Pillow Cover Panels (make 4)
- Rnds 1-8: Work as Flower Square Rnds 1-8. (31 dc per side)
- Rnd 9 (mesh): Work as Rnd 7, but repeat [ch 1, sk next st, dc in next st] 15 times on each side. (64 dc, 64 ch-1 sps)
- Rnd 10 (solid): Work as Rnd 6. (37 dc per side, 148 total)
- Rnd 11 (mesh): Work as Rnd 7, repeating the bracket 18 times on each side. (76 dc, 76 ch-1 sps)
- Rnd 12 (solid): Work as Rnd 6. (43 dc per side, 172 total)
- Rnd 13 (mesh): Work as Rnd 7, repeating the bracket 21 times on each side. (88 dc, 88 ch-1 sps)
- Rnd 14 (solid): Work as Rnd 6. (49 dc per side, 196 total)
- Rnd 15 (edging): Work as Flower Square Rnd 9. (51 sc per side, 204 total) Fasten off, weave in ends, and block to about 37 cm (14.5 in) square.
Pillow Assembly (make 2)
- Hold two panels wrong sides together, with the corners and stitches matched.
- Join yarn in a corner ch-2 sp through both layers. Ch 1, then work (sc, ch 2, sc) in each corner sp and 1 sc in each st through both layers along three sides.
- Push the 40 cm insert in through the open side. The cover is slightly smaller than the insert on purpose, so it fills out plump and smooth.
- Continue the same sc seam across the fourth side, holding the insert away from your hook. Sl st to the first sc, fasten off, and hide the tail inside the cover.
Finishing
Once the border is on, weave in any remaining tails along the seam ridges, where they disappear completely. Lay the whole bedspread out flat on clean towels or a carpet, mist it evenly, and gently pat the squares and border into straight lines. Let it dry fully before using it. You only need to do this once to even out small tension differences between squares made weeks apart.
Wash the bedspread according to your yarn label. Dry it flat or on low heat if the fiber allows, because a bedspread this size gets heavy when wet and can stretch if hung. Store it folded rather than on a hanger.
Tips for Success
- Pull every loop of the puff stitch up to the same height, about 1.5 cm, before closing it. Even petals are what make the flowers look sharp in a single dark color.
- Count the 19 stitches per side at the end of Round 4 before starting the mesh. Every later round depends on that number being right.
- Weave in the two tails of each square as soon as it is finished. Leaving 160 ends for the end of the project is the fastest way to stall.
- Weigh your first finished square. Each one uses about 43 m of yarn (roughly 24 g of a 180 m / 100 g skein), so the weight tells you early whether your yardage estimate holds.
- Work in good light, or use a white towel on your lap. Stitches in navy are hard to see, especially the posts in the border rounds.
Common Mistakes to Avoid
- Ending a mesh round with a dc right beside the corner instead of a ch-1: this means the previous round had the wrong count, usually 18 or 20 stitches instead of 19. Recount the side and fix it before moving on.
- Counting the beginning chain as a stitch where it should not be counted, or skipping it where it should: this makes squares slant. Each round states whether the starting chain counts, so check it every time.
- Joining too tightly: if seams are shorter than the square edges, the bedspread puckers and will not lie flat. Use a larger hook for joining and keep each seam the same length as one square edge.
- Squares that cup in the middle after Round 4: your trebles are too short or your puffs too tall. Loosen your treble stitches slightly, or make the puff loops a little shorter.
- A wavy border: if Round 1 of the border ripples, you have added stitches at the seams. Work exactly one dc into each square corner sp, never two.
Ways to Customize This Pattern
- Work Rounds 1-2 in cream or mustard and the rest in navy, so the flowers stand out in a contrasting color.
- Make a sofa throw instead: 5 x 6 squares gives about 130 x 155 cm before the border.
- Use a cotton or cotton-blend worsted for a lighter summer bedspread that shows the lace rounds more clearly.
- Make a scrappy version with each square in a different blue, from denim to midnight, joined with navy so the grid ties everything together.
- Turn the joining seam to the wrong side if you prefer a smooth, flat surface instead of a raised grid.
Frequently asked questions
A twin bed needs about 6 x 9 squares (54 in total, roughly 150 x 225 cm with the border). A king needs about 10 x 10 squares (100 in total, roughly 250 x 250 cm). Add about 45 m of yarn for every extra square, plus a little more for the longer border.
Yes, but each square will come out closer to 20 cm with a 4 mm hook. To reach the same bedspread size you will need about 10 x 12 squares. Always block a test square and redo the count from your own measurement.
The squares are joined with wrong sides together, which pushes the single crochet seam up as a ridge on the right side. That ridge creates the clean grid you see in the photo. If you join with right sides together instead, the seam sits on the back and the front lies flat.
The loops are probably too short, or uneven in height. Hold each loop up at about 1.5 cm while you make the next one, then close all seven loops in one smooth pull. The ch 2 after each puff also matters, because it holds the petals apart so they stand up.
No. The bedspread is complete on its own. The pillow covers use only about 400 m of extra yarn, though, and they reuse the same motif you will know by heart after 80 squares, so they go quickly.
The finished Midnight Bloom Crochet Granny Square Bedspread Pattern

