Mocha Wheel Lace Table Runner Crochet Pattern
Beginner Friendly
Perfect for those just starting their crochet journey, with clear instructions and simple techniques
Single-Day Project
A satisfying project you can complete in a single afternoon or evening.
Handmade Gift
A beautiful keepsake — free forever. Read online or print at home.
About This Mocha Wheel Lace Table Runner Crochet Pattern
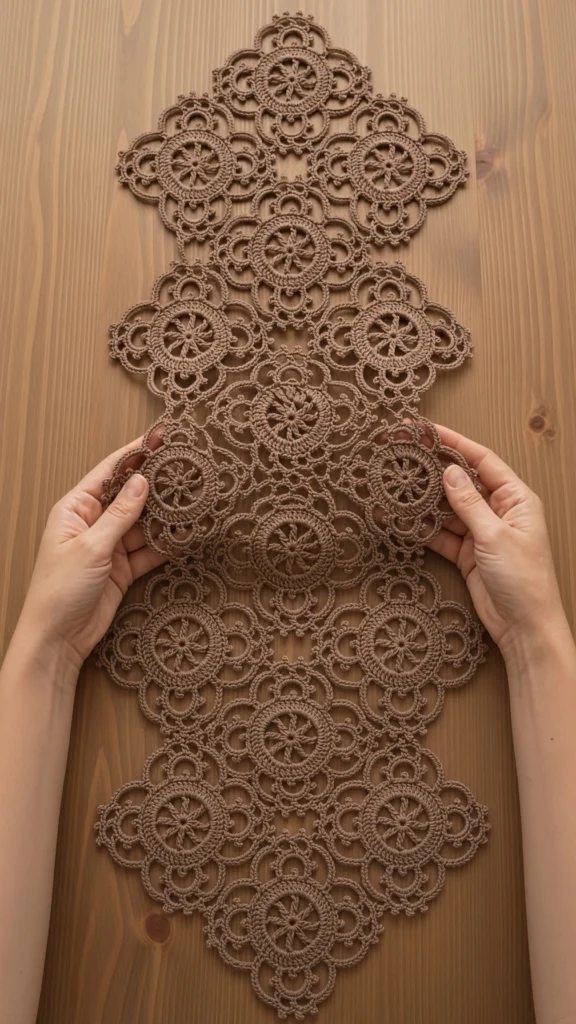
This crochet lace table runner pattern builds a long, scallop-edged runner out of twenty-nine spoked wheel medallions and sixteen small filler rings, all worked in one warm mocha cotton. The wheel at the centre of each medallion is made with paired double crochets and chain spaces, so the spokes stay crisp and open instead of blurring into a solid disc. Around that sits a firm sc rim, a ring of petals, and a final round of picot arches that does double duty as the joining round.
The medallions sit on a diamond lattice rather than a straight grid, which is what gives the runner its pointed ends and its zigzag side edges. Each medallion joins to four diagonal neighbours at four of its eight picot arches; the remaining four arches are left free to catch the small filler motifs that fill the square gaps. Nothing is sewn together. Once you have made and joined the last medallion, the only work left is the two-round picot edging and a proper wet block.
Expect 14 to 18 hours in total. A single medallion takes about 20 minutes once you have the rhythm, and the filler motifs take five. It is an advanced piece, but the difficulty is in the planning rather than the stitches: you need to track where each medallion sits in the layout and which of its arches are already spoken for. If you have made a granny-square blanket join-as-you-go and want a step up, this is a good next project.
Materials
- Size 3 crochet cotton in warm mocha / soft taupe approx. 350-400 m (about 150 g); buy one extra ball, dye lots show badly in lace
- 2.5 mm steel or aluminium hook or the size that gives you the gauge below
- Blunt tapestry needle fine enough for size 3 thread
- Rust-proof pins at least 60 — you will pin every point of every outer arch
- Blocking mats or a towel-covered board needs to take the full 80 x 32 cm at once
- Spray bottle or a basin for wet blocking
- Stitch marker optional, useful for marking the “north” arch on each medallion
- Spray starch or diluted fabric stiffener optional, for a firmer finished runner
Abbreviations
chchainsl stslip stitchscsingle crochethdchalf double crochetdcdouble crochetMRmagic ringsp(s)space(es)st(s)stitch(es)skskipreprepeatpicotch 3, sl st in 3rd ch from hookjoin-picotch 1, sl st in matching picot of neighbouring motif, ch 1, sl st in 3rd ch from hook of the current archRSright sideFOfasten offGauge and Finished Size
- Gauge: one completed medallion (Rounds 1-7) measures 8.5 cm across the picot points after wet blocking.
- If your medallion comes out larger than 9 cm, drop to a 2.25 mm hook; if it comes out under 8 cm, move up to 2.75 mm.
- Finished runner as written: approximately 80 cm long x 32 cm at the widest point, measured after blocking and including the picot edging.
- To lengthen the runner, add matched pairs of rows (one 3-medallion row plus one 2-medallion row) — each pair adds about 12 cm of length, 5 medallions and 3 filler motifs.
- The width is fixed at 3 medallion columns. Adding a fourth column changes the join count on every edge motif, so plan that before you start rather than partway through.
Main Medallion (make 29)
- Rnd 1: MR. Ch 3 (counts as first dc), 15 dc in ring. Pull the ring tight and sl st in top of beginning ch-3. (16 dc)
- Rnd 2: Ch 4 (counts as dc + ch 1). [Dc in next dc, ch 1] 15 times. Sl st in 3rd ch of beginning ch-4. (16 dc, 16 ch-1 sps) — these chain spaces are the spokes; keep them loose and even.
- Rnd 3: Ch 1, sc in same st. [Sc in next ch-1 sp, sc in next dc] 15 times. Sc in last ch-1 sp. Sl st in first sc. (32 sc)
- Rnd 4: Ch 1, sc in same st. *Ch 5, sk next 3 sc, sc in next sc; rep from * 6 more times. Ch 5, sk last 3 sc. Sl st in first sc. (8 sc, 8 ch-5 loops)
- Rnd 5: Sl st into first ch-5 loop. Ch 1, then work (sc, 2 hdc, 3 dc, 2 hdc, sc) in that loop and in each of the next 7 ch-5 loops. Sl st in first sc. (8 petals, 72 sts)
- Rnd 6: Sl st in next 4 sts to reach the centre dc of the first petal. Ch 1, sc in that centre dc. *Ch 7, sc in centre dc of next petal; rep from * 6 more times. Ch 7, sl st in first sc. (8 ch-7 loops)
- Rnd 7 (joining round): Sl st into first ch-7 loop. Ch 1, work (sc, 4 dc, picot, 4 dc, sc) in each of the 8 ch-7 loops around. Sl st in first sc. FO and weave in ends. (8 picot arches)
- The very first medallion is worked with plain picots throughout. Every medallion after it replaces some of those picots with join-picots — see the joining section below.
Layout Map
- The runner is 13 rows deep. Reading from one point to the other, the rows hold: 1, 2, 3, 2, 3, 2, 3, 2, 3, 2, 3, 2, 1 medallions. That is 29 medallions in total.
- Rows of 3 sit in columns 1, 2 and 3. Rows of 2 sit offset, nested in the notches between those columns. The single medallions at rows 1 and 13 sit on the centre column and form the two points.
- Medallions in the same row do not touch each other. Every join is diagonal, to the row above or the row below.
- Each interior medallion therefore joins at 4 of its 8 picot arches — upper-left, upper-right, lower-left, lower-right. Think of these as the arches at 1, 5, 7 and 11 o’clock relative to the top of the motif.
- The 4 arches left free on every medallion (12, 3, 6 and 9 o’clock) are the ones the filler motifs and the edging attach to. Keep them free — this is the single easiest thing to get wrong.
- Work in rows from one point to the other, left to right within each row, so each new medallion only ever joins to motifs already made.
- Row 1: 1 medallion, no joins. Row 2: 2 medallions, each joining to Row 1 at one arch, and the second also to nothing else. Row 3 onward: each medallion joins to every completed neighbour it touches — 1 or 2 joins for edge motifs, 2 for most, up to 4 once you are working past a row of 2.
Joining the Medallions
- Work each new medallion through Rnd 6 exactly as written. All joining happens on Rnd 7.
- When you reach an arch that meets a completed neighbour, work: sc, 4 dc, then instead of a plain picot work a join-picot — ch 1, sl st into the matching picot of the neighbouring medallion, ch 1, sl st in the 3rd ch from hook — then 4 dc, sc to finish the arch.
- Work plain picots on every arch that has no neighbour yet.
- Before you fasten off, count: the medallion should have exactly as many join-picots as it has completed neighbours, and they should be spaced with one free arch between each pair.
- Lay the joined section flat every three or four medallions. If it starts to cup, your join-picots are too tight; add one extra chain on each side of the sl st (ch 2 instead of ch 1) for the rest of the runner.
- Do not fasten off and re-join a medallion to fix a missed join. Frog Rnd 7 back to the arch in question and rework it — a sewn-in join shows immediately in thread lace.
Small Filler Motif (make 16)
- These fill the square gaps where four medallions meet. Make them after all 29 medallions are joined, so every gap is fully framed before you work into it.
- Rnd 1: MR. Ch 3 (counts as first dc), 11 dc in ring. Pull the ring tight and sl st in top of beginning ch-3. (12 dc)
- Rnd 2: Ch 1, sc in same st. *Ch 5, sk next 2 dc, sc in next dc; rep from * 2 more times. Ch 5, sk last 2 dc. Sl st in first sc. (4 sc, 4 ch-5 loops)
- Rnd 3 (joining round): Sl st into first ch-5 loop. Ch 1, work (sc, 3 dc, join-picot, 3 dc, sc) in each of the 4 ch-5 loops, joining each arch to the free picot of the medallion facing it. Sl st in first sc. FO. (4 join-picots)
- Work the four joins in order around the gap — top, right, bottom, left — so the filler sits square rather than pulled toward one corner.
- Gap count check: 2 gaps sit inside each of the five 3-medallion rows (10 total), and 1 gap sits centred on each of the six 2-medallion rows (6 total), for 16 fillers.
Picot Edging
- Rnd 1: Join thread with a sl st to the picot at the tip of any free outer arch. Ch 1, sc in same picot. *Ch 6, sc in the picot of the next free arch on the same medallion; rep from * across every free arch of that medallion. Where the edge passes from one medallion to the next at a join, ch 8 instead of ch 6 to bridge the valley, then sc in the first free picot of the next medallion.
- Continue in this way all the way around both long sides and both points. At each point medallion, the free arches run continuously around the tip — work ch 6 between each pair, with no bridge.
- End with the appropriate ch-6 or ch-8 and sl st in the first sc.
- Rnd 2: Sl st into the first ch-6 sp. Work (sc, 3 dc, picot, 3 dc, sc) in each ch-6 sp, and (sc, 4 dc, picot, ch 2, picot, 4 dc, sc) in each ch-8 bridge. Sl st in first sc.
- FO leaving a 15 cm tail. Weave the tail along the back of the last few dc, split-stitching through the strands rather than just threading under them, and trim close.
Finishing
Weave in every end before blocking, not after. Thread ends that are still loose will migrate during a wet block and pull the surrounding lace out of shape. Work each tail back along the top edge of the stitches it came from, changing direction once, and trim it flush.
Soak the finished runner in cool water with a drop of wool wash for about fifteen minutes, then press it between towels — do not wring it. Lay it out on your blocking surface and pin the two points first, stretching the runner to its full length. Then pin the outermost picot of every edge arch along both long sides, working from the centre outward so the tension stays even. The lace should be under real tension: the spokes in each wheel only open up properly when the medallion is stretched to its full diameter. Leave it to dry completely, which takes most of a day.
If you want a firmer runner that stays put on a polished table, spray lightly with starch while it is still pinned and let it dry a second time before unpinning. Store it rolled around a cardboard tube rather than folded — creases set permanently in blocked cotton lace.
Tips for Success
- Mark the “12 o’clock” arch of every medallion with a scrap of contrast thread as you finish it. Orientation is invisible in a round motif until you have joined it wrong.
- Keep the ch-1 spaces of Rnd 2 deliberately loose. They are the spokes, and tight chains close them up so the wheel reads as a solid centre instead of a wheel.
- Make all 29 medallions through Rnd 6 first, then work the joining round on each in layout order. Batching the repetitive rounds is faster and keeps your tension consistent across the whole runner.
- Count the sts of Rnd 3 (32 sc) before moving on. Rnd 4 divides evenly by 4, so a single missed or added sc there will throw off the eight-loop spacing and you will only notice at Rnd 5.
- Lay the joined rows out on your blocking mat every few rows and check the outer columns are running straight. Cumulative drift is easy to correct after two rows and painful after eight.
Common Mistakes to Avoid
- Joining at the wrong arches. Using adjacent arches instead of alternating ones eats the free arch the filler motif needs, and the gap ends up with only three attachment points. Fix: undo Rnd 7 back to the first wrong join and rework — count one free arch between every pair of join-picots.
- Over-tight join-picots. Slip-stitching directly into the neighbour’s picot with no ch 1 on either side pulls the two motifs together and makes the runner ripple. Fix: rework the affected joins with ch 1 on each side of the sl st, or ch 2 if your tension is firm.
- Skipping the wrong stitches on Rnd 4. Skipping 2 sc instead of 3 gives you loops that do not divide into 8, and Rnd 5’s petals will not sit symmetrically. Fix: check that you end the round having skipped exactly 24 sc and worked 8.
- Making the filler motifs too early. Attaching a filler before all four surrounding medallions are in place forces the last medallion into a gap that no longer has any give. Fix: finish and join all 29 medallions first, without exception.
- Under-blocking. A gently patted-out runner looks nothing like a stretched one — the picot arches stay curled and the spokes stay closed. Fix: pin every single outer picot, not every third one, and stretch to the full 80 cm before pinning the sides.
Ways to Customize This Pattern
- Work the runner as a square centrepiece instead: use 5 columns and rows of 5, 4, 5, 4, 5 medallions, with fillers in every four-motif gap, for a piece of roughly 55 x 55 cm.
- Work Rnds 1-3 of each medallion in cream and Rnds 4-7 in mocha for a two-tone version where the wheels read as pale centres inside darker frames.
- Swap the filler motifs for a single large picot from each surrounding medallion joined to a ch-8 ring, leaving the square gaps genuinely open for a lighter, airier runner.
- Use size 10 crochet thread and a 1.75 mm hook for a fine doily-scale version — the medallion drops to about 5.5 cm and the same 29-motif layout gives roughly 52 x 21 cm.
- Add a beaded picot on the edging round only: slide a size 6 seed bead onto the thread before each edging picot and let it sit at the point of the arch, so the beads outline the runner without appearing in the body.
Frequently asked questions
You can, but it will show. The join-picot creates a flat, invisible link between two arches at exactly the point they meet; a sewn join adds a visible seam thread across an open space and tends to pull one motif slightly out of round. If you strongly prefer sewing, use a whip stitch through the picot loops only, matched to the yarn colour, and block hard afterwards to even everything out.
Almost always tension on Rnd 2. The spokes are formed by the ch-1 spaces between the double crochets, and if those chains are worked snugly the neighbouring dc stitches close over them. Try working Rnd 2 with your hook held a little further back in the stitch, or go up one hook size for that round only and return to the main size for Rnd 3. Blocking also opens the spokes considerably, so judge a medallion only after it has been pinned and dried.
Budget 350-400 m of size 3 crochet cotton for the runner as written, and buy it all in one dye lot. Worsted weight will work structurally but changes the character of the piece entirely: the medallion grows to roughly 15 cm, the runner ends up around 140 x 55 cm, and the lace reads as a chunky doily-blanket rather than fine thread lace. If you go that route, use a 4 mm hook and reduce the layout to 5 rows so the finished size stays sensible for a table.
Mild rippling usually blocks out — pin the edges under firm tension and let it dry fully before you judge it. Persistent rippling means the join-picots are too tight relative to the medallions, which pulls the interior in and pushes the perimeter out. That cannot be blocked away permanently. The fix is to rework the edging round with ch 7 instead of ch 6 between free arches, which gives the perimeter enough length to lie flat against the tighter interior.
The finished Mocha Wheel Lace Table Runner Crochet Pattern

