Moon Granny Square Blanket Crochet Pattern
Beginner Friendly
Perfect for those just starting their crochet journey, with clear instructions and simple techniques
Single-Day Project
A satisfying project you can complete in a single afternoon or evening.
Handmade Gift
A beautiful keepsake — free forever. Read online or print at home.
About This Moon Granny Square Blanket Crochet Pattern
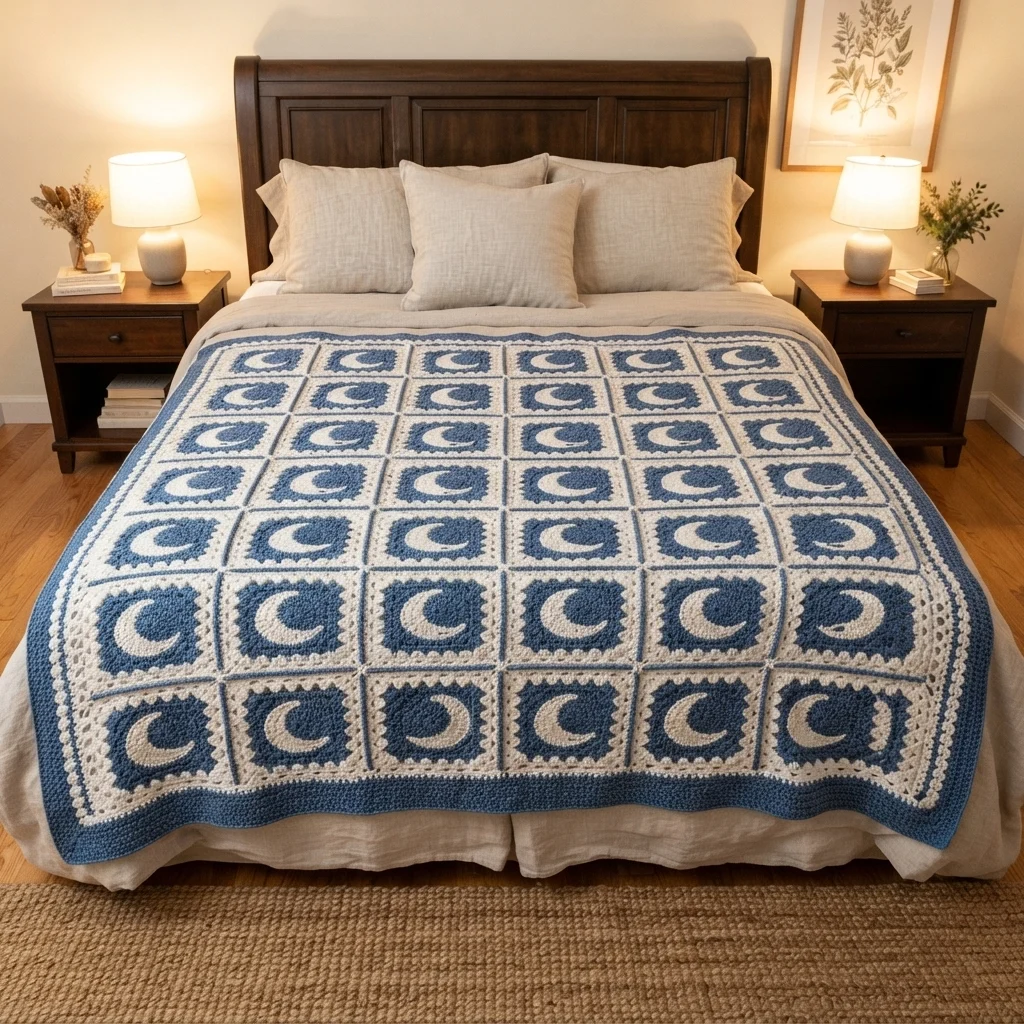
This moon granny square blanket pattern builds a cozy throw from blue and cream squares, each with a cream crescent moon at the center. Every square has a solid blue middle with the moon worked in tapestry crochet, a cream granny cluster border, and a final blue round that makes the seams look like thin blue lines across the blanket.
It is an advanced project because of the colorwork in the center, the two cluster rounds in the border, and the 30 matching squares you need to make and join. Each square is worked flat in single crochet for the moon, then in the round for the border. Plan on 30 to 40 hours for the full throw, about an hour per square once you find a rhythm.
It suits crocheters who are comfortable with changing colors in single crochet and working granny clusters at the corners. The finished throw is about 130 x 155 cm, and you can make it larger or smaller by changing the number of squares.
Materials
- Chunky cotton-blend yarn, blue (B) about 1.5 kg, estimated
- Chunky cotton-blend yarn, cream (C) about 1.1 kg, estimated
- Crochet hook 6.0 mm
- Yarn needle
- Stitch markers for joining
- Flat surface and pins for blocking and layout
Abbreviations
chchainscsingle crochetdcdouble crochetsl stslip stitchspspacest(s)stitch(es)FOfasten offcluster3 dc worked in the same stitch or spaceBblue yarnCcream yarn( )xrepeat the stitches in brackets the number of times givenMoon Center (flat, tapestry crochet)
- Each row has 19 stitches. Ch 1 and turn at the end of every row (the ch 1 does not count as a stitch). Change colors on the last pull-through of the stitch before, and carry the unused color loosely inside the stitches you work over. The rows below are written in the order you work them, for a right-handed crocheter: odd rows (right side) start at the right edge of the moon and even rows (wrong side) start at the left edge.
- Row 1 (foundation): with B, ch 20. Sc in the 2nd ch from the hook and in each ch across (19). All B.
- Row 2 (WS): sc in each st across (19). All B.
- Row 3 (RS): 11 B, 1 C, 7 B (19)
- Row 4 (WS): 3 B, 5 C, 11 B (19)
- Row 5 (RS): 13 B, 4 C, 2 B (19)
- Row 6 (WS): 1 B, 4 C, 14 B (19)
- Row 7 (RS): 14 B, 4 C, 1 B (19)
- Row 8 (WS): 4 C, 15 B (19)
- Row 9 (RS): 15 B, 4 C (19)
- Row 10 (WS): 4 C, 15 B (19)
- Row 11 (RS): 15 B, 4 C (19)
- Row 12 (WS): 4 C, 15 B (19)
- Row 13 (RS): 14 B, 4 C, 1 B (19)
- Row 14 (WS): 1 B, 4 C, 14 B (19)
- Row 15 (RS): 13 B, 4 C, 2 B (19)
- Row 16 (WS): 3 B, 5 C, 11 B (19)
- Row 17 (RS): 11 B, 1 C, 7 B (19)
- Row 18 (WS): sc in each st across (19). All B.
- Row 19 (RS): sc in each st across (19). All B. Do not turn and do not FO.
- Check your center: the moon should be thickest on the left, with its two points curving to the right, and the chart should be the same top and bottom.
Blue Round (B)
- Round 1: ch 1, work 3 sc in the corner st. Sc evenly down the side, working 17 sc along the row ends. Work 3 sc in the next corner and 17 sc along the foundation edge, 3 sc in the next corner and 17 sc up the side, 3 sc in the last corner and 17 sc along the top. Join with a sl st to the first sc (80). FO.
First Granny Round (C)
- Round 2: join C in the middle sc of any corner. Ch 3 (counts as a dc), 2 dc in the same st, ch 2, 3 dc in the same st. This is the first corner.
- Side: *ch 1, 3 dc in the next st, (ch 1, skip 2 sts, 3 dc in the next st)x6, ch 1. In the middle sc of the next corner work 3 dc, ch 2, 3 dc.* Repeat from * to * 3 more times, ending the last repeat after the final side with ch 1 instead of the corner.
- Join with a sl st to the top of the ch 3. Each side has 7 clusters and 8 ch-1 spaces, and each corner has a ch-2 space (108 dc in all). Do not FO.
Second Granny Round (C)
- Round 3: sl st across to the first corner ch-2 sp. Ch 3, 2 dc, ch 2, 3 dc in the same sp.
- Side: *ch 1, 3 dc in the next ch-1 sp, repeating along the side to the last ch-1 sp, ch 1. In the next corner ch-2 sp work 3 dc, ch 2, 3 dc.* Repeat for all four sides.
- Each side now has 8 clusters and 9 ch-1 spaces. Join with a sl st to the top of the ch 3 and FO.
Blue Edge Round (B)
- Round 4: join B in any corner ch-2 sp. Ch 1, 3 sc in the same sp. Sc in each dc and in each ch-1 sp along the side (39 sts between corner groups), then 3 sc in the next corner ch-2 sp. Repeat around (168).
- Join with a sl st to the first sc, FO and weave in the ends.
- Block each square flat with a damp cloth and pin it to the same size as your test square. Let it dry fully.
Blanket Layout
- Lay out 5 squares across and 6 squares down (30 squares in all).
- Turn every square the same way, with the thick side of the moon on the left, so all the moons face the same direction as in the photo.
- Check the layout from a few steps back before you start joining.
Joining
- Join the squares into 6 strips of 5. Hold two squares with wrong sides together and sc through both loops of the blue edge round along one side, using B. Match the stitches one for one and work through the 3-sc corner groups as one.
- Join the strips in the same way, matching the corners so the seams make a clean cross.
- Work the horizontal seams last so the vertical and horizontal seams meet flat at each corner.
- Weave in all ends.
Blanket Edging (B)
- Round 1: join B in any corner. Ch 1 and sc evenly around the blanket, working 3 sc in each corner and one sc in each stitch of the blue edge rounds. Join with a sl st.
- Round 2: ch 1, sc in each st around, working 3 sc in the middle st of each corner. Join with a sl st, FO and weave in the ends.
Finishing
Block the finished blanket by laying it flat on towels, pinning the corners and edges to the size you want, and misting it with water. Let it dry fully before moving it. This relaxes the carried yarn at the back of each moon and makes the granny clusters sit flat.
Check the back of the squares for loose strands and tack any long float down with a few small stitches. Fold the blanket across the foot of the bed with a row of moons showing, and it will look like the photo.
Tips for Success
- Make one test square before you commit to all 30, and write down your hook size and measurements.
- Count every row of the moon. All rows have 19 stitches, and the cream stitches are 1, 5, 4 or 4 across the chart.
- Cross the colors on the wrong side so the carried yarn does not show through the cream crescent.
- Make the squares in batches of five, one strip at a time, so you can keep track of the layout.
- Block every square before joining. Colorwork centers curl, and unblocked squares will not join flat.
Common Mistakes to Avoid
- Pulling the carried cream yarn tight puckers the center. Spread the stitches on your hook and carry the strand loosely.
- Reading an odd and an even row the wrong way round flips the moon. Mark each row off as you finish it.
- Squares that come out different sizes will not join flat. Block each one to the same measurements.
- Missing a ch-1 space in round 3 shifts the cluster count. Every side should end with 8 clusters.
- Joining with a tight seam makes ridges. Use a loose stitch and match the seam tension to the squares.
Ways to Customize This Pattern
- Swap blue for sage, charcoal or dusty rose and keep cream for the moon and clusters.
- Make a baby blanket with 4 squares across and 5 down (20 squares), about 100 x 125 cm.
- Make matching pillow covers by sewing one square to a plain blue back.
- Work some squares with the moon facing the other way for a playful, scattered look.
- Add a small cream star by making a single sc in cream in the top left blue space of the center, for a night-sky touch.
Frequently asked questions
The amounts above are estimates of about 50 g of blue and 36 g of cream per square, plus extra for joining and edging. Yarn use depends on your tension, so weigh your test square and multiply by 30, then add about 10 percent.
Yes. Use a larger hook for bigger squares or a smaller hook for smaller ones, and keep the stitch counts the same so the moon and border stay even.
For the rows with a single cream stitch you can drop and pick up the yarn, but carrying it inside the stitches is neater. The back of the moon stays tidy and you have fewer ends to weave in.
Yes. One square works well on its own. Use a smaller hook and a lighter yarn for a coaster, or sew two squares together with a zipper or buttons for a cushion cover.
The finished Moon Granny Square Blanket Crochet Pattern

