Moroccan Diamond Bedspread and Pillow Shams Crochet Pattern
Beginner Friendly
Perfect for those just starting their crochet journey, with clear instructions and simple techniques
Single-Day Project
A satisfying project you can complete in a single afternoon or evening.
Handmade Gift
A beautiful keepsake — free forever. Read online or print at home.
About This Moroccan Diamond Bedspread and Pillow Shams Crochet Pattern
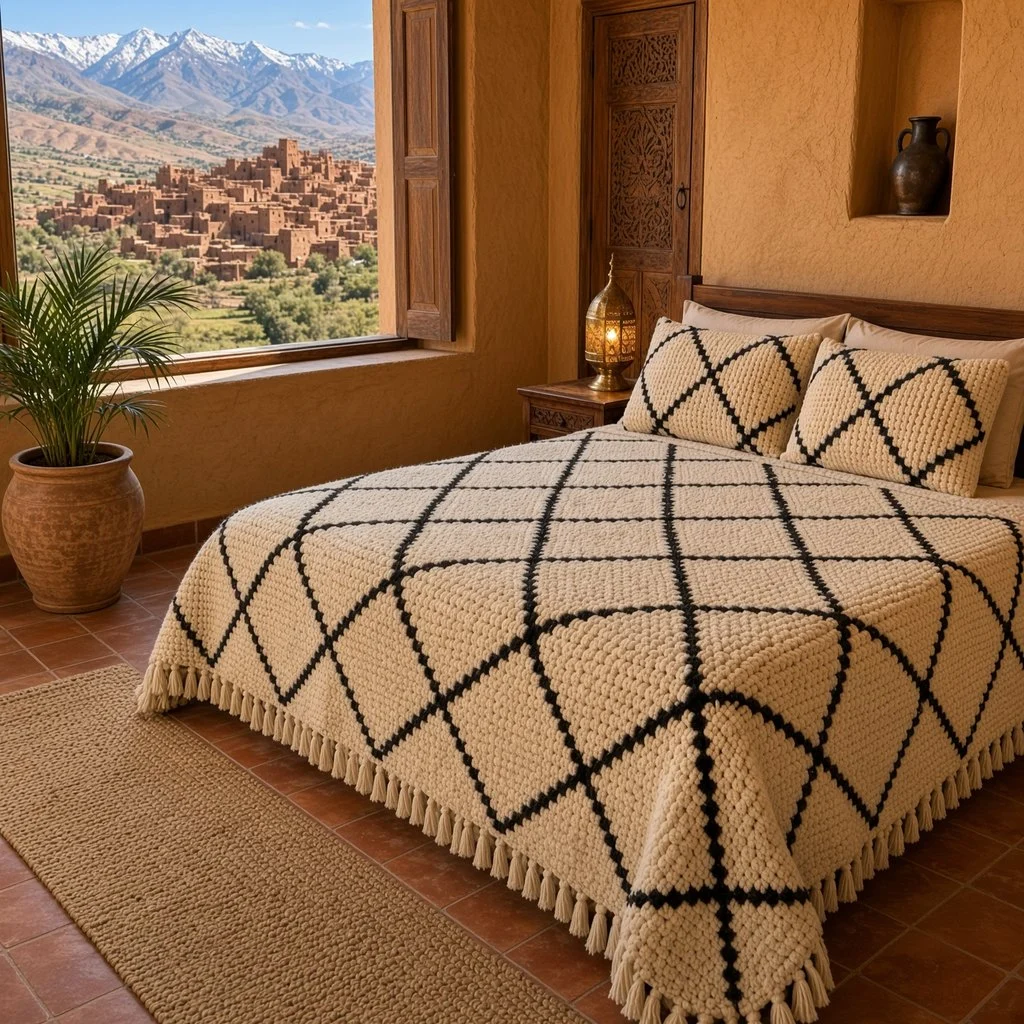
This Moroccan crochet bedspread pattern takes its look from Beni Ourain rugs: a thick, nubby cream fabric crossed by bold black lines that form a lattice of diamonds. The base is worked in linen stitch with bulky yarn, which gives a dense, woven-looking texture that lies heavy and flat on the bed. A fringe of cream tassels hangs along the foot and both sides, and two matching pillow shams carry the same lattice.
The black lines are added after the base is finished, using surface slip stitch with a doubled strand of black yarn. That keeps the lines thick and raised, and it means the base can be worked as plain, relaxing rows with no color changes. The bedspread is made in three long panels that are seamed together first, and the lines run straight across the seams, so the lattice looks continuous.
Plan on 130 to 160 hours for the bedspread and shams. Most of that time is the base, which is a simple two-row repeat. It suits a crocheter who is comfortable with gauge and long projects, and who wants a bold, graphic piece that looks like a woven Moroccan textile.
Materials
- Bulky weight wool or wool blend, cream about 5,400 m (54 skeins of 100 g / 100 m), including tassels
- Bulky weight wool or wool blend, black about 450 m (5 skeins of 100 g / 100 m)
- 9 mm crochet hook for the base, seams and edging
- 10 mm crochet hook for the surface slip stitch lines
- Locking stitch markers about 60, for marking the line points
- Contrasting scrap yarn for guide lines
- Stiff card 12 cm wide for winding tassels
- Large tapestry needle and scissors
- Two pillows 50 x 75 cm, for the shams
Abbreviations
chchainscsingle crochetsl stslip stitchsurf sl stsurface slip stitch: yarn held behind the work, insert hook from the front, pull up a loop and draw it through the loop on hookrev screverse single crochet (crab stitch), worked left to rightskskipspspacest(s)stitch(es)rndroundreprepeatRS / WSright side / wrong sideLinen Stitch Panels (make 3)
- Make two outer panels of 81 sts and one center panel of 79 sts.
- With cream and 9 mm hook, ch 82 for an outer panel (ch 80 for the center panel).
- Row 1 (RS): sc in 2nd ch from hook, *ch 1, sk next ch, sc in next ch; rep from * across. (Outer: 81 sts, 41 sc and 40 ch-1 sps. Center: 79 sts, 40 sc and 39 ch-1 sps)
- Row 2: ch 1, turn, sc in first sc, sc in next ch-1 sp, *ch 1, sk next sc, sc in next ch-1 sp; rep from * to last sc, sc in last sc. (Outer: 81 sts, 42 sc and 39 ch-1 sps. Center: 79 sts, 41 sc and 38 ch-1 sps)
- Row 3: ch 1, turn, sc in first sc, *ch 1, sk next sc, sc in next ch-1 sp; rep from * to last 2 sc, ch 1, sk next sc, sc in last sc. (Same counts as Row 1)
- Rows 4-385: rep Rows 2 and 3 alternately, ending with a Row 3. (Stitch count stays the same in every row)
- Place a marker at the end of every 32nd row (Rows 33, 65, 97 and so on). These help when placing the lines.
- Fasten off. Each outer panel measures about 74 x 257 cm and the center panel about 72 x 257 cm. Block all three to the same length.
Joining the Panels
- Lay the panels side by side, RS up, with the center panel in the middle and all foundation edges at the same end. This end is the foot of the bedspread.
- Hold an outer panel and the center panel RS together. With cream, sl st through both layers in each row end, matching the row markers. (385 sl st)
- Join the second outer panel to the other side of the center panel the same way.
- Grid: lay the bedspread RS up with the foot toward you. Number the columns 1-241 from left to right and the rows 1-385 from the foot. Count every sc and every ch-1 sp as one column. Columns 1-81 are the left panel, 82-160 the center panel and 161-241 the right panel.
Diamond Lattice Setup
- Every line crosses other lines at points spaced 24 columns apart and 32 rows apart. So each line moves 3 columns sideways for every 4 rows it goes up.
- For each line, place a locking marker at its start point, at every point 24 columns and 32 rows along, and at its end point. Check that the markers make a straight line before you start.
- If you like, run a strand of scrap yarn between the markers as a guide and remove it afterward.
- To work a line: with black held double and the 10 mm hook, RS facing, hold the yarn behind the work at the start point. Work 1 surf sl st in each row, moving up one row with every stitch. On three stitches out of every four, also move one column sideways; on the fourth, go straight up.
- Keep the stitches relaxed. Each surf sl st should lie flat without pulling the fabric.
- At the end point, fasten off leaving a 15 cm tail and pull it to the WS. Where a line crosses one that’s already worked, go straight over it.
Up-Right Lines (10 lines)
- These lines go up and to the right. Points are given as (column, row).
- Line 1: from (1, 1) to (241, 321).
- Line 2: from (49, 1) to (241, 257).
- Line 3: from (97, 1) to (241, 193).
- Line 4: from (145, 1) to (241, 129).
- Line 5: from (193, 1) to (241, 65).
- Line 6: from (1, 65) to (241, 385).
- Line 7: from (1, 129) to (193, 385).
- Line 8: from (1, 193) to (145, 385).
- Line 9: from (1, 257) to (97, 385).
- Line 10: from (1, 321) to (49, 385).
Up-Left Lines (10 lines)
- These lines go up and to the left, mirroring the first set.
- Line 11: from (241, 1) to (1, 321).
- Line 12: from (193, 1) to (1, 257).
- Line 13: from (145, 1) to (1, 193).
- Line 14: from (97, 1) to (1, 129).
- Line 15: from (49, 1) to (1, 65).
- Line 16: from (241, 65) to (1, 385).
- Line 17: from (241, 129) to (49, 385).
- Line 18: from (241, 193) to (97, 385).
- Line 19: from (241, 257) to (145, 385).
- Line 20: from (241, 321) to (193, 385).
- When all 20 lines are done, the bedspread has 5 diamonds across and 6 down, with part diamonds running off every edge.
Edging and Tassels
- Rnd 1: with cream and 9 mm hook, RS facing, join in a foot corner. 3 sc in corner st, sc in next 239 sts, 3 sc in corner st; 287 sc evenly along the side (about 3 sc for every 4 rows); 3 sc in corner st, sc in next 239 sts, 3 sc in corner st; 287 sc evenly along the other side. Join with sl st. (1,064 sts)
- Rnd 2: ch 1, rev sc in each st around. Join and fasten off. (1,064 sts)
- Tassels (make about 139): wind cream yarn 15 times around the 12 cm card. Slip a 30 cm strand under the loops at one edge and tie tightly. Cut the loops at the other edge. Wrap another strand around the tassel 2 cm below the top, tie and hide the ends inside. Trim to 12 cm.
- Attach a tassel at each foot corner, then about every 6 sts along the foot and both sides, tying it through Rnd 1 with its top strand. (About 41 along the foot and 49 along each side, sharing the corner tassels) Leave the head edge without tassels.
Pillow Sham Fronts (make 2)
- With cream and 9 mm hook, ch 82.
- Rows 1-73: work in linen stitch as for the outer panels, ending with a Row 3. Fasten off. (81 sts, about 74 x 49 cm)
- Number the columns 1-81 and the rows 1-73. On the shams, lines cross every 20 columns and 24 rows, so each line moves 5 columns for every 6 rows. Work 1 surf sl st per row, moving one column sideways on five stitches out of every six.
- Up-right lines: from (1, 1) to (61, 73); from (41, 1) to (81, 49); from (1, 49) to (21, 73).
- Up-left lines: from (81, 1) to (21, 73); from (41, 1) to (1, 49); from (81, 49) to (61, 73).
- This gives one full diamond in the center with part diamonds around it.
Pillow Sham Backs (make 2 sets)
- Upper back: with cream, ch 82. Work Rows 1-45 in linen stitch, ending with a Row 3. (81 sts)
- Edge row: ch 1, turn, sc in each sc and ch-1 sp across. Fasten off. (81 sc)
- Lower back: with cream, ch 82. Work Rows 1-40 in linen stitch, ending with a Row 2. (81 sts)
- Edge row: ch 1, turn, sc in each sc and ch-1 sp across. Fasten off. (81 sc)
- The sc rows are the open edges of the envelope. The two pieces together give about 8 cm of overlap.
Sham Assembly
- Lay a sham front WS up. Place the lower back on top, RS up, with its foundation edge along the bottom. Place the upper back on top, RS up, with its foundation edge along the top, overlapping the lower back. Pin all edges.
- Rnd 1: turn so the front faces you. With cream, join in a corner through all layers. 3 sc in corner st, sc in next 79 sts, 3 sc in corner st; 54 sc evenly along the side; 3 sc in corner st, sc in next 79 sts, 3 sc in corner st; 54 sc evenly along the other side. Join. (278 sts)
- Rnd 2: ch 1, rev sc in each st around. Join and fasten off. (278 sts)
- Rep with the second sham.
Finishing
Weave in all ends on the WS. Run the black tails along the back of their own line so they don’t show through the cream, and hide the cream ends inside the seams between panels.
Wet block the bedspread flat, easing the lines straight while it is damp, and comb the tassels so they hang evenly. Let it dry completely before moving it, which may take two days with this much bulky yarn. Block the shams the same way and slip in the pillows.
Tips for Success
- Wind two balls of black and hold one strand from each for the lines. Pulling two strands from the same ball makes them twist around each other.
- Place all the markers for a line before working it. A line that wanders by even one column will show clearly against the cream.
- Work the lines with the bedspread flat on a large table or the floor. Holding the weight in your lap stretches the fabric and pulls the lines out of shape.
- Use wool or a wool blend for the base. Bulky acrylic in linen stitch tends to stiffen, while wool softens and drapes better after blocking.
- Make the tassels while you work the panels, a few at a time. Making all 139 at the end is tedious.
Common Mistakes to Avoid
- Working sc into the sc instead of the ch-1 sp. This turns linen stitch into plain sc and shrinks the row height, so the diamonds come out squashed. Each sc goes into a space, except the first and last stitches of Rows 2 and 3.
- Panels of different lengths. If one panel has more rows, the lines bend at the seams. Check the row markers line up before seaming.
- Lines that pucker. Surface slip stitch worked too tightly pulls the fabric in. Use the larger hook and pull each loop up to the height of the line.
- Moving sideways on every stitch. This makes the line too shallow, and it misses the crossing points. Go straight up on every fourth stitch on the bedspread (every sixth on the shams).
- Tassels that come loose. A single knot through one strand won’t hold. Tie each tassel through a full sc of Rnd 1 with a double knot.
Ways to Customize This Pattern
- Change the line color: charcoal, rust or terracotta give a softer look while keeping the Moroccan style.
- Make a throw or rug: one panel of 81 sts and 193 rows, with the same lattice spacing, gives a piece about 74 x 129 cm.
- Make the lines thinner by working them with a single strand of black and a 9 mm hook.
- Add a small black X in the center of every diamond with a few surf sl st for extra detail.
- Leave out the tassels and finish the edge with a black rev sc round for a more modern look.
Frequently asked questions
You can work them with tapestry crochet, carrying the black inside the stitches, but the carried yarn shows through the cream linen stitch. Surface slip stitch keeps the cream clean and the lines thick and raised.
Each diamond is about 44 cm wide and 43 cm tall. Add or remove 48 sts for each diamond across, and 64 rows for each diamond in length, then extend the line list with the same spacing.
It is heavy, around 5.5 kg, which helps it hang straight and stay in place. If you want it lighter, use a lighter bulky yarn with plenty of air in it, such as a lofty wool, and check that it still meets gauge.
If you used wool, hand wash in cool water or have it dry cleaned. Never put a wool bedspread in a hot wash or tumble dryer, because it will felt and shrink. Dry it flat and shake out the tassels once it’s dry.
The finished Moroccan Diamond Bedspread and Pillow Shams Crochet Pattern

