Mustard Chrysanthemum Crochet Bedspread Pattern
Beginner Friendly
Perfect for those just starting their crochet journey, with clear instructions and simple techniques
Single-Day Project
A satisfying project you can complete in a single afternoon or evening.
Handmade Gift
A beautiful keepsake — free forever. Read online or print at home.
About This Mustard Chrysanthemum Crochet Bedspread Pattern
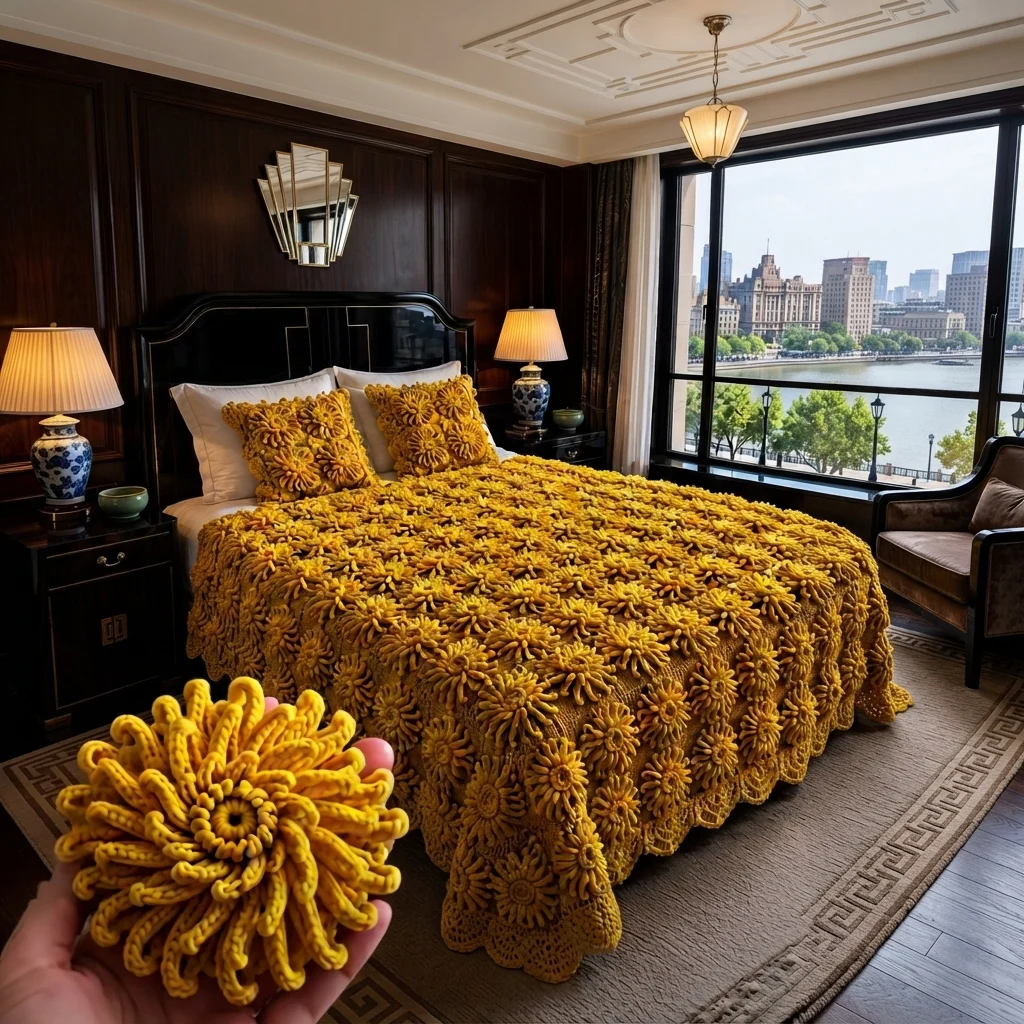
This crochet flower bedspread pattern builds a warm mustard throw from an open double crochet mesh and covers it with 108 curly chrysanthemum flowers. Each flower has a small center ring and a crown of long, curled petals, and the flowers sit so close together that they overlap slightly, just like the bedspread in the photo. A fan-shaped edge runs all the way around.
It is an advanced project because of its size and the amount of finishing. The mesh body is a simple repeat, but you will make 108 flowers and 108 centers, pin them to an exact grid and sew every one on by hand. The edge adds seven rounds of more than 1,000 stitches, ending in 130 fans. Plan on 65 to 75 hours in total, with about 35 of them spent on the flowers.
It suits crocheters who are comfortable with mesh, magic rings and small repeated pieces, and who want a rich, textured bedspread in one color. The finished cover is about 150 x 188 cm, and it is easy to resize because the width changes in steps of one flower column and the length in steps of one flower row.
Materials
- Worsted or aran cotton yarn, mustard about 4.2 kg in all, estimated (mesh 0.9 kg, edge 0.4 kg, flowers 2.9 kg)
- Crochet hook 4.0 mm
- Yarn needle
- Stitch markers and pins at least 40 of each, for the flower grid
- Flat surface for blocking and layout
Abbreviations
MRmagic ringchchainscsingle crochetinc2 sc in the same stitchdcdouble crochetsl stslip stitchspspacest(s)stitch(es). Each dc and each ch-1 sp in the mesh counts as one stitch.BLOback loop onlyRSright sideFOfasten off( )xrepeat the stitches in brackets the number of times givenMesh Body (flat)
- Foundation: ch 216.
- Row 1 (RS): sc in the 2nd ch from the hook and in each ch across (215). Ch 3 and turn.
- Row 2: the ch 3 counts as the first dc and stands in for the first st. *Ch 1, skip 1 st, dc in the next st*, repeat 107 times (108 dc and 107 ch-1 sps, 215 sts). Ch 3 and turn.
- Rows 3-144: ch 3 (counts as the first dc). *Ch 1, skip the ch-1 sp, dc in the next dc*, repeat 106 times, then ch 1, skip the last ch-1 sp and dc in the top of the turning ch of the row below (108 dc and 107 ch-1 sps, 215 sts). Ch 3 and turn at the end of every row except row 144.
- Row 145: after row 144, ch 1 and turn. Sc in each dc and each ch-1 sp across, including the top of the turning ch (215). Do not FO.
- Place a stitch marker in the turning chain of rows 24, 48, 72, 96, 120 and 144 so you can check your length. The body should measure about 134 cm wide and 172 cm tall.
- Check your mesh: every row must have exactly 108 dc and 107 spaces, with the dc stacked in straight columns and the spaces stacked above each other.
Sc Rounds of the Edge
- Round 1: with the RS facing you and row 145 at the top, you are in the top right corner stitch. Ch 1 and work 3 sc in this st. Sc in each of the next 213 sts across the top. Work 3 sc in the top left corner st.
- Work 285 sc down the left side: 2 sc in each of the first 142 row ends and 1 sc in the last one. Work 3 sc in the first st of the foundation edge (the bottom left corner), 213 sc across the foundation edge and 3 sc in the last st (the bottom right corner). Work 285 sc up the right side in the same way. Join with a sl st to the first sc (1008).
- Rounds 2-5: ch 1, sc in each st around, working 3 sc in the middle st of each 3-sc corner group. Join with a sl st at the end of each round. Each round adds 8 stitches: round 2 has 1016, round 3 has 1024, round 4 has 1032 and round 5 has 1040.
- Check round 5: there are 224 stitches from corner middle to corner middle along the top and foot, and 296 down each side. Both numbers divide by 8, which is what makes the fans land on every corner. If your count is off, fix it now.
Fan Round and Edge
- Round 6 (fans): join yarn in the middle st of any corner group. Ch 3 (counts as a dc), 6 dc in the same st (7 dc, the first fan).
- *Skip 3 sts, sl st in the next st, skip 3 sts, 7 dc in the next st*, and repeat around. For the last repeat, work skip 3 sts, sl st in the next st, skip 3 sts, then join with a sl st to the top of the ch 3 (130 fans).
- Round 7: ch 1, sc in each dc and each sl st around, including the top of the ch 3 (130 x 8 = 1040). Join with a sl st, FO and weave in the end.
- Check your edge: there should be 28 fans along the top and foot and 37 down each side (counting the corner fans once), and a fan on each of the four corners. The edge should be about 8 cm wide.
Chrysanthemum Flower (make 108)
- Round 1: 8 sc in MR (8)
- Round 2: inc x8 (16)
- Round 3: (1 sc, inc)x8 (24). Join with a sl st to the first sc. Do not FO.
- Round 4 (petals): sl st in the next st of round 3 to start. *Ch 9. Starting in the 2nd ch from the hook, work 2 sc in each of the 8 chains (16 sc). Sl st in the next st of round 3.* Repeat from * to * 24 times in total (24 petals, one on every stitch of round 3). The last sl st lands in the first stitch.
- FO leaving a tail of about 30 cm for sewing. The double sc in each chain makes every petal curl on its own.
- Count your petals. There must be 24, one for each stitch of round 3.
Flower Center (make 108)
- Round 1: 6 sc in MR (6)
- Round 2: inc x6 (12)
- Round 3: sc in the back loop only of each st around (12). Join with a sl st, FO leaving a tail of about 20 cm.
- The ridge made by the back loops gives the ring look in the middle of the flower.
Flower Grid
- There are 9 columns and 12 rows of flowers (108 in all). Lay the blocked body flat with the RS facing you and the foundation edge nearest to you.
- Columns: the flower centers sit over stitches 11, 35, 59, 83, 107, 131, 155, 179 and 203 of the foundation row, counted from the right. These are 24 stitches (about 15 cm) apart.
- Rows: the flower centers sit on mesh rows 7, 19, 31, 43, 55, 67, 79, 91, 103, 115, 127 and 139, counted up from the foundation row. These are 12 rows (about 14.5 cm) apart.
- Pin a marker at each of the 108 crossing points, using a tape measure and the row markers as a guide.
Sewing the Flowers
- Pin all 108 flowers to the markers before you sew any of them. Step back and check that the rows and columns look straight and that the flowers touch or overlap by no more than 1 cm.
- Sew each flower on first by its base: work small stitches through the 24 stitches of round 3 and the mesh underneath, in 4 or 5 places around the circle.
- Sew the center ring over the middle of the flower, working around its edge. This also hides the stitches that hold the flower.
- Tack 2 or 3 petals of each flower to the mesh with one small stitch near the base so they lie over the mesh and do not flop. Leave the tips free and curled.
- Weave all tails along the back of the mesh for at least 6 cm.
Finishing
Block the mesh and edge before you sew on the flowers if you can: lay the body flat on towels, pin the corners and the edges to about 134 x 172 cm for the body, and mist it with water. Let it dry fully before moving it. After sewing, steam the flowers from a few centimeters above without pressing, so the petals keep their curl.
Drape the bedspread with the head under the pillows and the fan edge hanging over the foot and sides, and it will look like the photo. Fluff each flower gently with your fingers and check for loose stitches.
Tips for Success
- Count the stitches at the end of every tenth row of the mesh. There should always be 215, and a wrong count is easiest to fix straight away.
- Make the flowers in batches of nine, one for each column, so you can keep them in bags by row.
- Work the petals loosely so they curl. A tight chain makes a stiff, straight petal.
- Use a thinner mustard thread, if you have one, to sew on the flowers, so the stitches sink in and stay hidden.
- Weave in the tail of every flower and center as you go. Doing 216 pieces at the end is slow.
Common Mistakes to Avoid
- Counting the turning chain as an extra dc makes the rows 217 stitches wide and shifts the grid. Row 2 and every later row have exactly 108 dc.
- Working a dc into the ch-1 space instead of the dc below fills the mesh. Skip the space and put the dc on the dc.
- Making fewer or more than 24 petals leaves a gap or crowds the flower. Count the round 3 stitches and the petals.
- Pinning the flowers without a grid makes the rows wander. Use the stitch and row numbers above and check from a few steps back.
- Working different corner counts in the edge makes it ripple and breaks the fan count. Use exactly 3 sc in each corner stitch on every round.
Ways to Customize This Pattern
- Swap mustard for rust, cream, sage or deep teal. A single color keeps the texture in the spotlight.
- Make a baby blanket with 5 columns and 6 rows (30 flowers). Chain 120 (119 stitches), work 71 mesh rows and 1 sc row, and recalculate the edge so the corner distances divide by 8. About 75 x 87 cm before the edge.
- Make matching pillow covers by chaining 48 (47 stitches), working 23 mesh rows and one sc row, sewing on 4 flowers in a 2 x 2 grid and adding 2 sc rounds. Sew the panel to a plain back with a button closure.
- Work the flower centers in a deeper gold or a cream for a subtle two-color effect.
- Skip the fans and finish with 2 more rounds of sc and one round of crab stitch (reverse sc) for a quicker edge.
Frequently asked questions
The amounts above are estimates of about 4.2 kg. Weigh your swatch and scale it up by area for the mesh and edge, then weigh one finished flower with its center, multiply by 108 and add about 10 percent. The flowers use about two thirds of the total.
Add 24 chains to the foundation for every extra flower column, and 12 mesh rows for every extra flower row. Each extra column also adds 3 fans to the top and foot, and each extra row adds 3 fans to each side. If the corner distances in the last sc round do not divide by 8, add or remove a few sc at the sides.
Each petal has 2 sc in every chain, so there are more stitches than the chain has room for. The extra stitches push the petal into a spiral. If your petals are too straight, work them looser or use a smaller hook for the petal rounds.
With a washable cotton, wash it by hand or on a gentle cycle in cool water, press out the water without wringing, and lay it flat to dry. Check that the flowers are sewn on securely before every wash, and never hang a wet bedspread this large, because the mesh will stretch.
The finished Mustard Chrysanthemum Crochet Bedspread Pattern

