Mustard Puff Flower Hexagon Blanket Pattern
Beginner Friendly
Perfect for those just starting their crochet journey, with clear instructions and simple techniques
Single-Day Project
A satisfying project you can complete in a single afternoon or evening.
Handmade Gift
A beautiful keepsake — free forever. Read online or print at home.
About This Mustard Puff Flower Hexagon Blanket Pattern
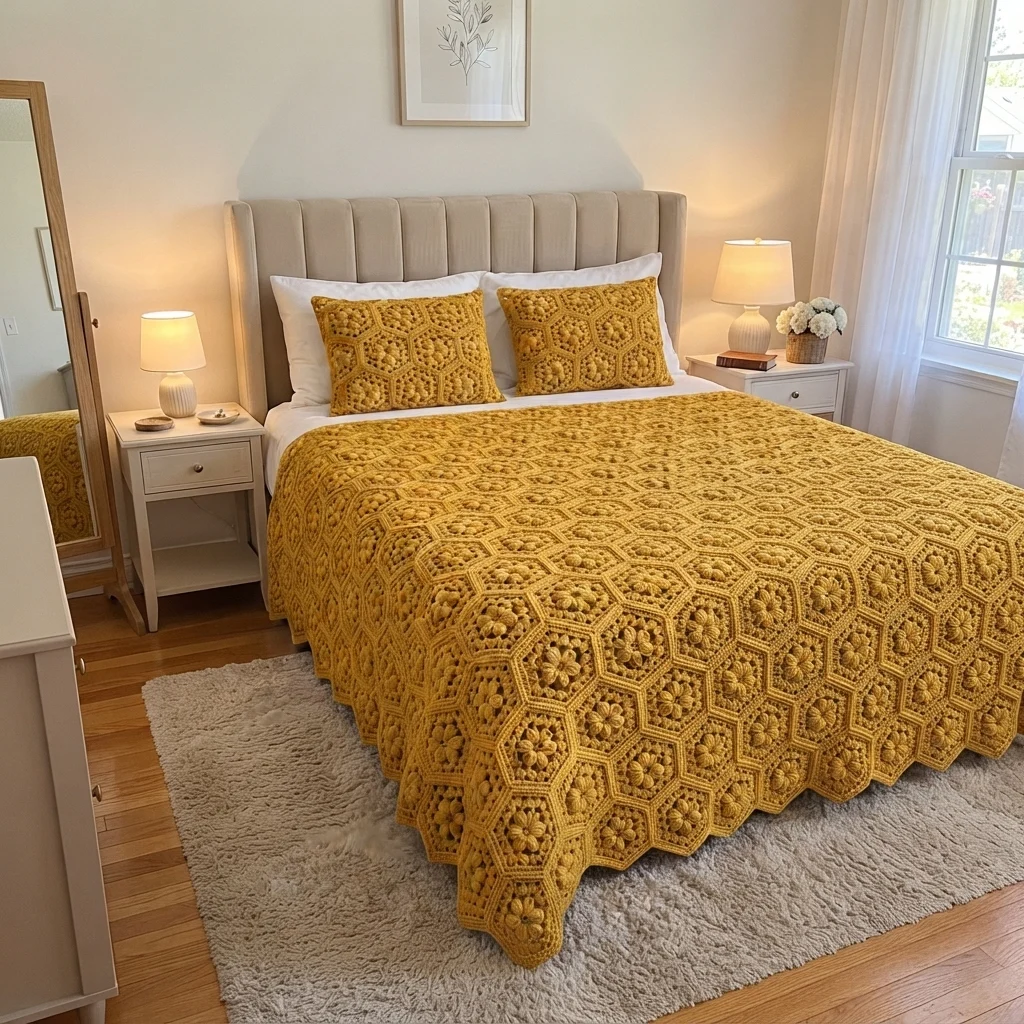
This crochet hexagon blanket pattern builds a warm, textured throw from mustard hexagons, each with a six-petal puff flower in the center. The flower sits inside open granny rounds, and the hexagons are joined in a honeycomb layout, so the whole blanket reads as a field of small flowers.
It is an advanced project because of the puff stitches in the center, the six corners you must keep aligned in every round, and the 94 motifs you need to make and join. Each hexagon is worked in the round from a magic ring and finished with a round of single crochet that makes joining easy. Plan on 50 to 60 hours for the full throw, about 35 minutes per hexagon once you find a rhythm.
It suits crocheters who are comfortable with puff stitches, granny clusters and corner spaces, and who want a classic heirloom-style blanket in one rich color. The finished throw is about 125 x 135 cm, and it is easy to make larger by adding rows or hexagons.
Materials
- Worsted or aran cotton-blend yarn, mustard yellow about 2.8 kg, estimated
- Crochet hook 4.5 mm
- Yarn needle
- Stitch markers to mark the first corner of each round
- Flat surface and pins for blocking and layout
Abbreviations
MRmagic ringchchainscsingle crochetdcdouble crochetdecsingle crochet 2 stitches togethersl stslip stitchspspacest(s)stitch(es)FOfasten offpuff(yarn over, insert hook in the stitch, pull up a loop) 4 times, yarn over and pull through all 9 loops on the hook( )xrepeat the stitches in brackets the number of times givenFlower Center
- Round 1: 12 sc in MR. Join with a sl st to the first sc (12).
- Round 2: ch 1, (puff in the next st, ch 2, skip 1 st)x6. Join with a sl st to the top of the first puff (6 puffs, 6 ch-2 sps).
- Round 3: ch 1, (sc in the top of the next puff, 3 sc in the next ch-2 sp)x6, starting in the puff you joined to. Join with a sl st to the first sc (24).
Corner Rounds
- Round 4: ch 3 (counts as a dc), 2 dc, ch 2, 3 dc in the same st. This is the first corner. Ch 1, skip 3 sts, (3 dc, ch 2, 3 dc) in the next st, ch 1, skip 3 sts. Repeat until you have 6 corners. Join with a sl st to the top of the ch 3 (36 dc, 6 ch-2 sps, 6 ch-1 sps). Place a marker in the first corner.
- Round 5: sl st across the next 2 dc and into the corner ch-2 sp. Ch 3, 2 dc, ch 2, 3 dc in the same sp. Ch 1, 3 dc in the next ch-1 sp, ch 1. Repeat in each corner sp and ch-1 sp around. Join with a sl st to the top of the ch 3 (54 dc, 6 ch-2 sps, 12 ch-1 sps).
- Round 6: sl st to the first corner ch-2 sp. Ch 3, 2 dc, ch 2, 3 dc in the same sp. Ch 1, (3 dc in the next ch-1 sp, ch 1)x2. Repeat in each corner sp and along each side. Join with a sl st to the top of the ch 3 (72 dc, 6 ch-2 sps, 18 ch-1 sps).
- Each side now has 3 clusters between the corner clusters, and each corner has a ch-2 sp. Check this before you move on.
Edge Round
- Round 7: ch 1, sc in each dc and in each ch-1 sp around. Work 3 sc in each corner ch-2 sp. Join with a sl st to the first sc (108 sts, with 15 sts between the 3-sc corner groups on each side).
- FO and weave in the ends.
- Block each hexagon flat with a damp cloth and pin it to the same size as your test hexagon. Let it dry fully.
Blanket Layout
- Lay out 11 rows of hexagons, alternating 9 and 8 hexagons per row, starting and ending with a row of 9 (94 hexagons in all).
- Offset each row by half a hexagon so each hexagon fits into the dip between two hexagons in the row above, as in the photo.
- Turn every hexagon the same way, with a corner pointing up, before you start joining.
Joining
- Join the hexagons into rows first. Hold two hexagons with wrong sides together and sc through both loops of the edge round, working from one corner stitch to the next (17 stitches per side: corner, 15 side sts, corner).
- Join the rows to each other in the same way, joining each hexagon to the two hexagons above or below it.
- Where three hexagons meet, work one sl st through all three corners to close the point.
- Weave in all ends.
Blanket Edging
- Join yarn at any outward point. Ch 1, sc in each st around the whole blanket, working 3 sc in each outward point and dec once at each inward corner where two hexagons meet. Join with a sl st.
- Optional: work a second round of sc in each st, working 3 sc in each point and dec at each inward corner, for a firmer edge. FO and weave in the ends.
Finishing
Block the finished blanket by laying it flat on towels, pinning the points and edges to the size you want, and misting it with water. Let it dry fully before moving it. This opens the granny rounds evenly and makes the puff flowers sit up.
Check the seams for loose ends and weave them in along the joins. Drape the blanket over the foot of the bed with a row of flowers facing up, and it will look like the photo.
Tips for Success
- Make one test hexagon before you commit to all 94, and write down your hook size and measurements.
- Count every round. Round 3 has 24 sts, round 4 has 36 dc, round 5 has 54 dc, round 6 has 72 dc and round 7 has 108 sts.
- Place a marker in the first corner of every round so you always know where the six corners fall.
- Weave in the ends as you go. Doing 94 hexagons at the end is slow.
- Make the hexagons in batches of ten and keep them in a bag by row, so the layout is easy later.
Common Mistakes to Avoid
- Pulling the puff loops too tight makes the petals small and hard. Pull up each loop to the height of a dc so the puff stays full.
- Missing a corner ch-2 sp makes the hexagon lopsided. Check that you have 6 corners at the end of every round.
- Hexagons that come out different sizes will not join flat. Block every motif to the same measurements before you start joining.
- Skipping the wrong stitches in round 4 shifts the corners. Skip exactly 3 sts between corners.
- Joining with a tight seam makes ridges. Use a loose stitch and match the seam tension to the hexagons.
Ways to Customize This Pattern
- Swap mustard for sage, dusty blue or terracotta for a different palette.
- Work the flower center (rounds 1-3) in cream and the rest in mustard for a two-color version.
- Make a baby blanket with 8 rows of alternating 6 and 5 hexagons (44 hexagons), about 85 x 100 cm.
- Make matching pillow covers by joining 7 hexagons into a flower shape, one in the center with six around it, and sewing it to a plain back.
- Add two more granny rounds (rounds 7 and 8 with 4 and 5 clusters per side) before the edge round for a larger, lacier hexagon.
Frequently asked questions
The amount above is an estimate of about 27 g per hexagon, plus extra for joining and edging. Yarn use depends on your tension, so weigh your test hexagon and multiply by 94, then add about 10 percent.
Yes. Use a larger hook for bigger hexagons or a smaller hook for smaller ones, and keep the stitch counts the same so the corners and puffs stay even.
Yes. On round 7, work a sl st into the matching stitch of a finished neighboring hexagon instead of sc, working the sides that touch it. This saves time at the end, but you need to plan the layout first.
Skipping every second stitch gives you six evenly spaced petals. Six petals divide the hexagon into six equal sections, which is what keeps all six corners aligned in the rounds that follow.
The finished Mustard Puff Flower Hexagon Blanket Pattern

