Mustard Spiral Medallion Bedspread and Cushions Crochet Pattern
Beginner Friendly
Perfect for those just starting their crochet journey, with clear instructions and simple techniques
Single-Day Project
A satisfying project you can complete in a single afternoon or evening.
Handmade Gift
A beautiful keepsake — free forever. Read online or print at home.
About This Mustard Spiral Medallion Bedspread and Cushions Crochet Pattern
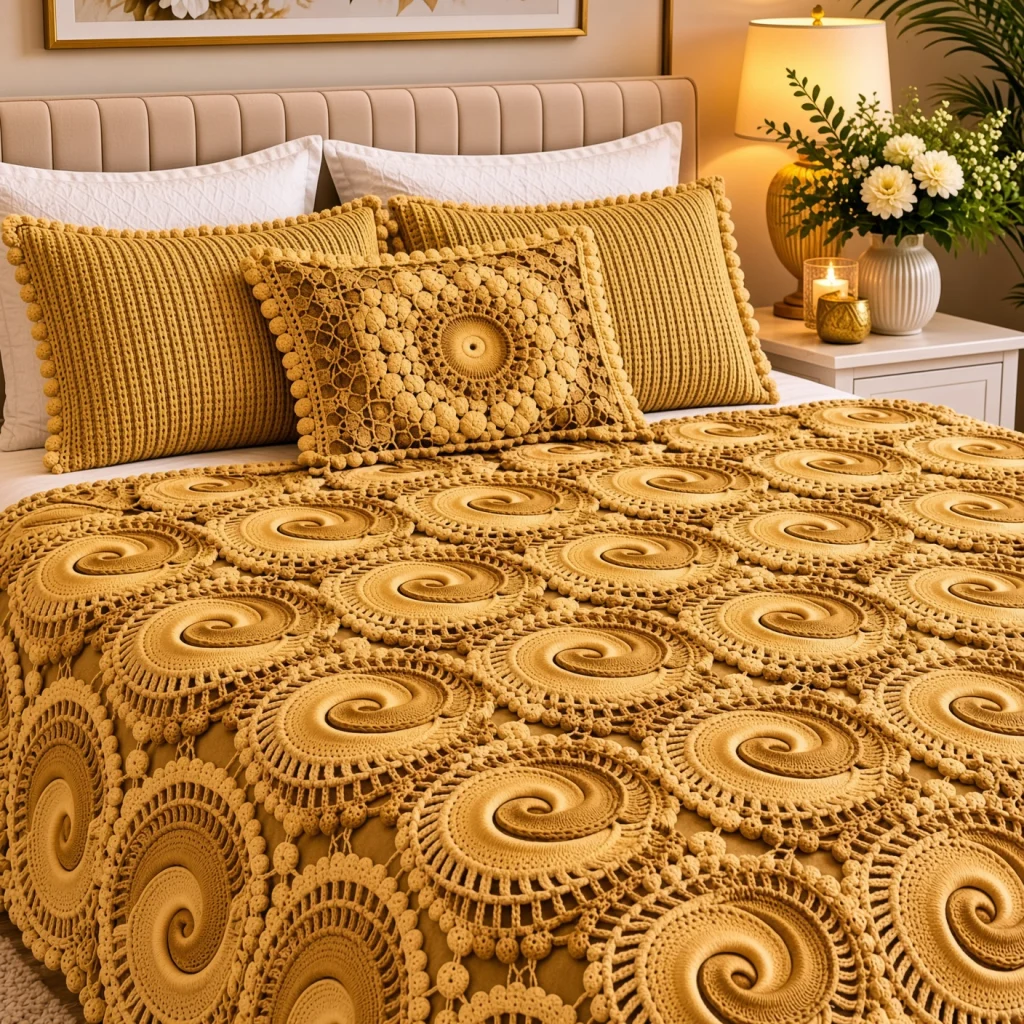
This spiral medallion crochet bedspread is made from 52 lacy circles in warm mustard, each with a raised swirl at its center like a coiled rope. Around the swirl, two rings of tall spoke stitches open up like a wheel, and a ring of bobbles finishes the edge. The circles are joined in honeycomb rows, and small bobble rosettes fill the gaps between them. Two ribbed shams and a matching medallion cushion complete the set.
The swirl is the part that makes this design special. It’s made as a separate tapered strip that grows from slip stitches to double crochet, then coiled up flat and sewn onto the center of each medallion, so it stands out in strong relief against the lacy spokes. Because the whole bedspread is one color, all the interest comes from texture and shadow.
The set takes about 105 to 125 hours. Each medallion takes around an hour and a half, and the fillers are quick. It suits a crocheter who is comfortable with bobbles, tall stitches and joining motifs as they go.
Materials
- Worsted weight cotton blend, mustard about 2,600 m (13 skeins of 100 g / 200 m)
- 5 mm crochet hook
- Stitch markers a few, for marking joining spaces
- Tapestry needle and scissors
- Two 50 x 75 cm pillows and one 40 cm square cushion form
Abbreviations
MRmagic ringchchainscsingle crochethdchalf double crochetdcdouble crochettrtreble crochetsl stslip stitchbobble(yarn over, insert hook in st or sp, pull up a loop, yarn over, pull through 2 loops) 4 times in the same place, yarn over, pull through all 5 loopsBLOback loop onlyskskipspspacest(s)stitch(es)rndroundreprepeatRS / WSright side / wrong sideMedallion Base (Rnds 1-4)
- Rnd 1: MR, ch 3 (counts as dc here and throughout), 11 dc in ring, join with sl st to top of ch 3. Pull the ring tight. (12 sts)
- Rnd 2: ch 3, dc in same st, 2 dc in each st around, join. (24 sts)
- Rnd 3: ch 3, 2 dc in next st, *dc in next st, 2 dc in next st; rep from * 10 more times, join. (36 sts)
- Rnd 4: ch 3, dc in next st, 2 dc in next st, *dc in next 2 sts, 2 dc in next st; rep from * 10 more times, join. (48 sts)
- The solid center measures about 12 cm across. The swirl will be sewn on top of it.
Spoke and Bobble Rounds (Rnds 5-8)
- Rnd 5: ch 4 (counts as tr), ch 2, sk next st, *tr in next st, ch 2, sk next st; rep from * 22 more times, join to top of ch 4. (24 tr spokes, 24 ch-2 sps)
- Rnd 6: ch 1, *sc in next tr, 2 sc in next ch-2 sp; rep from * 23 more times, join. (72 sc)
- Rnd 7: ch 4 (counts as tr), ch 3, sk next 2 sts, *tr in next st, ch 3, sk next 2 sts; rep from * 22 more times, join to top of ch 4. (24 tr spokes, 24 ch-3 sps)
- Rnd 8 (first medallion only): sl st in first ch-3 sp, ch 2, bobble in same sp (the ch 2 stands in for the first yarn over), ch 3, *bobble in next ch-3 sp, ch 3; rep from * 22 more times, join to top of first bobble. Fasten off. (24 bobbles, 24 ch-3 sps)
- Sp positions: hold the medallion RS up and turn it so the sp after the first bobble points left, at 9 o’clock. That is sp 1. Counting in the direction you worked, sp 5 points down and left, sp 9 down and right, sp 13 right, sp 17 up and right and sp 21 up and left. Sps 3, 7, 11, 15, 19 and 23 point into the gaps between neighbors.
Coiled Swirl (make 53)
- Row 1: ch 61, sl st in 2nd ch from hook and in next 9 ch, sc in next 15 ch, hdc in next 15 ch, dc in next 20 ch. (60 sts: 10 sl st, 15 sc, 15 hdc, 20 dc)
- Row 2: ch 1, turn, sc in each st across. Fasten off leaving a 60 cm tail. (60 sc)
- The strip is narrow at one end and wide at the other.
- Starting at the narrow end, coil the strip flat into a spiral about 2.5 turns, with the sc edge facing up and each turn resting against the one inside it. The wide dc end finishes on the outside.
- Place the coil on the solid center of a medallion and sew it down along the inner edge of each turn with the tail, keeping the stitches hidden in the grooves. The swirl covers the center, about 11 cm across.
Joining As You Go (Rnd 8 for all other medallions)
- Work Rnds 1-7 as usual. On Rnd 8, plan your starting point so that sp 1 will face left in the finished layout.
- Join stitch: in a sp that needs joining, replace the ch 3 with: ch 1, sl st in the matching ch-3 sp of the neighbor, ch 1. Then continue the round as written.
- Sp 1 joins to sp 13 of the medallion on the left.
- Sp 5 joins to sp 17 of the medallion below and to the left.
- Sp 9 joins to sp 21 of the medallion below and to the right.
- Work a plain ch 3 wherever there is no neighbor yet. Sew the swirl on after the medallion is joined, or before, whichever you find easier to handle.
Bedspread Layout
- The medallions are set in offset rows like a honeycomb: 8 rows, alternating 7 and 6 medallions. (52 medallions)
- Row 1 (7 medallions): medallion 1 is worked plain. Medallions 2-7 join sp 1 to the medallion on the left.
- Row 2 (6 medallions): each medallion sits between two medallions of Row 1. Medallion 1 joins sp 5 to Row 1 medallion 1 and sp 9 to Row 1 medallion 2. Medallions 2-6 also join sp 1 to the medallion on the left.
- Row 3 (7 medallions): medallion 1 joins only sp 9, to Row 2 medallion 1. Medallions 2-6 join sp 1 to the left, sp 5 to the Row 2 medallion below left, and sp 9 to the Row 2 medallion below right. Medallion 7 joins sp 1 to the left and sp 5 to Row 2 medallion 6.
- Rows 4-8: rep Rows 2 and 3 alternately, ending with a Row 2.
- The joined bedspread measures about 231 x 233 cm, with a scalloped edge of bobbles all around.
Bobble Fillers (make 84)
- Each filler goes in a small triangular gap where three medallions meet. There are 12 gaps between each pair of rows.
- Rnd 1: MR, ch 1, 6 sc in ring, join. (6 sts)
- Rnd 2: hold the filler in the gap. Ch 2, bobble in same st (the ch 2 counts as the first yarn over), *ch 3, sl st in the gap-facing ch-3 sp of the medallion beside it (sp 3, 7, 11, 15, 19 or 23), ch 3, bobble in next st, ch 4, bobble in next st; rep from * 2 more times, ending the last rep with ch 4 and joining to the top of the first bobble. Fasten off. (6 bobbles, joined to 3 medallions)
Ribbed Sham Fronts and Backs (make 2 sets)
- Gauge for the shams: 14 hdc and 9 rows = 10 cm in hdc BLO.
- Front: ch 72. Row 1: hdc in 3rd ch from hook and in each ch across. (70 hdc) Rows 2-68: ch 2 (does not count as a st), turn, hdc in BLO of each st across. Fasten off. (70 hdc, about 50 x 75 cm, with ribs running across the width)
- Back pieces (make 2 per sham): ch 72. Work Row 1 as for the front. Rows 2-38: ch 2, turn, hdc in BLO of each st across. Fasten off. (70 hdc, about 50 x 42 cm)
- The two back pieces overlap by about 9 cm in the middle to make an envelope opening.
Sham Assembly
- Lay a front WS up. Place one back piece on top, RS up, lined up with the left edge, and the other lined up with the right edge, overlapping in the middle. Pin all edges.
- Rnd 1: turn so the front faces you. Join in a corner through all layers. 3 sc in each corner, 104 sc evenly along each long side and 68 sc evenly along each short side. Join. (356 sts)
- Rnd 2: ch 1, *sc in next 3 sts, bobble in next st; rep from * around, join. Fasten off. (89 bobbles)
- Rep with the second sham.
Medallion Cushion
- Front and back (make 2): ch 58. Row 1: hdc in 3rd ch from hook and in each ch across. (56 hdc) Rows 2-36: ch 2, turn, hdc in BLO of each st across. Fasten off. (about 40 cm square)
- Make one extra medallion with its swirl, worked plain, and sew it to the center of the front through the bobbles.
- Hold the front and back WS together. Rnd 1: join in a corner through both layers, 3 sc in each corner and 56 sc evenly along each side. Insert the cushion form before closing the last side. Join. (236 sts)
- Rnd 2: ch 1, *sc in next 3 sts, bobble in next st; rep from * around, join. Fasten off. (59 bobbles)
Finishing
Weave in all ends on the WS, running them along the solid sc rounds rather than the open spokes, where they would show. Make sure each swirl is sewn down along every turn so it can’t lift or catch.
Wet block the bedspread on a large flat surface. Pin each medallion round, open up the spokes and set every bobble along the edge. Let it dry completely. The swirls hold their shape on their own, but you can press them down gently with your fingers while the bedspread is still damp.
Tips for Success
- Make the swirl strips in batches while you work the medallions. They’re quick and very satisfying to coil.
- Coil each swirl the same way, clockwise or counterclockwise, so all the swirls on the bed turn in the same direction.
- Mark sps 1, 5 and 9 on each medallion before Rnd 8. It takes the guesswork out of joining.
- Keep the tr spokes even. Spokes of different heights make the medallion wobble, and the rows won’t sit straight.
- Use a firm cotton blend. It shows the relief of the swirls and the shadow between the spokes much better than a fuzzy yarn.
Common Mistakes to Avoid
- A medallion that cups. Rnds 5 and 7 need enough height to lie flat. If the medallion bowls, loosen the ch 2 and ch 3 between spokes.
- A flat swirl. If the strip is coiled with the dc edge on the inside, the swirl has no relief. Always start coiling at the narrow sl st end.
- Joining the wrong sp. Joining sp 4 instead of sp 5 rotates the medallion slightly and the rows drift. Count from your marker before each join.
- Fillers that pull. If a filler distorts the medallions around it, the ch 3 on each side of its joins is too short. Make it ch 4 instead.
- Ribbed shams that slant. Working into both loops on some rows makes the ribs uneven. Work every row after Row 1 in the BLO only.
Ways to Customize This Pattern
- Work the swirls in a slightly darker shade, such as ochre or bronze, for extra depth.
- Change the size: each medallion adds 33 cm in width, and each extra row adds about 29 cm in length.
- Make a round table topper from 7 medallions: one in the center and six around it, with six fillers.
- Use cream or white for a light, summery version that looks like vintage cotton lace.
- Fill the edge gaps with half fillers (3 bobbles worked into a half magic ring) for straighter sides.
Frequently asked questions
A strip coiled and sewn on gives a much higher, rounder relief than any stitch worked into the medallion. It also means the medallion underneath stays flat and easy to join.
Yes. Work Rnd 8 plain on every medallion, lay them out, and sew the matching ch-3 sps together with a few stitches each. Joining as you go is faster and gives neater joins, though.
It’s a lacy, decorative bedspread rather than a warm blanket. The open spokes let a sheet or quilt show through, which also makes it lovely for summer.
Wash it on a gentle cold cycle inside a large laundry bag, or by hand, and dry it flat. Pin the medallions round again while it’s damp so the spokes stay open.
The finished Mustard Spiral Medallion Bedspread and Cushions Crochet Pattern

