Navy and Mustard Triangle Crochet Bedspread Pattern
Beginner Friendly
Perfect for those just starting their crochet journey, with clear instructions and simple techniques
Single-Day Project
A satisfying project you can complete in a single afternoon or evening.
Handmade Gift
A beautiful keepsake — free forever. Read online or print at home.
About This Navy and Mustard Triangle Crochet Bedspread Pattern
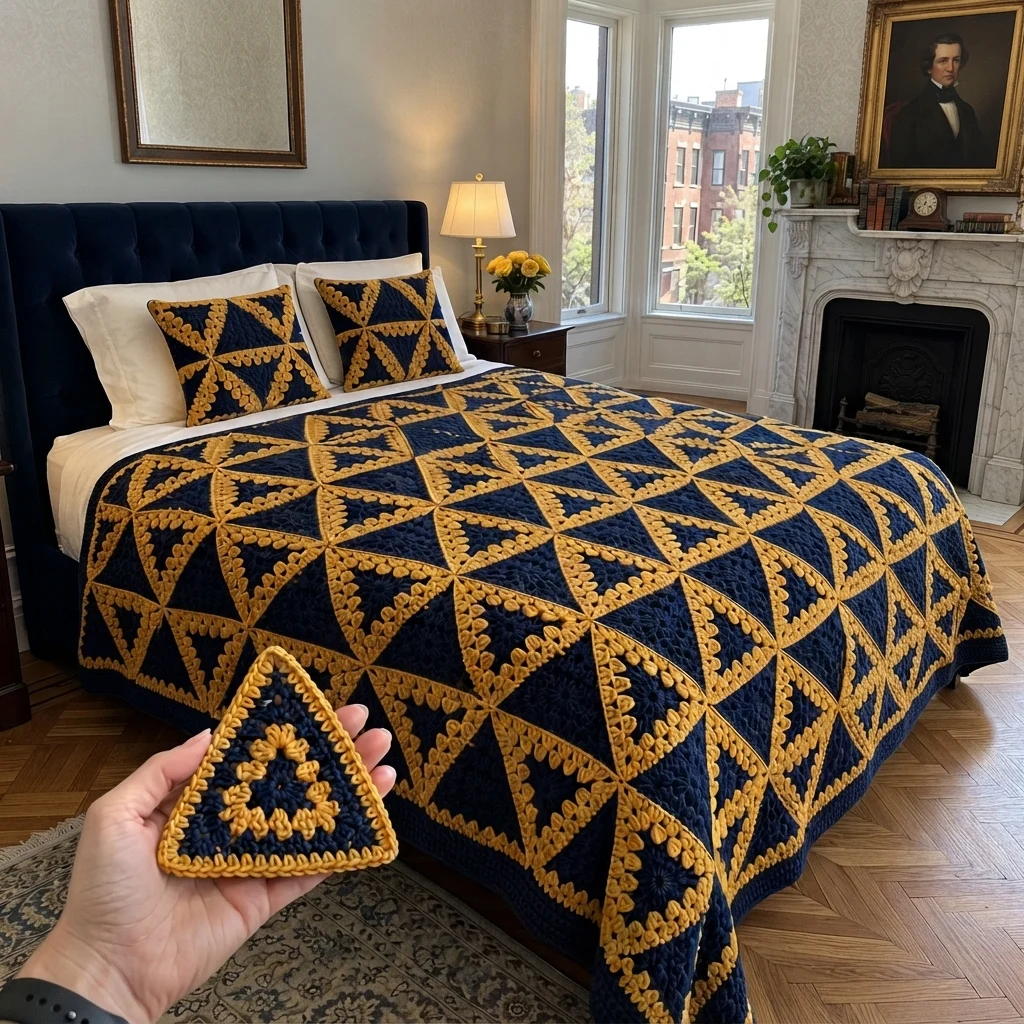
This navy and mustard crochet bedspread pattern recreates the striking geometric look in the photo with deep blue triangle motifs, golden textured edges, and optional matching pillow covers. The triangles are worked individually, blocked, and joined into a repeating diamond layout that gives the finished blanket its bold, quilt-like appearance.
This is an advanced project because it involves repeated color changes, careful motif placement, blocking, and a long join-as-you-go assembly. Allow about 80 to 120 hours for a double or queen-sized bedspread, plus extra time for pillow covers. Measure your mattress and desired drape before beginning; the sample layout is a guide, not a fixed size.
Materials
- Worsted-weight cotton or cotton blend in deep navy Main triangle color; about 2,000-2,600 g for a large bedspread
- Worsted-weight cotton or cotton blend in golden mustard Triangle accents, edging, and border; about 1,000-1,400 g
- 5 mm crochet hook Use a size that gives firm but flexible fabric
- 4.5 mm crochet hook Optional, for a tighter joining seam and border
- Yarn needle For joining motifs and weaving in ends
- Locking stitch markers Mark triangle corners and layout positions
- Blocking mats and rustproof pins Essential for making the triangles uniform
- Tape measure and scissors For sizing and finishing
- Optional pillow forms or existing pillow inserts Measure before making the matching covers
Abbreviations
chchainsl stslip stitchscsingle crochethdchalf double crochetdcdouble crochettrtreble crochetskskipspspacereprepeatst(s)stitch(es)RSright sideWSwrong sideNavy granny triangle motif
- With navy, ch 4 and join with a sl st to form a ring. Ch 3; this counts as the first dc throughout the motif.
- Round 1: Work 2 dc into the ring, ch 2, (3 dc, ch 2) twice. Join with a sl st to the top of the beginning ch 3. (9 dc groups; 3 corner spaces)
- Round 2: Sl st across to the first ch-2 corner space. Ch 3, 2 dc in the same corner space, ch 1, (3 dc, ch 2, 3 dc) in the next corner space, ch 1, (3 dc, ch 2, 3 dc) in the next corner space, ch 1, 3 dc in the starting corner space. Join to the top of the beginning ch 3. (12 dc groups; 3 corner spaces)
- Round 3: Sl st to the next corner space. Ch 3, 2 dc in the same space, ch 1, 3 dc in each side space until the next corner, ch 1, (3 dc, ch 2, 3 dc) in the corner. Rep along the remaining sides, ending with 3 dc in the starting corner space. Join to the top of the beginning ch 3. (3 more side groups than the previous round)
- Round 4: Repeat Round 3, working one additional 3-dc group along each side between corners. Join and fasten off.
- For larger triangles, continue in the same manner. Each new round adds one 3-dc group to each side. Stop when the triangle reaches half the desired finished width; the golden border will add a small amount of size.
- Keep the corner spaces open and clearly marked. Each round must have exactly three corner spaces, one at each point of the triangle.
Mustard textured triangle edging
- With the RS facing, join mustard at one corner. Ch 1 and work sc evenly along the first side, placing 1 sc in each dc and 1 sc around each ch-1 space. At the corner, work (sc, ch 2, sc) in the corner space.
- Continue around the triangle, placing (sc, ch 2, sc) in each of the remaining two corners. Adjust the side stitches evenly if the edge ripples or pulls. Join with a sl st to the first sc.
- Round 2: Ch 1. Work 1 sc in each sc to the corner; in each corner ch-2 space, work (sc, ch 2, sc). Join and fasten off. This stabilizing round creates a firm golden frame.
- Round 3, textured detail: Join mustard at a side stitch. *Sl st in the next st, ch 3, sl st in the same st, sl st in the next 2 sts.* Rep from * along each side. At a corner, work the picot in the corner-adjacent stitch and keep the corner ch-2 space free of extra picots.
- Repeat the textured edging on all navy triangles. Block again so the golden edge lies flat before joining.
Half-triangle filler motifs
- Use these fillers along the outer edges of the bedspread when a full triangle would extend beyond the desired rectangle. With navy, ch 4 and join into a ring.
- Row 1: Ch 3, work 2 dc into the ring, ch 2, 3 dc into the ring. Turn. (6 dc)
- Row 2: Ch 3, 2 dc in the first stitch, ch 1, 3 dc in the ch-2 space, ch 1, 3 dc in the last stitch. Turn. (12 dc)
- Row 3: Ch 3, 2 dc in the first stitch, ch 1, 3 dc in each ch-1 space to the center, ch 2, 3 dc in the center space, ch 1, 3 dc in each remaining ch-1 space, ch 1, 3 dc in the last stitch. Turn.
- Continue in this manner, increasing at both row ends and working a ch-2 space at the center point. Add one 3-dc group on each side per row. Stop when the straight edge matches the side of a full triangle.
- Edge the two sloping sides in mustard as for the full motif. Leave the straight edge plain for joining to the outer border.
Layout and motif joining
- Measure the mattress width and length, then add the desired overhang on each side and at the foot. Make a paper or bed-sized layout before joining any motifs.
- Arrange the triangles in alternating directions so their points meet and form diamonds. Place navy motifs consistently and orient the mustard textured sides toward the visible diagonal lines shown in the photo.
- For a rectangular edge, use half-triangle fillers along the sides and foot as needed. Keep the top edge straight if the blanket will sit below the pillows.
- Join motifs with RS together using a yarn needle and mattress stitch through the inner loops of the mustard edging. Alternatively, join with a row of sl st on the WS, keeping the seam relaxed.
- Join the motifs into diagonal strips first, then sew the strips together. Check the points at every intersection before securing the ends of each seam.
- Weave in the ends as each strip is completed. Avoid carrying yarn across open spaces, as long floats can snag and pull the blanket out of shape.
Optional matching pillow covers
- Measure the pillow insert. Make a front panel from four or more triangles arranged as diamonds, adding half-triangle fillers as needed to reach the insert width and height.
- For the back, crochet two navy rectangles in dc rows. Make each rectangle the full pillow width; make the first half the pillow height and the second half 3-5 cm longer for an overlap.
- On the shorter back panel, work 3 rows of sc along the overlap edge. On the longer panel, work 3 rows of sc and add evenly spaced buttonholes in the final row: ch 1, sk 1, then continue in sc.
- Overlap the back panels with the buttonhole flap on top. Pin the front and back together with WS facing and sc around three sides and the outer edge, placing 3 sc in each corner.
- Insert the pillow form, mark button positions through the buttonholes, sew on buttons securely, then close the final side with sc or a removable seam.
Finishing
Lay the joined bedspread flat and check that the triangle points and seams sit evenly. Weave in any remaining ends, then wash and block according to the yarn label. Let the blanket dry completely before placing it on the bed. If you make the pillow covers, align their diamond pattern with the bedspread and fasten the backs so the inserts stay in place.
Tips for success
- Block motifs to the same measurements before joining; even a small difference at each edge can shift the diamond intersections.
- Use a locking marker in each corner space while crocheting. It makes the three-corner structure easier to check as the triangle grows.
- Keep the mustard edging tension consistent. If the frame tightens, use a larger hook for the edging rather than stretching the motif during blocking.
- Photograph or sketch the triangle arrangement before sewing the strips together so you can preserve the planned color orientation.
- Test the joined fabric over the bed before adding a final border; the drape and overhang can change once the seams are complete.
Common mistakes to avoid
- Triangles with different side lengths: this usually comes from inconsistent tension or missed side groups. Count the groups on all three sides and block each motif to the same dimensions.
- Curled triangle edges: the edging may be too tight. Undo the edging and use a larger hook or add sc more evenly along the sides.
- Wavy edges: too many stitches were added along the side. Remove the edging round and place fewer sc, keeping the corner increases intact.
- Misaligned diamond points: motifs were joined without a planned layout. Unpick the affected seam, realign the corners, and pin the strip intersections before sewing again.
- Long yarn floats showing through the navy fabric: yarn was carried across color sections. Fasten off at each color change and weave the tails into nearby stitches on the WS.
Ways to customize this pattern
- Swap navy for charcoal, forest green, or deep teal while keeping mustard for a strong geometric contrast.
- Use a lighter golden yellow for a softer look, or a burnt ochre for a warmer, vintage palette.
- Make the triangles smaller for a more detailed mosaic, or larger for a quicker project with fewer seams.
- Add a plain navy border with one mustard picot round if you prefer a crisp edge over the textured triangle frames.
- Use the triangle motif alone for coordinating cushion covers, a table runner, or a smaller lap blanket.
Frequently asked questions
The number depends on your blocked triangle size and the overhang you want. Measure the bed, sketch the diagonal layout, and divide the panel into motif widths. Make a few extra triangles so you can adjust the outer edges without changing the main pattern.
Yes. Use a washable worsted-weight acrylic and make a large blocked sample first. Acrylic can drape and stretch differently from cotton, so wash and dry the sample as you plan to care for the finished blanket before calculating the layout.
Check that each motif has three clearly formed corner spaces and that the side groups are evenly spaced. Block the finished triangles flat, then work the mustard edging with a hook that does not pull the sides inward.
Yes. Add or remove rounds from every triangle, keeping the same round count across all motifs. Recalculate the layout after blocking, since each added round increases the side length and the overall bedspread dimensions.
The finished Navy and Mustard Triangle Crochet Bedspread Pattern

