Olive and Ivory Floral Crochet Handbag Pattern
Advanced
For experienced crocheters who enjoy complex shaping, fine detail, and ambitious construction
Weekend Project
A satisfying weekend make — start Friday, finish Sunday, enjoy forever.
Handmade Gift
A beautiful keepsake — free forever. Read online or print at home.
About This Olive and Ivory Floral Crochet Handbag Pattern
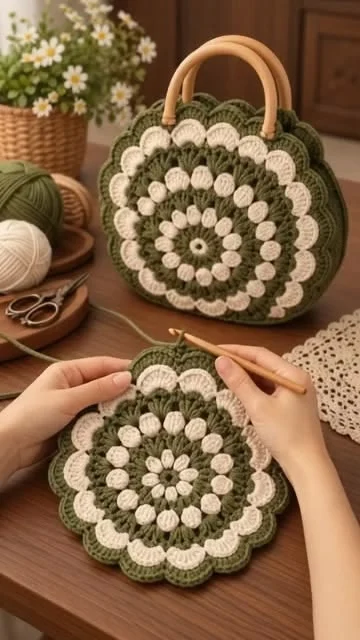
This floral crochet bag pattern recreates the reference handbag’s round olive panels, concentric ivory petals, softly scalloped outline, and warm wooden handles. Raised bobbles sit against a firm green background, while a separate gusset gives the bag useful depth without losing its circular silhouette.
Allow about 18–24 hours for the crochet, careful assembly, and hand-sewn lining. This advanced project suits crocheters who enjoy textured colorwork, precise stitch placement, and fitted finishing. The two decorative panels are worked separately, then joined to a shaped fabric-supported body with reinforced handle tabs.
Materials
- DK cotton yarn in olive green Approximately 300 g / 660 m
- Matching DK cotton yarn in warm ivory Approximately 125 g / 275 m
- Crochet hooks 3.5 mm for panels and gusset; 3.0 mm for handle tabs, or sizes needed for gauge
- Wooden D-shaped handles with straight lower bars 2 handles, approximately 14 cm wide × 10 cm tall; lower bars no thicker than 12 mm
- Firm cotton lining fabric 60 × 110 cm
- Medium woven fusible interfacing 60 × 110 cm; apply according to its instructions
- Matching sewing thread and sewing needle For the lining and reinforcement
- Tapestry needle, scissors, stitch markers, and blocking pins Include 12 markers for checking panel sectors
- Measuring tape and paper For checking the actual bag and drafting its fitted lining
Abbreviations
chchainsl stslip stitchscsingle crochetdcdouble crochetinc2 double crochet in the same stitchBO5-double-crochet bobble worked in one stitch; counts as 1 stitchMRmagic ringFLOfront loop onlyBLOback loop onlyRSright sideWSwrong sideGauge, Size, and Construction
- Use US crochet terminology. Target blocked double crochet gauge: 18 stitches and approximately 10 rows = 10 cm. Target blocked single crochet gauge: 22 stitches and 24 rows = 10 cm. Make separate swatches because both gauges affect the gusset fit.
- The round panel, measured after Round 12 and before scallops, should be approximately 25–26 cm across. The scallops add approximately 3 cm to its overall diameter. Treat the actual blocked panel measurement as the final size check because circular fabric and bobbles can differ from a flat swatch.
- The gusset measures approximately 5.5 cm wide × 60 cm long before its edge stitches. Its 144 rows correspond to 108 stitches along the lower three-quarters of each panel.
- Work panel rounds with the RS facing throughout. Starting chains and joining slip stitches never count as stitches. Begin each round in the same stitch as the join unless instructed otherwise.
- For each BO, repeat the following 5 times in one stitch: yarn over, insert hook, yarn over and draw up a loop, yarn over and draw through 2 loops. With 6 loops on the hook, yarn over and draw through all 6. Do not add a closing chain. Push the bobble toward the RS.
- For an ivory bobble in an olive round, change to ivory on the final pull-through of the preceding stitch. Complete the bobble in ivory, changing back to olive on its final pull-through. Carry olive loosely behind the bobble; cut ivory between separated bobbles and weave in the short ends securely. Use short ivory lengths to avoid carrying pale yarn behind long green sections.
Floral Circular Panels — Make 2
- Round 1, ivory: Make an MR, ch 2, work 12 dc into the ring. Join with a sl st to the first dc. Tighten the ring and fasten off. (12 stitches)
- Round 2, olive: Join in any stitch, ch 2, inc in every stitch around. Join. (24 stitches)
- Round 3: Ch 2; repeat [ivory BO in the next stitch, olive inc in the next stitch] 12 times. Join. There are 12 ivory bobbles and 24 olive dc. (36 stitches)
- Round 4, olive: Ch 2; repeat [dc in the next 2 stitches, inc in the next stitch] 12 times. Join. (48 stitches)
- Round 5: Ch 2; repeat [olive dc in the next 2 stitches, ivory BO in the next stitch, olive inc in the next stitch] 12 times. Join. There are 12 ivory bobbles. (60 stitches)
- Round 6, olive: Ch 2; repeat [dc in the next 4 stitches, inc in the next stitch] 12 times. Join. (72 stitches)
- Round 7, olive: Ch 2; repeat [dc in the next 5 stitches, inc in the next stitch] 12 times. Join. (84 stitches)
- Round 8: Ch 2; repeat [olive dc in the next 2 stitches, ivory BO in the next stitch, olive dc in the next 2 stitches, ivory BO in the next stitch, olive inc in the next stitch] 12 times. Join. There are 24 ivory bobbles. (96 stitches)
- Round 9, olive: Ch 2; repeat [dc in the next 7 stitches, inc in the next stitch] 12 times. Join. (108 stitches)
- Round 10: Ch 2; repeat [olive dc in the next 3 stitches, ivory BO in the next stitch, olive dc in the next 3 stitches, ivory BO in the next stitch, olive inc in the next stitch] 12 times. Join. There are 24 ivory bobbles. (120 stitches)
- Round 11, olive: Ch 2; repeat [dc in the next 9 stitches, inc in the next stitch] 12 times. Join. (132 stitches)
- Round 12, olive: Ch 2; repeat [dc in the next 10 stitches, inc in the next stitch] 12 times. Join and fasten off. (144 stitches)
- Weave in the colorwork ends on the WS without flattening the bobbles. Dampen and block each panel to the same 25–26 cm diameter. Let dry completely before adding scallops or attaching the gusset.
Ivory Petal Border and Olive Outline — Both Panels
- Number the stitches of panel Round 12 from 1 to 144, beginning at its join. Mark stitches 1, 36, 37, and 144. Stitches 1–36 form the top opening; stitches 37–144 form the lower attachment arc.
- Border Round 1, ivory: Work only in the FLO of panel Round 12. Join with a sl st in stitch 1; repeat [skip the next stitch, 6 dc in the next stitch, skip the next stitch, sl st in the next stitch] 35 times. For the final repeat, skip stitch 142, work 6 dc in stitch 143, skip stitch 144, and sl st into the starting stitch 1. Fasten off. This makes 36 shells, with 216 dc and 36 distinct anchor slip stitches. The last join shares the first anchor.
- Border Round 2, olive: Join in the first dc of any shell, ch 1, and work 1 sc in each of that shell’s 6 dc. Repeat for all 36 shells, leaving every anchor slip stitch unworked. Do not chain between shells; move directly into the first dc of the next shell. Join to the first sc and fasten off. (216 sc)
- Shape the valleys with your fingers. Keep the unused back loops of panel Round 12 accessible behind the border. The attachment markers refer to the original 144 panel stitches, not the scallop stitches.
Olive Gusset
- Foundation: With olive and the 3.5 mm hook, ch 13.
- Row 1: Sc in the second chain from the hook and in each remaining chain. Turn. (12 sc)
- Rows 2–144: Ch 1, sc in each stitch across, turn. The turning chain does not count. After Row 144, fasten off. (12 sc per row; 144 rows total)
- First long edge: With the RS facing, join olive at the Row 1 end and ch 1. Repeat [sc in each of the next 2 row ends, skip the next row end, sc in the next row end] 36 times. Fasten off. Each repeat spans 4 row ends and produces 3 stitches. (108 sc)
- Second long edge: Repeat the same pickup sequence along the other long edge, beginning at its Row 1 end. Fasten off. (108 sc)
- Mark each long edge after stitches 27, 54, and 81. Do not edge the two short ends yet. Block the gusset to approximately 60 cm along its long edges, keeping its width consistent.
Join the Bag and Finish Its Opening
- Lay the first panel RS down. Place the gusset against its lower arc with the panel WS facing the inside of the bag and the gusset extending backward from the panel. Match gusset edge stitches 1–108 to panel stitches 37–144, using only the BLO of panel Round 12.
- Match the quarter markers to panel stitches 63, 90, and 117. With olive, sew each gusset edge stitch to its corresponding panel back loop using small whipstitches. Keep the seam behind the scallops and do not catch the ivory border. Sew through all 108 matched pairs.
- Align the second panel so both top openings sit opposite each other. Attach the other gusset edge to the second panel’s stitches 37–144 in the same way. Check orientation before sewing beyond the first quarter.
- Opening Round 1, olive: Join in the free back loop of stitch 1 on either panel. Ch 1, sc in the free back loops of stitches 1–36, sc across the 12 foundation stitches of the adjacent gusset short end, sc in the free back loops of stitches 1–36 on the other panel in the direction of travel, then sc across the 12 stitches of the remaining gusset short end. Join to the first sc. Do not add corner stitches. (96 sc)
- Opening Round 2: Ch 1, sc in each stitch around. Join and fasten off. (96 sc)
- Check that the opening lies behind the top scallops. If a corner has a small gap, close it with a separate sewing stitch rather than changing the crochet stitch count.
Handle Tabs — Make 4
- Foundation: With olive and the 3.0 mm hook, ch 9.
- Row 1: Sc in the second chain from the hook and each remaining chain. Turn. (8 sc)
- Rows 2–14: Ch 1, sc in each stitch across, turn. After Row 14, fasten off, leaving a 60 cm sewing tail. (8 sc per row)
- Each tab should measure approximately 3 cm wide × 5 cm long. Fold one around a handle’s lower bar. The two short ends must meet with enough length below the bar for approximately 1.5 cm of attachment to the bag. If your handle bar requires more room, add an even number of rows to all four tabs before fastening off.
- On each panel, position the two tab centers over original panel stitches 9 and 28. These sit symmetrically within the 36-stitch opening arc. Place each folded tab inside the bag, with its bottom edges approximately 1.5 cm below the finished opening and its handle bar just above the opening.
- Sew the two tab ends together and through the bag fabric with a rectangular seam approximately 3 cm wide × 1.5 cm high. Add a diagonal in each direction inside the rectangle. Catch the firm olive panel fabric and opening band; avoid sewing through the raised ivory petals. Repeat for all four tabs.
Handle Reinforcement Patches — Make 4
- Foundation: With olive and the 3.0 mm hook, ch 11.
- Row 1: Sc in the second chain from the hook and each remaining chain. Turn. (10 sc)
- Rows 2–8: Ch 1, sc in each stitch across, turn. Fasten off, leaving a sewing tail. (10 sc per row)
- Place one patch over each tab’s sewn attachment area on the inside of the bag. Sew around all four patch edges, then work two vertical securing lines through the patch, tab ends, and olive panel fabric. Keep the stitches discreet on the outside.
Fitted Fabric Lining
- After assembling the crochet shell, lay one side flat without stretching it. Trace the structural panel outline along the gusset seam and finished opening, excluding all decorative scallops. This traced line is the lining’s seam line. Mark the two points where the gusset ends meet the opening.
- Add a 1 cm seam allowance around the traced side shape. Cut 2 mirrored fabric side pieces and 2 matching interfacing pieces. Fuse the interfacing to the fabric WS.
- Measure the actual sewn lower arc between the opening marks using a tape held on edge. Cut one fabric gusset whose length equals that measurement plus 2 cm and whose width equals the bag’s interior depth plus 2 cm. At the target gauge, the starting dimensions are approximately 62 × 7.5 cm. Cut and apply matching interfacing. Use the measured shell if it differs.
- With fabric right sides together and 1 cm seam allowances, sew one long gusset edge to the lower arc of one side piece, stopping at the opening marks. Repeat with the other side piece. Clip curved seam allowances carefully without cutting the stitching.
- Press the top raw edges 1 cm toward the lining WS. Keep the lining WS outward so its smooth right side will face the bag interior. Insert it into the crochet shell, covering the crochet seams and handle reinforcement patches.
- Fit the lining about 5 mm below the crochet opening. Hand-sew its folded edge to the inside of the opening band with small stitches. At each handle tab, stitch around the tab’s sides and continue behind it. The lining should rest on the bottom of the bag without hanging from its upper seam.
Finishing
Weave in the remaining ends and check the center rings, gusset joins, and handle stitching. Smooth the ivory petals outward with your fingers and arrange the olive edging into even curves. Lightly dampen any uneven scallops and pin them locally, keeping the wooden handles and lining dry.
Let the bag dry fully before use. Place a few light everyday items inside and lift it by both handles to check that the tabs share the load evenly. If a tab shifts, reinforce its stitching through the olive fabric and patch before carrying the bag.
Tips for Success
- Place markers between the 12 increase sectors while making each panel. Every sector gains exactly one stitch per round, making misplaced increases easier to find.
- Keep bobble loops slightly loose and the surrounding olive stitches firm. This helps the ivory petals rise from the surface without pulling the disc inward.
- Block both plain panel edges to the same diameter before making the border. Matching the structural circles matters more than matching individual scallop tips.
- Pin all four gusset quarters before sewing. The 27-stitch sections should meet without concentrated gathers or stretched areas.
- Support the handle attachment area with both crochet patches and interfaced lining. Sew through the green structural fabric so the decorative petals retain their shape.
Common Mistakes to Avoid
- Adding a chain after each bobble creates extra stitches. Close the bobble by pulling through its six loops, then work directly into the next base stitch.
- Working scallops through both loops removes the gusset attachment line. Use only the front loops for the ivory border and reserve the back loops for joining.
- Picking up one gusset edge stitch in every row produces 144 stitches instead of 108. Use the stated three-stitches-over-four-row-ends sequence along both long edges.
- Joining the gusset around the entire circle closes the bag. Attach it only to original panel stitches 37–144 and leave stitches 1–36 for the opening.
- A lining that is too shallow pulls on the opening and handle tabs. Fit it inside the finished shell before sewing its upper edge, and let its base sit against the bag’s base.
Ways to Customize This Pattern
- Use deep forest green instead of olive for a darker version while keeping the warm ivory petals and wooden handles.
- Give the flower a subtle tonal center by using pale oat for Round 1 and the first bobble ring, then ivory for the remaining petals.
- Add a fabric pocket to one lining side before assembling the lining. A finished 12 × 10 cm pocket fits small keys or cards without altering the crochet panels.
- Make a deeper bag by starting the gusset with ch 17 and working 16 sc per row. Keep 144 rows and 108 stitches along each long edge; the opening rounds then contain 104 sc. Increase the fabric gusset width to match the finished interior depth.
Frequently asked questions
The ivory shells use the front loops of the final panel round. The unused back loops form a continuous structural seam for the gusset and opening. Keeping those functions separate lets the scallops sit outside the bag without carrying its contents.
Compare its blocked length with the lower 108-stitch arc before sewing. Both should be approximately 60 cm. Adjust the hook used for the gusset to reach 24 rows per 10 cm, keeping the prescribed 144 rows and 108 edge stitches. Do not force a short strip around the panel, because it will cup the sides.
Yes, if each handle is approximately 14 cm across and its lower section fits through the folded tabs. Test a tab around the actual handle before making the other three. A circular handle hangs lower inside the opening, so pin it in place and check hand clearance before sewing.
No stuffing is used. The cotton crochet, interfaced lining, and reinforced tabs provide its structure. A rigid circular insert would restrict the opening and make the bag less comfortable to carry.
The finished Olive and Ivory Floral Crochet Handbag Pattern

