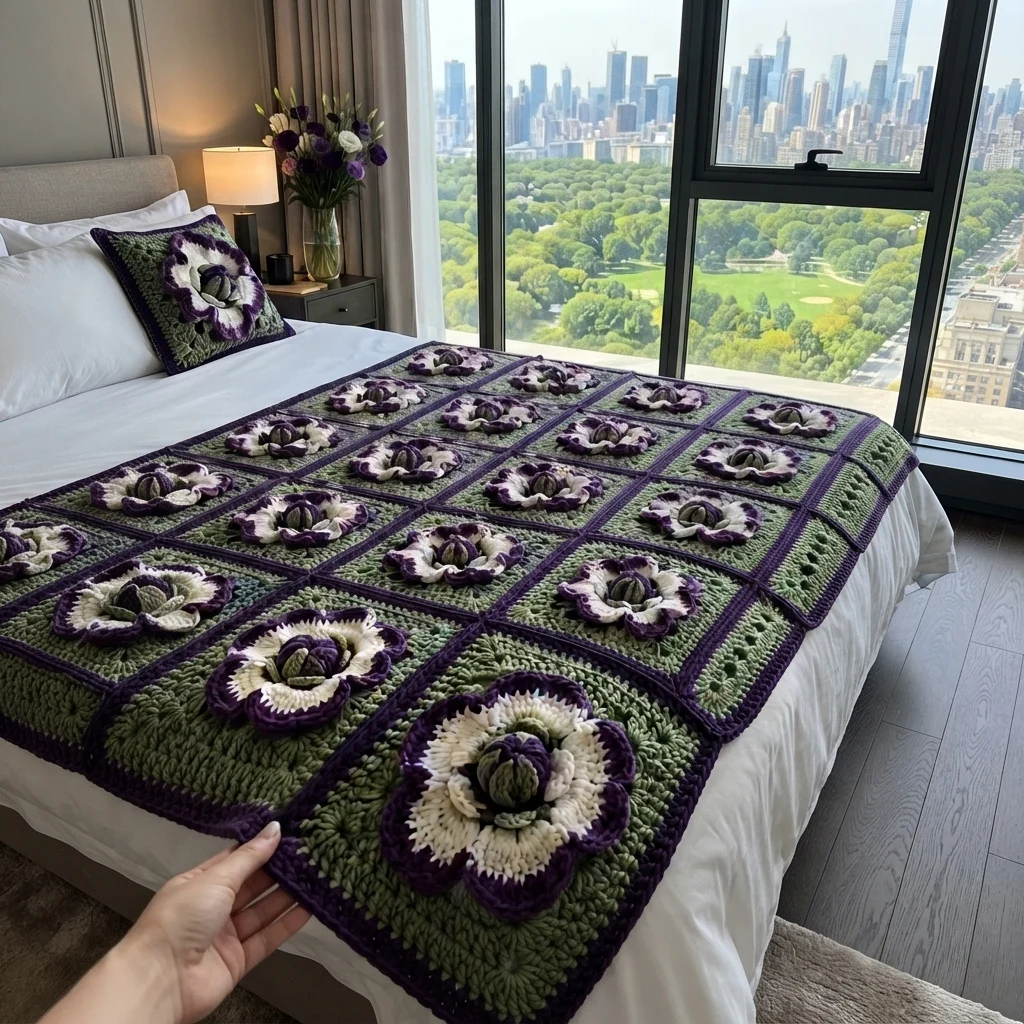
Olive and Plum 3D Flower Crochet Blanket
Beginner Friendly
Perfect for those just starting their crochet journey, with clear instructions and simple techniques
Single-Day Project
A satisfying project you can complete in a single afternoon or evening.
Handmade Gift
A beautiful keepsake — free forever. Read online or print at home.
About This Olive and Plum 3D Flower Crochet Blanket
This 3D flower crochet blanket pattern covers a bed in 54 olive green squares, each carrying a big ruffled flower with a creamy white face, a deep plum edge and a plump green and plum bud in the center. The squares are worked in dense single crochet with raised ridges and finished with a plum outline round. Each flower is made separately and sewn on, and the plum outline becomes a bold raised grid when the squares are joined.
Every flower is made the same way, from a flat ruffled disc, a small round base and six upright bud segments. The shapes are simple, so the effect comes from the contrast of cream and plum against the olive ground. Once you have made one flower you have made them all, and the repetition makes the project easy to do in batches.
Plan on about an hour and 45 minutes per finished square, so roughly 100 to 120 hours for the twin size, or about 45 hours for a throw. It suits crocheters who are comfortable with single crochet in the round, double crochet fans, working in the back loop only and basic sewing. The pattern also includes matching pillow covers.
Materials
- Bulky (weight 5-6) yarn in olive green about 2,200 m (2,400 yd) for the twin-size blanket
- Bulky (weight 5-6) yarn in plum / deep purple about 1,000 m (1,100 yd), including flowers, joining and border
- Bulky (weight 5-6) yarn in cream / white about 500 m (550 yd)
- Extra yarn for two pillow covers about 650 m (710 yd) olive, 230 m (250 yd) plum, 90 m (100 yd) cream
- 6 mm (US J-10) crochet hook
- 8 mm (US L-11) crochet hook only for the large pillow flowers
- Large-eye tapestry needle for sewing on the flowers and seaming
- 4 stitch markers one per corner
- Blocking mats and rustproof pins
- Two 40 cm (16 in) pillow inserts optional, for the pillow covers
Abbreviations
MRmagic ringchchainscsingle crochetdcdouble crochetsl stslip stitchst(s)stitch(es)skskipincincrease: 2 sc in the same stcnrcorner: 3 sc in the same stBLOback loop onlyyoyarn over4 scsc in each of the next 4 sts (same idea for any number)Square Base (make 54 for the twin size)
The square is worked in olive from the center out, counterclockwise, as a continuous spiral with no joining and no turning. Place a marker in the center sc of each cnr and move it up each round. Every round has 4 corners, and the stitch count in brackets is the total for the round. Rounds 5, 8, 11 and 14 are worked in BLO, including the corner stitches (work the 3 sc of each cnr in the back loop of the corner st). The unworked front loops are left behind as raised ridges on the right side. Round 15 is worked in plum in both loops.
- Rd 1: With olive, 4 sc in MR. Pull the tail to close the ring tightly. Do not join. (4)
- Rd 2: cnr in each st. (12)
- Rd 3: 1 sc, cnr, 2 sc, cnr, 2 sc, cnr, 2 sc, cnr, 1 sc. (20)
- Rd 4: 1 sc, cnr, 4 sc, cnr, 4 sc, cnr, 4 sc, cnr, 3 sc. (28)
- Rd 5 (BLO): 1 sc, cnr, 6 sc, cnr, 6 sc, cnr, 6 sc, cnr, 5 sc. (36)
- Rd 6: 1 sc, cnr, 8 sc, cnr, 8 sc, cnr, 8 sc, cnr, 7 sc. (44)
- Rd 7: 1 sc, cnr, 10 sc, cnr, 10 sc, cnr, 10 sc, cnr, 9 sc. (52)
- Rd 8 (BLO): 1 sc, cnr, 12 sc, cnr, 12 sc, cnr, 12 sc, cnr, 11 sc. (60)
- Rd 9: 1 sc, cnr, 14 sc, cnr, 14 sc, cnr, 14 sc, cnr, 13 sc. (68)
- Rd 10: 1 sc, cnr, 16 sc, cnr, 16 sc, cnr, 16 sc, cnr, 15 sc. (76)
- Rd 11 (BLO): 1 sc, cnr, 18 sc, cnr, 18 sc, cnr, 18 sc, cnr, 17 sc. (84)
- Rd 12: 1 sc, cnr, 20 sc, cnr, 20 sc, cnr, 20 sc, cnr, 19 sc. (92)
- Rd 13: 1 sc, cnr, 22 sc, cnr, 22 sc, cnr, 22 sc, cnr, 21 sc. (100)
- Rd 14 (BLO): 1 sc, cnr, 24 sc, cnr, 24 sc, cnr, 24 sc, cnr, 23 sc, changing to plum on the last yo of the final sc. (108)
- Rd 15 (plum outline): 1 sc, cnr, 26 sc, cnr, 26 sc, cnr, 26 sc, cnr, 25 sc. (116) Sl st in the next st and fasten off. Weave in all ends. The square measures about 21 cm (8.25 in) after blocking.
Ruffled Flower (make 1 for each square)
The flower is a flat disc worked from the center out in a spiral, with a cream face and a ruffled plum edge. Work in a spiral without joining, and use a marker to track the start of each round. Leave a 25 cm tail at the end for sewing.
- Rd 1: With cream, 10 sc in MR. (10)
- Rd 2: inc in each st around. (20)
- Rd 3: [1 sc, inc] 10 times. (30)
- Rd 4: [2 sc, inc] 10 times. (40)
- Rd 5 (cream petals): [sk 3 sts, 11 dc in the next st, sk 3 sts, sl st in the next st] 5 times, changing to plum on the last yo of the final sl st. This makes 5 broad petals. (60)
- Rd 6 (plum edge): [inc in each of the 11 dc of the next petal, sl st in the sl st between petals] 5 times. This deep increase makes the edge ruffle. (115)
- Rd 7 (plum edge): sc in each st around. Sl st in the next st and fasten off, leaving a 25 cm tail. (115)
Bud Base (olive, make 1 for each flower)
- Rd 1: 6 sc in MR. (6)
- Rd 2: inc in each st around. (12)
- Rd 3: [1 sc, inc] 6 times. (18)
- Rd 4: sc in each st around. Sl st in the next st and fasten off, leaving a 25 cm tail. (18)
Bud Segment (olive and plum, make 6 for each flower)
- Rd 1: With olive, ch 5. Sc in the 2nd ch from hook and the next 2 ch (3 sc), 3 sc in the last ch, then 3 sc down the other side of the foundation chain. Do not join. (9)
- Rd 2: Change to plum. 3 sc, inc, 3 sc in the next st, inc, 3 sc. Sl st in the next st and fasten off, leaving a 25 cm tail at the base. (13)
Assembling the Flower on the Square
- Block the square and all the flower pieces before you sew anything. Pin the flower flat and let it dry. Leave the ruffles unpinned so they stay frilly.
- Find the center of the square (the MR) and mark it with a pin. Place the flower on the square with its center on the pin, and sew it down through Round 3 (the cream face) with 8 to 10 small tacking stitches. Leave the petals and plum edge free so they ruffle and stand away from the square.
- Sew the bud base to the middle of the flower, stitching around its outer edge.
- Stand the 6 segments upright around the rim of the bud base, 3 sts apart, with the plum tips leaning toward the center and overlapping slightly. Sew each segment down at its base, then add one stitch between neighboring segments about halfway up so they hold their shape.
Layout and Sizing
- Turn every square the same way so the flowers line up in neat rows.
- Sizes: throw, 4 squares across by 5 down (20 squares), about 84 x 105 cm. Twin, 6 across by 9 down (54 squares), about 126 x 189 cm. Full or double, 8 across by 10 down (80 squares), about 168 x 210 cm. The border adds about 6 cm in each direction. The yarn amounts in this pattern are for the twin size.
- Lay out all the squares on the floor and take a photo before you join anything.
Joining the Squares
- Join the squares into rows first, then join the rows to each other.
- Place two squares with wrong sides together and edges touching. Join plum at one corner and slip stitch through the outer loops of both squares, working one sl st in each pair of sts. The seam ridge forms on the side facing you, so keep the right side toward you. This makes the raised plum grid.
- Match the corners first, then ease the 26 sts between the corners.
- Where four squares meet, work the sl sts across the join in a plus shape so there is no gap at the center.
Border
- Rd 1: Join plum at any outer corner of the blanket. Work 3 sc in the corner, then 1 sc in each st along the edge and 1 sc in each seam, with 3 sc in every remaining outer corner. Join with a sl st to the first sc.
- Rd 2: Ch 1, sc in each st around with 3 sc in each outer corner. Join with a sl st, fasten off, and weave in the end.
Matching Pillow Cover (make 2)
- Make 8 base squares for each cover: 4 for the front and 4 for the back.
- Join the 4 front squares into a 2 x 2 panel using the plum sl st seam. Join the 4 back squares into the back panel the same way. Each panel measures about 42 cm (16.5 in) square.
- For the large front flower, make the flower, bud base and 6 segments with an 8 mm hook and two strands of yarn held together. The flower measures about 20 cm (8 in) across. Sew it to the center of the front panel, over the seam crossing, as in the assembly steps.
- With wrong sides together, seam the panels along three sides using plum sl st.
- Insert the 40 cm pillow and close the fourth side with whip stitch, or sew on snaps if you want to remove the insert for washing.
Finishing
Weave in every end before blocking, as each square and flower has a few and they are easiest to hide while the pieces are small. Block the finished blanket flat, following your yarn’s care label: wet-block wool, and steam acrylic by holding the iron above the fabric without pressing. Be careful not to flatten the flowers. The blanket is thick and heavy, so wash it gently and dry it flat to keep the ridges and ruffles full.
Tips for Success
- Make the squares and flowers in batches of ten, block them together, and sew the flowers on in front of the television. It keeps the project from feeling endless.
- Work the petal fans loosely in Round 5 and the increases in Round 6 without pulling tight. Tight stitches make the edge stand up instead of ruffling.
- Keep your tension firm on the base. The dense fabric supports the heavy flower and keeps the ridges crisp.
- Pin the bud segments in position before you sew. A quick photo of your pinned layout helps you copy it on the next flower.
- Weigh your first finished square and flower, then multiply by your square count to check you have enough yarn before you begin the rest.
Common Mistakes to Avoid
- Working a BLO round of the base in both loops loses a ridge. If you notice it within a round or two, rip back so the ridges stay evenly spaced.
- Sewing the whole flower down flat kills the ruffle. Tack only the cream face, and let the petals and plum edge stand free.
- Sewing the flower on before blocking the square can leave the square puckered. Always block the square first.
- Skipping a corner increase turns the square into a rounded blob. Always work 3 sc in each marked corner stitch.
- Using a hook that is too large leaves the fabric loose, and the flower sags. Drop down half a size so it stays dense.
Ways to Customize This Pattern
- Change the palette. A navy ground with cream and rust flowers, or a cream ground with burgundy-edged flowers, gives a very different mood.
- Make the flower edges in a second color, such as lilac, for a two-tone bloom, and keep the plum for the outline and joins.
- Skip the flowers on alternate squares for a lighter, quicker blanket that still shows off the plum grid.
- Make a throw or baby blanket using the smaller sizes in the Layout and Sizing section.
- Make the bud segments all olive for a simpler, calmer center.
Frequently asked questions
Yes. Every base square and every flower is made exactly the same way. Only the pillow backs differ, because they are left plain.
Yes. Worsted yarn and a 4 mm hook make a much lighter blanket, but you will need about 18 rounds per square and the flowers will be smaller. Make a test square and measure it before you start the rest.
The petals are firmly worked and fairly sturdy, but wash the blanket on a gentle cycle inside a pillowcase or by hand, and dry it flat. Avoid the dryer, which can flatten the ruffles and fray the petal edges.
About an hour and 45 minutes including the flower and sewing, a little longer for the first few. The base takes about 55 minutes, the flower and bud about 40 minutes and the sewing about 10 minutes.
The finished Olive and Plum 3D Flower Crochet Blanket

