Olive Rose Garden Crochet Blanket Pattern
Advanced
For experienced crocheters who enjoy complex shaping, fine detail, and ambitious construction
Weekend Project
A satisfying weekend make — start Friday, finish Sunday, enjoy forever.
Handmade Gift
A beautiful keepsake — free forever. Read online or print at home.
About This Olive Rose Garden Crochet Blanket Pattern
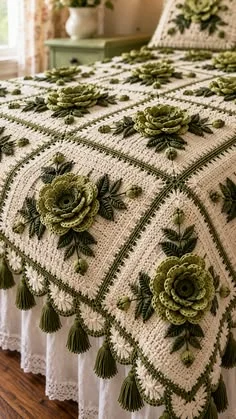
This rose garden crochet blanket pattern brings together warm cream squares, raised olive roses, and dark green foliage. Inspired by the photographed bed covering, it uses individually made floral motifs, narrow green seams, and hanging tassels to create a richly textured throw.
The roses are assembled from three separate petal strips, then surrounded with pointed leaves and small stuffed buds. Allow approximately 80–110 hours for the full blanket. This advanced project suits crocheters who enjoy precise blocking, layered appliqué, and careful finishing. The instructions create a decorative throw; the white fabric visible beneath the photographed covering is separate bedding.
Materials
- Worsted cotton or cotton-blend yarn, approximately 100 m per 50 g Use the same yarn range throughout for compatible washing and blocking.
- Warm cream yarn Approximately 1,200 g / 2,400 m for squares and border.
- Medium olive yarn Approximately 650 g / 1,300 m for rose petals and buds.
- Dark forest-olive yarn Approximately 550 g / 1,100 m for leaves, square edging, joins, border, and tassels.
- Light moss yarn Approximately 150 g / 300 m for outer petals and embroidered veins.
- Crochet hooks 4.5 mm for blanket fabric; 3.5 mm for floral pieces.
- Polyester stuffing A small handful for the buds only.
- Tapestry needle, scissors, stitch markers, blocking mat, rustproof pins, and ruler Also a 12 cm tall cardboard tassel former.
Abbreviations
chchainsl stslip stitchscsingle crochethdchalf double crochetdcdouble crochetst / stsstitch / stitchesspspaceMRmagic ringinc2 sc in one stitchdecsingle crochet two stitches togetherRS / WSright side / wrong sideGauge, Dimensions, and Construction
- Use US crochet terminology. Turning chains do not count as stitches unless expressly stated. Work blanket squares in joined rounds with the RS facing throughout.
- Target gauge: one cream square through Round 7 measures 19 × 19 cm after blocking. Its dark green Round 8 brings it to 20 × 20 cm. Adjust the 4.5 mm hook to achieve this full-motif gauge.
- Floral gauge with the 3.5 mm hook: approximately 22 sc and 24 rows per 10 cm. Aim for roses approximately 10–11 cm across and leaves approximately 5 cm long. Adjust the floral hook independently if needed.
- Make 30 squares and arrange them in five columns and six rows. Each square receives one three-layer rose, four leaves, and two buds: 30 roses, 120 leaves, and 60 buds altogether.
- The joined square field measures approximately 100 × 120 cm. The eight-round border adds approximately 4 cm on each side, giving 108 × 128 cm before tassels. Seam tension and blocking can slightly affect these measurements.
Cream Granny Squares — Make 30
- Round 1: With cream and the larger hook, make an MR. Ch 3, counting as the first dc, work 2 dc into the ring, ch 2; repeat (3 dc into the ring, ch 2) three times. Join to the top of the beginning ch 3. Tighten the ring. Count: 12 dc and four ch-2 corner spaces.
- Round 2: Sl st across to the next corner space. In that space work (ch 3, 2 dc, ch 2, 3 dc); ch 1. In each remaining corner work (3 dc, ch 2, 3 dc), followed by ch 1. Join to the beginning ch 3. Count: 24 dc, four ch-2 corners, and four ch-1 side spaces.
- Round 3: Sl st to the next corner. Work the beginning corner as in Round 2. Proceed around, working ch 1 between all groups, 3 dc in every side ch-1 space, and (3 dc, ch 2, 3 dc) in each corner. Join. Count: 36 dc, four ch-2 corners, and eight ch-1 side spaces.
- Round 4: Repeat the Round 3 method. Count: 48 dc, four ch-2 corners, and 12 ch-1 side spaces.
- Round 5: Repeat the Round 3 method. Count: 60 dc, four ch-2 corners, and 16 ch-1 side spaces.
- Round 6: Repeat the Round 3 method. Count: 72 dc, four ch-2 corners, and 20 ch-1 side spaces.
- Round 7: Repeat the Round 3 method. Count: 84 dc, four ch-2 corners, and 24 ch-1 side spaces. Fasten off cream. Block to 19 cm square.
- Round 8: Join dark forest-olive in any corner space. Ch 1; work (sc, ch 2, sc) in that corner. Work one sc in each dc and one sc in each ch-1 space along the side; repeat around, placing (sc, ch 2, sc) in every corner. Join to the first sc. Count: 116 sc and four ch-2 corners, with 29 sc between successive corner spaces. Fasten off and block to 20 cm square.
Inner Rose Petal Strips — Make 30
- Row 1: With medium olive and the smaller hook, ch 20. Starting in the second ch from the hook, sc in each ch. Count: 19 sc.
- Row 2: Ch 1, turn. Sc in the first st; repeat (ch 3, skip two sts, sc in the next st) six times. Count: six ch-3 loops and seven sc anchors.
- Row 3: Ch 1, turn. Sl st in the first sc. In each ch-3 loop work (sc, hdc, 3 dc, hdc, sc), then sl st in the next sc anchor. Count: six petals, each containing seven stitches; seven anchoring slip stitches including the first. Fasten off with a 60 cm sewing tail.
- Coil the strip tightly from one short end, keeping its foundation edge level. Sew through the lower edges of successive turns to secure a small rose center. Leave the petal tops free.
Middle Rose Petal Strips — Make 30
- Row 1: With medium olive and the smaller hook, ch 26. Sc in the second ch and each remaining ch. Count: 25 sc.
- Row 2: Ch 1, turn. Sc in the first st; repeat (ch 3, skip two sts, sc in the next st) eight times. Count: eight ch-3 loops and nine sc anchors.
- Row 3: Ch 1, turn. Sl st in the first sc. In each loop work (sc, hdc, 5 dc, hdc, sc), then sl st in the next sc anchor. Count: eight petals of nine stitches each; nine anchoring slip stitches including the first. Leave a 75 cm sewing tail.
- Wrap this strip around the inner rose with its petals offset from the center petals. Ease the foundation around the center without stretching it. Sew the foundation edge to the base of the inner coil.
Outer Rose Petal Strips — Make 30
- Row 1: With light moss and the smaller hook, ch 32. Sc in the second ch and each remaining ch. Count: 31 sc.
- Row 2: Ch 1, turn. Sc in the first st; repeat (ch 3, skip two sts, sc in the next st) ten times. Count: ten ch-3 loops and 11 sc anchors.
- Row 3: Ch 1, turn. Sl st in the first sc. In each loop work (sc, hdc, 7 dc, hdc, sc), then sl st in the next sc anchor. Count: ten petals of 11 stitches each; 11 anchoring slip stitches including the first. Leave a 90 cm sewing tail.
- Wrap around the middle layer, keeping the base flat and distributing the ten petals around the rose. Sew through foundation edges to secure. Open the outer petals gently with your fingers; avoid stitching their upper edges together.
Pointed Leaves — Make 120
- Round 1, first side: With dark forest-olive and the smaller hook, ch 10. Starting in the second ch, work sc, hdc, dc in each of the next five chains, hdc, sc. Count: nine stitches along the first side.
- Round 1, tip and second side: Ch 2. Rotate to work into the unused foundation loops. In the same foundation chain that received the last sc, work sc; then work hdc, dc in each of the next five chains, hdc, sc. Join to the first sc. Count: 18 stitches and one ch-2 tip space. The two sc at the tip share the final foundation chain.
- Fasten off, leaving a 35 cm attachment tail. With light moss, embroider a central vein from the base to just below the tip using three short straight stitches. Add two short diagonal vein stitches on each side. Secure the embroidery on the WS.
- Block each leaf into a pointed oval. Keep its center slightly cupped so it retains dimension after attachment.
Small Rosebuds — Make 60
- Round 1: With medium olive and the smaller hook, work 6 sc in an MR. Continue in a spiral, marking the first stitch. Count: 6 sc.
- Round 2: Inc in each st. Count: 12 sc.
- Round 3: Sc in each st. Count: 12 sc.
- Round 4: Dec six times. Count: 6 sc. Add a small pinch of stuffing. Fasten off with a 35 cm tail, thread through the six front loops, and draw closed.
- With dark forest-olive, embroider three straight sepal stitches up the lower half of each bud. Keep all knots and ends underneath. These buds have no eyes or other facial features.
Join the Square Field
- Lay the blocked squares RS up in five columns and six rows. Mark the top edge so the floral arrangements can be repeated consistently later.
- Using dark forest-olive and a tapestry needle, whipstitch adjacent squares through the outermost loops of their 29 corresponding edge sc. At each end, also secure the two adjacent corner spaces with one small stitch. Keep the seam relaxed and flat.
- Join the five squares across each row, then join the six rows. At four-square intersections, secure the corner spaces together without pulling them into a tight knot. Weave in joining ends on the WS.
- The exposed perimeter contains 145 sc across each short edge and 174 sc along each long edge, plus the corner spaces at the outer corners and at the ends of seams. The first border round specifies how to bridge these spaces consistently.
Framing Border
- Round 1: With dark forest-olive and the larger hook, join in an outer corner space. Ch 1; work (sc, ch 2, sc) there. Sc in each exposed edge sc. At every seam junction, work one sc into each of the two touching square corner spaces, giving two extra sc per junction. Work (sc, ch 2, sc) at each outer blanket corner. Join to the first sc. Count: 155 sc along each short side and 186 along each long side, measured between corner spaces; 682 sc total and four ch-2 corners.
- Round 2: Change to cream. Ch 1; sc in every sc and work (sc, ch 2, sc) in each corner space. Join. Count: 690 sc and four ch-2 corners; sides 157 and 188 sc.
- Round 3: With cream, repeat Round 2. Count: 698 sc and four ch-2 corners; sides 159 and 190 sc.
- Round 4: With cream, repeat Round 2. Count: 706 sc and four ch-2 corners; sides 161 and 192 sc.
- Round 5: With cream, repeat Round 2. Count: 714 sc and four ch-2 corners; sides 163 and 194 sc.
- Round 6: With cream, repeat Round 2. Count: 722 sc and four ch-2 corners; sides 165 and 196 sc.
- Round 7: Change to dark forest-olive and repeat Round 2. Count: 730 sc and four ch-2 corners; sides 167 and 198 sc.
- Round 8: With dark forest-olive, repeat Round 2. Count: 738 sc and four ch-2 corners; sides 169 and 200 sc. Fasten off. The border should measure approximately 4 cm deep after blocking.
Attach the Roses, Leaves, and Buds
- Block the joined blanket flat before attaching the raised pieces. Let it dry completely. Mark the center of every square.
- On each square, place four leaves along the diagonal directions, with their bases approximately 2 cm from the center and their tips pointing toward the corners. Their bases will sit underneath the rose.
- Sew each leaf down along its central vein and around its lower third. Leave the upper edges and pointed tip free. Take small stitches through the square fabric without gathering it.
- Center one rose over the leaf bases. Sew its foundation to the square with two concentric rings of small stitches: one under the inner coil and one under the outer foundation. Keep the petal tops free.
- Place two buds on opposite sides of the rose, each approximately 7 cm from the square center and midway between adjacent leaves. Sew around each bud base securely. Keep all floral pieces clear of the square seams.
- Repeat on all 30 squares, orienting the buds consistently for a formal arrangement. Check the WS frequently and weave in all ends beneath the appliqué attachment stitches.
Olive Tassels — Make 22
- For each tassel, wrap dark forest-olive yarn 30 times around a 12 cm tall cardboard former. Pass a separate 35 cm strand through the loops at the top and tie firmly.
- Slide the bundle off and cut the loops at the opposite end. Wrap a second strand tightly around the bundle approximately 2 cm below the tied top. Knot securely and bury its ends inside the tassel. Trim to approximately 12 cm overall length.
- Attach one tassel through each of the four blanket corner spaces. Along both short edges, attach four more at the square-seam positions; along both long edges, attach five more at the square-seam positions. Count: four corner tassels plus eight short-edge tassels plus ten long-edge tassels, totaling 22.
- Use both top tie ends to sew each tassel through the final two border rounds. Knot securely on the WS and weave the ends through several border stitches.
Finishing
Spread the blanket flat and lift each petal into place with your fingers. Check every rose base, bud, leaf, and tassel for a firm attachment. Trim any remaining ends only after they have been woven securely through the fabric.
For later washing, follow the yarn label and support the full weight of the wet blanket. Reshape it flat, with the roses facing upward and the tassels combed straight. Avoid pressing or ironing the raised flowers.
Tips for Success
- Measure all squares after they are fully dry. Consistent 20 cm edged squares make the green seam grid sit evenly.
- Roll the rose center firmly, then loosen your wrapping slightly for each outer layer. This creates a defined center with open outer petals.
- Pin all four leaves before sewing the rose. Their bases should disappear beneath the flower while their tips remain visible.
- Support the blanket on a table while attaching flowers. Hanging weight can stretch the square beneath your sewing.
- Make one complete floral square first and use its placement measurements for the other 29.
Common Mistakes to Avoid
- Missing a ch-1 gap during the green square edging produces a short side. Each side must contain 29 sc between corner spaces.
- Pulling joins tight creates ridges and distorts corners. Undo the affected seam and resew with the squares lying flat.
- Skipping the paired corner spaces at border seam junctions makes the border contract. Round 1 needs two additional sc at every junction.
- Sewing through petal tops flattens the roses. Attach through the foundation edges and underside of the coils.
- Overstuffing buds makes them hard and exposes gaps. Use only enough filling to hold a soft rounded shape.
Ways to Customize This Pattern
- Use medium olive for all three rose layers for a quieter tonal effect, keeping light moss only for leaf veins.
- Create a larger coverlet with six columns and eight rows. Make 48 floral squares and recalculate the border from the new exposed edge counts.
- Omit the tassels for a clean framed edge while keeping the full eight-round border.
- Alternate the bud placement by a quarter turn on neighboring squares to give the floral field more movement.
Frequently asked questions
The written size is a 108 × 128 cm throw, excluding tassels. For a bed covering, measure the mattress and desired drop first, then increase the number of 20 cm squares. Add approximately 8 cm to each field dimension for the border.
The flat square field is easier to measure and block accurately. Attaching the roses afterward also protects the petals from being flattened during blocking.
These roses depend on separately rolled petal strips for their layered shape. Make them separately and sew through their bases so the outer petals can lift away from the blanket.
Use a slightly smaller hook for Round 8 and check that you worked one sc per dc and one per ch-1 space. Keep the required 29 sc per side, then block the finished square to 20 cm.
The finished Olive Rose Garden Crochet Blanket Pattern

